remote start BUICK TERRAZA 2007 User Guide
[x] Cancel search | Manufacturer: BUICK, Model Year: 2007, Model line: TERRAZA, Model: BUICK TERRAZA 2007Pages: 562, PDF Size: 2.96 MB
Page 242 of 562
REMOTE START DISABLED
If your vehicle has the remote start feature, this
message displays if a remote start attempt is
unsuccessful. This may be caused if any of the
following conditions are true when a remote
start attempt is made:
The remote start system is disabled through
the DIC.
The key is in the ignition.
The hood or the doors are not closed.
There is an emission control system
malfunction.
The engine coolant temperature is too high.
The oil pressure is low.
The hazard warning �ashers are turned on.
The maximum number of remote starts
or remote start attempts between ignition
cycles has been reached.
The content theft-deterrent alarm is on while
attempting to remote start the vehicle.
See “REMOTE START” underDIC Vehicle
Personalization (Uplevel Only) on page 249and
“Remote Vehicle Start” underRemote Keyless
Entry System Operation on page 99for more
information.
REMOTE START ON
If your vehicle has the remote start feature, this
message displays when a remote start is initiated.
See “Remote Vehicle Start” underRemote Keyless
Entry System Operation on page 99for more
information.
RIGHT FRONT TURN LAMP OUT
This message displays when the right front turn
signal bulb needs to be replaced. SeeHeadlamps
and Sidemarker Lamps on page 443.
This message displays while the ignition is in RUN.
Press any of the DIC buttons to acknowledge this
message and to clear it from the screen.
This message continues to display for two seconds
if it has not been acknowledged when the engine
is turned off. It also re-displays for two seconds if
the message has been acknowledged, but the
condition still exists when the engine is turned off.
If the condition still exists, the message re-appears
when the engine is turned on.
242
Page 249 of 562
DIC Vehicle Personalization
(Uplevel Only)
Your vehicle may have customization capabilities
that allow you to program certain features to
one preferred setting. Customization features
can only be programmed to one setting on
the vehicle and cannot be programmed to a
preferred setting for two different drivers. The
customization features include the following:
Exterior lighting delay
Interior lighting delay
Delayed locking
Content theft
Remote keyless entry feedback
Remote start
Rear park chime
Your vehicle may also have personalization
capabilities that allow you to program certain
features to a preferred setting for up to two drivers.
The �rst personalized key corresponds to driver 1
and the second personalized key corresponds to
driver 2. The driver number also corresponds to the
numbers, 1 or 2, on the back of the remote keyless
entry transmitters.The personalization features include the following:
Radio station presets
Auto door unlock preferences
Remote keyless entry unlock preferences
All of the customization and personalization
options may not be available on your vehicle.
Only the options available will be displayed
on your DIC.
The default settings for the customization and
personalization features were set when your
vehicle left the factory, but may have been
changed from their default setting since then.
The customization preferences are automatically
recalled.
The driver’s personalization preferences are
recalled by using the key programmed for
driver 1 or 2. The driver number also corresponds
to the numbers, 1 or 2, on the back of the
remote keyless entry transmitters.
To change customization and personalization
preferences, use the following procedure.
249
Page 254 of 562
FOB LOCK FEEDBACK
This feature allows you to select the type of
feedback you will receive when locking the vehicle
with the remote keyless entry transmitter.
Press the menu button until FOB LOCK
FEEDBACK appears on the DIC display. Press
the set/reset button to scroll through the following
choices:
OFF:There will be no feedback when locking the
vehicle.
LIGHTS:The exterior lamps will �ash when you
press the lock button on the remote keyless
entry transmitter.
LIGHTS and HORN (default):The exterior lamps
will �ash when you press the lock button on the
remote keyless entry transmitter, and the horn will
sound when the lock button is pressed again
within �ve seconds of the previous command.
Choose one of the available settings and press the
menu button while it is displayed on the DIC to
select it and move on to the next feature.
REMOTE START
If your vehicle has remote start, this feature allows
the remote start to be turned OFF or ON. The
remote start feature allows you to start the engine
from outside of the vehicle using the remote
keyless entry transmitter. See “Remote Vehicle
Start” underRemote Keyless Entry System
Operation on page 99for more information.
Press the menu button until REMOTE START
appears on the DIC display. Press the set/reset
button to scroll through the following choices:
OFF:The remote start feature will be disabled.
ON (default):The remote start feature will
be enabled.
Choose one of the available settings and press
the menu button while it is displayed on the DIC to
select it and move on to the next feature.
REAR PARK CHIME
If your vehicle has the Ultrasonic Rear Parking
Assist (URPA) system, this feature allows
the URPA system’s chime to be turned OFF or
ON. SeeUltrasonic Rear Parking Assist (URPA)
on page 188for more information.
254
Page 268 of 562
tSEEKu:Press the left arrow to go to the
start of the current track if more than eight seconds
have played. Press the right arrow to go to the
start of the next track. If either arrow is held
or pressed more than once, the player continues
moving backward or forward through the CD.
BAND:Press this button to listen to the radio
when a CD is playing. The inactive CD remains
safely inside the radio for future listening.
CD AUX (Auxiliary):Press this button to play a
CD when listening to the radio. CD appears on the
display when a CD is in the player. If the system
has a remote playback device, pressing this button
a second time allows the remote device to play.
AUTO EQ (Automatic Equalization):Press
AUTO EQ to select the equalization setting
while playing a CD. The equalization is stored
whenever a CD is played. For more information on
AUTO EQ, see “AUTO EQ” listed previously in
this section.
X(Eject):Press this button to eject the CD.
EJECT may be activated with either the ignition
or radio off.
Playing a CD(s) (Six-Disc CD Player)
If the ignition or radio is turned off, with a CD in the
player, it stays in the player. When the ignition
or radio is turned on, the CD starts playing where
it stopped, if it was the last selected audio
source.
When a CD is inserted, the CD symbol appears
on the CD. As each new track starts to play,
the track number appears on the display.
The CD player can play the smaller 3 inch (8 cm)
single CDs with an adapter ring. Full-size CDs
and the smaller CDs are loaded in the same
manner.
If playing a CD-R, the sound quality (and playback
performance) may be reduced due to the CD-R
quality, method of recording, the quality of
the music that has been recorded, and the way
the CD-R has been handled. For better playback
performance when home burning audio discs,
use brand named CD media showing the Compact
Disc™, and a burn rate no faster than 12X.
268
Page 289 of 562
Playing a Disc
To play a disc, gently insert the disc, with the
label side up, into the loading slot. The DVD player
will continue loading the disc and the player will
automatically start if the vehicle is in
ACCESSORY, RUN, or RAP.
If a disc is already in the player, make sure that
the DVD player is on, then press the play/pause
button on the player faceplate or on the remote
control. You can also, press the CD AUX button on
the radio faceplate, until RSE appears on the
display, to start playing a disc.
Some DVDs will not allow fast forwarding or
skipping of the copyright information or previews.
Some DVDs will begin playing after the previews
have �nished. If the DVD does not begin
playing at the main title, refer to the on-screen
instructions.
Stopping and Resuming Playback
To stop playing a disc, press and release the
stop button on the DVD player faceplate or
the remote control.
To resume playback, press the play/pause button
on the DVD player faceplate or the remote control.
The movie should resume play from where it was
last stopped if the disc has not been ejected.
If the disc has been ejected, the disc will resume
play at the beginning of the disc.
Ejecting a Disc
Press the eject button on the DVD player
faceplate, when the disc is stopped, to eject the
disc. There is not an eject button on the
remote control.
If a disc is ejected from the player, but not removed,
the DVD player will reload the disc after a short
period of time.
289
Page 303 of 562
DVD Player
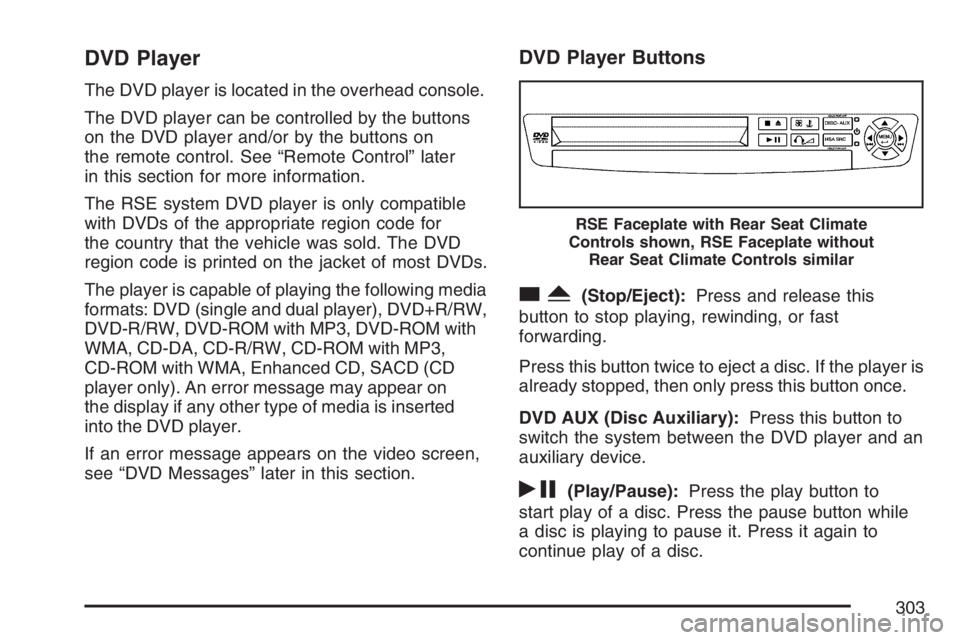
The DVD player is located in the overhead console.
The DVD player can be controlled by the buttons
on the DVD player and/or by the buttons on
the remote control. See “Remote Control” later
in this section for more information.
The RSE system DVD player is only compatible
with DVDs of the appropriate region code for
the country that the vehicle was sold. The DVD
region code is printed on the jacket of most DVDs.
The player is capable of playing the following media
formats: DVD (single and dual player), DVD+R/RW,
DVD-R/RW, DVD-ROM with MP3, DVD-ROM with
WMA, CD-DA, CD-R/RW, CD-ROM with MP3,
CD-ROM with WMA, Enhanced CD, SACD (CD
player only). An error message may appear on
the display if any other type of media is inserted
into the DVD player.
If an error message appears on the video screen,
see “DVD Messages” later in this section.
DVD Player Buttons
cY(Stop/Eject):Press and release this
button to stop playing, rewinding, or fast
forwarding.
Press this button twice to eject a disc. If the player is
already stopped, then only press this button once.
DVD AUX (Disc Auxiliary):Press this button to
switch the system between the DVD player and an
auxiliary device.
rj(Play/Pause):Press the play button to
start play of a disc. Press the pause button while
a disc is playing to pause it. Press it again to
continue play of a disc.
RSE Faceplate with Rear Seat Climate
Controls shown, RSE Faceplate without
Rear Seat Climate Controls similar
303
Page 305 of 562
Playing a Disc
To play a disc, gently insert the disc, with the label
side up, into the loading slot. The DVD player
will continue loading the disc and the player will
automatically start if the vehicle is in
ACCESSORY, RUN, or RAP.
If a disc is already in the player, make sure that
the DVD player is on, then press the play/pause
button on the player faceplate or on the remote
control. You can also press the DVD AUX button
on the player faceplate, or the CD AUX button
on the radio faceplate until RSE appears on
the display, to start playing a disc.
Some DVDs will not allow fast forwarding or
skipping of the copyright information or previews.
Some DVDs will begin playing after the previews
have �nished. If the DVD does not begin
playing at the main title, refer to the on-screen
instructions.
Stopping and Resuming Playback
To stop playing a disc, press and release the
stop button on the DVD player faceplate or
the remote control.
To resume playback, press the play/pause button
on the DVD player faceplate or the remote control.
The movie should resume play from where it was
last stopped if the disc has not been ejected.
If the disc has been ejected, the disc will resume
play at the beginning of the disc.
Ejecting a Disc
Press the eject button on the DVD player faceplate,
when the disc is stopped, to eject the disc. There is
no eject button on the remote control.
If a disc is ejected from the player, but not removed,
the DVD player will reload the disc after a short
period of time.
305
Page 322 of 562
Selecting Your Mobile Digital Media as the
Active Source
Your radio and rear seat entertainment system
communicate with the GM Mobile Digital Media
system, as one compact unit that can be accessed
by everyone seated inside the vehicle. The GM
Mobile Digital Media system can hold thousands of
songs, hours of videos, and hundreds of games.
To help use this system, see the following
“Quick Start” information:
Front seat driver and passenger, use the radio
and steering wheel controls to access the music
collection with PhatNoise Voice Index™
technology. The preset buttons can be used to
select the browsing category. The Next,
Previous, and Seek buttons can be used to
browse within a browsing category. Browse the
music collection by artist, album, genre, or
custom playlist as the system uses the voice
mode to announce these selections. See “Using
the GM Mobile Digital Media System for Front
Seat Audio Entertainment” later in this manual.
Rear seat passengers, use the wireless DVD
remote control to navigate the menu displayed
on the overhead DVD video screen, then selectto play music, videos, or games. A dedicated
game controller is included with the Mobile
Digital Media package. See “Using the GM
Mobile Digital Media System for Rear Seat
Entertainment” later in this manual.
Your vehicle may have audio steering wheel
controls. Some audio controls can be adjusted at
the steering wheel. SeeAudio Steering Wheel
Controls on page 341in your owner manual.
If your vehicle has the OnStar
®/Mute audio
steering wheel control, read the following
instructions.
For vehicles with OnStar
®:
Press and hold the mute button to activate
OnStar®.
Press and release this button once again
to deactivate OnStar®mode and go to
mute mode.
Press this button twice to return to sound from
the GM Mobile Digital Media system.
For vehicles without OnStar
®:
Press the mute button to silence the system,
press and release this button once again to
turn the sound back on.
322
Page 327 of 562
Using the Fast Forward and Fast
Reverse Buttons
{|(Fast Forward/Fast Reverse):Press and
hold the fast forward or fast reverse arrow to
fast forward or reverse within the current track.
Using the GM Mobile Digital Media
System for Rear Seat Entertainment
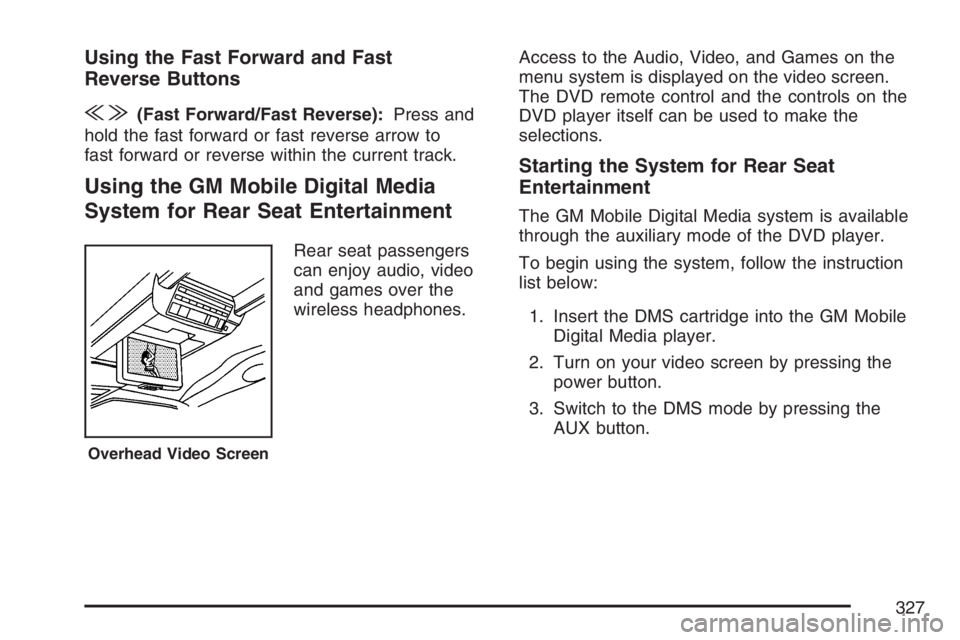
Rear seat passengers
can enjoy audio, video
and games over the
wireless headphones.Access to the Audio, Video, and Games on the
menu system is displayed on the video screen.
The DVD remote control and the controls on the
DVD player itself can be used to make the
selections.
Starting the System for Rear Seat
Entertainment
The GM Mobile Digital Media system is available
through the auxiliary mode of the DVD player.
To begin using the system, follow the instruction
list below:
1. Insert the DMS cartridge into the GM Mobile
Digital Media player.
2. Turn on your video screen by pressing the
power button.
3. Switch to the DMS mode by pressing the
AUX button.
Overhead Video Screen
327
Page 328 of 562
Navigating the On-Screen Menus Using
the DVD Remote Control
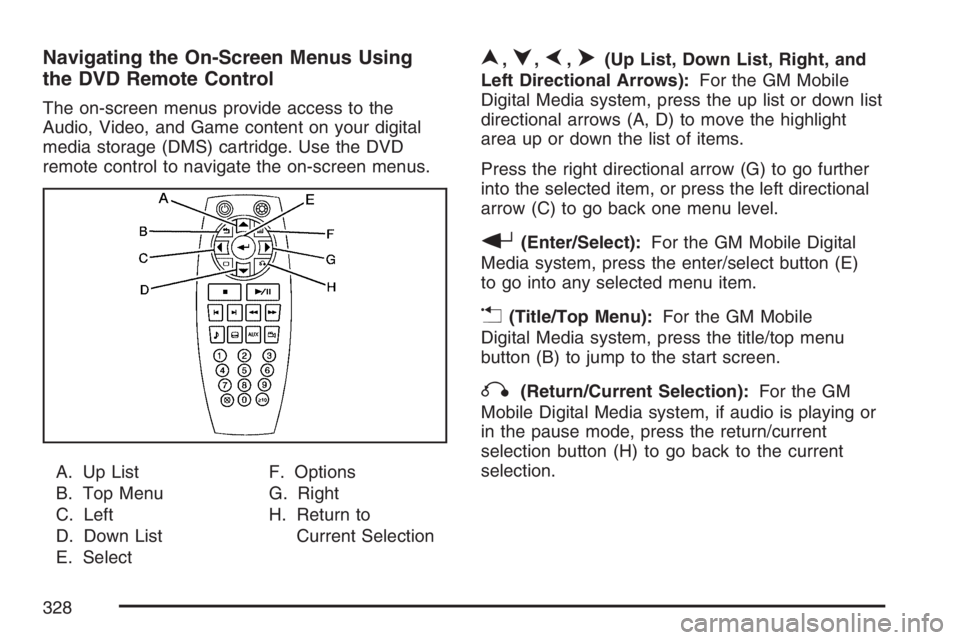
The on-screen menus provide access to the
Audio, Video, and Game content on your digital
media storage (DMS) cartridge. Use the DVD
remote control to navigate the on-screen menus.
A. Up List
B. Top Menu
C. Left
D. Down List
E. SelectF. Options
G. Right
H. Return to
Current Selection
n,q,p,o(Up List, Down List, Right, and
Left Directional Arrows):For the GM Mobile
Digital Media system, press the up list or down list
directional arrows (A, D) to move the highlight
area up or down the list of items.
Press the right directional arrow (G) to go further
into the selected item, or press the left directional
arrow (C) to go back one menu level.
r(Enter/Select):For the GM Mobile Digital
Media system, press the enter/select button (E)
to go into any selected menu item.
v(Title/Top Menu):For the GM Mobile
Digital Media system, press the title/top menu
button (B) to jump to the start screen.
q(Return/Current Selection):For the GM
Mobile Digital Media system, if audio is playing or
in the pause mode, press the return/current
selection button (H) to go back to the current
selection.
328