clutch BUICK VERANO 2013 Owner's Manual
[x] Cancel search | Manufacturer: BUICK, Model Year: 2013, Model line: VERANO, Model: BUICK VERANO 2013Pages: 382, PDF Size: 5.43 MB
Page 202 of 382
Black plate (18,1)Buick Verano Owner Manual - 2013 - crc - 10/17/12
9-18 Driving and Operating
If the vehicle cannot be pulled over,
and must be shut off while driving,
press and hold the engine START/
STOP button for longer than
two seconds, or press twice in
five seconds.
ACC/ACCESSORY (Amber
Indicator Light):This mode allows
you to use some electrical
accessories when the engine is off.
With the ignition off, pressing the
button one time without the brake
pedal applied will place the ignition
system in ACC/ACCESSORY.
The ignition will switch from ACC/
ACCESSORY to OFF after
five minutes to prevent battery
rundown.
ON/RUN/START (Green Indicator
Light): This mode is for driving and
starting. With the ignition off, and
the brake pedal applied, pressing
the button once will place the
ignition system in ON/RUN/START.
Once engine cranking begins,
release the button. Engine cranking
will continue until the engine starts. See
Starting the Engine on
page 9‑18 for more information. The
ignition will then remain in ON/RUN.
Service Only Mode
This power mode is available for
service and diagnostics, and to
verify the proper operation of the
malfunction indicator lamp as may
be required for emission inspection
purposes. With the vehicle off, and
the brake pedal not applied,
pressing and holding the button for
more than five seconds will place
the vehicle in Service Only Mode.
The instruments and audio systems
will operate as they do in ON/RUN,
but the vehicle will not be able to be
driven. The engine will not start in
Service Only Mode. Push the button
again to turn the vehicle off.
Starting the Engine
Place the transmission in the
proper gear.
Automatic Transmission
Move the shift lever to P (Park) or
N (Neutral). The engine will not start
in any other position. To restart the
vehicle when it is already moving,
use N (Neutral) only.
Notice: Do not try to shift to
P (Park) if the vehicle is moving.
If you do, you could damage the
transmission. Shift to P (Park)
only when the vehicle is stopped.
Notice: If you add electrical parts
or accessories, you could change
the way the engine operates. Any
resulting damage would not be
covered by the vehicle warranty.
See Add-On Electrical Equipment
on page 9‑56.
Manual Transmission
The shift lever should be in
N (Neutral) and the parking brake
engaged. Hold the clutch pedal
down to the floor and start the
engine. The vehicle will not start if
the clutch pedal is not all the
way down.
Page 207 of 382

Black plate (23,1)Buick Verano Owner Manual - 2013 - crc - 10/17/12
Driving and Operating 9-23
If the shift lever cannot be moved
out of P (Park):
1. Apply and maintain the regularbrakes.
2. Turn the ignition to the ON/RUN position. See Ignition Positions
(Key Access) on page 9‑14 or
Ignition Positions (Keyless
Access) on page 9‑16 for more
information.
3. Let up on the shift lever and make sure the shift lever is
pushed all the way into P (Park).
4. Press the shift lever button.
5. Move the shift lever into the desired gear.
If you still cannot move the shift
lever from P (Park), consult your
dealer or a professional towing
service.Parking
If the vehicle has a manual
transmission, before getting out of
the vehicle, move the shift lever into
R (Reverse) if parking on a downhill
slope. On a level surface or an
uphill slope, use 1 (First) gear.
Firmly apply the parking brake. Turn
the wheels toward the curb for a
downhill slope, or away from the
curb for an uphill slope. Once the
shift lever has been placed into gear
with the clutch pedal pressed in,
turn the ignition key to LOCK/OFF,
remove the key, and release the
clutch.
Parking over Things
That Burn
{WARNING
Things that can burn could touch
hot exhaust parts under the
vehicle and ignite. Do not park
over papers, leaves, dry grass,
or other things that can burn.
Page 212 of 382

Black plate (28,1)Buick Verano Owner Manual - 2013 - crc - 10/17/12
9-28 Driving and Operating
Manual Transmission
This is the shift pattern for the
six-speed manual transmission.
To operate the transmission:
Notice:Do not rest your hand on
the shift lever while driving. The
pressure could cause premature
wear in the transmission. The
repairs would not be covered by
the vehicle warranty. Notice:
Do not rest your foot on
the clutch pedal while driving or
while stopped. The pressure can
cause premature wear in the
clutch. The repairs would not be
covered by the vehicle warranty.
1 (First): Press the clutch pedal
fully to the pedal stop and shift into
1 (First). Then slowly let up on the
clutch pedal as you press the
accelerator pedal.
If you come to a complete stop and
it is hard to shift into 1 (First), put
the shift lever in Neutral and let up
on the clutch. Press the clutch pedal
back down. Then shift into 1 (First).
2 (Second): Press the clutch pedal
as you let up on the accelerator
pedal and shift into 2 (Second).
Then, slowly let up on the clutch
pedal as you press the accelerator
pedal. 3 (Third), 4 (Fourth), 5 (Fifth), and
6 (Sixth):
Shift into 3 (Third),
4 (Fourth), 5 (Fifth), and 6 (Sixth) the
same way you do for 2 (Second).
Slowly let up on the clutch pedal as
you press the accelerator pedal. For
the best fuel economy, use 6 (Sixth)
gear whenever vehicle speed and
driving conditions allow.
{WARNING
If you skip a gear when you
downshift, you could lose control
of the vehicle. You could injure
yourself or others. Do not shift
down more than one gear at a
time when you downshift.
Notice: Do not skip gears while
upshifting. This can cause
premature wear in the
transmission. The repairs would
not be covered by the vehicle
warranty.
Page 213 of 382
Black plate (29,1)Buick Verano Owner Manual - 2013 - crc - 10/17/12
Driving and Operating 9-29
To stop, let up on the accelerator
pedal and press the brake pedal.
Just before the vehicle stops, press
the clutch pedal and the brake
pedal, and shift to Neutral.
Neutral:Use this position when
you start or idle the engine. The
shift lever is in Neutral when it is
centered in the shift pattern, not in
any gear.
R (Reverse): To back up, with the
vehicle at a complete stop, press
down the clutch pedal. Then pull up
on the button on the shift lever, and
shift into R (Reverse). Let up on the
clutch pedal slowly while pressing
the accelerator pedal. If R (Reverse)
gear does not engage, shift the
transmission to Neutral, release the
clutch pedal, and press it back
down. Repeat the gear selection. Notice:
Shifting to R (Reverse)
while the vehicle is moving
forward could damage the
transmission. The repairs would
not be covered by the vehicle
warranty. Shift to R (Reverse) only
after the vehicle is stopped.
Use R (Reverse) along with the
parking brake to park the vehicle.
When operating, press the clutch
pedal down completely. Do not use
the pedal as a foot rest.Brakes
Antilock Brake
System (ABS)
This vehicle has the Antilock Brake
System (ABS), an advanced
electronic braking system that helps
prevent a braking skid.
When the vehicle begins to drive
away, ABS checks itself.
A momentary motor or clicking noise
might be heard while this test is
going on, and it might even be
noticed that the brake pedal moves
a little. This is normal.
If there is a problem with ABS, this
warning light stays on. See Antilock
Brake System (ABS) Warning Light
on page 5‑16.
Page 216 of 382
Black plate (32,1)Buick Verano Owner Manual - 2013 - crc - 10/17/12
9-32 Driving and Operating
If the parking brake warning light is
on, the EPB has detected an error
in another system and is operating
with reduced functionality. To
release the EPB when this light is
on, push down on the EPB switch
and hold it in the down position.
EPB release may take a longer
period of time than normal when this
light is on. Continue to hold the
switch until the parking brake status
light is off. If the light is on, see your
dealer.
Notice:Driving with the parking
brake on can overheat the brake
system and cause premature
wear or damage to brake system
parts. Make sure that the parking
brake is fully released and the
brake warning light is off before
driving.
Automatic EPB Release
The EPB will automatically release if
the vehicle is running, placed into
gear, and an attempt is made to drive away. Avoid rapid acceleration
when the EPB is applied, to
preserve parking brake lining life.
If you are towing a trailer and
parking on a hill, see
Driving
Characteristics and Towing Tips on
page 9‑51 for more information.
The EPB can also be used to
prevent roll back for vehicles with a
manual transmission taking off on a
hill. In a situation where no roll back
is desired, an applied EPB will allow
both feet to be used for the clutch
and accelerator pedals in
preparation for starting the vehicle
moving in the intended direction.
In this situation, perform the normal
clutch and/or accelerator actions
required to begin moving the
vehicle. There is no need to push
the switch to release the EPB.Brake Assist
This vehicle has a brake assist
feature designed to assist the driver
in stopping or decreasing vehicle
speed in emergency driving conditions. This feature uses the
stability system hydraulic brake
control module to supplement the
power brake system under
conditions where the driver has
quickly and forcefully applied the
brake pedal in an attempt to quickly
stop or slow down the vehicle. The
stability system hydraulic brake
control module increases brake
pressure at each corner of the
vehicle until the ABS activates.
Minor brake pedal pulsation or
pedal movement during this time is
normal and the driver should
continue to apply the brake pedal as
the driving situation dictates. The
brake assist feature will
automatically disengage when the
brake pedal is released or brake
pedal pressure is quickly
decreased.
Hill Start Assist (HSA)
This vehicle has a Hill Start Assist
(HSA) feature, which may be useful
when the vehicle is stopped on a
grade (less than 10%). This feature
Page 241 of 382
Black plate (1,1)Buick Verano Owner Manual - 2013 - crc - 10/17/12
Vehicle Care 10-1
Vehicle Care
General Information
General Information . . . . . . . . . . 10-2
California Proposition65 Warning . . . . . . . . . . . . . . . . . 10-2
California Perchlorate Materials Requirements . . . . 10-3
Accessories and Modifications . . . . . . . . . . . . . . . 10-3
Vehicle Checks
Doing Your OwnService Work . . . . . . . . . . . . . . . 10-3
Hood . . . . . . . . . . . . . . . . . . . . . . . . 10-4
Engine Compartment Overview . . . . . . . . . . . . . . . . . . . 10-6
Engine Oil . . . . . . . . . . . . . . . . . . . 10-9
Engine Oil Life System . . . . . 10-11
Automatic Transmission Fluid . . . . . . . . . . . . . . . . . . . . . . 10-12
Manual Transmission Fluid . . . . . . . . . . . . . . . . . . . . . . 10-13
Hydraulic Clutch . . . . . . . . . . . . 10-13
Engine Air Cleaner/Filter . . . . 10-13
Cooling System . . . . . . . . . . . . 10-14 Engine Coolant . . . . . . . . . . . . . 10-16
Engine Overheating . . . . . . . . 10-19
Washer Fluid . . . . . . . . . . . . . . . 10-19
Brakes . . . . . . . . . . . . . . . . . . . . . 10-20
Brake Fluid . . . . . . . . . . . . . . . . . 10-21
Battery . . . . . . . . . . . . . . . . . . . . . 10-22
Starter Switch Check . . . . . . . 10-23
Automatic Transmission Shift
Lock Control Function
Check . . . . . . . . . . . . . . . . . . . . . 10-23
Ignition Transmission Lock Check . . . . . . . . . . . . . . . . . . . . . 10-23
Park Brake and P (Park) Mechanism Check . . . . . . . . 10-24
Wiper Blade Replacement . . . . . . . . . . . . . . 10-24
Headlamp Aiming
Headlamp Aiming . . . . . . . . . . 10-25
Bulb Replacement
Bulb Replacement . . . . . . . . . . 10-25
Halogen Bulbs . . . . . . . . . . . . . . 10-25
Headlamps, Front TurnSignal and Parking
Lamps . . . . . . . . . . . . . . . . . . . . 10-25
Fog Lamps . . . . . . . . . . . . . . . . . 10-26 Taillamps, Turn Signal,
Stoplamps, and Back-Up
Lamps . . . . . . . . . . . . . . . . . . . . 10-26
License Plate Lamp . . . . . . . . 10-28
Replacement Bulbs . . . . . . . . . 10-28
Electrical System
Electrical System Overload . . . . . . . . . . . . . . . . . . 10-29
Fuses and Circuit Breakers . . . . . . . . . . . . . . . . . . 10-29
Engine Compartment Fuse Block . . . . . . . . . . . . . . . . . . . . . 10-30
Instrument Panel Fuse Block . . . . . . . . . . . . . . . . . . . . . 10-33
Rear Compartment Fuse Block . . . . . . . . . . . . . . . . . . . . . 10-35
Wheels and Tires
Tires . . . . . . . . . . . . . . . . . . . . . . . . 10-37
All-Season Tires . . . . . . . . . . . . 10-38
Winter Tires . . . . . . . . . . . . . . . . 10-39
Low-Profile Tires . . . . . . . . . . . 10-39
Tire Sidewall Labeling . . . . . . 10-39
Tire Designations . . . . . . . . . . . 10-42
Tire Terminology and
Definitions . . . . . . . . . . . . . . . . 10-42
Tire Pressure . . . . . . . . . . . . . . . 10-45
Page 253 of 382
Black plate (13,1)Buick Verano Owner Manual - 2013 - crc - 10/17/12
Vehicle Care 10-13
Change the fluid and filter at the
intervals listed inMaintenance
Schedule on page 11‑3, and be sure
to use the fluid listed in
Recommended Fluids and
Lubricants on page 11‑12.
Manual Transmission
Fluid
How to Check Manual
Transmission Fluid
It is not necessary to check the
manual transmission fluid level.
A transmission fluid leak is the only
reason for fluid loss. If a leak
occurs, take the vehicle to your
dealer and have it repaired as soon
as possible. See Recommended
Fluids and Lubricants on page 11‑12
for the proper fluid to use.
Hydraulic Clutch
For vehicles with a manual
transmission, it is not necessary to
regularly check brake/clutch fluid
unless there is a leak suspected. Adding fluid will not correct a leak.
A fluid loss in this system could
indicate a problem. Have the
system inspected and repaired.
When to Check and What
to Use
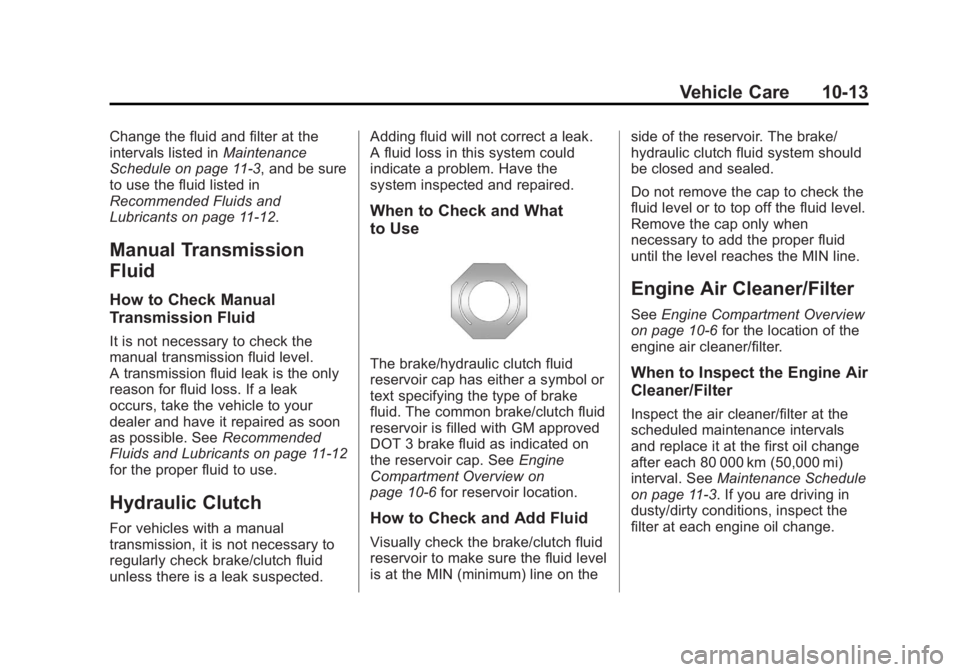
The brake/hydraulic clutch fluid
reservoir cap has either a symbol or
text specifying the type of brake
fluid. The common brake/clutch fluid
reservoir is filled with GM approved
DOT 3 brake fluid as indicated on
the reservoir cap. See
Engine
Compartment Overview on
page 10‑6 for reservoir location.
How to Check and Add Fluid
Visually check the brake/clutch fluid
reservoir to make sure the fluid level
is at the MIN (minimum) line on the side of the reservoir. The brake/
hydraulic clutch fluid system should
be closed and sealed.
Do not remove the cap to check the
fluid level or to top off the fluid level.
Remove the cap only when
necessary to add the proper fluid
until the level reaches the MIN line.
Engine Air Cleaner/Filter
See
Engine Compartment Overview
on page 10‑6 for the location of the
engine air cleaner/filter.
When to Inspect the Engine Air
Cleaner/Filter
Inspect the air cleaner/filter at the
scheduled maintenance intervals
and replace it at the first oil change
after each 80 000 km (50,000 mi)
interval. See Maintenance Schedule
on page 11‑3. If you are driving in
dusty/dirty conditions, inspect the
filter at each engine oil change.
Page 261 of 382

Black plate (21,1)Buick Verano Owner Manual - 2013 - crc - 10/17/12
Vehicle Care 10-21
Brake Fluid
The brake/clutch master cylinder
reservoir is filled with DOT 3 brake
fluid as indicated on the reservoir
cap. SeeEngine Compartment
Overview on page 10‑6 for the
location of the reservoir.
There are only two reasons why the
brake fluid level in the reservoir
might go down:
.The brake fluid level goes down
because of normal brake lining
wear. When new linings are
installed, the fluid level goes
back up.
.A fluid leak in the brake/clutch
hydraulic system can also cause
a low fluid level. Have the brake/
clutch hydraulic system fixed, since a leak means that sooner
or later the brakes will not
work well.
Do not top off the brake/clutch fluid.
Adding fluid does not correct a leak.
If fluid is added when the linings are
worn, there will be too much fluid
when new brake linings are
installed. Add or remove fluid, as
necessary, only when work is done
on the brake/clutch hydraulic
system.
{WARNING
If too much brake fluid is added, it
can spill on the engine and burn,
if the engine is hot enough. You
or others could be burned, and
the vehicle could be damaged.
Add brake fluid only when work is
done on the brake/clutch
hydraulic system.
Checking Brake Fluid
The brake/clutch fluid can be
checked without taking off the cap
by looking at the brake/clutch fluid
reservoir.
The fluid level should be above
MIN. If it is not, have the brake/
clutch hydraulic system checked to
see if there is a leak.
After work is done on the brake/
clutch hydraulic system, make sure
the level is above MIN but not over
the MAX mark.
When the brake/clutch fluid falls to a
low level, the brake warning light
comes on. See Brake System
Warning Light on page 5‑15.
What to Add
Use only new DOT 3 brake fluid
from a sealed container. See
Recommended Fluids and
Lubricants on page 11‑12.
Page 262 of 382
Black plate (22,1)Buick Verano Owner Manual - 2013 - crc - 10/17/12
10-22 Vehicle Care
Always clean the brake/clutch fluid
reservoir cap and the area around
the cap before removing it. This
helps keep dirt from entering the
reservoir.
{WARNING
With the wrong kind of fluid in the
brake/clutch hydraulic system, the
brakes might not work well. This
could cause a crash. Always use
the proper brake/clutch fluid.
Notice
.Using the wrong fluid can
badly damage brake/clutch
hydraulic system parts. For
example, just a few drops of
mineral-based oil, such as
engine oil, in the brake
hydraulic system can
damage brake hydraulic
system parts so badly that
they will have to be replaced.
Do not let someone put in
the wrong kind of fluid.
.If brake fluid is spilled on the
vehicle's painted surfaces,
the paint finish can be
damaged. Be careful not to
spill brake fluid on the
vehicle. If you do, wash it off
immediately.
Battery
Refer to the replacement number
shown on the original battery label
when a new battery is needed. See
Engine Compartment Overview on
page 10‑6 for battery location.
{WARNING
Battery posts, terminals, and
related accessories contain lead
and lead compounds, chemicals
known to the State of California to
cause cancer and reproductive
harm. Wash hands after handling.
Vehicle Storage
{WARNING
Batteries have acid that can burn
you and gas that can explode.
You can be badly hurt if you are
not careful. See Jump Starting on
page 10‑66 for tips on working
around a battery without
getting hurt.
Infrequent Usage: Remove the
black, negative (−) cable from the
battery to keep the battery from
running down.
Extended Storage: Remove the
black, negative (−) cable from the
battery or use a battery trickle
charger.
Page 271 of 382
Black plate (31,1)Buick Verano Owner Manual - 2013 - crc - 10/17/12
Vehicle Care 10-31
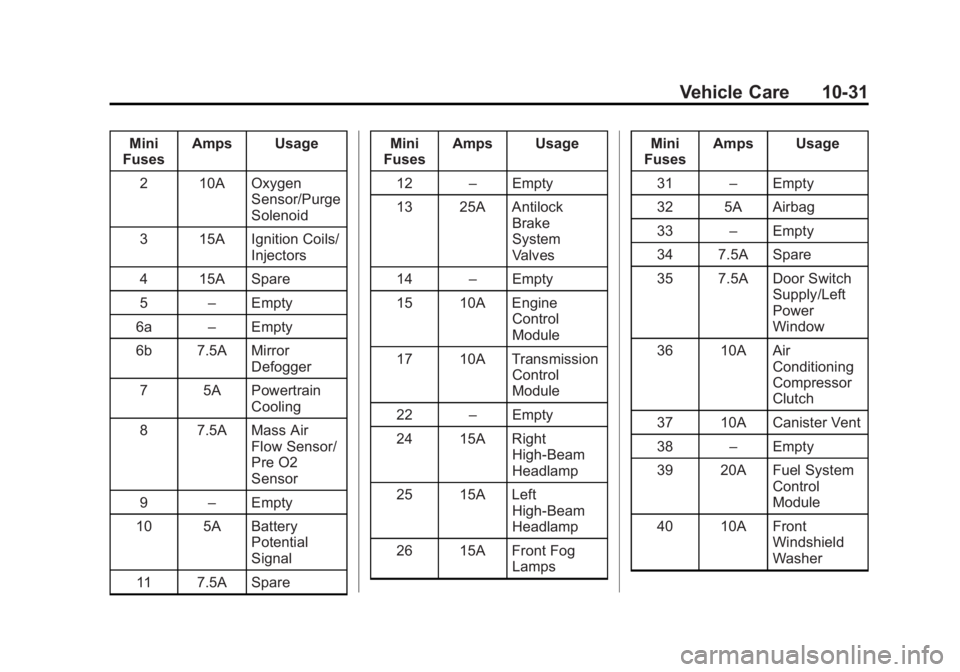
Mini
Fuses Amps Usage
2 10A Oxygen Sensor/Purge
Solenoid
3 15A Ignition Coils/ Injectors
4 15A Spare
5 –Empty
6a –Empty
6b 7.5A Mirror Defogger
7 5A Powertrain Cooling
8 7.5A Mass Air Flow Sensor/
Pre O2
Sensor
9 –Empty
10 5A Battery Potential
Signal
11 7.5A Spare Mini
Fuses Amps Usage
12 –Empty
13 25A Antilock Brake
System
Valves
14 –Empty
15 10A Engine Control
Module
17 10A Transmission Control
Module
22 –Empty
24 15A Right High-Beam
Headlamp
25 15A Left High-Beam
Headlamp
26 15A Front Fog Lamps Mini
Fuses Amps Usage
31 –Empty
32 5A Airbag
33 –Empty
34 7.5A Spare
35 7.5A Door Switch Supply/Left
Power
Window
36 10A Air Conditioning
Compressor
Clutch
37 10A Canister Vent
38 –Empty
39 20A Fuel System Control
Module
40 10A Front Windshield
Washer