buttons BUICK VERANO 2015 Get To Know Guide
[x] Cancel search | Manufacturer: BUICK, Model Year: 2015, Model line: VERANO, Model: BUICK VERANO 2015Pages: 20, PDF Size: 2.23 MB
Page 2 of 20
2
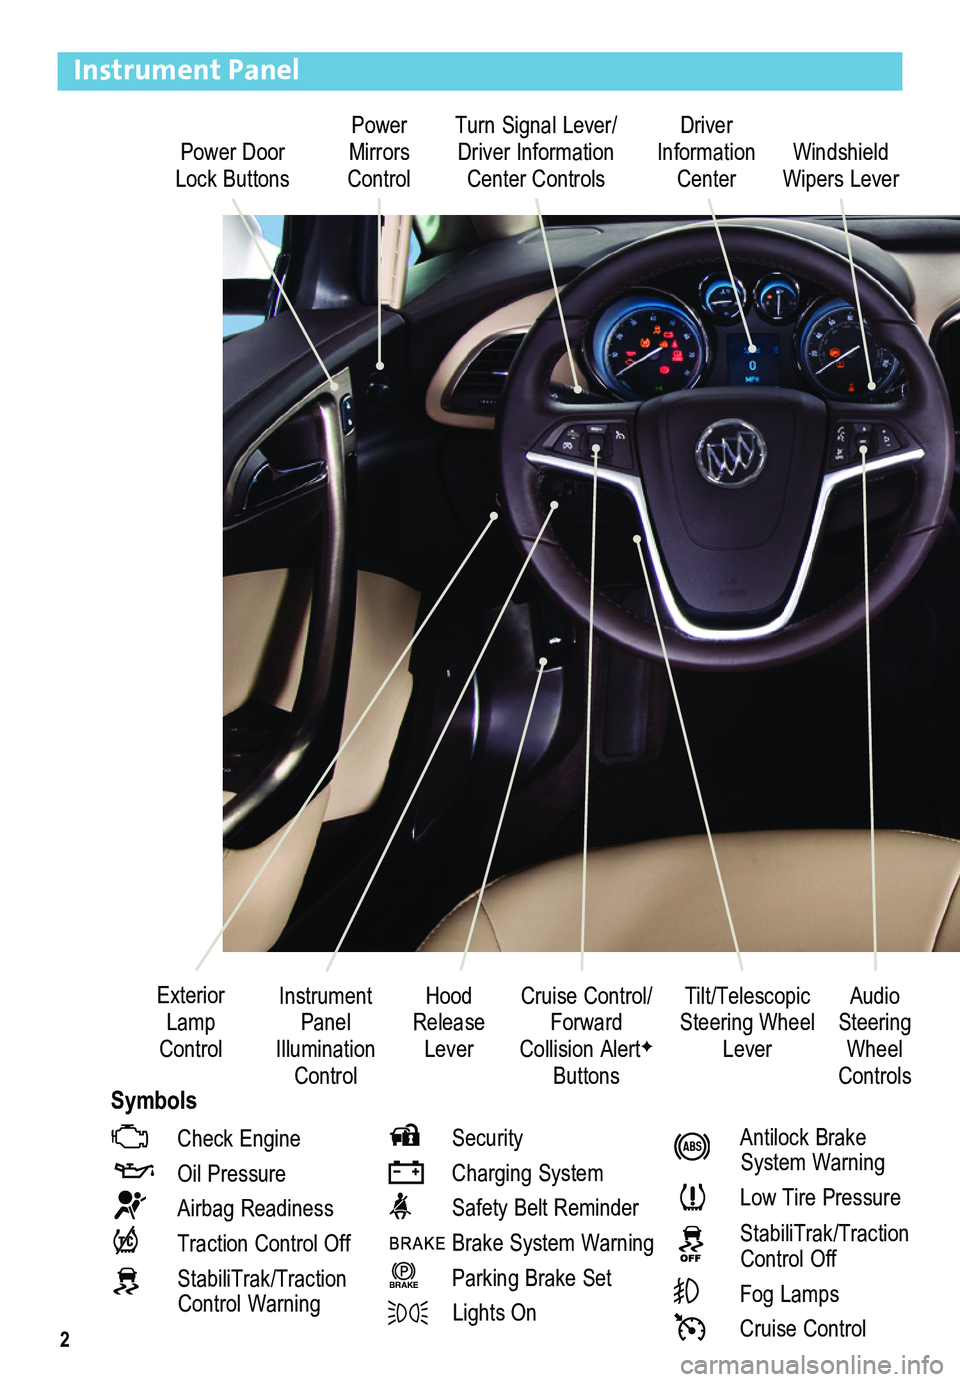
Power Door Lock Buttons
Power Mirrors Control
Turn Signal Lever/ Driver Information Center Controls
Driver Information Center
Tilt/Telescopic Steering Wheel Lever
Instrument Panel Illumination Control
Cruise Control/Forward Collision AlertF
Buttons
Windshield Wipers Lever
Hood Release Lever
Exterior Lamp Control
Instrument Panel
Check Engine
Oil Pressure
Airbag Readiness
Traction Control Off
StabiliTrak/Traction Control Warning
Security
Charging System
Safety Belt Reminder
Brake System Warning
BRAKE Parking Brake Set
Lights On
Antilock Brake System Warning
Low Tire Pressure
StabiliTrak/Traction Control Off
Fog Lamps
Cruise Control
Audio Steering Wheel ControlsSymbols
Page 3 of 20
3
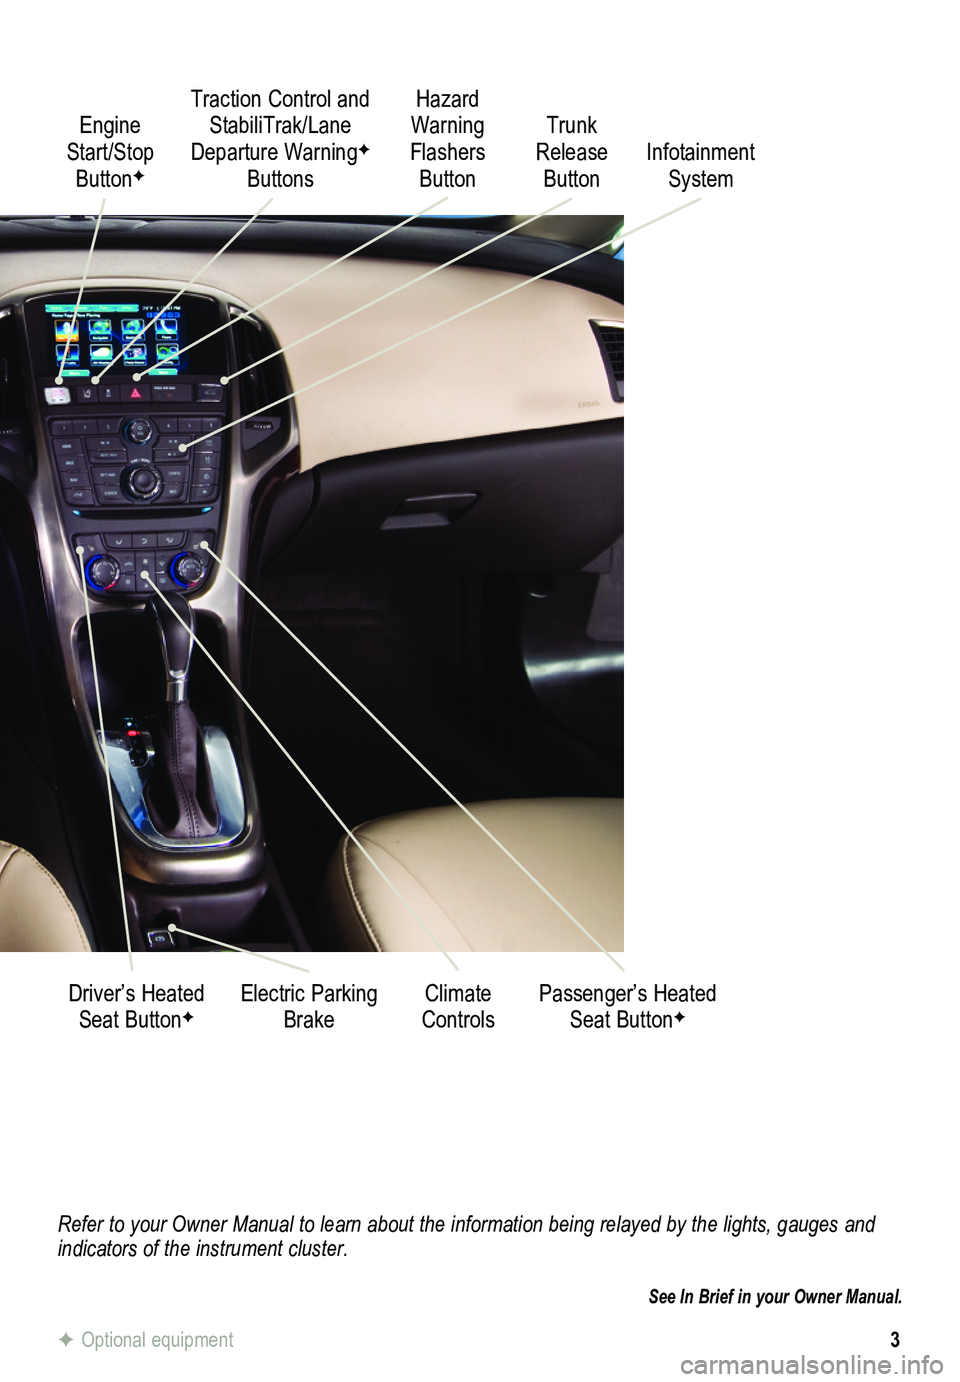
Refer to your Owner Manual to learn about the information being relayed \
by the lights, gauges and indicators of the instrument cluster.
See In Brief in your Owner Manual.
Engine Start/Stop ButtonF
Traction Control and StabiliTrak/Lane Departure WarningF
Buttons
Electric Parking BrakeDriver’s Heated Seat ButtonFClimate ControlsPassenger’s Heated Seat ButtonF
Hazard Warning Flashers Button
Trunk Release ButtonInfotainment System
F Optional equipment
Page 9 of 20
9
Audio System
Setting the Time
1. Turn on the audio system.
2. Press the Clock button.
3. Press the MENU knob chrome ring to highlight the desired time.
4. Turn the MENU knob to change the value; press the chrome ring to confirm the set value. Press the BACK button to return to the Time Settings menu.
Note: Open the Time and Date Settings in the Configuration menu to make other time and date adjustments.
Storing Favorite Stations
Radio stations from all bands (AM, FM or XMF) can be stored, in any order, on up to six pages of favorites.
1. Tune in the desired radio station.
2. Press the FAV button to display the page where the station is to be stored.
3. Press and hold one of the six numeric pushbuttons for more than two seconds.
4. Repeat the steps for each pushbutton on each page.
Portable Audio Devices
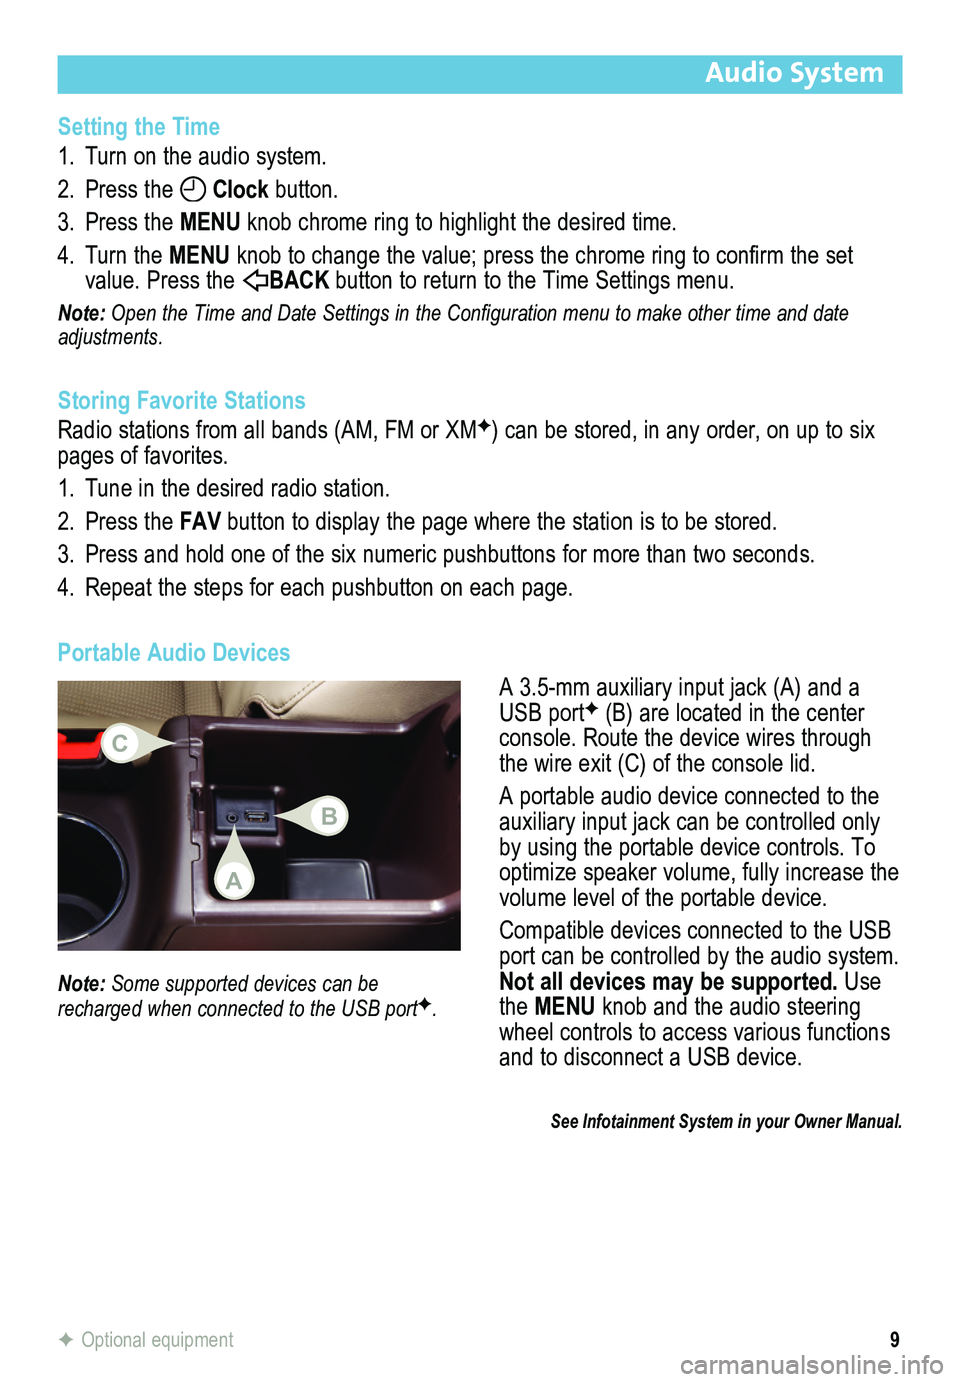
A 3.5-mm auxiliary input jack (A) and a USB portF (B) are located in the center console. Route the device wires through the wire exit (C) of the console lid.
A portable audio device connected to the auxiliary input jack can be controlled only by using the portable device controls. To optimize speaker volume, fully increase the volume level of the portable device.
Compatible devices connected to the USB port can be controlled by the audio system. Not all devices may be supported. Use the MENU knob and the audio steering wheel controls to access various functions and to disconnect a USB device.
Note: Some supported devices can be recharged when connected to the USB portF.
See Infotainment System in your Owner Manual.
F Optional equipment
A
C
B
Page 10 of 20
10
IntelliLink System
IntelliLink uses a Bluetooth or USB connection to link to a compatible mobile device, such as a smartphone, cell phone, USB flash drive or portable audio player/iPod®. IntelliLink enables streaming audio through a smartphone and hands-free voice contro\
l. For assis-tance with the IntelliLink system, contact Customer Assistance at 1-855-4-SUPPORT (1-855-478-7767) or go to www.buick.com and click the Owners link.
Pair a Phone
Before using a Bluetooth-enabled device in the vehicle, it must be paired with the IntelliLink system. Not all devices will support all functions. The pairing process is disabled when the vehicle is moving. For more infor-mation, visit www.gmtotalconnect.com.
Pair a Phone using Voice Recognition
1. Press the Push to Talk button.
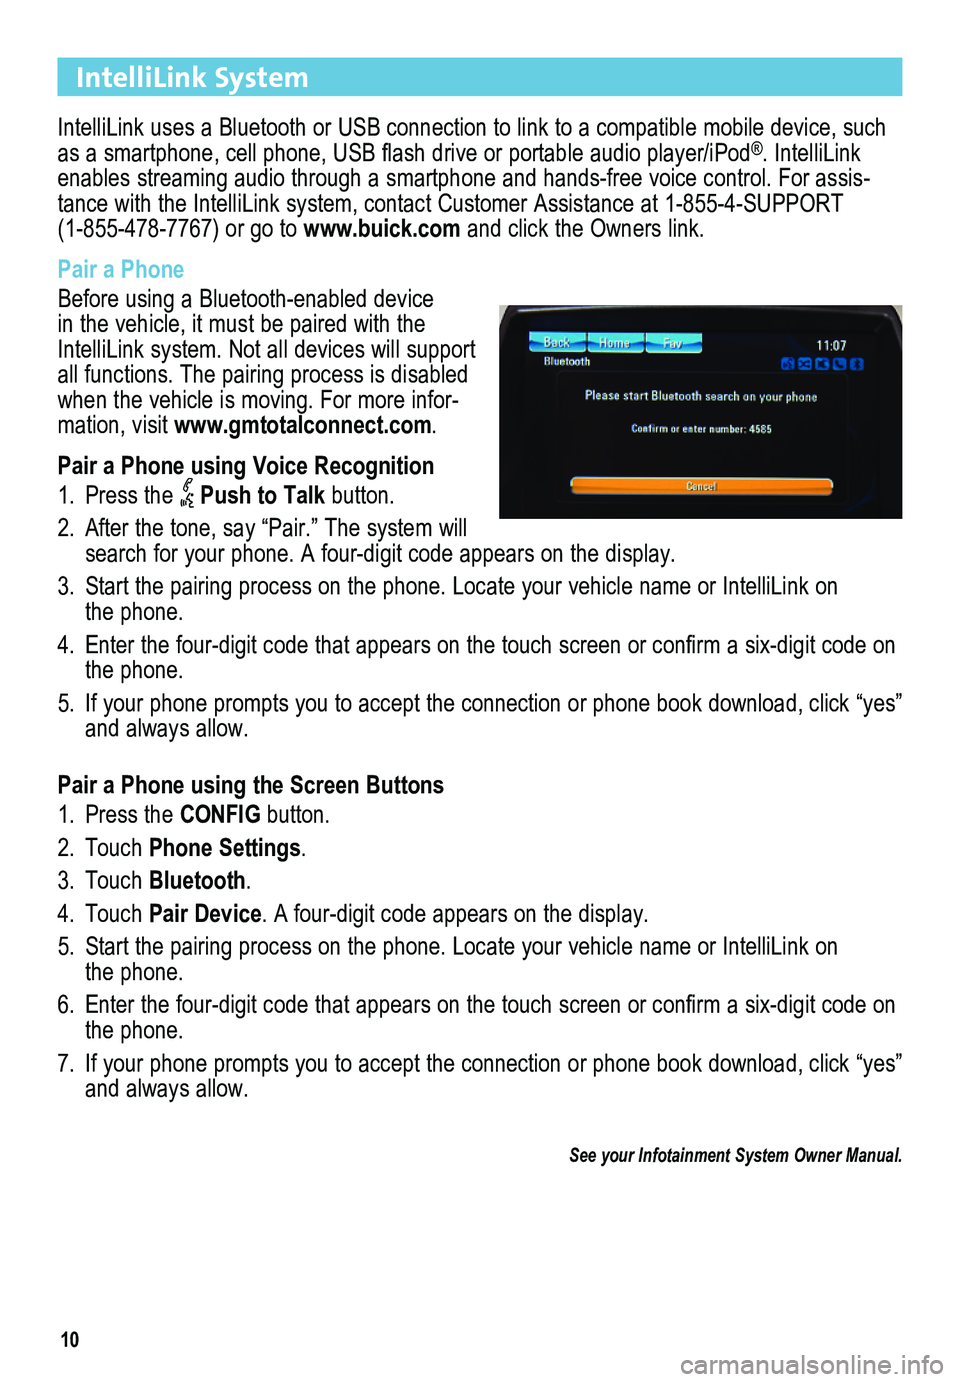
2. After the tone, say “Pair.” The system will search for your phone. A four-digit code appears on the display.
3. Start the pairing process on the phone. Locate your vehicle name or Inte\
lliLink on the phone.
4. Enter the four-digit code that appears on the touch screen or confirm a six-digit code on the phone.
5. If your phone prompts you to accept the connection or phone book download, click “yes” and always allow.
Pair a Phone using the Screen Buttons
1. Press the CONFIG button.
2. Touch Phone Settings.
3. Touch Bluetooth.
4. Touch Pair Device. A four-digit code appears on the display.
5. Start the pairing process on the phone. Locate your vehicle name or Inte\
lliLink on the phone.
6. Enter the four-digit code that appears on the touch screen or confirm a six-digit code on the phone.
7. If your phone prompts you to accept the connection or phone book download, click “yes” and always allow.
See your Infotainment System Owner Manual.
Page 11 of 20
11
IntelliLink System
Voice Recognition
Control the music source and make phone calls hands-free (after pairing\
your Bluetooth-enabled phone) using the enhanced voice recognition system.
1. Press the Push to Talk button on the steering wheel.
2. The radio will say “Ready,” followed by a beep.
3. After the beep, say what you want it to do.
• Phone (using your paired phone):
– “Pair” or “Connect”
– “Dial” or “Call [number]”
– “Dial” or “Call [phone book name]”
Example command: “Call Amanda” or “Dial 555-1212”
• Media Music Device Search:
– “Play CD”
– “Play USB”
– “Play Bluetooth audio”
Example command: “Play artist [name]”
Example command: “Play song [name]”
• Radio Control:
Example command: “Tune FM 104.3” or “Tune Classic Vinyl”
Example command: “Tune Pandora” (Pandora app required)
Example command: “Thumbs up” or “Thumbs down” (Pandora app \
required)
• Help:
– Say “Help” for voice recognition assistance.
Device List
To switch devices, select from the list of paired phones/devices.
Listing all Paired Phones using Voice Recognition
See your Infotainment System Owner Manual.
1. Press the Push to Talk button.
2. Say “Device list” or “Select device.”
Listing all Paired Phones using the Screen Buttons
1. Press the CONFIG button.
2. Touch Phone Settings.
3. Touch Bluetooth.
4. Touch Device List.
Page 13 of 20
13
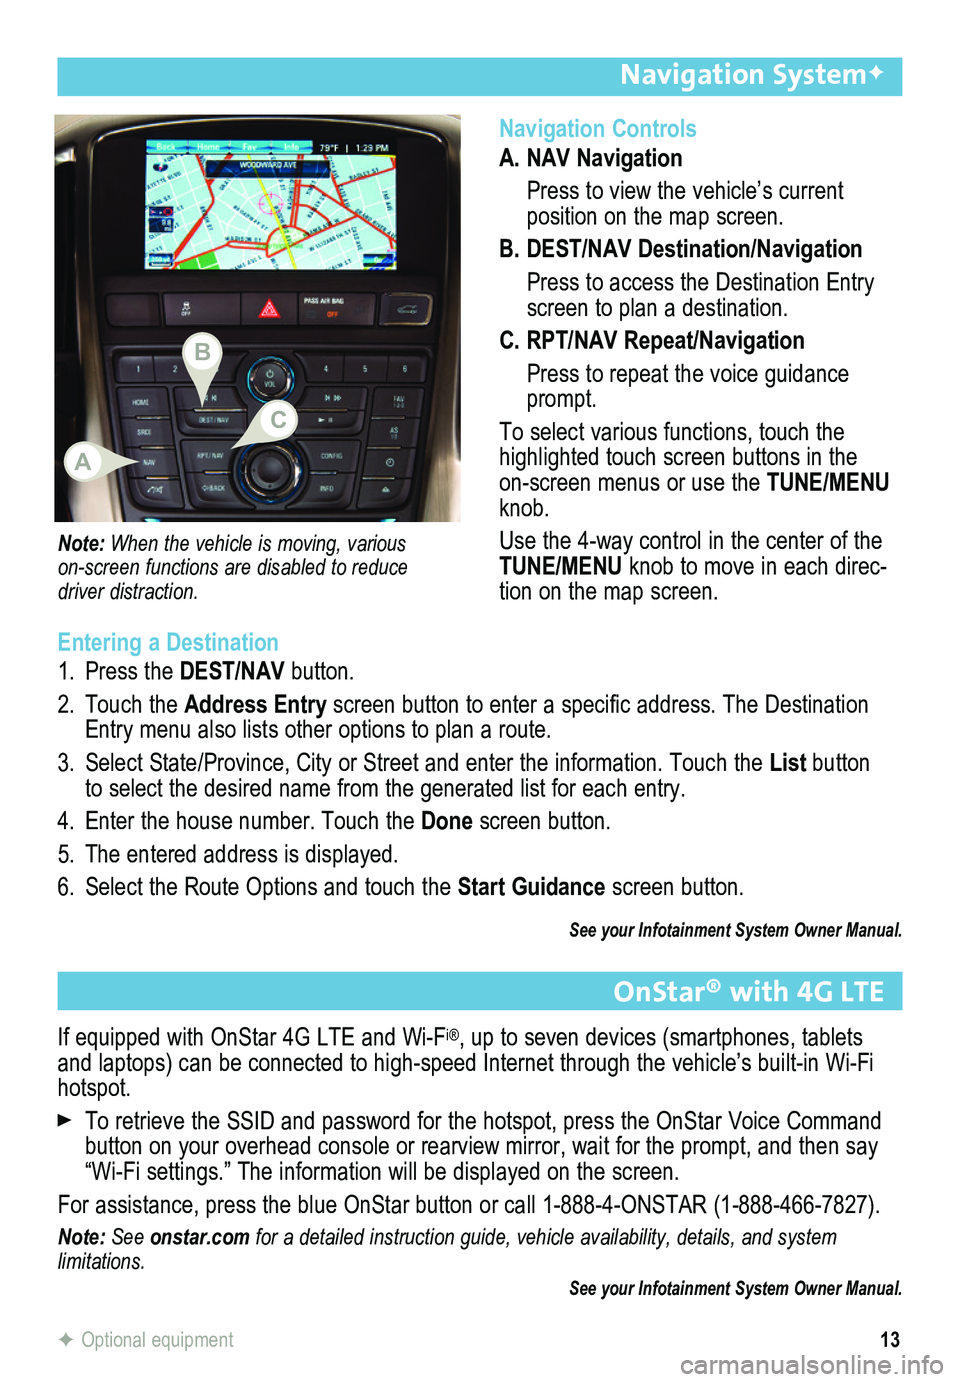
Navigation Controls
A. NAV Navigation
Press to view the vehicle’s current
position on the map screen.
B. DEST/NAV Destination/Navigation
Press to access the Destination Entry screen to plan a destination.
C. RPT/NAV Repeat/Navigation
Press to repeat the voice guidance prompt.
To select various functions, touch the highlighted touch screen buttons in the on-screen menus or use the TUNE/MENU knob.
Use the 4-way control in the center of the TUNE/MENU knob to move in each direc-tion on the map screen.
Navigation SystemF
Note: When the vehicle is moving, various
on-screen functions are disabled to reduce driver distraction.
Entering a Destination
1. Press the DEST/NAV button.
2. Touch the Address Entry screen button to enter a specific address. The Destination Entry menu also lists other options to plan a route.
3. Select State/Province, City or Street and enter the information. Touch the List button to select the desired name from the generated list for each entry.
4. Enter the house number. Touch the Done screen button.
5. The entered address is displayed.
6. Select the Route Options and touch the Start Guidance screen button.
See your Infotainment System Owner Manual.
F Optional equipment
OnStar® with 4G LTE
If equipped with OnStar 4G LTE and Wi-Fi®, up to seven devices (smartphones, tablets and laptops) can be connected to high-speed Internet through the vehicl\
e’s built-in Wi-Fi hotspot.
To retrieve the SSID and password for the hotspot, press the OnStar Voice Command button on your overhead console or rearview mirror, wait for the prompt,\
and then say “Wi-Fi settings.” The information will be displayed on the screen.
For assistance, press the blue OnStar button or call 1-888-4-ONSTAR (1-888-466-7827).
Note: See onstar.com for a detailed instruction guide, vehicle availability, details, and system limitations. See your Infotainment System Owner Manual.
B
A
C