steering BUICK VERANO 2015 Get To Know Guide
[x] Cancel search | Manufacturer: BUICK, Model Year: 2015, Model line: VERANO, Model: BUICK VERANO 2015Pages: 20, PDF Size: 2.23 MB
Page 2 of 20
2
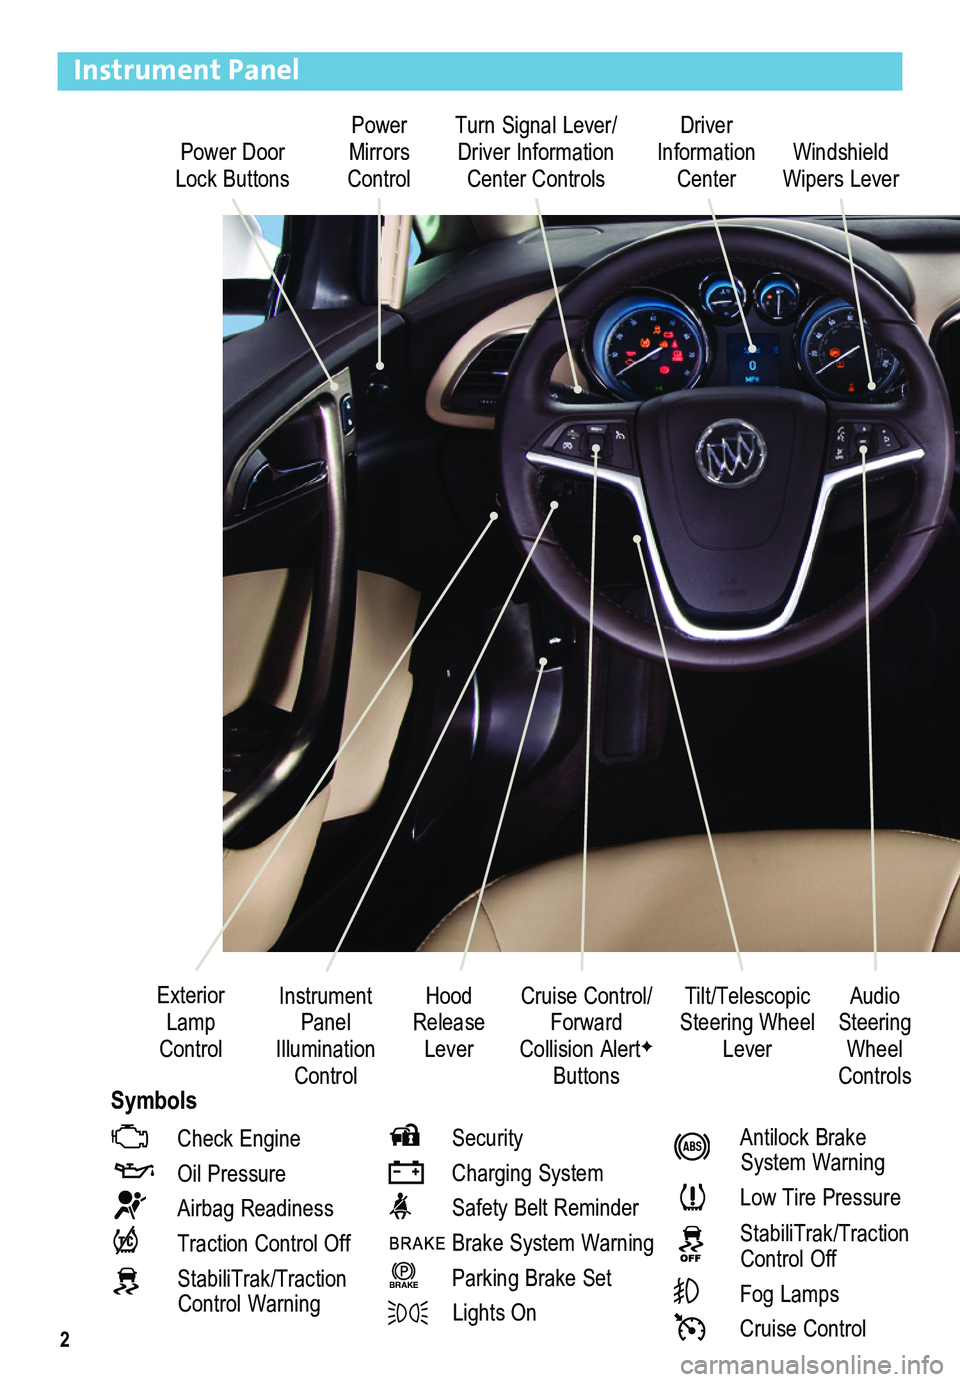
Power Door Lock Buttons
Power Mirrors Control
Turn Signal Lever/ Driver Information Center Controls
Driver Information Center
Tilt/Telescopic Steering Wheel Lever
Instrument Panel Illumination Control
Cruise Control/Forward Collision AlertF
Buttons
Windshield Wipers Lever
Hood Release Lever
Exterior Lamp Control
Instrument Panel
Check Engine
Oil Pressure
Airbag Readiness
Traction Control Off
StabiliTrak/Traction Control Warning
Security
Charging System
Safety Belt Reminder
Brake System Warning
BRAKE Parking Brake Set
Lights On
Antilock Brake System Warning
Low Tire Pressure
StabiliTrak/Traction Control Off
Fog Lamps
Cruise Control
Audio Steering Wheel ControlsSymbols
Page 6 of 20
6
Tilt/Telescopic Steering Wheel
With the vehicle parked, push down the lever on the left side of the steering column to \
adjust the steering wheel. The steering wheel can then be moved up or do\
wn and in or out. Pull up the lever to lock the steering wheel in place.
See Instruments and Controls in your Owner Manual.
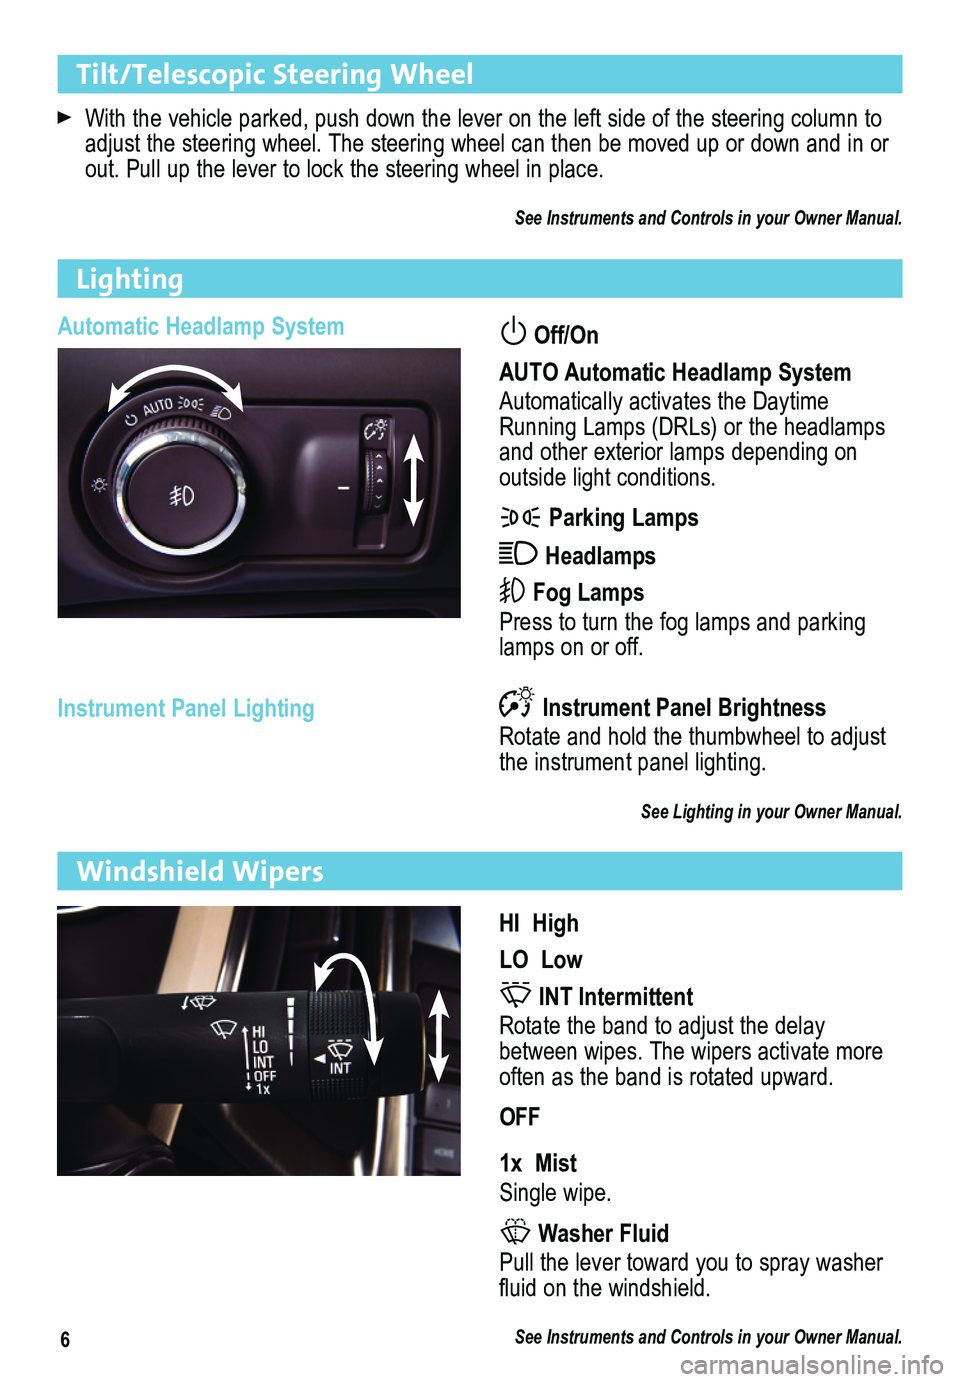
Automatic Headlamp System Off/On
AUTO Automatic Headlamp System
Automatically activates the Daytime Running Lamps (DRLs) or the headlamps and other exterior lamps depending on
outside light conditions.
Parking Lamps
Headlamps
Fog Lamps
Press to turn the fog lamps and parking lamps on or off.
Instrument Panel Lighting
Lighting
Instrument Panel Brightness
Rotate and hold the thumbwheel to adjust the instrument panel lighting.
See Lighting in your Owner Manual.
HI High
LO Low
INT Intermittent
Rotate the band to adjust the delay between wipes. The wipers activate more often as the band is rotated upward.
OFF
1x Mist
Single wipe.
Washer Fluid
Pull the lever toward you to spray washer fluid on the windshield.
See Instruments and Controls in your Owner Manual.
Windshield Wipers
Page 7 of 20
7
Climate Controls
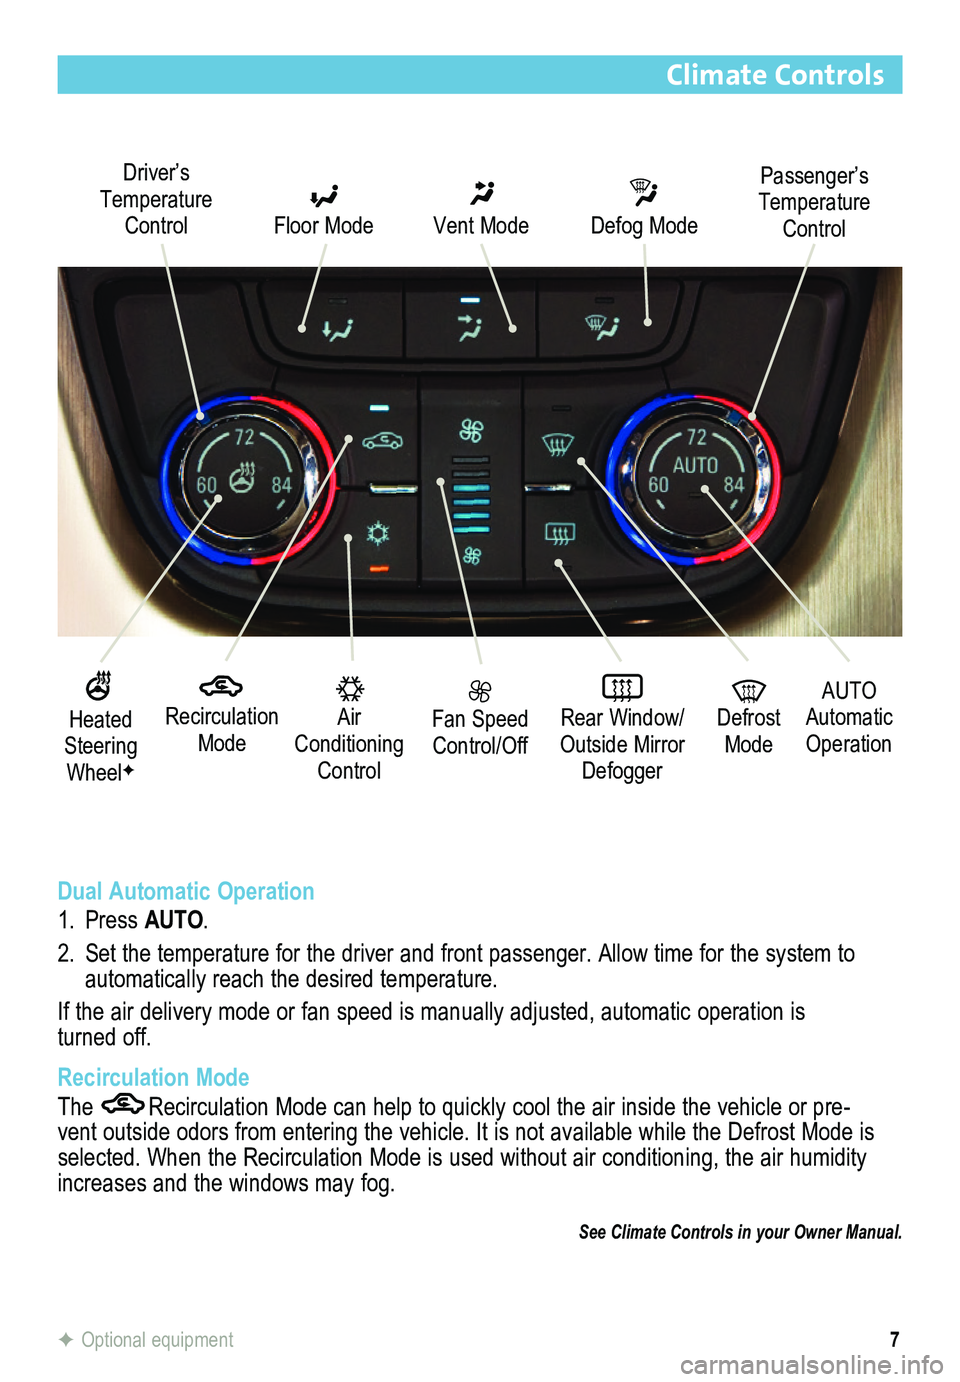
Recirculation Mode
Driver’s Temperature Control Floor Mode
Vent Mode
Defog Mode
Fan Speed Control/Off
Rear Window/ Outside Mirror Defogger
Air Conditioning Control
AUTO
Automatic Operation
Defrost Mode
Dual Automatic Operation
1. Press AUTO.
2. Set the temperature for the driver and front passenger. Allow time for t\
he system to automatically reach the desired temperature.
If the air delivery mode or fan speed is manually adjusted, automatic operation is turned off.
Recirculation Mode
The Recirculation Mode can help to quickly cool the air inside the vehicle or pre-vent outside odors from entering the vehicle. It is not available while the Defrost Mode is selected. When the Recirculation Mode is used without air conditioning, the air humidity increases and the windows may fog.
See Climate Controls in your Owner Manual.
Passenger’s Temperature Control
Heated Steering WheelF
F Optional equipment
Page 9 of 20
9
Audio System
Setting the Time
1. Turn on the audio system.
2. Press the Clock button.
3. Press the MENU knob chrome ring to highlight the desired time.
4. Turn the MENU knob to change the value; press the chrome ring to confirm the set value. Press the BACK button to return to the Time Settings menu.
Note: Open the Time and Date Settings in the Configuration menu to make other time and date adjustments.
Storing Favorite Stations
Radio stations from all bands (AM, FM or XMF) can be stored, in any order, on up to six pages of favorites.
1. Tune in the desired radio station.
2. Press the FAV button to display the page where the station is to be stored.
3. Press and hold one of the six numeric pushbuttons for more than two seconds.
4. Repeat the steps for each pushbutton on each page.
Portable Audio Devices
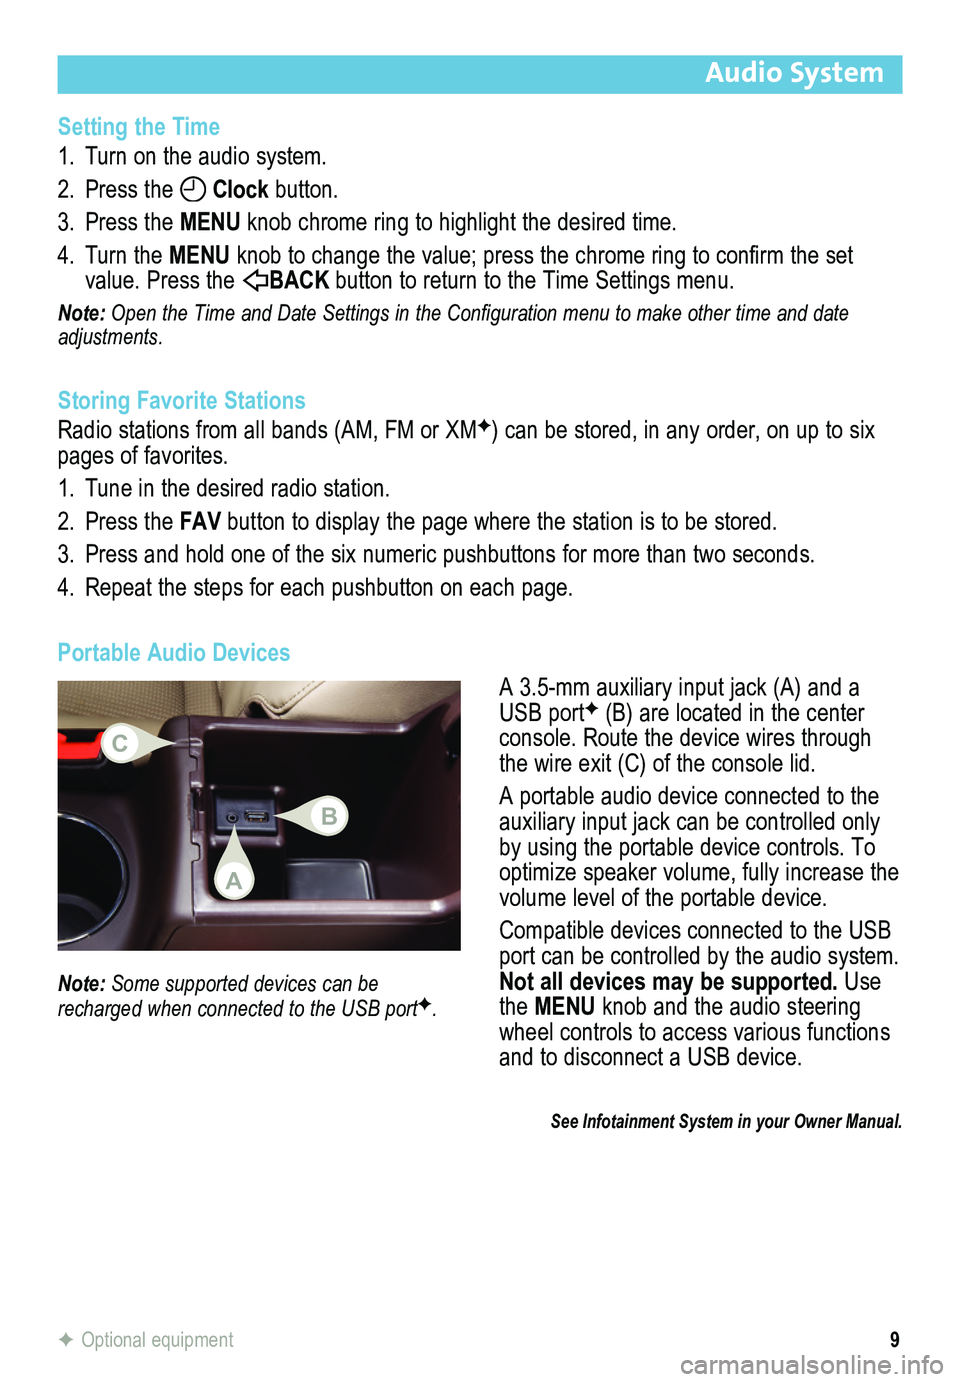
A 3.5-mm auxiliary input jack (A) and a USB portF (B) are located in the center console. Route the device wires through the wire exit (C) of the console lid.
A portable audio device connected to the auxiliary input jack can be controlled only by using the portable device controls. To optimize speaker volume, fully increase the volume level of the portable device.
Compatible devices connected to the USB port can be controlled by the audio system. Not all devices may be supported. Use the MENU knob and the audio steering wheel controls to access various functions and to disconnect a USB device.
Note: Some supported devices can be recharged when connected to the USB portF.
See Infotainment System in your Owner Manual.
F Optional equipment
A
C
B
Page 11 of 20
11
IntelliLink System
Voice Recognition
Control the music source and make phone calls hands-free (after pairing\
your Bluetooth-enabled phone) using the enhanced voice recognition system.
1. Press the Push to Talk button on the steering wheel.
2. The radio will say “Ready,” followed by a beep.
3. After the beep, say what you want it to do.
• Phone (using your paired phone):
– “Pair” or “Connect”
– “Dial” or “Call [number]”
– “Dial” or “Call [phone book name]”
Example command: “Call Amanda” or “Dial 555-1212”
• Media Music Device Search:
– “Play CD”
– “Play USB”
– “Play Bluetooth audio”
Example command: “Play artist [name]”
Example command: “Play song [name]”
• Radio Control:
Example command: “Tune FM 104.3” or “Tune Classic Vinyl”
Example command: “Tune Pandora” (Pandora app required)
Example command: “Thumbs up” or “Thumbs down” (Pandora app \
required)
• Help:
– Say “Help” for voice recognition assistance.
Device List
To switch devices, select from the list of paired phones/devices.
Listing all Paired Phones using Voice Recognition
See your Infotainment System Owner Manual.
1. Press the Push to Talk button.
2. Say “Device list” or “Select device.”
Listing all Paired Phones using the Screen Buttons
1. Press the CONFIG button.
2. Touch Phone Settings.
3. Touch Bluetooth.
4. Touch Device List.
Page 14 of 20

14
Audio Steering Wheel Controls
Volume
Press + or – to adjust the volume.
SRC Source
Press to select an audio source.
Next/Previous
Rotate the thumbwheel up or down to go to the next or previous favorite radio station, track, or file.
Push to Talk
Press to answer an incoming call or interact with the audio, Bluetooth, or OnStar® system.
End Call/Mute
Press to end or reject a call.
Press to mute the vehicle speakers.
See Instruments and Controls in your Owner Manual.
Cruise Control
Setting Cruise Control
1. Press the On/Off button. The Cruise Control symbol will illuminate in white on the instrument cluster.
2. When traveling at the desired speed, rotate the thumbwheel down to the SET position to set the speed. The symbol will illuminate in green on the instrument cluster.Adjusting Cruise Control
RES/+ Resume/Accelerate
Toggle the thumbwheel up to resume a set speed. When the system is activ\
e, toggle the thumbwheel up to increase speed.
SET/– Set/Coast
When the system is active, toggle the thumbwheel down to decrease speed.\
Cancel
Press to cancel the cruise control but retain the set speed in memory. P\
ressing the brake pedal also will cancel the cruise control. Turn off cruise control or th\
e vehicle ignition to erase the cruise control set speed.
See Driving and Operating in your Owner Manual.
Page 18 of 20
18
Tire Pressure Monitor
The Low Tire Pressure warning light on the instrument cluster illuminates when one or more of the vehicle’s tires is significantly underinflated. Fill the tires to the proper tire pressures. The proper tire pressures for the vehicle are listed on the T\
ire and Loading Information label, located below the driver’s door latch. Current tir\
e pressures can be viewed in the Driver Information Center.
Tire pressure is affected by cold weather and distance driven. If the low tire pressure
warning light illuminates when the vehicle is first started in cooler temperatures and then turns off as the vehicle is driven, check for the proper tire pressures.\
Refer to your Owner Manual for additional information about normal monthly tire maintenance.
See Vehicle Care in your Owner Manual.
Engine Oil Life System
The Oil Life System calculates engine oil life based on vehicle use and displays Change Engine Oil Soon on the Driver Information Center (DIC) when it’s necessary to change the engine oil and filter. The system should be reset to 100% only following an oil change.
See Vehicle Care in your Owner Manual.
F Optional equipment
Forward Collision AlertF
When the green symbol is displayed on the instrument cluster, the system is tracking the vehicle ahead. When approaching a vehicle directly ahead too quickly, a visual alert is displayed on the Driver Information Center and audible beeps sound.
Press the Forward Collision Alert button on the steering wheel to select a follow gap setting of Far, Medium, Near, or Off.
See Driving and Operating in your Owner Manual.
Lane Departure WarningF
When crossing a detected lane marking without using a turn signal, a visual alert is
displayed on the instrument panel and audible beeps sound.
To turn the system Off or On, press the Lane Departure Warning button on the upper center of the instrument panel.
Note: The system operates only at speeds greater than 35 mph. The visual alert and displ\
ay turn off at speeds below 35 mph.
See Driving and Operating in your Owner Manual.