center console BUICK VERANO 2015 Owner's Manual
[x] Cancel search | Manufacturer: BUICK, Model Year: 2015, Model line: VERANO, Model: BUICK VERANO 2015Pages: 393, PDF Size: 4.74 MB
Page 23 of 393
Black plate (16,1)Buick Verano Owner Manual (GMNA-Localizing-U.S./Canada/Mexico-
7707488) - 2015 - CRC - 10/31/14
1-16 In Brief
2. Highlight 12/24 Hour Format.
3. Press TUNE/MENU to select the12 hour or 24 hour display
format.
Setting the Clock (Radio with
CD and Touch Screen)
The clock menu can be only be
used with the radio on while in ON/
RUN or ACC/ACCESSORY.
To set the time:
1. Press the CONFIG button toenter the menu options or press
H. Turn the TUNE/MENU knob
to scroll through the available
setup features and select Time
and Date. Press TUNE/MENU or
press the Time screen button to
display other options within that
feature.
2. Press + or −to increase or
decrease the Hours and Minutes
displayed on the clock. 12/24 HR Format:
Press the 12 HR
screen button for standard time;
press the 24 HR screen button for
military time.
Day + or Day −:Press the Day +
or Day −display buttons to increase
or decrease the day.
Display: Press Display to turn the
display of the time on the screen on
or off.
See Clock on page 5-5.
Satellite Radio
If equipped, vehicles with a
SiriusXM®satellite radio tuner and a
valid SiriusXM satellite radio
subscription can receive SiriusXM
programming.
SiriusXM Satellite Radio
Service
SiriusXM is a satellite radio service
based in the 48 contiguous United
States and 10 Canadian provinces.
SiriusXM satellite radio has a wide variety of programming and
commercial-free music, coast to
coast, and in digital-quality sound.
A fee is required to receive the
SiriusXM service.
Refer to:
.www.siriusxm.com or call
1-866-635-2349 (U.S.).
.www.xmradio.ca or call
1-877-209-0079 (Canada).
See Satellite Radio on page 7-11.
Portable Audio Devices
Some vehicles have a 3.5 mm
(1/8 in) auxiliary input and a USB
port in the center console. External
devices such as iPods
®, laptop
computers, MP3 players, CD
changers, and USB drives may be
connected, depending on the audio
system.
See Auxiliary Devices on page 7-16.
Page 26 of 393

Black plate (19,1)Buick Verano Owner Manual (GMNA-Localizing-U.S./Canada/Mexico-
7707488) - 2015 - CRC - 10/31/14
In Brief 1-19
Lane Departure
Warning (LDW)
If equipped, LDW may help avoid
unintentional lane departures at
speeds of 56 km/h (35 mph) or
greater. LDW uses a camera sensor
to detect the lane markings. The
LDW light,
@, is green if a lane
marking is detected. If the vehicle
departs the lane without using a turn
signal in that direction, the light will
change to amber and flash. In
addition, beeps will sound.
See Lane Departure Warning (LDW)
on page 9-45.
Side Blind Zone
Alert (SBZA)
If equipped, SBZA will detect
vehicles in the next lane over in the
vehicle's side blind zone area.
When this happens, the SBZA
display will light up in the
corresponding outside side mirror
and will flash if the turn signal is on. See
Side Blind Zone Alert (SBZA)
on page 9-41.
Rear Vision
Camera (RVC)
If equipped, RVC displays a view of
the area behind the vehicle, on the
center stack display, when the
vehicle is shifted into R (Reverse).
See Rear Vision Camera (RVC) on
page 9-43.
Rear Cross Traffic Alert
(RCTA) System
If equipped, the RCTA system uses
a triangle with an arrow displayed
on the RVC screen to warn of traffic
behind your vehicle that may cross
your vehicle's path while in
R (Reverse). In addition, beeps will
sound.
See “Rear Cross Traffic Alert
(RCTA)” underRear Vision Camera
(RVC) on page 9-43.
Parking Assist
If equipped, this system uses
sensors on the rear bumper to
assist with parking and avoiding
objects while in R (Reverse).
It operates at speeds less than
8 km/h (5 mph). Rear Parking Assist
(RPA) uses audible beeps to
provide distance and system
information.
Keep the sensors on the vehicle's
rear bumper clean to ensure proper
operation.
See Parking Assist on page 9-39.
Power Outlets
The accessory power outlets can be
used to plug in electrical equipment,
such as a cell phone or MP3 player.
There is one accessory power outlet
located on the center stack below
the climate control and one on the
rear of the center floor console.
These outlets are powered when the
key is in ON/RUN or ACC/
ACCESSORY, or until the driver
Page 35 of 393
Black plate (6,1)Buick Verano Owner Manual (GMNA-Localizing-U.S./Canada/Mexico-
7707488) - 2015 - CRC - 10/31/14
2-6 Keys, Doors, and Windows
Programming without a
Recognized Transmitter (Key
Vehicles Only)
Program a new key to the vehicle
when a recognized key is not
available. Canadian regulations
require that owners see their dealer.
If there are no currently recognized
keys available, follow this procedure
to program the 1st key.
This procedure will take
approximately 30 minutes to
complete for the first key. The
vehicle must be off and all of the
keys you wish to program must be
with you.
1. Insert the new vehicle key intothe ignition.
2. Turn to ON/RUN. The security light will come on.
3. Wait 10 minutes until the security light turns off.
4. Turn the ignition to LOCK/OFF. 5. Repeat Steps 2–4 two more
times. After the third time, turn to
ON/RUN; the key is learned and
all previously known keys will no
longer work with the vehicle.
Remaining keys can be learned by
following the procedure in
“Programming with a Recognized
Transmitter.”
Programming with a Recognized
Transmitter (Keyless Access
Vehicles Only)
A new transmitter can be
programmed to the vehicle when
there is one recognized transmitter.
To program, the vehicle must be off
and all of the transmitters, both
currently recognized and new, must
be with you.
1. Place the recognized transmitter(s) near you. 2. Insert the vehicle key of the new
transmitter into the key lock
cylinder on the outside of the
driver door and turn the key to
the unlock position five times
within 10 seconds.
The Driver Information Center
(DIC) displays READY FOR
REMOTE #2, 3, 4 or 5.
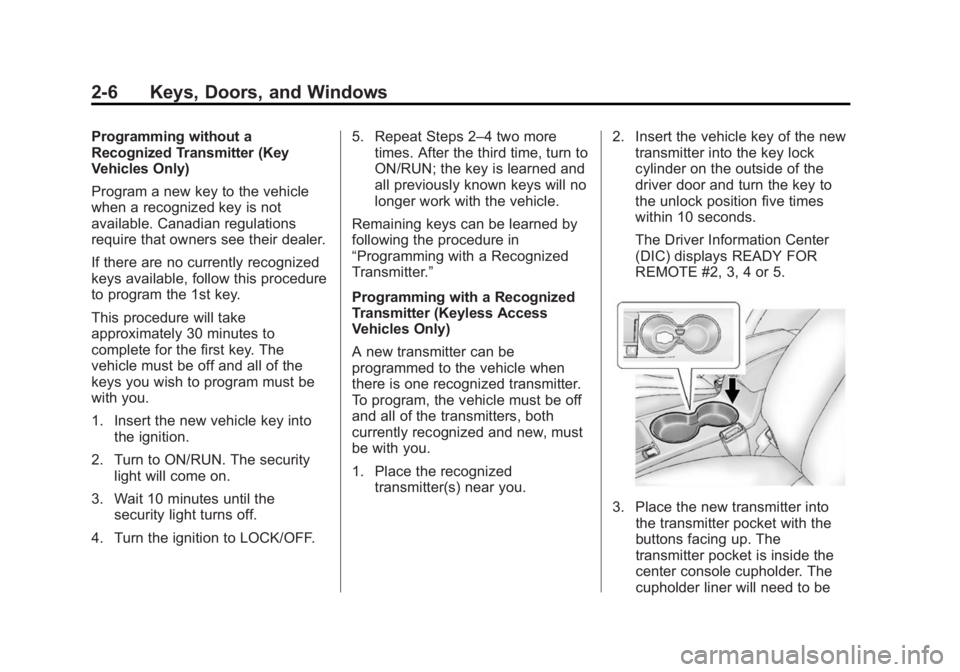
3. Place the new transmitter into
the transmitter pocket with the
buttons facing up. The
transmitter pocket is inside the
center console cupholder. The
cupholder liner will need to be
Page 36 of 393
Black plate (7,1)Buick Verano Owner Manual (GMNA-Localizing-U.S./Canada/Mexico-
7707488) - 2015 - CRC - 10/31/14
Keys, Doors, and Windows 2-7
removed to access the
transmitter pocket. Use a finger
or a tool in the notch at the rear
of the cupholders to remove the
liner. SeeCupholders on
page 4-2.
4. Press the ENGINE START/ STOP button. When the
transmitter is learned, the DIC
will show that it is ready to
program the next transmitter.
5. Remove the transmitter from the transmitter pocket and press
K.
To program additional
transmitters, repeat Steps 3–5.
When all additional transmitters
are programmed, press and hold
the ignition for at least
10 seconds to exit
programming mode. Programming without a
Recognized Transmitter (Keyless
Access Vehicles Only)
Program a new key to the vehicle
when a recognized key is not
available. Canadian regulations
require that owners see their dealer.
1. Insert the vehicle key of the
transmitter into the key lock
cylinder on the outside of the
driver door and turn the key to
the unlock position five times
within 10 seconds.
The Driver Information Center
(DIC) displays REMOTE LEARN
PENDING, PLEASE WAIT.
2. Wait for 10 minutes until the DIC displays PRESS ENGINE
START BUTTON TO LEARN
and then press the ignition.
The DIC display will again show
REMOTE LEARN PENDING,
PLEASE WAIT. 3. Repeat Step 2 two additional
times. After the third time all
previously known transmitters
will no longer work with the
vehicle. Remaining transmitters
can be relearned during the next
steps.
The DIC display should now
show READY FOR REMOTE
# 1.
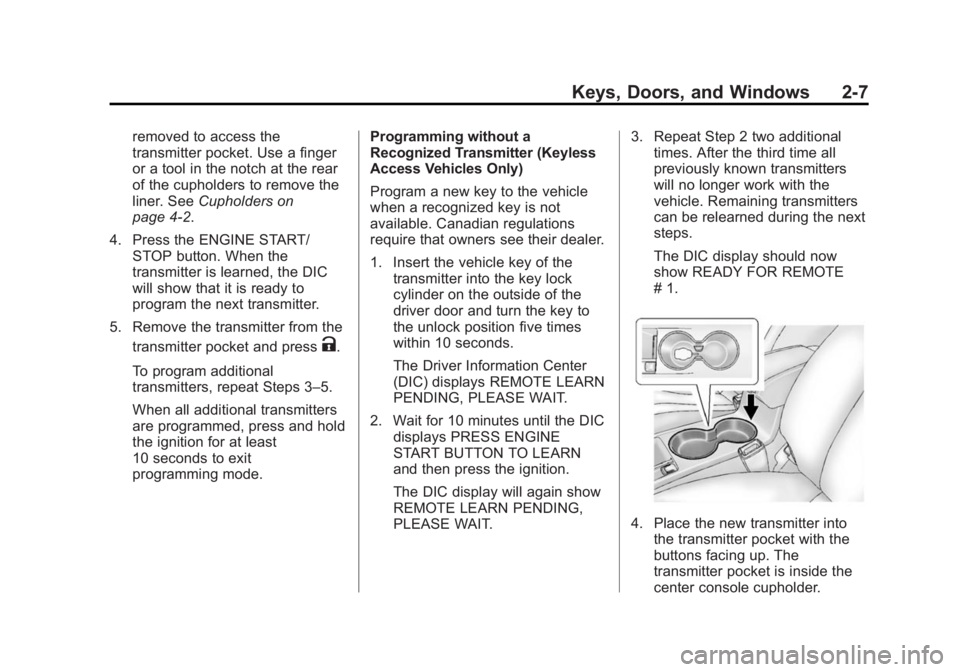
4. Place the new transmitter intothe transmitter pocket with the
buttons facing up. The
transmitter pocket is inside the
center console cupholder.
Page 37 of 393
Black plate (8,1)Buick Verano Owner Manual (GMNA-Localizing-U.S./Canada/Mexico-
7707488) - 2015 - CRC - 10/31/14
2-8 Keys, Doors, and Windows
The cupholder liner will need to
be removed to access the
transmitter pocket. Use a finger
or a tool in the notch at the rear
of the cupholders to remove the
liner. SeeCupholders on
page 4-2.
5. Press the ENGINE START/ STOP button. When the
transmitter is learned, the DIC
will show that it is ready to
program the next transmitter.
6. Remove the transmitter from the transmitter pocket and press
K.
To program additional
transmitters, repeat Steps 4–6.
When all additional transmitters
are programmed, press and hold
the ignition for at least
10 seconds to exit
programming mode.
Starting the Vehicle with a Low
Transmitter Battery
When trying to start the vehicle,
if the transmitter battery is weak, the
DIC may display NO REMOTE
DETECTED or NO REMOTE KEY
DETECTED, PLACE KEY IN
TRANSMITTER POCKET, THEN
START YOUR VEHICLE. The
REPLACE BATTERY IN REMOTE
KEY message may also be
displayed at this time.
To start the vehicle:
1. Remove the cupholder liner from the center console cupholder.
See Cupholders on page 4-2.
2. Place the transmitter in the transmitter pocket with the
buttons facing up. 3. With the vehicle in P (Park) or
N (Neutral), press the brake
pedal and the ENGINE START/
STOP button. See Starting the
Engine on page 9-18 for
additional information about the
vehicle's keyless ignition with
pushbutton start.
Replace the transmitter battery
as soon as possible.
Battery Replacement
Replace the battery if the REPLACE
BATTERY IN REMOTE KEY
message displays in the DIC. See
Key and Lock Messages on
page 5-29.
{Caution
When replacing the battery, do
not touch any of the circuitry on
the transmitter. Static from your
body could damage the
transmitter.
Page 104 of 393
Black plate (1,1)Buick Verano Owner Manual (GMNA-Localizing-U.S./Canada/Mexico-
7707488) - 2015 - CRC - 10/31/14
Storage 4-1
Storage
Storage Compartments
Storage Compartments . . . . . . . 4-1
Instrument Panel Storage . . . . . 4-1
Glove Box . . . . . . . . . . . . . . . . . . . . 4-1
Cupholders . . . . . . . . . . . . . . . . . . . 4-2
Center Console Storage . . . . . . 4-2
Storage
Compartments
{Warning
Do not store heavy or sharp
objects in storage compartments.
In a crash, these objects may
cause the cover to open and
could result in injury.
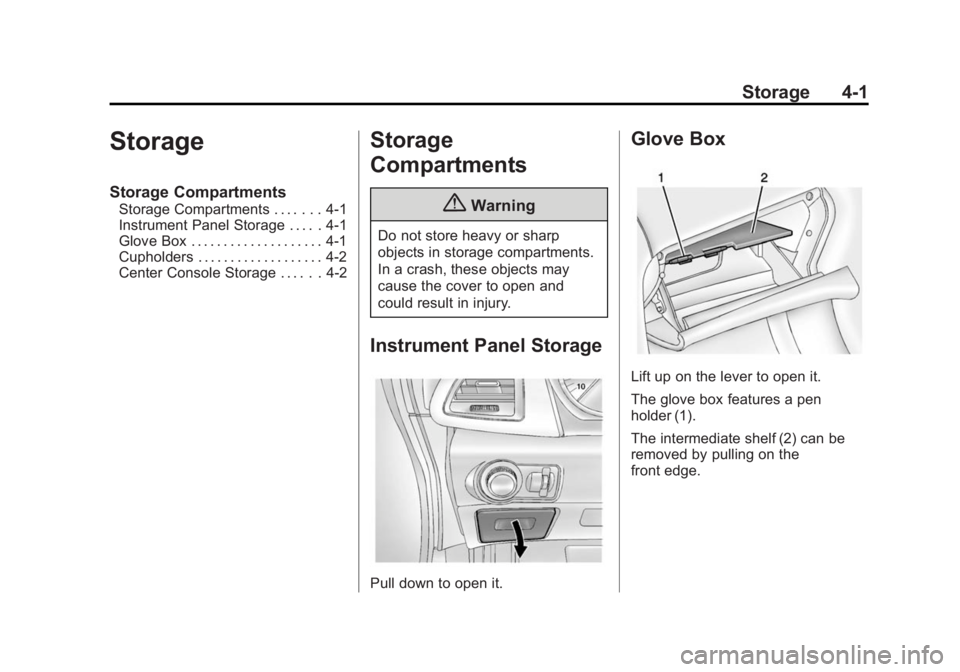
Instrument Panel Storage
Pull down to open it.
Glove Box
Lift up on the lever to open it.
The glove box features a pen
holder (1).
The intermediate shelf (2) can be
removed by pulling on the
front edge.
Page 105 of 393
Black plate (2,1)Buick Verano Owner Manual (GMNA-Localizing-U.S./Canada/Mexico-
7707488) - 2015 - CRC - 10/31/14
4-2 Storage
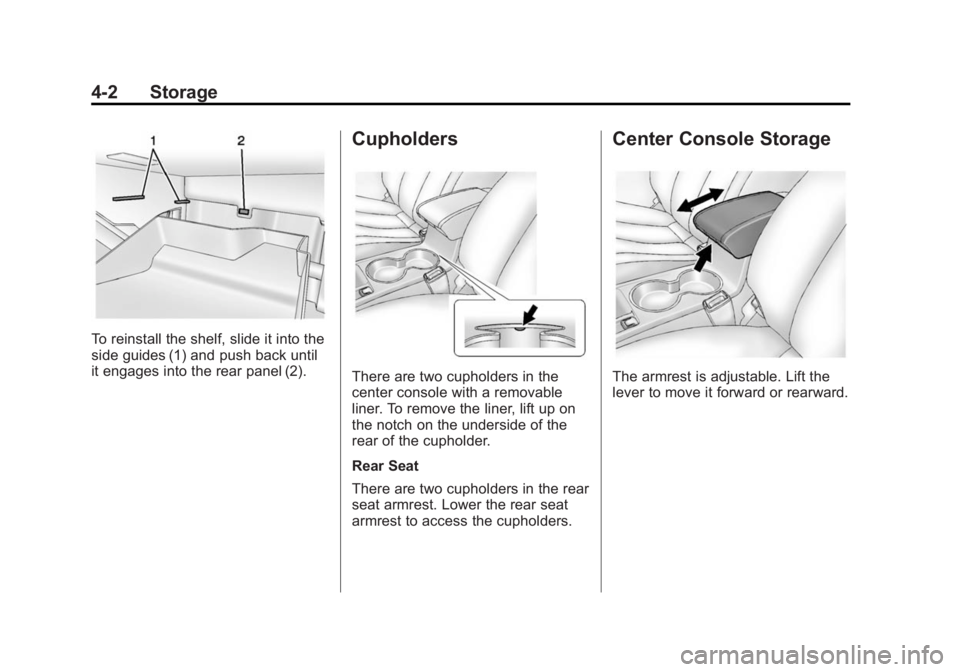
To reinstall the shelf, slide it into the
side guides (1) and push back until
it engages into the rear panel (2).
Cupholders
There are two cupholders in the
center console with a removable
liner. To remove the liner, lift up on
the notch on the underside of the
rear of the cupholder.
Rear Seat
There are two cupholders in the rear
seat armrest. Lower the rear seat
armrest to access the cupholders.
Center Console Storage
The armrest is adjustable. Lift the
lever to move it forward or rearward.
Page 113 of 393
Black plate (6,1)Buick Verano Owner Manual (GMNA-Localizing-U.S./Canada/Mexico-
7707488) - 2015 - CRC - 10/31/14
5-6 Instruments and Controls
Display:Press Display to turn the
display of the time on the screen on
or off.
Power Outlets
The accessory power outlets can be
used to plug in electrical equipment,
such as a cell phone or MP3 player.
There is one accessory power outlet
located on the center stack below
the climate control and one on the
rear of the center floor console.
These outlets are powered when the
key is in ON/RUN or ACC/
ACCESSORY, or until the driver
door is opened within 10 minutes of
turning off the vehicle. See Retained
Accessory Power (RAP) on
page 9-21.
{Caution
Leaving electrical equipment
plugged in for an extended period
of time while the vehicle is off will
drain the battery. Always unplug
electrical equipment when not in
use and do not plug in equipment
that exceeds the maximum
20 amp rating.
Certain electrical accessories may
not be compatible with the
accessory power outlet and could
overload vehicle or adapter fuses.
If a problem is experienced, see
your dealer. When adding electrical equipment,
be sure to follow the installation
instructions included with the
equipment. See
Add-On Electrical
Equipment on page 9-56.
{Caution
Hanging heavy equipment from
the power outlet can cause
damage not covered by the
vehicle warranty. The power
outlets are designed for
accessory power plugs only, such
as cell phone charge cords.
Page 173 of 393
Black plate (16,1)Buick Verano Owner Manual (GMNA-Localizing-U.S./Canada/Mexico-
7707488) - 2015 - CRC - 10/31/14
7-16 Infotainment System
.Genres
.Folder View
To search for tracks:
1. Turn the TUNE/MENU knob.
2. Select Search.
3. Select: Playlists, Artists, Albums, Song Titles, Genres,
or Folder View.
4. Select the track.
Error Messages
If Disc Read Error displays and/or
the disc comes out, it could be for
one of the following reasons:
.The disc has an invalid or
unknown format.
.The disc is not from a correct
region.
.The disc is very hot. Try the disc
again when the temperature
returns to normal.
.The road is very rough. Try the
disc again when the road is
smoother.
.The disc is dirty, scratched, wet,
or upside down.
.The air is very humid. Try the
disc again later.
.There was a problem while
burning the disc.
.The label is caught in the CD
player.
If the CD is not playing correctly, for
any other reason, try a known
good CD.
If any error continues, contact your
dealer.
Auxiliary Devices
For radios with CD and touch
screen, see “Auxiliary Devices” in
the infotainment manual.
The optional AUX input allows
portable devices to connect to the
vehicle using the 3.5 mm (1/8 in)
auxiliary jack or USB port.
Portable devices are controlled by
using the menu system described in
Operation on page 7-4. The AUX input and USB port (if
equipped) are in the center console.
3.5 mm Jack
Connect a 3.5 mm (1/8 in) cable to
the auxiliary input jack to use a
portable audio player.
Playback of an audio device that is
connected to the 3.5 mm jack can
only be controlled using the controls
on the device.
Adjusting the Volume
Turn the
O/VOL knob to adjust the
volume of the infotainment system
after the volume level has been set
on the portable audio device.
USB Port
Not all USB drives are compatible
with the USB port. Check the height
of the USB drive prior to closing the
arm rest.
Page 227 of 393
Black plate (30,1)Buick Verano Owner Manual (GMNA-Localizing-U.S./Canada/Mexico-
7707488) - 2015 - CRC - 10/31/14
9-30 Driving and Operating
If driving safely on a wet road and it
becomes necessary to slam on the
brakes and continue braking to
avoid a sudden obstacle, a
computer senses the wheels are
slowing down. If one of the wheels
is about to stop rolling, the computer
will separately work the brakes at
each wheel.
ABS can change the brake pressure
to each wheel, as required, faster
than any driver could. This can help
you steer around the obstacle while
braking hard.
As the brakes are applied, the
computer keeps receiving updates
on wheel speed and controls
braking pressure accordingly.
Remember: ABS does not change
the time needed to get a foot up to
the brake pedal or always decrease
stopping distance. If you get too
close to the vehicle in front of you,
there will not be enough time to
apply the brakes if that vehiclesuddenly slows or stops. Always
leave enough room up ahead to
stop, even with ABS.
Using ABS
Do not pump the brakes. Just hold
the brake pedal down firmly and let
ABS work. You may hear the ABS
pump or motor operating and feel
the brake pedal pulsate. This is
normal.
Braking in Emergencies
ABS allows you to steer and brake
at the same time. In many
emergencies, steering can help
more than even the very best
braking.
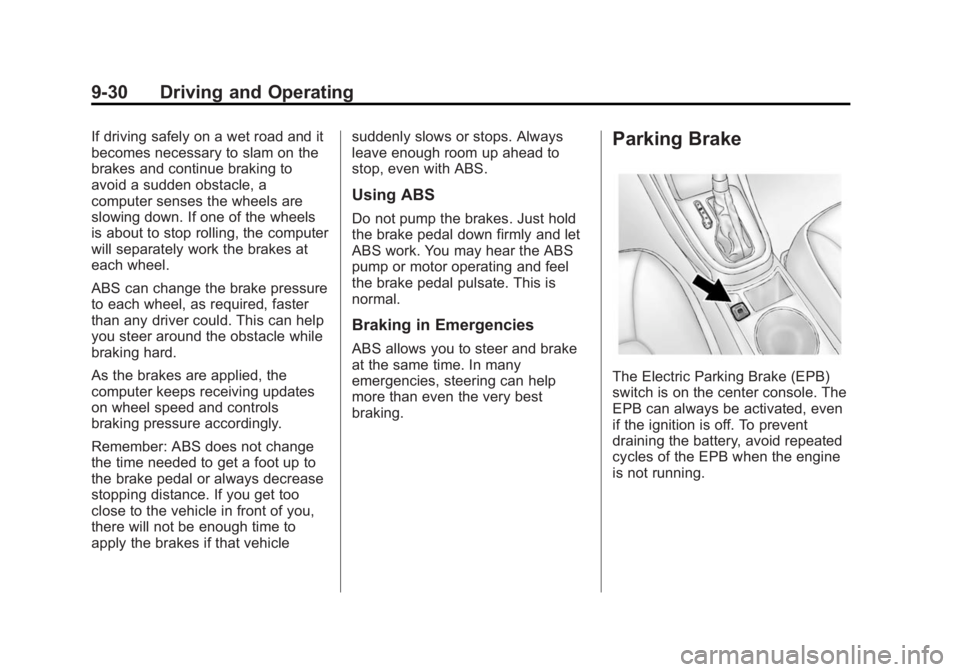
Parking Brake
The Electric Parking Brake (EPB)
switch is on the center console. The
EPB can always be activated, even
if the ignition is off. To prevent
draining the battery, avoid repeated
cycles of the EPB when the engine
is not running.