Engine BUICK VERANO 2017 Owners Manual
[x] Cancel search | Manufacturer: BUICK, Model Year: 2017, Model line: VERANO, Model: BUICK VERANO 2017Pages: 354, PDF Size: 4.92 MB
Page 271 of 354

Buick Verano Owner Manual (GMNA- Localizing-U.S./Canada-10122753) -
2017 - crc - 5/16/16
270 Vehicle Care
the sensor matching process is
performed successfully. See
your dealer for service.
. Replacement tires or wheels do
not match the original equipment
tires or wheels. Tires and wheels
other than those recommended
could prevent the TPMS from
functioning properly. See Buying
New Tires 0273.
. Operating electronic devices or
being near facilities using radio
wave frequencies similar to the
TPMS could cause the TPMS
sensors to malfunction.
If the TPMS is not functioning
properly it cannot detect or signal a
low tire condition. See your dealer
for service if the TPMS malfunction
light and DIC message comes on
and stays on.
TPMS Sensor Matching
Process
Each TPMS sensor has a unique
identification code. The identification
code needs to be matched to a new
tire/wheel position after rotating the
vehicle’s tires or replacing one or more of the TPMS sensors. The
TPMS sensor matching process
should also be performed after
replacing a spare tire with a road
tire containing the TPMS sensor.
The malfunction light and the DIC
message should go off at the next
ignition cycle. The sensors are
matched to the tire/wheel positions,
using a TPMS relearn tool, in the
following order: driver side front tire,
passenger side front tire, passenger
side rear tire, and driver side rear.
See your dealer for service or to
purchase a relearn tool. A TPMS
relearn tool can also be purchased.
See Tire Pressure Monitor Sensor
Activation Tool at
www.gmtoolsandequipment.com or
call 1-800-GM TOOLS
(1-800-468-6657).
There are two minutes to match the
first tire/wheel position, and
five minutes overall to match all four
tire/wheel positions. If it takes
longer, the matching process stops
and must be restarted.
The TPMS sensor matching
process is:
1. Set the parking brake.
2. Turn the ignition to ON/RUN with the engine off or place the
vehicle power mode in ON/
RUN/START. See Ignition
Positions (Keyless Access)
0 189 orIgnition Positions (Key
Access) 0187.
3. Use the MENU button to select the Vehicle Information Menu
in the Driver Information
Center (DIC).
4. Use the thumbwheel to scroll to the Tire Pressure Menu Item
screen.
5. Press the SET/CLR button to begin the sensor matching
process.
A message asking if the
process should begin should
appear.
6. Press the SET/CLR button again to confirm the selection.
Page 280 of 354

Buick Verano Owner Manual (GMNA- Localizing-U.S./Canada-10122753) -
2017 - crc - 5/16/16
Vehicle Care 279
{Warning
Changing a tire can be
dangerous. The vehicle can slip
off the jack and roll over or fall
causing injury or death. Find a
level place to change the tire. To
help prevent the vehicle from
moving:1. Set the parking brake firmly.
2. Put an automatictransmission in P (Park) or a
manual transmission in
1 (First) or R (Reverse).
3. Turn off the engine and do not restart while the vehicle
is raised.
4. Do not allow passengers to remain in the vehicle.
5. Place wheel blocks, if equipped, on both sides of
the tire at the opposite
corner of the tire being
changed. When the vehicle has a flat tire (2),
use the following example as a
guide to assist in the placement of
the wheel blocks (1), if equipped.
1. Wheel Block (If Equipped)
2. Flat Tire
The following information explains
how to repair or change a tire.
Tire Changing
Removing the Spare Tire and
Tools
1. Retainer Nut
2. Tool Bag Tether
3. Tool Bag
4. Spare Tire
To access the spare tire and tools:
1. Open the trunk. See Trunk 038.
2. Lift the load floor.
3. Turn the retainer nut (1) counterclockwise to remove it.
Then remove the tool bag
Page 288 of 354
Buick Verano Owner Manual (GMNA- Localizing-U.S./Canada-10122753) -
2017 - crc - 5/16/16
Vehicle Care 287
Warning (Continued)
SeeCalifornia Proposition
65 Warning 0227.
{Warning
Batteries can hurt you. They can
be dangerous because:
. They contain acid that can
burn you.
. They contain gas that can
explode or ignite.
. They contain enough
electricity to burn you.
If you do not follow these steps
exactly, some or all of these
things can hurt you.
Caution
Ignoring these steps could result
in costly damage to the vehicle
that would not be covered by the
vehicle warranty. Trying to start
the vehicle by pushing or pulling it
will not work, and it could damage
the vehicle.
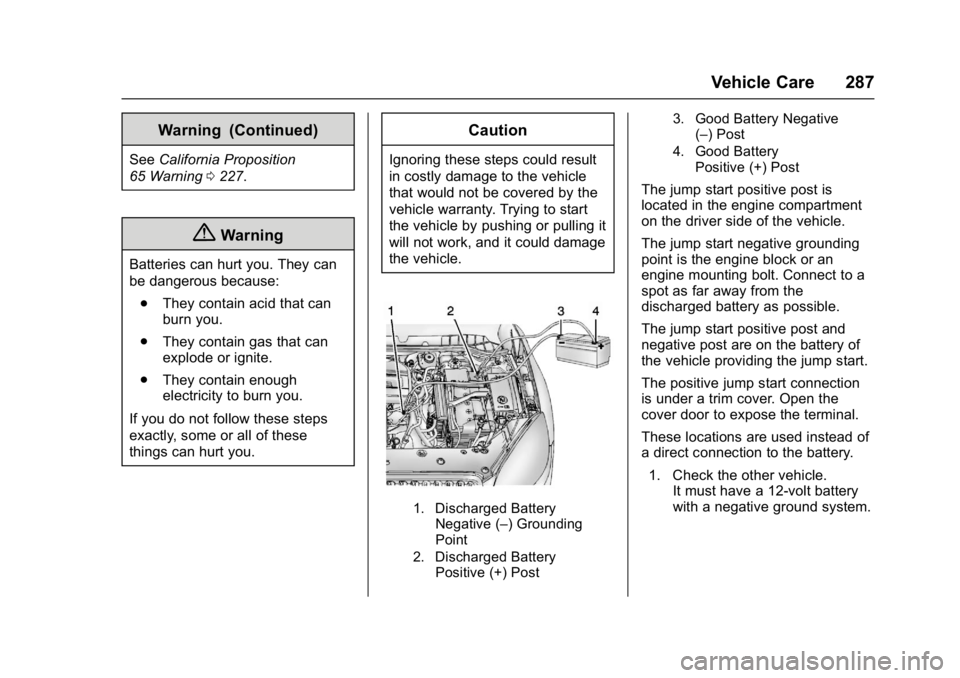
1. Discharged Battery Negative (–) Grounding
Point
2. Discharged Battery Positive (+) Post 3. Good Battery Negative
(–) Post
4. Good Battery Positive (+) Post
The jump start positive post is
located in the engine compartment
on the driver side of the vehicle.
The jump start negative grounding
point is the engine block or an
engine mounting bolt. Connect to a
spot as far away from the
discharged battery as possible.
The jump start positive post and
negative post are on the battery of
the vehicle providing the jump start.
The positive jump start connection
is under a trim cover. Open the
cover door to expose the terminal.
These locations are used instead of
a direct connection to the battery.
1. Check the other vehicle. It must have a 12-volt battery
with a negative ground system.
Page 289 of 354
Buick Verano Owner Manual (GMNA- Localizing-U.S./Canada-10122753) -
2017 - crc - 5/16/16
288 Vehicle Care
Caution
If the other vehicle does not have
a 12-volt system with a negative
ground, both vehicles can be
damaged. Only use a vehicle that
has a 12-volt system with a
negative ground for jump starting.
2. Position the two vehicles so that they are not touching.
3. Set the parking brake firmly and put the shift lever in
P (Park). See Shifting Into
Park 0194.
Caution
If any accessories are left on or
plugged in during the jump
starting procedure, they could be
damaged. The repairs would not
be covered by the vehicle
warranty. Whenever possible, turn
off or unplug all accessories on
either vehicle when jump starting. 4. Turn the ignition to LOCK/OFF.
Turn off all lights and
accessories in both vehicles,
except the hazard warning
flashers if needed.
{Warning
An electric fan can start up even
when the engine is not running
and can injure you. Keep hands,
clothing, and tools away from any
underhood electric fan.
{Warning
Using a match near a battery can
cause battery gas to explode.
People have been hurt doing this,
and some have been blinded.
Use a flashlight if you need more
light.
Battery fluid contains acid that
can burn you. Do not get it on
you. If you accidentally get it in
(Continued)
Warning (Continued)
your eyes or on your skin, flush
the place with water and get
medical help immediately.
{Warning
Fans or other moving engine
parts can injure you badly. Keep
your hands away from moving
parts once the engine is running.
5. Connect one end of the red positive (+) cable to the
positive (+) post (2) on the
discharged battery.
6. Connect the other end of the red positive (+) cable to the
positive (+) post (4) of the good
battery.
7. Connect one end of the black negative (–) cable to the
negative (–) post (3) of the
good battery.
Page 290 of 354
Buick Verano Owner Manual (GMNA- Localizing-U.S./Canada-10122753) -
2017 - crc - 5/16/16
Vehicle Care 289
8. Connect the other end of theblack negative (–) cable to the
negative (–) grounding point (1)
for the discharged battery.
9. Start the engine in the vehicle with the good battery and run
the engine at idle speed for at
least four minutes.
10. Try to start the vehicle that had the dead battery. If it will not
start after a few tries, it
probably needs service.Caution
If the jumper cables are
connected or removed in the
wrong order, electrical shorting
may occur and damage the
vehicle. The repairs would not be
covered by the vehicle warranty.
Always connect and remove the
jumper cables in the correct order,
making sure that the cables do
not touch each other or other
metal.
Jumper Cable Removal
Reverse the sequence exactly when
removing the jumper cables.
After starting the disabled vehicle
and removing the jumper cables,
allow it to idle for several minutes.
Towing the Vehicle
Caution
Incorrectly towing a disabled
vehicle may cause damage to the
vehicle. The disabled vehicle
should be towed on a flatbed car
carrier. Use care when there is
low ground clearance and/or
special equipment. Attempting to
pull the vehicle onto a flatbed
without following the proper steps
could damage the vehicle.
Consult your dealer or a
professional towing service if the
disabled vehicle must be towed.
See Roadside Assistance
Program 0323.
To load a vehicle onto a flatbed
carrier: 1. The vehicle must be on a flat surface.
2. The front tires must be properly inflated. If necessary, move a
rear tire to the front to replace
a flat or damaged tire.
Page 304 of 354
Buick Verano Owner Manual (GMNA- Localizing-U.S./Canada-10122753) -
2017 - crc - 5/16/16
Service and Maintenance 303
frequent checks and services. The
Additional Required Services -
Normal are for vehicles that:
.Carry passengers and cargo
within recommended limits on
the Tire and Loading Information
label. See Vehicle Load
Limits 0183.
. Are driven on reasonable road
surfaces within legal driving
limits.
. Use the recommended fuel. See
Fuel 0216.
Refer to the information in the
Maintenance Schedule Additional
Required Services - Normal chart.
The Additional Required Services -
Severe are for vehicles that are:
. Mainly driven in heavy city traffic
in hot weather.
. Mainly driven in hilly or
mountainous terrain.
. Frequently towing a trailer.
. Used for high speed or
competitive driving. .
Used for taxi, police, or delivery
service.
Refer to the information in the
Maintenance Schedule Additional
Required Services - Severe chart.
{Warning
Performing maintenance work can
be dangerous and can cause
serious injury. Perform
maintenance work only if the
required information, proper tools,
and equipment are available.
If they are not, see your dealer to
have a trained technician do the
work. See Doing Your Own
Service Work 0228.
Maintenance
Schedule
Owner Checks and Services
At Each Fuel Stop
.
Check the engine oil level. See
Engine Oil 0232.
Once a Month
. Check the tire inflation
pressures. See Tire
Pressure 0266.
. Inspect the tires for wear. See
Tire Inspection 0271.
. Check the windshield washer
fluid level. See Washer
Fluid 0241.
Engine Oil Change
When the CHANGE ENGINE OIL
SOON message displays, have the
engine oil and filter changed within
the next 1 000 km/600 mi. If driven
under the best conditions, the
engine oil life system may not
indicate the need for vehicle service
for up to a year. The engine oil and
filter must be changed at least once
Page 305 of 354
Buick Verano Owner Manual (GMNA- Localizing-U.S./Canada-10122753) -
2017 - crc - 5/16/16
304 Service and Maintenance
a year and the oil life system must
be reset. Your trained dealer
technician can perform this work.
If the engine oil life system is reset
accidentally, service the vehicle
within 5 000 km/3,000 mi since the
last service. Reset the oil life
system when the oil is changed.
SeeEngine Oil Life System 0234.
Tire Rotation and Required
Services Every 12 000 km/
7,500 mi
Rotate the tires, if recommended for
the vehicle, and perform the
following services. See Tire
Rotation 0271.
. Check engine oil level and oil
life percentage. If needed,
change engine oil and filter, and
reset oil life system. See Engine
Oil 0232 andEngine Oil Life
System 0234. .
Check engine coolant level. See
Engine Coolant 0237.
. Check windshield washer fluid
level. See Washer Fluid 0241.
. Visually inspect windshield wiper
blades for wear, cracking,
or contamination and replace
worn or damaged blades. See
Exterior Care 0292. Replace
wiper blades every 20 000 km/
12,000 mi or 12 months. See
Wiper Blade
Replacement 0246.
. Check tire inflation pressures.
See Tire Pressure 0266.
. Inspect tire wear. See Tire
Inspection 0271.
. Visually check for fluid leaks.
. Inspect engine air cleaner filter.
See Engine Air Cleaner/
Filter 0235. .
Inspect brake system. See
Exterior Care 0292.
. Visually inspect steering,
suspension, and chassis
components for damaged, loose,
or missing parts or signs of
wear. See Exterior Care 0292.
. Check restraint system
components. See Safety System
Check 062.
. Visually inspect fuel system for
damage or leaks.
. Visually inspect exhaust system
and nearby heat shields for
loose or damaged parts.
. Lubricate body components. See
Exterior Care 0292.
. Check starter switch. See Starter
Switch Check 0244.
Page 307 of 354

Buick Verano Owner Manual (GMNA- Localizing-U.S./Canada-10122753) -
2017 - crc - 5/16/16
306 Service and Maintenance
Maintenance Schedule
Additional Required
Services - Normal12 000 km/7,500 mi
24 000 km/15,000 mi
36 000 km/22,500 mi
48 000 km/30,000 mi
60 000 km/37,500 mi
72 000 km/45,000 mi
84 000 km/52,500 mi
96 000 km/60,000 mi
108 000 km/67,500 mi
120 000 km/75,000 mi
132 000 km/82,500 mi
144 000 km/90,000 mi
156 000 km/97,500 mi
168 000 km/105,000 mi 180 000 km/112,500 mi
192 000 km/120,000 mi
204 000 km/127,500 mi
216 000 km/135,000 mi
228 000 km/142,500 mi
240 000 km/150,000 mi
Rotate tires and perform Required Services.
Check engine oil level and oil life percentage.
Change engine oil and filter, if needed.@ @ @ @ @ @ @ @ @ @ @ @ @ @ @ @ @ @ @ @
Replace passenger compartment air filter. (1)@ @@@@@
Inspect evaporative control system. (2)@ @@
Replace engine air cleaner filter. (3)@@@
Replace spark plugs. Inspect spark plug wires.@
Drain and fill engine cooling system. (4)@
Visually inspect accessory drive belts. (5)@
Replace brake fluid. (6)
Page 309 of 354

Buick Verano Owner Manual (GMNA- Localizing-U.S./Canada-10122753) -
2017 - crc - 5/16/16
308 Service and Maintenance
Maintenance Schedule
Additional Required
Services - Severe12 000 km/7,500 mi
24 000 km/15,000 mi
36 000 km/22,500 mi
48 000 km/30,000 mi
60 000 km/37,500 mi
72 000 km/45,000 mi
84 000 km/52,500 mi
96 000 km/60,000 mi
108 000 km/67,500 mi
120 000 km/75,000 mi
132 000 km/82,500 mi
144 000 km/90,000 mi
156 000 km/97,500 mi
168 000 km/105,000 mi 180 000 km/112,500 mi
192 000 km/120,000 mi
204 000 km/127,500 mi
216 000 km/135,000 mi
228 000 km/142,500 mi
240 000 km/150,000 mi
Rotate tires and perform Required Services.
Check engine oil level and oil life percentage.
Change engine oil and filter, if needed.@ @ @ @ @ @ @ @ @ @ @ @ @ @ @ @ @ @ @ @
Replace passenger compartment air filter. (1)@ @@@@@
Inspect evaporative control system. (2)@ @@
Replace engine air cleaner filter. (3)@@@
Change automatic transmission fluid.@@@
Replace spark plugs. Inspect spark plug wires.@
Drain and fill engine cooling system. (4)@
Visually inspect accessory drive belts. (5)@
Replace brake fluid. (6)
Page 311 of 354
Buick Verano Owner Manual (GMNA- Localizing-U.S./Canada-10122753) -
2017 - crc - 5/16/16
310 Service and Maintenance
Additional
Maintenance and Care
Your vehicle is an important
investment and caring for it properly
may help to avoid future costly
repairs. To maintain vehicle
performance, additional
maintenance services may be
required.
It is recommended that your dealer
perform these services—their
trained dealer technicians know
your vehicle best. Your dealer can
also perform a thorough
assessment with a multi-point
inspection to recommend when your
vehicle may need attention.
The following list is intended to
explain the services and conditions
to look for that may indicate
services are required. Battery
The 12-volt battery supplies power
to start the engine and operate any
additional electrical accessories.
.
To avoid break-down or failure to
start the vehicle, maintain a
battery with full cranking power.
. Trained dealer technicians have
the diagnostic equipment to test
the battery and ensure that the
connections and cables are
corrosion-free.
Belts
. Belts may need replacing if they
squeak or show signs of
cracking or splitting.
. Trained dealer technicians have
access to tools and equipment
to inspect the belts and
recommend adjustment or
replacement when necessary. Brakes
Brakes stop the vehicle and are
crucial to safe driving.
.
Signs of brake wear may include
chirping, grinding, or squealing
noises, or difficulty stopping.
. Trained dealer technicians have
access to tools and equipment
to inspect the brakes and
recommend quality parts
engineered for the vehicle.
Fluids
Proper fluid levels and approved
fluids protect the vehicle’s systems
and components. See
Recommended Fluids and
Lubricants 0313 for GM approved
fluids.
. Engine oil and windshield
washer fluid levels should be
checked at every fuel fill.
. Instrument cluster lights may
come on to indicate that fluids
may be low and need to be
filled.