turn signal BUICK VERANO 2017 Owner's Guide
[x] Cancel search | Manufacturer: BUICK, Model Year: 2017, Model line: VERANO, Model: BUICK VERANO 2017Pages: 354, PDF Size: 4.92 MB
Page 214 of 354

Buick Verano Owner Manual (GMNA- Localizing-U.S./Canada-10122753) -
2017 - crc - 5/16/16
Driving and Operating 213
Selecting the Alert Timing
The Collision Alert control is on the
steering wheel. Press
[to set the
alert timing. The first button press
shows the current control setting on
the DIC. Additional button presses
will change this setting and turn the
system off.
Unnecessary Alerts
FCA may provide unnecessary
alerts to turning vehicles, vehicles in
other lanes, objects that are not
vehicles, or shadows. These alerts
are normal operation and the
vehicle does not need service.
Other Messages
There are messages that may
appear on the Driver Information
Center (DIC) in the instrument
cluster to provide information about
FCA. See Object Detection System
Messages 0121.
Cleaning the System
If the FCA system does not seem to
operate properly, clean the outside
of the windshield area in front of the
camera sensor before considering
taking the vehicle in for service.
Side Blind Zone
Alert (SBZA)
If equipped, the SBZA system is a
lane-changing aid that assists
drivers with avoiding crashes that
occur with moving vehicles in the
side blind zone (or spot) areas. The
SBZA warning display will light up in
the corresponding outside side
mirror and will flash if the turn signal
is on.
{Warning
SBZA does not alert the driver to
vehicles rapidly approaching
outside of the side blind zones,
pedestrians, bicyclists,
or animals. It may not provide
alerts when changing lanes under
all driving conditions. Failure to
use proper care when changing
lanes may result in injury, death,
or vehicle damage. Before
making a lane change, always
check mirrors, glance over your
shoulder, and use the turn
signals.
Page 215 of 354

Buick Verano Owner Manual (GMNA- Localizing-U.S./Canada-10122753) -
2017 - crc - 5/16/16
214 Driving and Operating
SBZA Detection Zones
The SBZA sensor covers a zone of
approximately one lane over from
both sides of the vehicle, or 3.5 m
(11 ft). The height of the zone is
approximately between 0.5 m (1.5 ft)
and 2 m (6 ft) off the ground. This
zone starts at approximately the
middle of the vehicle and goes back
5 m (16 ft).
How the System Works
The SBZA symbol lights up in the
side mirrors when the system
detects a moving vehicle in the next
lane over that is in the side blind
zone. This indicates it may beunsafe to change lanes. Before
making a lane change, check the
SBZA display, check mirrors, glance
over your shoulder, and use the turn
signals.
Left Side Mirror
DisplayRight Side Mirror Display
When the vehicle is started, both
outside mirror SBZA displays will
briefly come on to indicate the
system is operating. When the
vehicle is in a forward gear, the left
or right side mirror display will light
up if a moving vehicle is detected in
that blind zone. If the turn signal is
activated in the same direction of a
detected vehicle, this display will
flash as an extra warning not to
change lanes.
SBZA can be disabled through
vehicle personalization. See
“Collision Detection Systems” under
Vehicle Personalization 0124. If SBZA is disabled by the driver,
the SBZA mirror displays will not
light up.
When the System Does Not
Seem to Work Properly
SBZA displays may not come on
when passing a vehicle quickly, for
a stopped vehicle, or when towing a
trailer. The SBZA detection zones
that extend back from the side of
the vehicle do not move further back
when a trailer is towed. Use caution
while changing lanes when towing a
trailer. SBZA may alert to objects
attached to the vehicle, such as a
trailer, bicycle, or object extending
out to either side of the vehicle. This
is normal system operation; the
vehicle does not need service.
SBZA may not always alert the
driver to vehicles in the side blind
zone, especially in wet conditions.
The system does not need to be
serviced. The system may light up
due to guardrails, signs, trees,
shrubs, and other non-moving
objects. This is normal system
operation; the vehicle does not need
service.
Page 216 of 354

Buick Verano Owner Manual (GMNA- Localizing-U.S./Canada-10122753) -
2017 - crc - 5/16/16
Driving and Operating 215
SBZA may not operate when the
SBZA sensors in the left or right
corners of the rear bumper are
covered with mud, dirt, snow, ice,
or slush, or in heavy rainstorms. For
cleaning instructions, see "Washing
the Vehicle" underExterior Care
0 292. If the DIC displays the
system unavailable message after
cleaning both sides of the vehicle
toward the rear corners of the
vehicle, see your dealer.
If the SBZA displays do not light up
when vehicles are in the blind zone
and the system is clean, the system
may need service. Take the vehicle
to your dealer.
When SBZA is disabled for any
reason other than the driver turning
it off, the Side Blind Zone Alert On
option will not be available on the
personalization menu.
Radio Frequency Information
See Radio Frequency
Statement 0329.
Lane Departure
Warning (LDW)
If equipped, LDW may help avoid
crashes due to unintentional lane
departures. It may provide an alert if
the vehicle is crossing a lane
without using a turn signal in that
direction. LDW uses a camera
sensor to detect the lane markings
at speeds of 56 km/h (35 mph) or
greater.
{Warning
The LDW system does not steer
the vehicle. The LDW system
may not:
. Provide enough time to
avoid a crash.
. Detect lane markings under
poor weather or visibility
conditions. This can occur if
the windshield or
headlamps are blocked by
dirt, snow, or ice; if they are
(Continued)
Warning (Continued)
not in proper condition; or if
the sun shines directly into
the camera.
. Detect road edges.
. Detect lanes on winding or
hilly roads.
If LDW only detects lane
markings on one side of the road,
it will only warn you when
departing the lane on the side
where it has detected a lane
marking. Always keep your
attention on the road and
maintain proper vehicle position
within the lane, or vehicle
damage, injury, or death could
occur. Always keep the
windshield, headlamps, and
camera sensors clean and in
good repair. Do not use LDW in
bad weather conditions.
Page 217 of 354

Buick Verano Owner Manual (GMNA- Localizing-U.S./Canada-10122753) -
2017 - crc - 5/16/16
216 Driving and Operating
How the System Works
The LDW camera sensor is on the
windshield ahead of the rearview
mirror.
To turn LDW on and off, press
@on
the center stack. The control
indicator will light when LDW is on.
When LDW is on,@is green if
LDW is available to warn of a lane
departure. If the vehicle crosses a
detected lane marking without using
the turn signal in that direction,
@
changes to amber and flashes.
Additionally, there will be three
beeps on the right or left, depending
on the lane departure direction.
When the System Does Not
Seem To Work Properly
The system may not detect lanes as
well when there are:
. Close vehicles ahead.
. Sudden lighting changes, such
as when driving through tunnels.
. Banked roads.
If the LDW system is not functioning
properly when lane markings are
clearly visible, cleaning the
windshield may help.
LDW alerts may occur due to tar
marks, shadows, cracks in the road,
temporary or construction lane
markings, or other road
imperfections. This is normal system
operation; the vehicle does not need
service. Turn LDW off if these
conditions continue.
Fuel
GM recommends the use of TOP
TIER Detergent Gasoline to keep
the engine cleaner and reduce
engine deposits. See
www.toptiergas.com for a list of TOP
TIER Detergent Gasoline marketers
and applicable countries.
Do not use any fuel labeled E85 or
FlexFuel. Do not use gasoline with
ethanol levels greater than 15% by
volume.
Use regular unleaded gasoline
meeting ASTM specification D4814
with a posted octane rating of 87 or
higher. Do not use gasoline with a
Page 222 of 354
Buick Verano Owner Manual (GMNA- Localizing-U.S./Canada-10122753) -
2017 - crc - 5/16/16
Driving and Operating 221
electric brakes, start the
combination moving and then apply
the trailer brake controller by hand
to be sure the brakes work.
During the trip, check occasionally
to be sure that the load is secure
and the lamps and any trailer
brakes still work.
Towing with a Stability Control
System
When towing, the sound of the
stability control system might be
heard. The system is reacting to the
vehicle movement caused by the
trailer, which mainly occurs during
cornering. This is normal when
towing heavier trailers.
Following Distance
Stay at least twice as far behind the
vehicle ahead as you would when
driving the vehicle without a trailer.
This can help to avoid situations
that require heavy braking and
sudden turns.
Passing
More passing distance is needed
when towing a trailer. Because the
rig is longer, it is necessary to go
farther beyond the passed vehicle
before returning to the lane.
Backing Up
Hold the bottom of the steering
wheel with one hand. To move the
trailer to the left, move your hand to
the left. To move the trailer to the
right, move your hand to the right.
Always back up slowly and,
if possible, have someone
guide you.
Making TurnsCaution
Making very sharp turns while
trailering could cause the trailer to
come in contact with the vehicle.
The vehicle could be damaged.
Avoid making very sharp turns
while trailering. When turning with a trailer, make
wider turns than normal so the
trailer will not strike soft shoulders,
curbs, road signs, trees, or other
objects. Use the turn signal well in
advance and avoid jerky or sudden
maneuvers.
Turn Signals When Towing a
Trailer
The turn signal indicators on the
instrument cluster flash whenever
signaling a turn or lane change.
Properly hooked up, the trailer
lamps also flash, telling other
drivers the vehicle is turning,
changing lanes, or stopping.
When towing a trailer, the arrows on
the instrument cluster flash for turns
even if the bulbs on the trailer are
burned out. Check occasionally to
be sure the trailer bulbs are still
working.
Driving on Grades
Reduce speed and shift to a lower
gear before starting down a long or
steep downgrade. If the
transmission is not shifted down, the
Page 227 of 354
Buick Verano Owner Manual (GMNA- Localizing-U.S./Canada-10122753) -
2017 - crc - 5/16/16
226 Vehicle Care
Vehicle Care
General Information
General Information . . . . . . . . . . 227
California Proposition65 Warning . . . . . . . . . . . . . . . . . 227
California Perchlorate Materials Requirements . . . . . 227
Accessories and Modifications . . . . . . . . . . . . . . . . 228
Vehicle Checks
Doing Your OwnService Work . . . . . . . . . . . . . . . 228
Hood . . . . . . . . . . . . . . . . . . . . . . . . . 229
Engine Compartment Overview . . . . . . . . . . . . . . . . . . . . 231
Engine Oil . . . . . . . . . . . . . . . . . . . . 232
Engine Oil Life System . . . . . . . 234
Automatic Transmission Fluid . . . . . . . . . . . . . . . . . . . . . . . . 235
Engine Air Cleaner/Filter . . . . . . 235
Cooling System . . . . . . . . . . . . . . 236
Engine Coolant . . . . . . . . . . . . . . . 237
Engine Overheating . . . . . . . . . . 240
Washer Fluid . . . . . . . . . . . . . . . . . 241
Brakes . . . . . . . . . . . . . . . . . . . . . . . 242
Brake Fluid . . . . . . . . . . . . . . . . . . . 243
Battery - North America . . . . . . 244
Starter Switch Check . . . . . . . . . 244 Automatic Transmission Shift
Lock Control Function
Check . . . . . . . . . . . . . . . . . . . . . . . 245
Ignition Transmission Lock Check . . . . . . . . . . . . . . . . . . . . . . . 245
Park Brake and P (Park) Mechanism Check . . . . . . . . . . 245
Wiper Blade Replacement . . . . 246
Headlamp Aiming
Headlamp Aiming . . . . . . . . . . . . 247
Bulb Replacement
Bulb Replacement . . . . . . . . . . . . 247
Halogen Bulbs . . . . . . . . . . . . . . . . 247
Headlamps, Front Turn Signal and Parking Lamps . . . . . . . . . 247
Fog Lamps . . . . . . . . . . . . . . . . . . . 248
Taillamps, Turn Signal, Stoplamps, and Back-Up
Lamps . . . . . . . . . . . . . . . . . . . . . . 249
License Plate Lamp . . . . . . . . . . 250
Replacement Bulbs . . . . . . . . . . . 251
Electrical System
Electrical System Overload . . . 251
Fuses and Circuit Breakers . . . 252
Engine Compartment Fuse Block . . . . . . . . . . . . . . . . . . . . . . . . 252
Instrument Panel Fuse Block . . . . . . . . . . . . . . . . . . . . . . . . 255 Rear Compartment Fuse
Block . . . . . . . . . . . . . . . . . . . . . . . . 257
Wheels and Tires
Tires . . . . . . . . . . . . . . . . . . . . . . . . . . 258
All-Season Tires . . . . . . . . . . . . . . 259
Winter Tires . . . . . . . . . . . . . . . . . . 260
Low-Profile Tires . . . . . . . . . . . . . 260
Tire Sidewall Labeling . . . . . . . . 260
Tire Designations . . . . . . . . . . . . . 263
Tire Terminology andDefinitions . . . . . . . . . . . . . . . . . . 263
Tire Pressure . . . . . . . . . . . . . . . . . 266
Tire Pressure Monitor System . . . . . . . . . . . . . . . . . . . . . . 267
Tire Pressure Monitor Operation . . . . . . . . . . . . . . . . . . . 268
Tire Inspection . . . . . . . . . . . . . . . . 271
Tire Rotation . . . . . . . . . . . . . . . . . 271
When It Is Time for New Tires . . . . . . . . . . . . . . . . . . . . . . . . 272
Buying New Tires . . . . . . . . . . . . . 273
Different Size Tires and Wheels . . . . . . . . . . . . . . . . . . . . . . 274
Uniform Tire Quality Grading . . . . . . . . . . . . . . . . . . . . . 275
Wheel Alignment and Tire Balance . . . . . . . . . . . . . . . . . . . . . 276
Wheel Replacement . . . . . . . . . . 277
Tire Chains . . . . . . . . . . . . . . . . . . . 277
If a Tire Goes Flat . . . . . . . . . . . . 278
Page 236 of 354
Buick Verano Owner Manual (GMNA- Localizing-U.S./Canada-10122753) -
2017 - crc - 5/16/16
Vehicle Care 235
If the system is ever reset
accidentally, the oil must be
changed at 5 000 km (3,000 mi)
since the last oil change.
Remember to reset the oil life
system whenever the oil is changed.
How to Reset the Engine Oil
Life System
Reset the system whenever the
engine oil is changed so that the
system can calculate the next
engine oil change. To reset the
system:1. Turn the ignition to ON/RUN with the engine off.
2. Press the DIC MENU button on the turn signal lever to enter
the Vehicle Information Menu.
Use the thumbwheel to scroll
through the menu items until
you reach REMAINING
OIL LIFE.
3. Press the SET/CLR button to reset the oil life at 100%.
4. Turn the ignition to LOCK/OFF. The system is reset when the
CHANGE ENGINE OIL SOON
message is off and the REMAINING
OIL LIFE 100% message is
displayed.
If the CHANGE ENGINE OIL SOON
message comes back on when the
vehicle is started, the engine oil life
system has not been reset. Repeat
the procedure.
Automatic Transmission
Fluid
How to Check Automatic
Transmission Fluid
It is not necessary to check the
transmission fluid level.
A transmission fluid leak is the only
reason for fluid loss. If a leak
occurs, take the vehicle to your
dealer and have it repaired as soon
as possible.
The vehicle is not equipped with a
transmission fluid level dipstick.
There is a special procedure for
checking and changing the
transmission fluid. Because this procedure is difficult, this should be
done at the dealer. Contact the
dealer for additional information.
Change the fluid at the intervals
listed in
Maintenance Schedule
0 303, and be sure to use the fluid
listed in Recommended Fluids and
Lubricants 0313.
Engine Air Cleaner/Filter
See Engine Compartment Overview
0 231 for the location of the engine
air cleaner/filter.
When to Inspect the Engine Air
Cleaner/Filter
For intervals on changing and
inspecting the engine air cleaner/
filter, see Maintenance
Schedule 0303.
How to Inspect the Engine Air
Cleaner/Filter
Do not start the engine or have the
engine running with the engine air
cleaner/filter housing open. Before
removing the engine air cleaner/
filter, make sure that the engine air
cleaner/filter housing and nearby
Page 248 of 354
Buick Verano Owner Manual (GMNA- Localizing-U.S./Canada-10122753) -
2017 - crc - 5/16/16
Vehicle Care 247
Headlamp Aiming
Headlamp aim has been preset and
should need no further adjustment.
If the vehicle is damaged in a crash,
the headlamp aim may be affected.
If adjustment to the headlamps is
necessary, see your dealer.
Bulb Replacement
For the proper type of replacement
bulbs, seeReplacement
Bulbs 0251.
For any bulb-changing procedure
not listed in this section, contact
your dealer.
Halogen Bulbs
{Warning
Halogen bulbs have pressurized
gas inside and can burst if you
drop or scratch the bulb. You or
others could be injured. Be sure
to read and follow the instructions
on the bulb package.
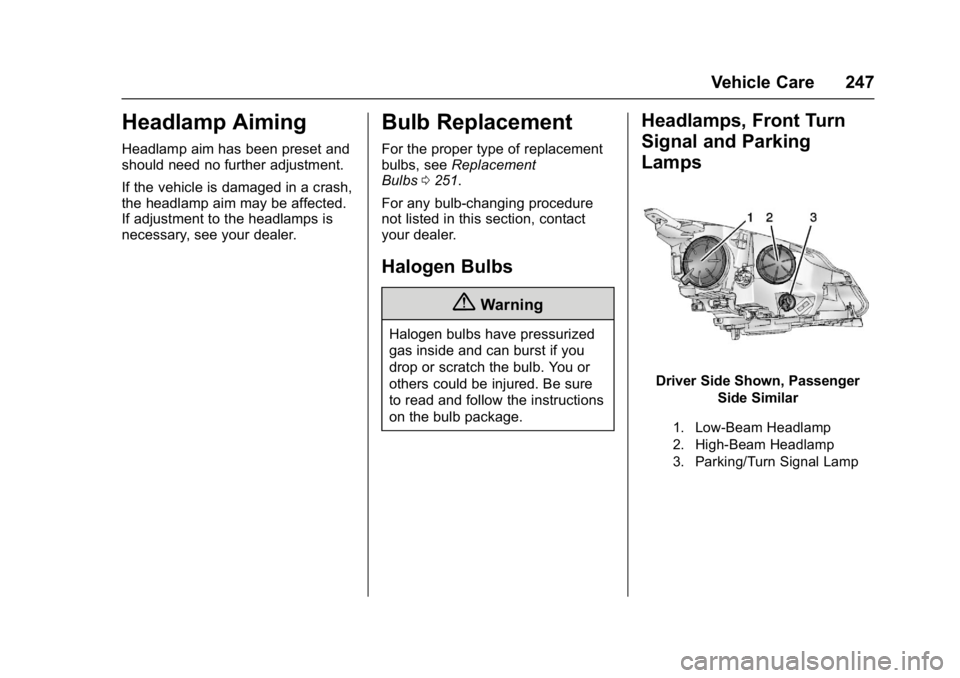
Headlamps, Front Turn
Signal and Parking
Lamps
Driver Side Shown, Passenger Side Similar
1. Low-Beam Headlamp
2. High-Beam Headlamp
3. Parking/Turn Signal Lamp
Page 249 of 354
Buick Verano Owner Manual (GMNA- Localizing-U.S./Canada-10122753) -
2017 - crc - 5/16/16
248 Vehicle Care
High-Beam Headlamp/
Low-Beam Headlamp
1. Open the hood. SeeHood 0229.
2. For the driver side bulb, remove the windshield washer
bottle filler neck by firmly
pulling it straight up and out of
the bottle.
3. Remove the headlamp bulb access cover.
4. Turn the bulb counterclockwise and pull straight back.
5. Disconnect the wiring harness connector from the bulb.
6. Install the new bulb in the headlamp assembly by turning
clockwise.
7. Reconnect the wiring harness connector.
8. Install the headlamp bulb access cover.
9. For the driver side, reinstall the windshield washer bottle filler
neck by firmly pushing it
straight into the bottle. Ensure that the filler neck clip engages
into the underhood electrical
center retainer.
Parking/Turn Signal Lamp
1. Open the hood. See
Hood 0229.
2. Remove the parking/turn signal lamp bulb socket from the
headlamp assembly by turning
counterclockwise.
3. Remove the bulb from the bulb socket by pulling it straight out.
4. Install the new bulb in the bulb socket.
5. Install the bulb socket into the headlamp assembly by turning
clockwise.
Fog Lamps
To replace the front fog lamp bulb:
1. Locate the bulb.
2. Remove the three screws holding the closeout panel
under the front fascia. 3. Remove the bulb by turning it
counterclockwise and pulling
straight out of the assembly.
4. Disconnect the electrical connector from the fog lamp
bulb assembly.
5. Install the new bulb by engaging the locking tabs.
6. Reverse Steps 1–3 to reinstall.
Page 250 of 354
Buick Verano Owner Manual (GMNA- Localizing-U.S./Canada-10122753) -
2017 - crc - 5/16/16
Vehicle Care 249
Taillamps, Turn Signal,
Stoplamps, and Back-Up
Lamps
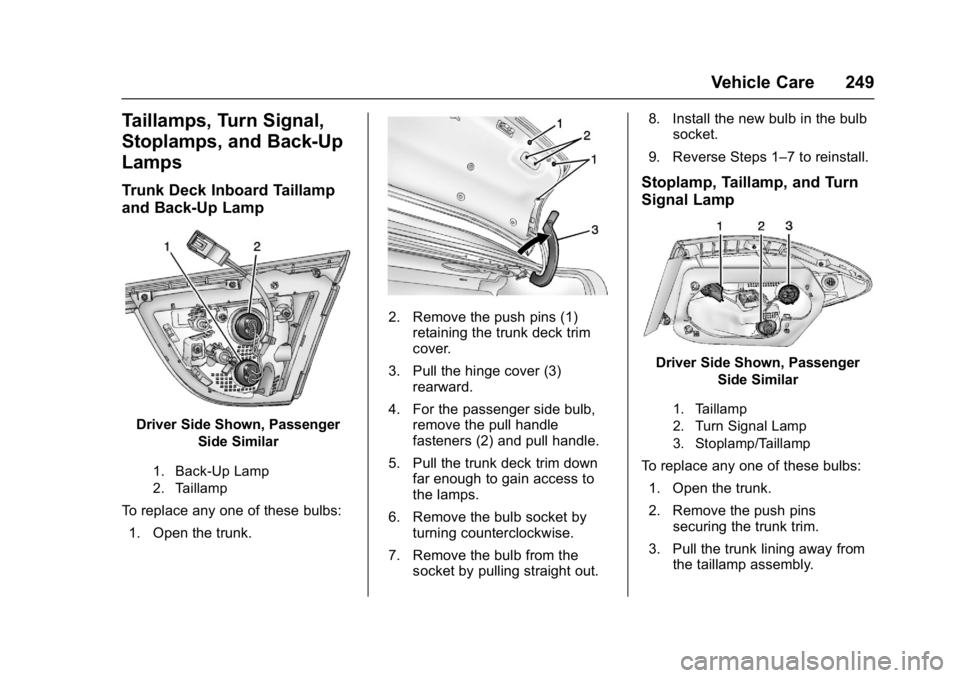
Trunk Deck Inboard Taillamp
and Back-Up Lamp
Driver Side Shown, PassengerSide Similar
1. Back-Up Lamp
2. Taillamp
To replace any one of these bulbs:
1. Open the trunk.
2. Remove the push pins (1) retaining the trunk deck trim
cover.
3. Pull the hinge cover (3) rearward.
4. For the passenger side bulb, remove the pull handle
fasteners (2) and pull handle.
5. Pull the trunk deck trim down far enough to gain access to
the lamps.
6. Remove the bulb socket by turning counterclockwise.
7. Remove the bulb from the socket by pulling straight out. 8. Install the new bulb in the bulb
socket.
9. Reverse Steps 1–7 to reinstall.
Stoplamp, Taillamp, and Turn
Signal Lamp
Driver Side Shown, Passenger Side Similar
1. Taillamp
2. Turn Signal Lamp
3. Stoplamp/Taillamp
To replace any one of these bulbs:
1. Open the trunk.
2. Remove the push pins securing the trunk trim.
3. Pull the trunk lining away from the taillamp assembly.