AC off BUICK VERANO 2017 Owner's Manual
[x] Cancel search | Manufacturer: BUICK, Model Year: 2017, Model line: VERANO, Model: BUICK VERANO 2017Pages: 354, PDF Size: 4.92 MB
Page 10 of 354
Buick Verano Owner Manual (GMNA- Localizing-U.S./Canada-10122753) -
2017 - crc - 5/16/16
In Brief 9
Canceling a Remote Start
To cancel a remote start, do one of
the following:
.Press and hold
/until the
parking lamps turn off.
. Turn on the hazard warning
flashers.
. Turn the vehicle on and then off.
See Remote Vehicle Start 034.
Door Locks
To lock or unlock the door from
outside the vehicle, press
Kon the
Remote Keyless Entry (RKE)
transmitter or use the key in the
driver door.
From inside the vehicle with the
doors locked, pull once on the door
handle to unlock it, and a second
time to open it.
Push down on the door lock knob
on the top of the door.
Manually locking the driver door
also automatically locks all other
doors. See
Door Locks 035 for additional
information.
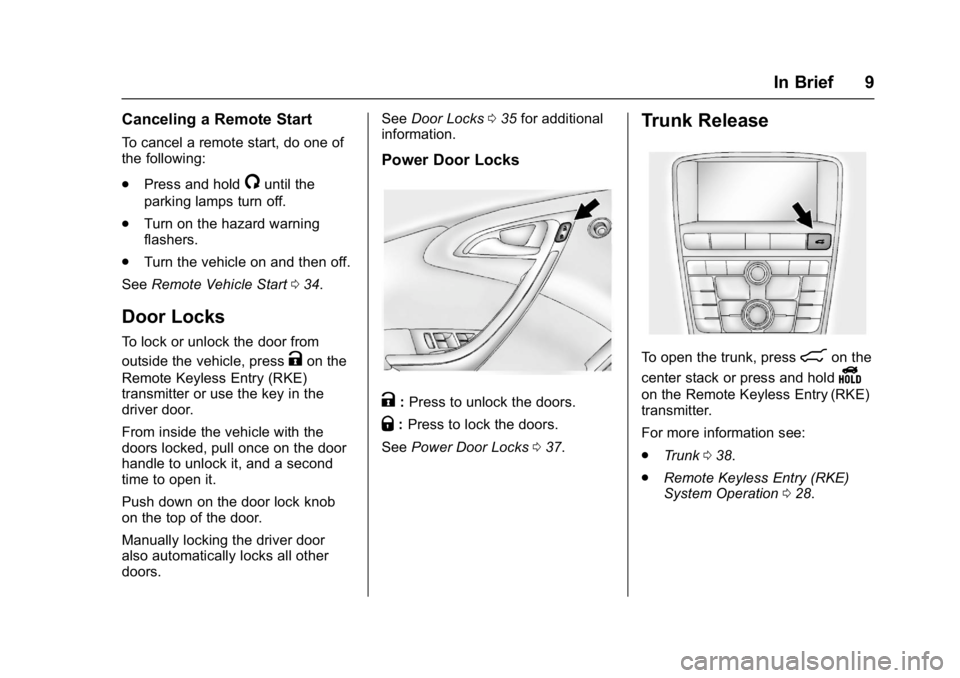
Power Door Locks
K: Press to unlock the doors.
Q: Press to lock the doors.
See Power Door Locks 037.
Trunk Release
To open the trunk, press8on the
center stack or press and hold
Y
on the Remote Keyless Entry (RKE)
transmitter.
For more information see:
. Trunk 038.
. Remote Keyless Entry (RKE)
System Operation 028.
Page 13 of 354
Buick Verano Owner Manual (GMNA- Localizing-U.S./Canada-10122753) -
2017 - crc - 5/16/16
12 In Brief
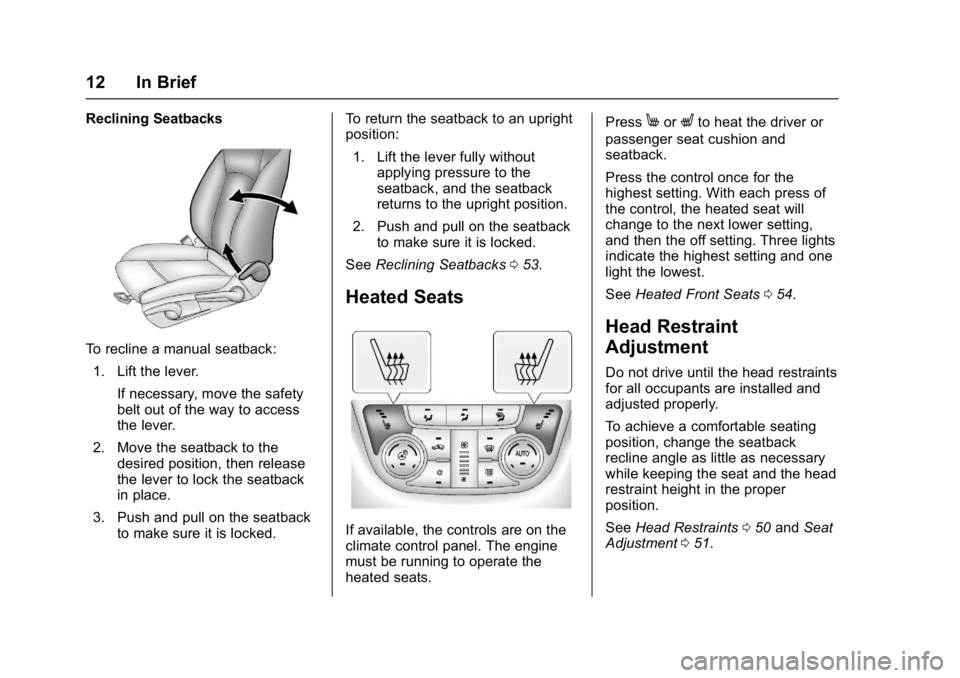
Reclining Seatbacks
To recline a manual seatback:1. Lift the lever.
If necessary, move the safety
belt out of the way to access
the lever.
2. Move the seatback to the desired position, then release
the lever to lock the seatback
in place.
3. Push and pull on the seatback to make sure it is locked. To return the seatback to an upright
position:
1. Lift the lever fully without applying pressure to the
seatback, and the seatback
returns to the upright position.
2. Push and pull on the seatback to make sure it is locked.
See Reclining Seatbacks 053.
Heated Seats
If available, the controls are on the
climate control panel. The engine
must be running to operate the
heated seats. Press
MorLto heat the driver or
passenger seat cushion and
seatback.
Press the control once for the
highest setting. With each press of
the control, the heated seat will
change to the next lower setting,
and then the off setting. Three lights
indicate the highest setting and one
light the lowest.
See Heated Front Seats 054.
Head Restraint
Adjustment
Do not drive until the head restraints
for all occupants are installed and
adjusted properly.
To achieve a comfortable seating
position, change the seatback
recline angle as little as necessary
while keeping the seat and the head
restraint height in the proper
position.
See Head Restraints 050 and Seat
Adjustment 051.
Page 14 of 354
Buick Verano Owner Manual (GMNA- Localizing-U.S./Canada-10122753) -
2017 - crc - 5/16/16
In Brief 13
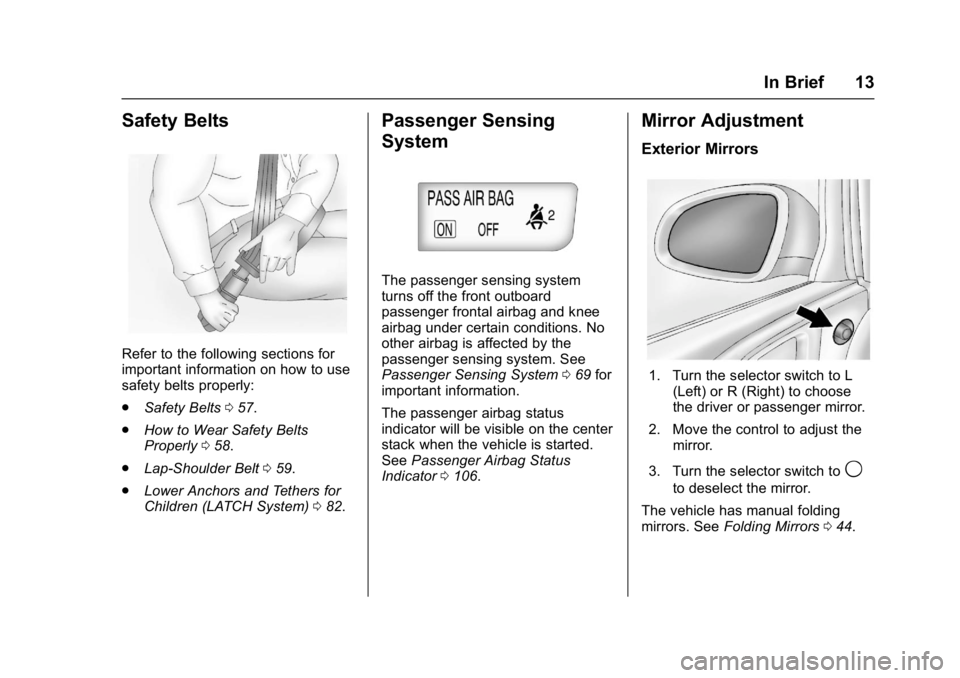
Safety Belts
Refer to the following sections for
important information on how to use
safety belts properly:
.Safety Belts 057.
. How to Wear Safety Belts
Properly 058.
. Lap-Shoulder Belt 059.
. Lower Anchors and Tethers for
Children (LATCH System) 082.
Passenger Sensing
System
The passenger sensing system
turns off the front outboard
passenger frontal airbag and knee
airbag under certain conditions. No
other airbag is affected by the
passenger sensing system. See
Passenger Sensing System 069 for
important information.
The passenger airbag status
indicator will be visible on the center
stack when the vehicle is started.
See Passenger Airbag Status
Indicator 0106.
Mirror Adjustment
Exterior Mirrors
1. Turn the selector switch to L
(Left) or R (Right) to choose
the driver or passenger mirror.
2. Move the control to adjust the mirror.
3. Turn the selector switch to
9
to deselect the mirror.
The vehicle has manual folding
mirrors. See Folding Mirrors 044.
Page 15 of 354
Buick Verano Owner Manual (GMNA- Localizing-U.S./Canada-10122753) -
2017 - crc - 5/16/16
14 In Brief
Interior Mirrors
Adjustment
Hold the rearview mirror in the
center and move it to view the area
behind the vehicle.
Manual Rearview Mirror
For vehicles with a manual rearview
mirror, push the tab forward for
daytime use and pull it for nighttime
use to avoid glare from the
headlamps from behind. See
Manual Rearview Mirror044.
Automatic Dimming Rearview
Mirror
For vehicles with an automatic
dimming rearview mirror, the mirror
will automatically reduce the glare
from the headlamps from behind.
The dimming feature comes on
when the vehicle is started.
See Automatic Dimming Rearview
Mirror 044.
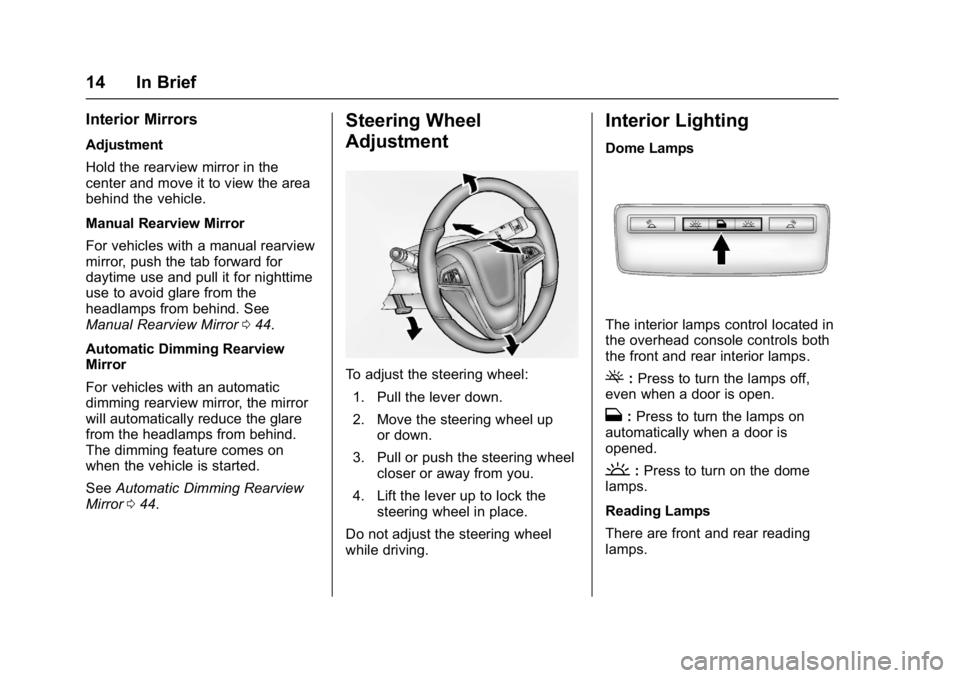
Steering Wheel
Adjustment
To adjust the steering wheel:
1. Pull the lever down.
2. Move the steering wheel up or down.
3. Pull or push the steering wheel closer or away from you.
4. Lift the lever up to lock the steering wheel in place.
Do not adjust the steering wheel
while driving.
Interior Lighting
Dome Lamps
The interior lamps control located in
the overhead console controls both
the front and rear interior lamps.
(: Press to turn the lamps off,
even when a door is open.
H: Press to turn the lamps on
automatically when a door is
opened.
': Press to turn on the dome
lamps.
Reading Lamps
There are front and rear reading
lamps.
Page 16 of 354

Buick Verano Owner Manual (GMNA- Localizing-U.S./Canada-10122753) -
2017 - crc - 5/16/16
In Brief 15
The front reading lamps are located
in the overhead console.
The rear reading lamps are located
in the headliner.
#or$:Press the button near
each lamp to turn it on or off.
For more information on interior
lighting, see Instrument Panel
Illumination Control 0137.
Exterior Lighting
The exterior lamp control is to the
left of the steering column on the
instrument panel.
O:Briefly turn to this position to
turn the automatic lamp control off
or on again.
AUTO : Turns the headlamps on
automatically at normal brightness,
together with the parking lamps,
taillamps, license plate lamps,
instrument panel lights, and
sidemarker lamps.
;: Turns on the parking lamps
including all lamps, except the
headlamps.
5: Turns on the headlamps
together with the parking lamps and
instrument panel lights. A warning
chime sounds if the driver door is
opened when the ignition switch is
off and the headlamps are on.
#: If equipped with fog lamps,
press to turn the lamps on or off.
See:
. Exterior Lamp Controls 0133
. Front Fog Lamps 0136
Windshield Wiper/Washer
The windshield wiper/washer lever
is on the right side of the steering
column. With the ignition in ACC/
ACCESSORY or ON/RUN, move
the windshield wiper lever to select
the wiper speed.
HI : Use for fast wipes.
Page 17 of 354

Buick Verano Owner Manual (GMNA- Localizing-U.S./Canada-10122753) -
2017 - crc - 5/16/16
16 In Brief
LO :Use for slow wipes.
INT : Move the lever up to INT for
intermittent wipes, then turn the
x
INT band up for more frequent
wipes or down for less frequent
wipes.
OFF : Use to turn the wipers off.
1X : For a single wipe, briefly move
the wiper lever down. For several
wipes, hold the wiper lever down.
n L: Pull the windshield wiper
lever toward you to spray windshield
washer fluid and activate the wipers.
See Windshield Wiper/Washer 099.
Climate Controls
The heating, cooling, defrosting, and ventilation for the vehicle can be
controlled with this system.
1. Driver and Passenger Heated
Seats (If Equipped)
2. Driver and Passenger Temperature Controls
3. Air Delivery Modes
4. AUTO (Automatic Operation)
5. Defrost
6. Rear Window Defogger 7. Fan Controls
8. Air Conditioning
9. Recirculation
10. Heated Steering Wheel (If Equipped)
See Dual Automatic Climate Control
System 0171.
Page 18 of 354

Buick Verano Owner Manual (GMNA- Localizing-U.S./Canada-10122753) -
2017 - crc - 5/16/16
In Brief 17
Transmission
Driver Shift Control (DSC)
DSC allows you to shift an
automatic transmission similar to a
manual transmission. To use the
DSC feature:1. Move the shift lever from D (Drive) to the left into the (+)
or (−) manual position.
2. Press the shift lever forward (+) to upshift or rearward (−) to
downshift. An M and the
current gear will be displayed
in the Driver Information
Center (DIC).
See Manual Mode 0199.
While using the DSC feature, the
vehicle will have firmer, quicker
shifting. You can use this for sport
driving or when climbing or
descending hills, to stay in gear
longer, or to downshift for more
power or engine braking.
Vehicle Features
Infotainment System
If the vehicle has a base radio it is
included in this manual. See the
separate infotainment manual for
information on the connected radios,
audio players, phone, navigation
system, and voice or speech
recognition. There is also
information on settings and
downloadable applications (if
equipped).
Radio(s)
O
/VOL : Press to turn the system
on and off. Turn to increase or
decrease the volume.
RADIO/BAND : Press to choose
between FM, AM, or SiriusXM
®,
if equipped.
TUNE/MENU : Turn to select radio
stations. Press to select a menu.
s ©:Press to seek the previous
station or track.
¨ \:Press to seek the next
station or track. Buttons 1 to 6 :
Press to save and
select favorite stations.
INFO : Press to show available
information about the current station
or track.
For more information about these
and other radio features, see
Operation 0142.
Storing a Station as a Favorite
Stations from all bands can be
stored in the favorite lists in any
order. Up to six stations can be
stored in each favorite page and the
number of available favorite pages
can be set.
To store the station to a position in
the list, press the FAV 1-2-3 button,
then press the corresponding
numeric button 1 to 6 for more than
two seconds.
For more information, see “Storing a
Station as a Favorite” inAM-FM
Radio 0145.
Page 19 of 354
Buick Verano Owner Manual (GMNA- Localizing-U.S./Canada-10122753) -
2017 - crc - 5/16/16
18 In Brief
Setting the Clock (Radio
with CD)
The clock menu can be only be
used with the radio on while in ON/
RUN or ACC/ACCESSORY.
To set the time:1. Press the CONFIG button and select Time and Date or
press
H.
2. Select Set Time.
3. Turn the TUNE/MENU knob to adjust the highlighted number.
4. Press TUNE/MENU to select the next number.
5. To save the time and return to the Time and Date menu, press
/BACK at any time or press
the TUNE/MENU knob after
adjusting the minutes.
Setting the 12/24 Hour Format 1. Press the CONFIG button and select Time and Date or
press
H.
2. Highlight 12/24 Hour Format. 3. Press TUNE/MENU to select
the 12 hour or 24 hour display
format.
Setting the Clock (Radio with
CD and Touch Screen)
The clock menu can be only be
used with the radio on while in ON/
RUN or ACC/ACCESSORY.
To set the time:
1. Press the CONFIG button to enter the menu options or
press
H. Turn the TUNE/
MENU knob to scroll through
the available setup features
and select Time and Date.
Press TUNE/MENU or press
the Time screen button to
display other options within that
feature.
2. Press + or −to increase or
decrease the Hours and
Minutes displayed on the clock.
12/24 HR Format : Press the 12 HR
screen button for standard time;
press the 24 HR screen button for
military time. Day + or Day
−:Press the Day +
or Day −display buttons to increase
or decrease the day.
Display : Press Display to turn the
display of the time on the screen on
or off.
See Clock 0100.
Satellite Radio
Vehicles with a SiriusXM®satellite
radio tuner and a valid SiriusXM
satellite radio subscription can
receive SiriusXM programming.
SiriusXM Satellite Radio
Service
SiriusXM is a satellite radio service
based in the 48 contiguous United
States and 10 Canadian provinces.
SiriusXM satellite radio has a wide
variety of programming and
commercial-free music, coast to
coast, and in digital-quality sound.
A fee is required to receive the
SiriusXM service.
Refer to:
. www.siriusxm.com or call
1-888-601-6296 (U.S.).
Page 21 of 354
Buick Verano Owner Manual (GMNA- Localizing-U.S./Canada-10122753) -
2017 - crc - 5/16/16
20 In Brief
Cruise Control
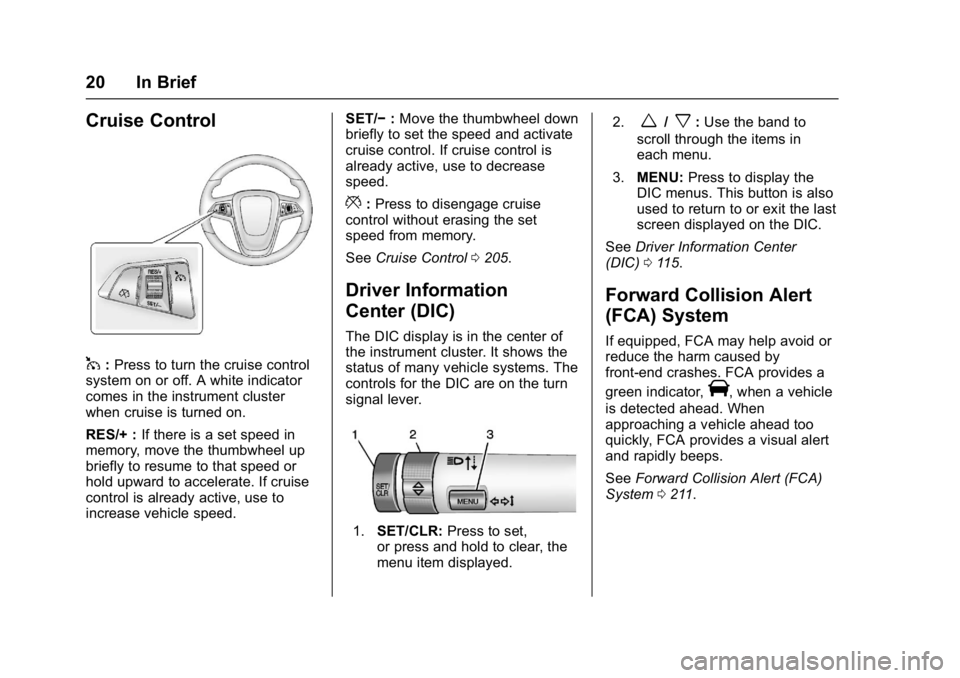
1:Press to turn the cruise control
system on or off. A white indicator
comes in the instrument cluster
when cruise is turned on.
RES/+ : If there is a set speed in
memory, move the thumbwheel up
briefly to resume to that speed or
hold upward to accelerate. If cruise
control is already active, use to
increase vehicle speed. SET/−
:Move the thumbwheel down
briefly to set the speed and activate
cruise control. If cruise control is
already active, use to decrease
speed.
*: Press to disengage cruise
control without erasing the set
speed from memory.
See Cruise Control 0205.
Driver Information
Center (DIC)
The DIC display is in the center of
the instrument cluster. It shows the
status of many vehicle systems. The
controls for the DIC are on the turn
signal lever.
1. SET/CLR: Press to set,
or press and hold to clear, the
menu item displayed. 2.
w/x:
Use the band to
scroll through the items in
each menu.
3. MENU: Press to display the
DIC menus. This button is also
used to return to or exit the last
screen displayed on the DIC.
See Driver Information Center
(DIC) 0115.
Forward Collision Alert
(FCA) System
If equipped, FCA may help avoid or
reduce the harm caused by
front-end crashes. FCA provides a
green indicator,
V, when a vehicle
is detected ahead. When
approaching a vehicle ahead too
quickly, FCA provides a visual alert
and rapidly beeps.
See Forward Collision Alert (FCA)
System 0211.
Page 22 of 354
Buick Verano Owner Manual (GMNA- Localizing-U.S./Canada-10122753) -
2017 - crc - 5/16/16
In Brief 21
Lane Departure
Warning (LDW)
If equipped, LDW may help avoid
unintentional lane departures at
speeds of 56 km/h (35 mph) or
greater. LDW uses a camera sensor
to detect the lane markings. The
LDW light,
@, is green if a lane
marking is detected. If the vehicle
departs the lane without using a turn
signal in that direction, the light will
change to amber and flash. In
addition, beeps will sound.
See Lane Departure Warning
(LDW) 0215.
Side Blind Zone
Alert (SBZA)
If equipped, SBZA will detect
moving vehicles in the next lane
over in the vehicle's side blind zone
area. When this happens, the SBZA
display will light up in the
corresponding outside side mirror
and will flash if the turn signal is on.
See Side Blind Zone Alert
(SBZA) 0213.
Rear Vision
Camera (RVC)
If equipped, RVC displays a view of
the area behind the vehicle, on the
infotainment display, when the
vehicle is shifted into R (Reverse).
See Rear Vision Camera
(RVC) 0208.
Rear Cross Traffic Alert
(RCTA) System
If equipped, the RCTA system uses
a triangle with an arrow displayed
on the RVC screen to warn of traffic
behind your vehicle that may cross
your vehicle's path while in
R (Reverse). In addition, beeps will
sound.
See “Rear Cross Traffic Alert
(RCTA)” underRear Vision Camera
(RVC) 0208.
Parking Assist
If equipped, Rear Parking Assist
(RPA) uses sensors on the rear
bumper to assist with parking and
avoiding objects while in R (Reverse). It operates at speeds
less than 8 km/h (5 mph) and uses
audible beeps to provide distance
and system information.
Keep the sensors on the vehicle's
rear bumper clean to ensure proper
operation.
See
Parking Assist 0210.
Power Outlets
The accessory power outlets can be
used to plug in electrical equipment,
such as a cell phone or MP3 player.
There is one accessory power outlet
on the center stack below the
climate controls and one on the rear
of the center floor console. These
outlets are powered when the key is
in ON/RUN or ACC/ACCESSORY,
or until the driver door is opened
within 10 minutes of turning off the
vehicle. See Retained Accessory
Power (RAP) 0193.
See Power Outlets 0101.