steering CADILLAC ATS 2015 1.G Personalization Guide
[x] Cancel search | Manufacturer: CADILLAC, Model Year: 2015, Model line: ATS, Model: CADILLAC ATS 2015 1.GPages: 20, PDF Size: 1.77 MB
Page 2 of 20
2
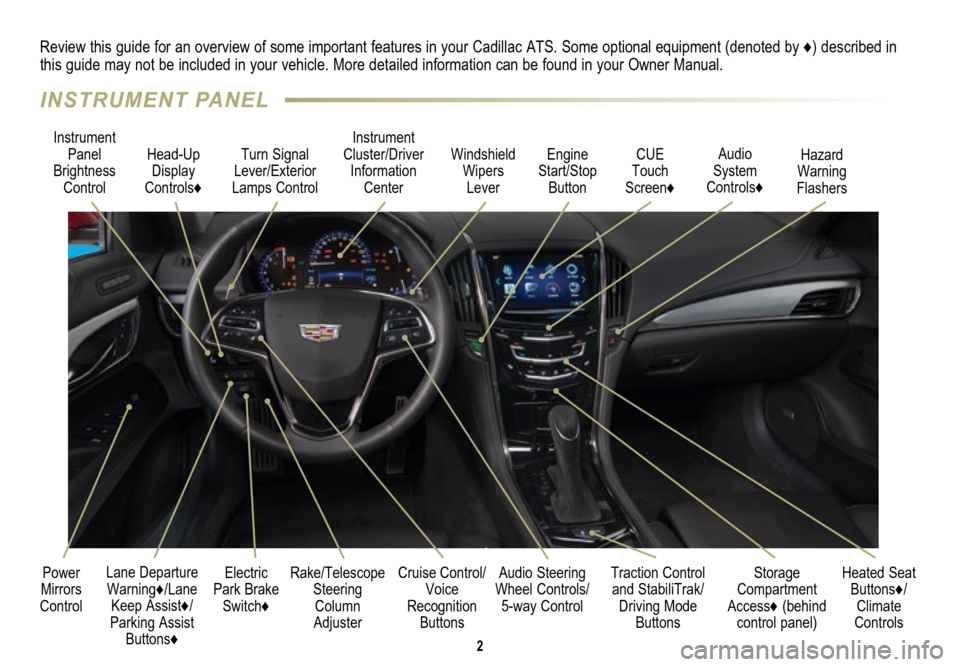
Electric
Park Brake Switch♦
Instrument
Panel
Brightness Control Turn Signal
Lever/Exterior
Lamps Control Instrument
Cluster/Driver Information Center
Cruise Control/ Voice
Recognition Buttons
Rake/Telescope
Steering Column
Adjuster Windshield
Wipers Lever
Audio Steering
Wheel Controls/ 5-way Control
Head-Up
Display
Controls♦
Power
Mirrors
Control
Review this guide for an overview of some important features in your Cadillac ATS. Some optional equipment (denoted by ♦) described in
this guide may not be included in your vehicle. More detailed informatio\
n can be found in your Owner Manual.
CUE
Touch
Screen♦
Traction Control and StabiliTrak/ Driving Mode Buttons Heated Seat
Buttons♦/Climate
Controls
Storage
Compartment
Access♦ (behind control panel)
Engine
Start/Stop Button Audio
System
Controls♦ Hazard
Warning
Flashers
Lane Departure Warning♦/Lane Keep Assist♦/
Parking Assist Buttons♦
INSTRUMENT PANEL
Page 5 of 20
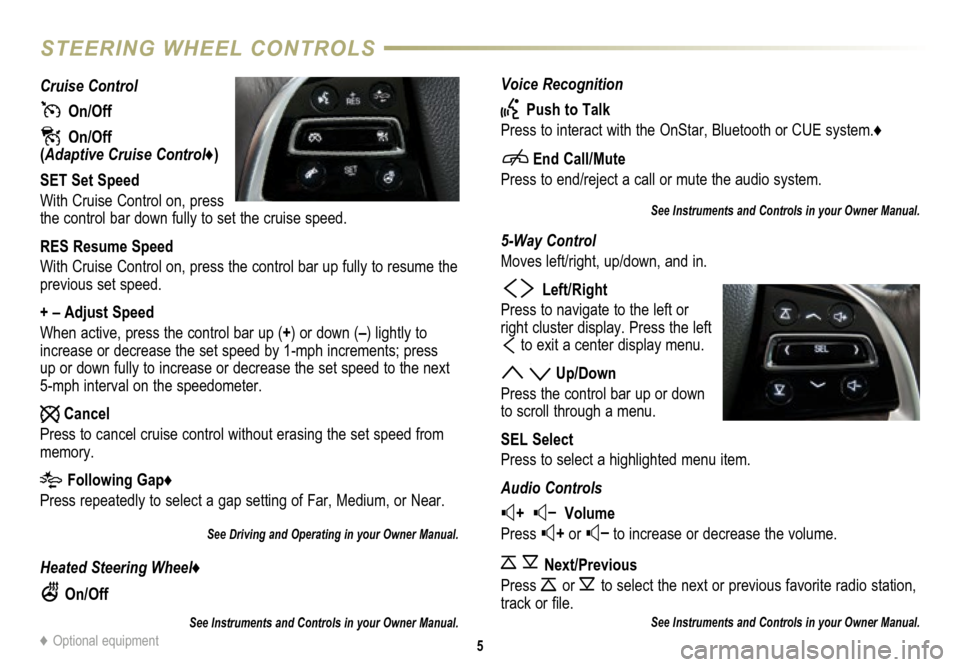
Voice Recognition
Push to Talk
Press to interact with the OnStar, Bluetooth or CUE system.♦
End Call/Mute
Press to end/reject a call or mute the audio system.
See Instruments and Controls in your Owner Manual.
5-Way Control
Moves left/right, up/down, and in.
Left/Right
Press to navigate to the left or
right cluster display. Press the left
to exit a center display menu.
Up/Down
Press the control bar up or down
to scroll through a menu.
SEL Select
Press to select a highlighted menu item.
Audio Controls
+ – Volume
Press
+ or – to increase or decrease the volume.
Next/Previous
Press
or to select the next or previous favorite radio
station,
track or file.
See Instruments and Controls in your Owner Manual.
Cruise Control
On/Off
On/Off (Adaptive Cruise Control♦)
SET Set Speed
With Cruise Control on, press
the control bar down fully to set the cruise speed.
RES Resume Speed
With Cruise Control on, press the control bar up fully to resume the
previous set speed.
+ – Adjust Speed
When active, press the control bar up (+) or down (–) lightly to
increase or decrease the set speed by 1-mph increments; press
up or down fully to increase or decrease the set speed to the next
5-mph interval on the speedometer.
Cancel
Press to cancel cruise control without erasing the set speed from
memory.
Following Gap♦
Press repeatedly to select a gap setting of Far, Medium, or Near.
See Driving and Operating in your Owner Manual.
Heated Steering Wheel♦
On/Off
See Instruments and Controls in your Owner Manual.
5
STEERING WHEEL CONTROLS
♦ Optional equipment
Page 7 of 20
7
DRIVER INFORMATION CENTER
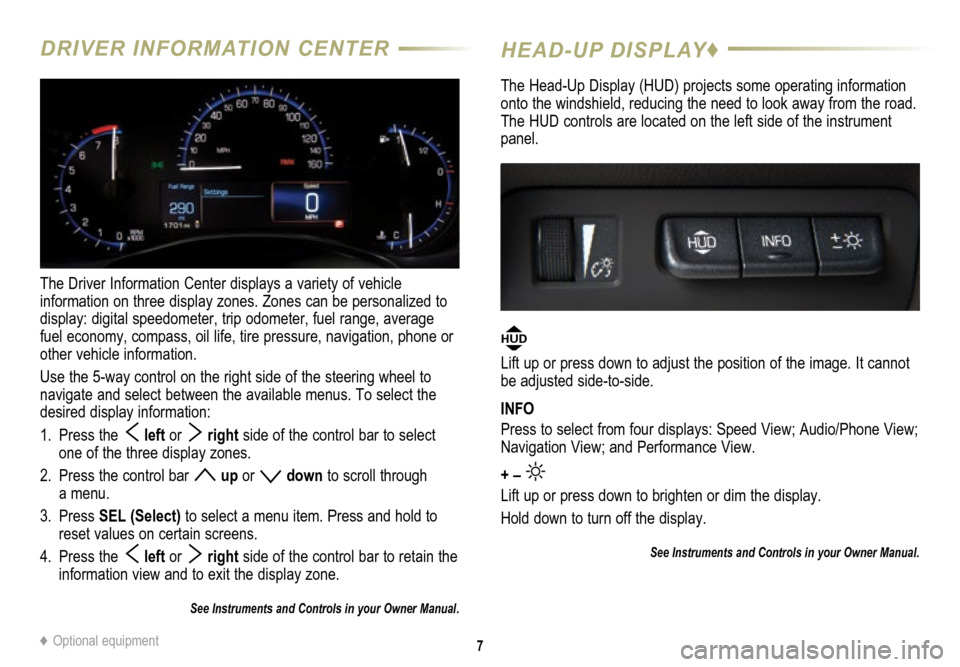
The Driver Information Center displays a variety of vehicle
information on three display zones. Zones can be personalized to
display: digital speedometer, trip odometer, fuel range, average
fuel economy, compass, oil life, tire pressure, navigation, phone or
other vehicle information.
Use the 5-way control on the right side of the steering wheel to
navigate and select between the available menus. To select the
desired display information:
1. Press the
left or right side of the control bar to select
one of the three display zones.
2. Press the control bar
up or down to scroll through
a menu.
3. Press SEL (Select) to select a menu item. Press and hold to
reset values on certain screens.
4. Press the
left or right side of the control bar to retain the
information view and to exit the display zone.
See Instruments and Controls in your Owner Manual.
HEAD-UP DISPLAY♦
The Head-Up Display (HUD) projects some operating information
onto the windshield, reducing the need to look away from the road.
The HUD controls are located on the left side of the instrument
panel.
HUD
Lift up or press down to adjust the position of the image. It cannot
be adjusted side-to-side.
INFO
Press to select from four displays: Speed View; Audio/Phone View;
Navigation View; and Performance View.
+ –
Lift up or press down to brighten or dim the display.
Hold down to turn off the display.
See Instruments and Controls in your Owner Manual.
♦ Optional equipment
Page 9 of 20
9
CUE SYSTEM MENUS♦
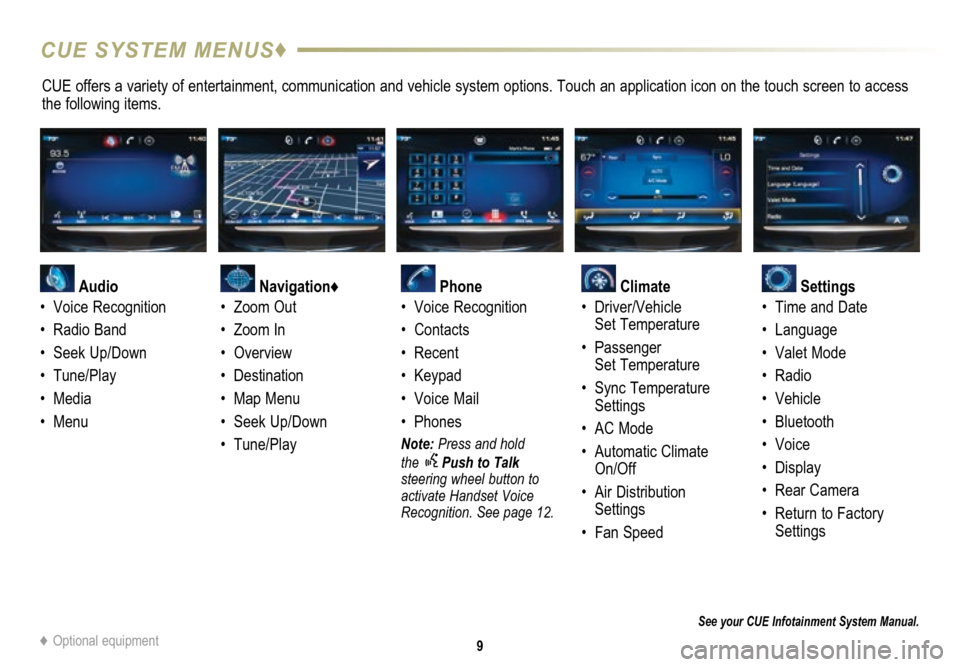
CUE offers a variety of entertainment, communication and vehicle system options. Touch an application icon on the touch screen to access
the following items.
See your CUE Infotainment System Manual.
Audio
• Voice Recognition
• Radio Band
• Seek Up/Down
• Tune/Play
• Media
• Menu
Navigation♦
• Zoom Out
• Zoom In
• Overview
• Destination
• Map Menu
• Seek Up/Down
• Tune/Play
Phone
• Voice Recognition
• Contacts
• Recent
• Keypad
• Voice Mail
• Phones
Note: Press and hold
the Push to Talk
steering wheel button to
activate Handset Voice
Recognition. See page 12.
Climate
• Driver/Vehicle
Set Temperature
• Passenger
Set Temperature
• Sync Temperature
Settings
• AC Mode
• Automatic Climate
On/Off
• Air Distribution
Settings
• Fan Speed
Settings
• Time and Date
• Language
• Valet Mode
• Radio
• Vehicle
• Bluetooth
• Voice
• Display
• Rear Camera
• Return to Factory
Settings
♦ Optional equipment
Page 12 of 20

12
VOICE RECOGNITION
BLUETOOTH® SYSTEM
Control the music source and navigation destination, and make
phone calls hands-free, using the natural voice recognition system.
1. Press the
Push to Talk button on the steering wheel.
2. The radio will say “Please say a command,” followed by a beep.
3. After the beep, say what you want it to do.
• Hands-free calling:
Example command: “Call Amanda” or “Dial 555-1212”
• Connected music device search:
Example commands: “Play artist [name]” or “Play song [name]”
• Radio control:
Example commands: “Tune FM 104.3” or “Tune XM Classic
Vinyl”
• Navigation control♦:
Example commands: “Destination Address” or “Destination
Contact”
• Help:
Say “Help” for voice recognition assistance
Handset Voice Recognition
Handset Voice Recognition pass-thru allows access to the voice
recognition commands on a compatible, paired cell phone; e.g.
Siri or Voice Command. Visit www.gmtotalconnect.com for more
information.
To activate Handset Voice Recognition, press and hold the Push to Talk steering wheel button.
See your CUE Infotainment System Manual.
Refer to your Owner Manual for important safety information about using \
the Bluetooth system while driving.
Before using a Bluetooth-enabled device in the vehicle, it must be
paired with the in-vehicle Bluetooth system. The pairing process is
disabled when the vehicle is moving. Not all devices will support all
functions. Visit www.gmtotalconnect.com for more information.
Pair a Phone
1. To use voice recognition, press the
Push to Talk button;
after the tone, say “Pair Phone,” or
Use the touch screen to select Phone > Pair Device.
2. Start the pairing process on the phone. Locate Cadillac CUE on
the phone.
3. Enter the four-digit code that appears on the touch screen into
the phone or, if a six-digit code appears on the phone, confirm it
on the touch screen.
4. If your phone prompts you to accept the connection or phone
book download, click “yes” and always allow.
See your CUE Infotainment System Manual.
VALET MODE
To lock/unlock various features of the vehicle, select Valet
Mode under Vehicle Settings and enter a passcode. It can be
used when it’s desired that only an authorized user has access
to personalized features.
See your CUE Infotainment System Manual.
Page 16 of 20
16
DRIVER ASSISTANCE SYSTEMS♦
See Driving and Operating in your Owner Manual.
Safety Alert Seat♦ – The driver’s seat pulses, left side, right side,
or simultaneously, to alert the driver of potential hazards.
Audible alerts may be selected instead of Safety Alert Seat
pulsing alerts. To change the alert setting, go to Settings >
Vehicle > Collision/Detection Systems > Alert Type.
Forward Collision Alert♦ – The
Vehicle Ahead indicator is
green on the instrument cluster when a vehicle is detected and is
yellow when following a vehicle ahead much too closely. When
approaching a vehicle directly ahead too rapidly, a red alert flashes
on the windshield and the driver’s seat pulses.
To set the alert timing or turn the system off, press the
Following Gap button on the left side of the steering wheel.
Lane Keep Assist♦ – The
Lane Keep Assist indicator is
green on the instrument cluster when a lane is detected ahead,
and is yellow and gently turns the steering wheel to assist when
crossing a detected lane marking to assist in keeping the vehicle in
the lane. Turn the steering wheel to override Lane Keep Assist.
Lane Departure Warning♦ – When crossing a detected lane
marking without using a turn signal, the yellow
Lane
Departure Warning symbol flashes on the instrument cluster and
the left or right side of the driver’s seat pulses. Turn the steering\
wheel to suppress Lane Departure Warning.
To turn the Lane Keep Assist and Lane Departure Warning
systems on or off, press the Lane Keep Assist button on
the left side of the instrument panel. Front and Rear Automatic Braking♦ – Automatically applies the
brakes in potential collision situations to help reduce damage or
help avoid collisions with vehicles directly ahead or behind, and
with some objects behind.
To turn the Front Automatic Braking system on or off, go to
Settings > Vehicle > Collision/Detection Systems > Auto
Collision Preparation.
To turn the Rear Automatic Braking system on or off, press the Parking Assist button on the left side of the instrument
panel. This will also turn on/off the Parking Assist and Rear
Cross Traffic Alert systems.
Adaptive Cruise Control♦ – If a vehicle is detected ahead, the
vehicle accelerates or brakes moderately to maintain the driver-
selected cruise speed and following gap.
To set a following gap, press the Following Gap button on
the left side of the steering wheel.
Lane Change Alert♦ – While driving, a
warning symbol
displays on the left or right side mirror when a vehicle is rapidly
approaching from beyond that side blind zone area.
Side Blind Zone Alert♦ – While driving, a
warning symbol
displays on the left or right side mirror when a vehicle is detected
in that side blind spot area.
To turn the Lane Change Alert and Side Blind Zone Alert sys-tems on or off, go to Settings > Vehicle > Collision/Detection
Systems > Lane Change Alert.
The driver assistance systems use advanced technologies to help avoid collisions by providing visual, audible and/or tactile (vibration) alerts.
Page 17 of 20
17
SUNROOF♦
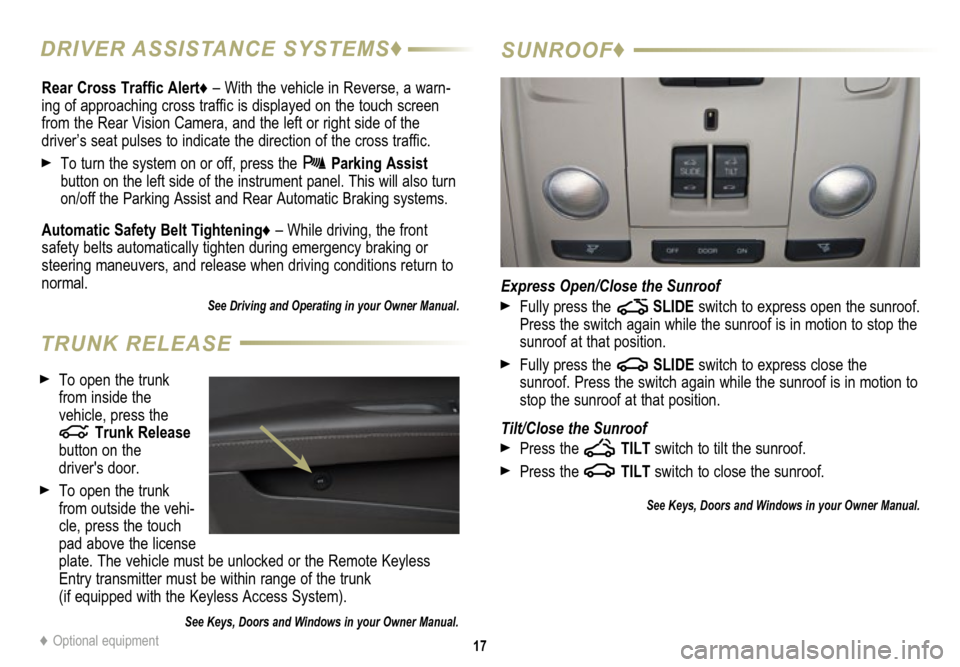
Express Open/Close the Sunroof
Fully press the SLIDE switch to express open the sunroof.
Press the switch again while the sunroof is in motion to stop the
sunroof at that position.
Fully press the SLIDE switch to express close the
sunroof. Press the switch again while the sunroof is in motion to
stop the sunroof at that position.
Tilt/Close the Sunroof
Press the TILT switch to tilt the sunroof.
Press the TILT switch to close the sunroof.
See Keys, Doors and Windows in your Owner Manual.
Rear Cross Traffic Alert♦ – With the vehicle in Reverse, a warn-ing of approaching cross traffic is displayed on the touch screen
from the Rear Vision Camera, and the left or right side of the
driver’s seat pulses to indicate the direction of the cross traffic.
To turn the system on or off, press the Parking Assist
button on the left side of the instrument panel. This will also turn
on/off the Parking Assist and Rear Automatic Braking systems.
Automatic Safety Belt Tightening♦ – While driving, the front
safety belts automatically tighten during emergency braking or
steering maneuvers, and release when driving conditions return to
normal.
See Driving and Operating in your Owner Manual.
♦ Optional equipment
To open the trunk
from inside the
vehicle, press the
Trunk Release
button on the
driver's door.
To open the trunk
from outside the vehi-cle, press the touch
pad above the license
plate. The vehicle must be unlocked or the Remote Keyless
Entry transmitter must be within range of the trunk
(if equipped with the Keyless Access System).
See Keys, Doors and Windows in your Owner Manual.
TRUNK RELEASE
DRIVER ASSISTANCE SYSTEMS♦
Page 18 of 20
The traction control
system limits wheelspin
and the StabiliTrak
system assists with the
stability of the vehicle in
difficult driving conditions.
Both systems turn on
automatically every time
the vehicle is started.
Turning Off Traction Control
Turn off traction control if the vehicle is stuck and rocking the
vehicle is required.
Press the Traction Control/StabiliTrak button on the center
console. The Traction Control Off light on the instrument
cluster will illuminate.
Press the button again to turn on traction control.
See Driving and Operating in your Owner Manual.
18
STEERING WHEEL TAP SHIFT♦ STABILITRAK®/TRACTION
CONTROL SYSTEMS
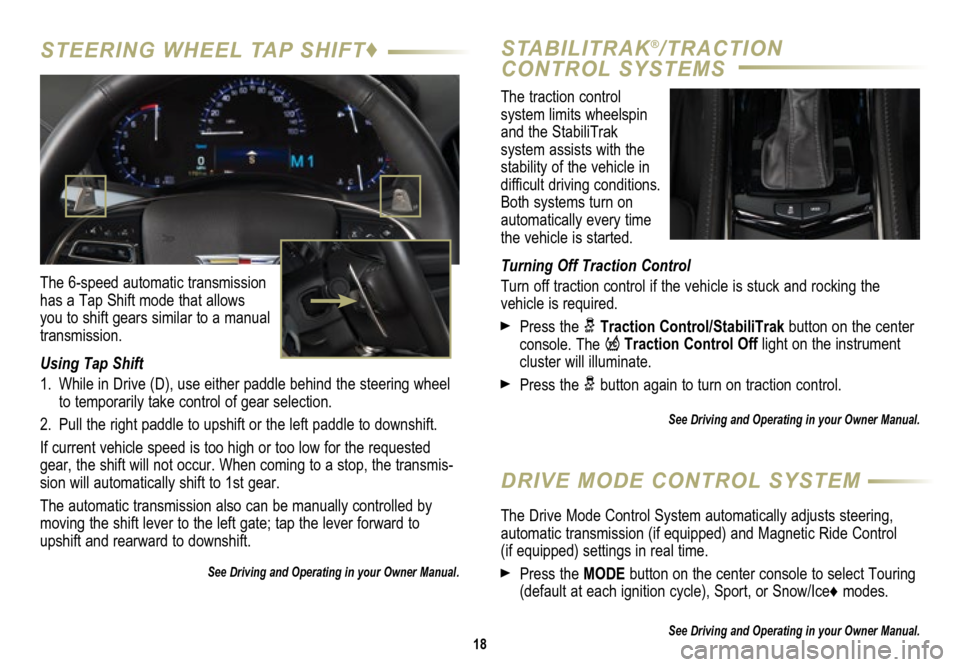
The 6-speed automatic transmission
has a Tap Shift mode that allows
you to shift gears similar to a manual
transmission.
Using Tap Shift
1. While in Drive (D), use either paddle behind the steering wheel
to temporarily take control of gear selection.
2. Pull the right paddle to upshift or the left paddle to downshift.
If current vehicle speed is too high or too low for the requested
gear, the shift will not occur. When coming to a stop, the transmis
-sion will automatically shift to 1st gear.
The automatic transmission also can be manually controlled by
moving the shift lever to the left gate; tap the lever forward to
upshift and rearward to downshift.
See Driving and Operating in your Owner Manual.
DRIVE MODE CONTROL SYSTEM
The Drive Mode Control System automatically adjusts steering,
automatic transmission (if equipped) and Magnetic Ride Control (if equipped) settings in real time.
Press the MODE button on the center console to select Touring
(default at each ignition cycle), Sport, or Snow/Ice♦ modes.
See Driving and Operating in your Owner Manual.