check engine CADILLAC ATS 2016 1.G User Guide
[x] Cancel search | Manufacturer: CADILLAC, Model Year: 2016, Model line: ATS, Model: CADILLAC ATS 2016 1.GPages: 348, PDF Size: 3.38 MB
Page 191 of 348
Cadillac ATS/ATS-V Owner Manual (GMNA-Localizing-MidEast-9369639) -
2016 - crc - 12/9/15
190 Driving and Operating
weight of the driver, passengers,
and cargo should never exceed
the vehicle's capacity weight.
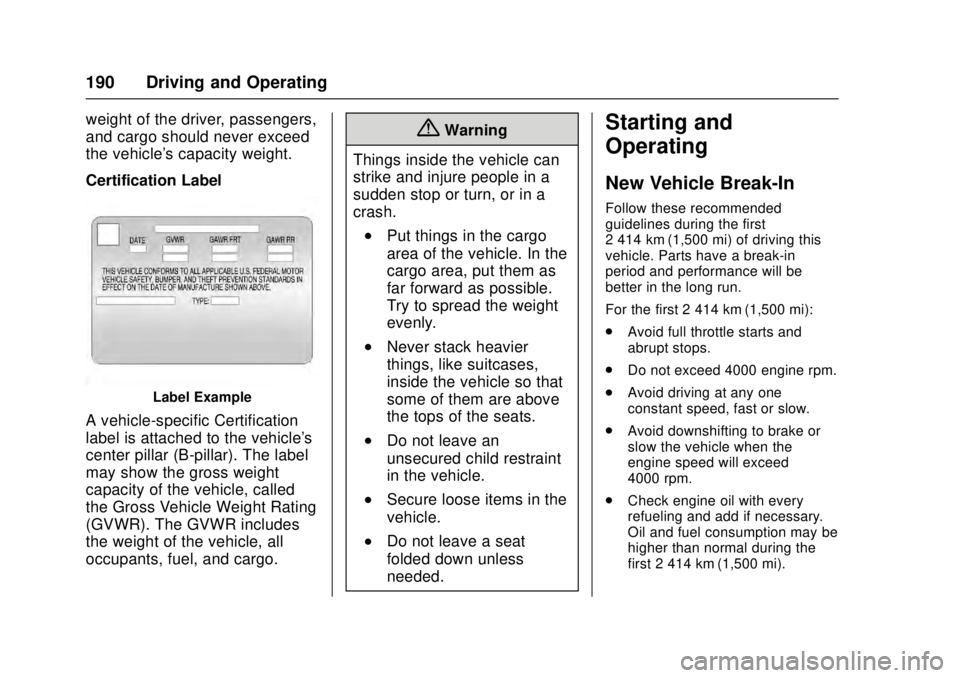
Certification Label
Label Example
A vehicle-specific Certification
label is attached to the vehicle's
center pillar (B-pillar). The label
may show the gross weight
capacity of the vehicle, called
the Gross Vehicle Weight Rating
(GVWR). The GVWR includes
the weight of the vehicle, all
occupants, fuel, and cargo.
{Warning
Things inside the vehicle can
strike and injure people in a
sudden stop or turn, or in a
crash.
.Put things in the cargo
area of the vehicle. In the
cargo area, put them as
far forward as possible.
Try to spread the weight
evenly.
.Never stack heavier
things, like suitcases,
inside the vehicle so that
some of them are above
the tops of the seats.
.Do not leave an
unsecured child restraint
in the vehicle.
.Secure loose items in the
vehicle.
.Do not leave a seat
folded down unless
needed.
Starting and
Operating
New Vehicle Break-In
Follow these recommended
guidelines during the first
2 414 km (1,500 mi) of driving this
vehicle. Parts have a break-in
period and performance will be
better in the long run.
For the first 2 414 km (1,500 mi):
. Avoid full throttle starts and
abrupt stops.
. Do not exceed 4000 engine rpm.
. Avoid driving at any one
constant speed, fast or slow.
. Avoid downshifting to brake or
slow the vehicle when the
engine speed will exceed
4000 rpm.
. Check engine oil with every
refueling and add if necessary.
Oil and fuel consumption may be
higher than normal during the
first 2 414 km (1,500 mi).
Page 202 of 348
Cadillac ATS/ATS-V Owner Manual (GMNA-Localizing-MidEast-9369639) -
2016 - crc - 12/9/15
Driving and Operating 201
3. To cancel DSC, move the shiftlever back to D (Drive).
Tap Shift Mode can also be used
temporarily while driving in
D (Drive). Pull either the (+) upshift
or (−) downshift control.
To cancel Tap Shift Mode, hold
the (+) upshift control for
two seconds. If no action is taken,
the vehicle returns to automatic
shifting after a brief period of driving
at a steady speed, or when the
vehicle comes to a stop.
While using the DSC feature, the
vehicle will have firmer, quicker
shifting. This can be used for sport
driving, climbing or descending hills,
staying in gear longer, downshifting
for more power, or engine braking. The transmission will only allow
shifting into gears appropriate for
the vehicle speed and engine
revolutions per minute (rpm). The
transmission will not automatically
shift to the next lower or higher gear
if the engine rpm is too high or
too low.
If shifting is prevented for any
reason, a DIC message will appear.
See
Transmission Messages 0141.
When accelerating the vehicle from
a stop in snowy and icy conditions,
it is suggested to shift into second
gear. A higher gear allows the
vehicle to gain more traction on
slippery surfaces. See Driver Mode
Control 0207.Brakes
Antilock Brake
System (ABS)
This vehicle has ABS, an advanced
electronic braking system that helps
prevent a braking skid.
When the vehicle begins to drive
away, ABS checks itself.
A momentary motor or clicking noise
might be heard while this test is
going on, and it might even be
noticed that the brake pedal moves
a little. This is normal.
If there is a problem with ABS, this
warning light stays on. See Antilock
Brake System (ABS) Warning
Light 0121.
If driving safely on a wet road and it
becomes necessary to slam on the
brakes and continue braking to
Page 204 of 348
Cadillac ATS/ATS-V Owner Manual (GMNA-Localizing-MidEast-9369639) -
2016 - crc - 12/9/15
Driving and Operating 203
If you are towing a trailer and are
parking on a hill, seeDriving
Characteristics and Towing
Tips 0238.
Parking Brake (Electric)
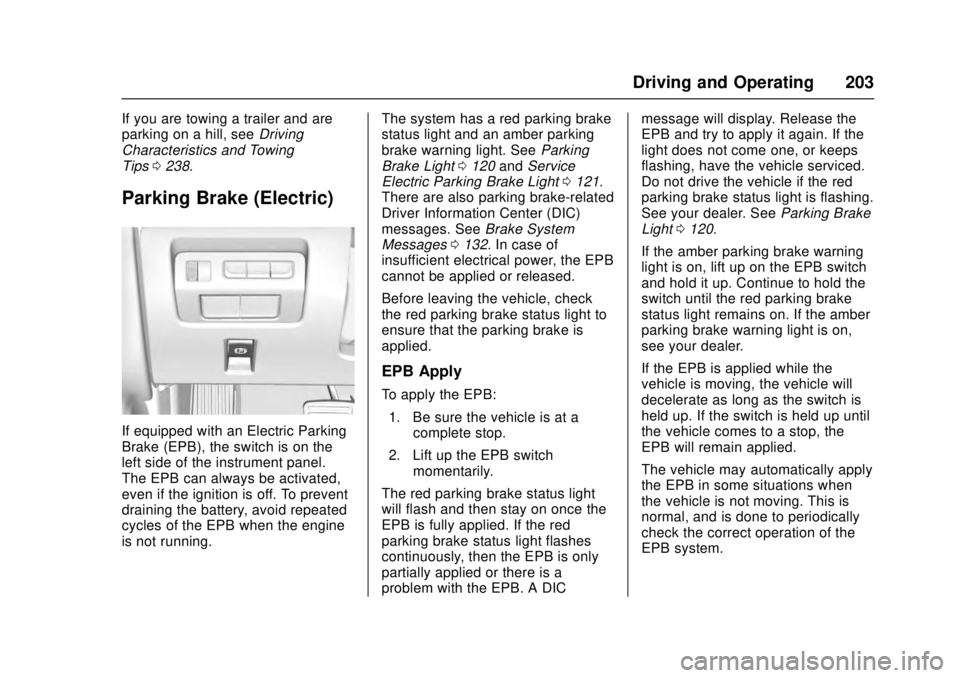
If equipped with an Electric Parking
Brake (EPB), the switch is on the
left side of the instrument panel.
The EPB can always be activated,
even if the ignition is off. To prevent
draining the battery, avoid repeated
cycles of the EPB when the engine
is not running. The system has a red parking brake
status light and an amber parking
brake warning light. See
Parking
Brake Light 0120 andService
Electric Parking Brake Light 0121.
There are also parking brake-related
Driver Information Center (DIC)
messages. See Brake System
Messages 0132. In case of
insufficient electrical power, the EPB
cannot be applied or released.
Before leaving the vehicle, check
the red parking brake status light to
ensure that the parking brake is
applied.
EPB Apply
To apply the EPB:
1. Be sure the vehicle is at a complete stop.
2. Lift up the EPB switch momentarily.
The red parking brake status light
will flash and then stay on once the
EPB is fully applied. If the red
parking brake status light flashes
continuously, then the EPB is only
partially applied or there is a
problem with the EPB. A DIC message will display. Release the
EPB and try to apply it again. If the
light does not come one, or keeps
flashing, have the vehicle serviced.
Do not drive the vehicle if the red
parking brake status light is flashing.
See your dealer. See
Parking Brake
Light 0120.
If the amber parking brake warning
light is on, lift up on the EPB switch
and hold it up. Continue to hold the
switch until the red parking brake
status light remains on. If the amber
parking brake warning light is on,
see your dealer.
If the EPB is applied while the
vehicle is moving, the vehicle will
decelerate as long as the switch is
held up. If the switch is held up until
the vehicle comes to a stop, the
EPB will remain applied.
The vehicle may automatically apply
the EPB in some situations when
the vehicle is not moving. This is
normal, and is done to periodically
check the correct operation of the
EPB system.
Page 206 of 348
Cadillac ATS/ATS-V Owner Manual (GMNA-Localizing-MidEast-9369639) -
2016 - crc - 12/9/15
Driving and Operating 205
drive off. After the driver completely
stops and holds the vehicle in a
complete standstill on a grade, HSA
will be automatically activated.
During the transition period between
when the driver releases the brake
pedal and starts to accelerate to
drive off on a grade, HSA holds the
braking pressure for a maximum of
two seconds to ensure that there is
no rolling. The brakes will
automatically release when the
accelerator pedal is applied within
the two-second window. It will not
activate if the vehicle is in a drive
gear and facing downhill, or if the
vehicle is facing uphill and in
R (Reverse).Ride Control Systems
Traction Control/
Electronic Stability
Control
System Operation
The vehicle has a Traction Control
System (TCS) and StabiliTrak®, an
electronic stability control system.
These systems help limit wheel slip
and assist the driver in maintaining
control, especially on slippery road
conditions.
TCS activates if it senses that any
of the drive wheels are spinning or
beginning to lose traction. When this
happens, TCS applies the brakes to
the spinning wheels and reduces
engine power to limit wheel spin.
StabiliTrak activates when the
vehicle senses a difference between
the intended path and the direction
the vehicle is actually traveling.
StabiliTrak selectively applies
braking pressure to any one of the vehicle wheel brakes to assist the
driver in keeping the vehicle on the
intended path.
If cruise control is being used and
traction control or StabiliTrak begins
to limit wheel spin, cruise control will
disengage. Cruise control may be
turned back on when road
conditions allow.
Both systems come on
automatically when the vehicle is
started and begins to move. The
systems may be heard or felt while
they are operating or while
performing diagnostic checks. This
is normal and does not mean there
is a problem with the vehicle.
It is recommended to leave both
systems on for normal driving
conditions, but it may be necessary
to turn TCS off if the vehicle gets
stuck in sand, mud, ice, or snow.
See
If the Vehicle Is Stuck 0186
and “Turning the Systems Off and
On” later in this section.
Page 238 of 348
Cadillac ATS/ATS-V Owner Manual (GMNA-Localizing-MidEast-9369639) -
2016 - crc - 12/9/15
Driving and Operating 237
the fuel cap has been left off or
improperly installed. This would
allow fuel to evaporate into the
atmosphere. SeeMalfunction
Indicator Lamp (Check Engine
Light) 0118.
Caution
If a new fuel cap is needed, be
sure to get the right type of cap
from your dealer. The wrong type
of fuel cap may not fit properly,
may cause the malfunction
indicator lamp to light, and could
damage the fuel tank and
emissions system. See
Malfunction Indicator Lamp
(Check Engine Light) 0118. Coupe
–Capless Fuel System
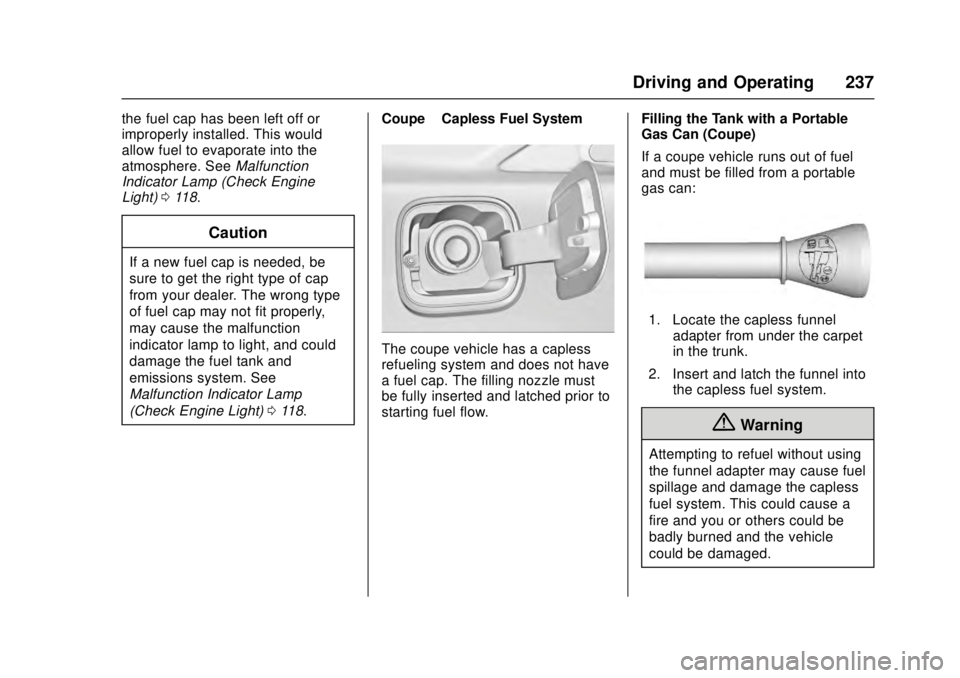
The coupe vehicle has a capless
refueling system and does not have
a fuel cap. The filling nozzle must
be fully inserted and latched prior to
starting fuel flow. Filling the Tank with a Portable
Gas Can (Coupe)
If a coupe vehicle runs out of fuel
and must be filled from a portable
gas can:
1. Locate the capless funnel
adapter from under the carpet
in the trunk.
2. Insert and latch the funnel into the capless fuel system.
{Warning
Attempting to refuel without using
the funnel adapter may cause fuel
spillage and damage the capless
fuel system. This could cause a
fire and you or others could be
badly burned and the vehicle
could be damaged.
Page 240 of 348

Cadillac ATS/ATS-V Owner Manual (GMNA-Localizing-MidEast-9369639) -
2016 - crc - 12/9/15
Driving and Operating 239
.Do not tow a trailer during the
first 2 414 km (1,500 mi) to
prevent damage to the engine,
axle, or other parts.
. Then during the first 800 km
(500 mi) of trailer towing, do not
drive over 80 km/h (50 mph) and
do not make starts at full throttle.
. Vehicles can tow in D (Drive).
Shift the transmission to a lower
gear if the transmission shifts
too often under heavy loads and/
or hilly conditions.
. Do not use Adaptive Cruise
Control when towing.
. The Front Automatic Braking
System should be set to Off
when towing. See Front
Automatic Braking (FAB)
System 0229.
. Turn off Parking Assist when
towing.{Warning
When towing a trailer, exhaust
gases may collect at the rear of
the vehicle and enter if the
liftgate, trunk/hatch, or rear-most
window is open.
When towing a trailer:
. Do not drive with the
liftgate, trunk/hatch,
or rear-most window open.
. Fully open the air outlets on
or under the instrument
panel.
. Also adjust the climate
control system to a setting
that brings in only outside
air. See “Climate Control
Systems” in the Index.
For more information about
carbon monoxide, see Engine
Exhaust 0197.
Towing a trailer requires a certain
amount of experience. The
combination you are driving is
longer and not as responsive as the vehicle itself. Get acquainted with
the handling and braking of the rig
before setting out for the open road.
Before starting, check all trailer hitch
parts and attachments, safety
chains, electrical connectors, lamps,
tires, and mirrors. If the trailer has
electric brakes, start the
combination moving and then apply
the trailer brake controller by hand
to be sure the brakes work.
During the trip, check occasionally
to be sure that the load is secure
and the lamps and any trailer
brakes still work.
Following Distance
Stay at least twice as far behind the
vehicle ahead as you would when
driving the vehicle without a trailer.
This can help to avoid heavy
braking and sudden turns.
Passing
More passing distance is needed
when towing a trailer. The
combination will not accelerate as
quickly and is longer so it is
Page 241 of 348
Cadillac ATS/ATS-V Owner Manual (GMNA-Localizing-MidEast-9369639) -
2016 - crc - 12/9/15
240 Driving and Operating
necessary to go much farther
beyond the passed vehicle before
returning to the lane.
Backing Up
Hold the bottom of the steering
wheel with one hand. To move the
trailer to the left, move that hand to
the left. To move the trailer to the
right, move your hand to the right.
Always back up slowly and,
if possible, have someone
guide you.
Making TurnsCaution
Making very sharp turns while
trailering could cause the trailer to
come in contact with the vehicle.
The vehicle could be damaged.
Avoid making very sharp turns
while trailering.
When turning with a trailer, make
wider turns than normal. Do this so
the trailer will not strike soft
shoulders, curbs, road signs, trees, or other objects. Avoid jerky or
sudden maneuvers. Signal well in
advance.
If the trailer turn signal bulbs burn
out, the arrows on the instrument
cluster will still flash for turns. It is
important to check occasionally to
be sure the trailer bulbs are still
working.
Driving on Grades
Reduce speed and shift to a lower
gear
before starting down a long or
steep downgrade. If the
transmission is not shifted down, the
brakes might get hot and no longer
work well.
Vehicles can tow in D (Drive). Shift
the transmission to a lower gear if
the transmission shifts too often
under heavy loads and/or hilly
conditions.
When towing at high altitude on
steep uphill grades, consider the
following: Engine coolant will boil at
a lower temperature than at normal
altitudes. If the engine is turned off
immediately after towing at high
altitude on steep uphill grades, the vehicle may show signs similar to
engine overheating. To avoid this,
let the engine run while parked,
preferably on level ground, with the
automatic transmission in P (Park)
for a few minutes before turning the
engine off. If the overheat warning
comes on, see
Engine
Overheating 0264.
Parking on Hills
{Warning
Parking the vehicle on a hill with
the trailer attached can be
dangerous. If something goes
wrong, the rig could start to move.
People can be injured, and both
the vehicle and the trailer can be
damaged. When possible, always
park the rig on a flat surface.
If parking the rig on a hill: 1. Press the brake pedal, but do not shift into P (Park) yet. Turn
the wheels into the curb if
facing downhill or into traffic if
facing uphill.
Page 242 of 348
Cadillac ATS/ATS-V Owner Manual (GMNA-Localizing-MidEast-9369639) -
2016 - crc - 12/9/15
Driving and Operating 241
2. Have someone place chocksunder the trailer wheels.
3. When the wheel chocks are in place, release the regular
brakes until the chocks absorb
the load.
4. Reapply the brake pedal. Then apply the parking brake and
shift into P (Park).
5. Release the brake pedal.
Leaving After Parking on a Hill
1. Apply and hold the brake pedal.
2. Start the engine.
3. Shift into a gear.
4. Release the parking brake.
5. Let up on the brake pedal.
6. Drive slowly until the trailer is clear of the chocks.
7. Stop and have someone pick up and store the chocks.
Maintenance when Trailer
Towing
The vehicle needs service more
often when pulling a trailer. See
Maintenance Schedule 0323.
Things that are especially important
in trailer operation are automatic
transmission fluid, engine oil, axle
lubricant, belts, cooling system, and
brake system. It is a good idea to
inspect these before and during
the trip.
Check periodically to see that all
hitch nuts and bolts are tight.
Trailer Towing (Coupe
and V-Series)
The vehicle is neither designed nor
intended to tow a trailer.
Trailer Towing (Sedan
With V6 Engine)
Before pulling a trailer, there are
three important considerations that
have to do with weight:
. The weight of the trailer.
. The weight of the trailer tongue. .
The total weight on your
vehicle's tires.
Weight of the Trailer
How heavy can a trailer safely be?
It should never weigh more than
454 kg (1,000 lb). But even that can
be too heavy.
It depends on how the rig is used.
For example, speed, altitude, road
grades, outside temperature, and
how much the vehicle is used to pull
a trailer are all important. It can
depend on any special equipment
on the vehicle, and the amount of
tongue weight the vehicle can carry.
See “Weight of the Trailer Tongue”
later in this section.
Maximum trailer weight is calculated
assuming only the driver is in the
tow vehicle and it has all the
required trailering equipment. The
weight of additional optional
equipment, passengers, and cargo
in the tow vehicle must be
subtracted from the maximum trailer
weight.
Ask your dealer for trailering
information or advice.
Page 244 of 348
Cadillac ATS/ATS-V Owner Manual (GMNA-Localizing-MidEast-9369639) -
2016 - crc - 12/9/15
Driving and Operating 243
Safety Chains
Always attach chains between the
vehicle and the trailer. Cross the
safety chains under the tongue of
the trailer to help prevent the tongue
from contacting the road if it
becomes separated from the hitch.
Leave enough slack so the rig can
turn. Never allow safety chains to
drag on the ground.
Trailer Brakes
Does the trailer have its own
brakes? Be sure to read and follow
the instructions for the trailer brakes
so they are installed, adjusted, and
maintained properly.
Because the vehicle has antilock
brakes, do not tap into the vehicle's
brake system. If this is done, both
brake systems will not work well or
at all.
Conversions and
Add-Ons
Add-On Electrical
Equipment
{Warning
The Data Link Connector (DLC) is
used for vehicle service and
Emission Inspection/Maintenance
testing. SeeMalfunction Indicator
Lamp (Check Engine Light) 0118.
A device connected to the DLC —
such as an aftermarket fleet or
driver-behavior tracking device —
may interfere with vehicle
systems. This could affect vehicle
operation and cause a crash.
Such devices may also access
information stored in the vehicle’s
systems.
Caution
Some electrical equipment can
damage the vehicle or cause
components to not work and
would not be covered by the
vehicle warranty. Always check
with your dealer before adding
electrical equipment.
Add-on equipment can drain the
vehicle's 12-volt battery, even if the
vehicle is not operating.
The vehicle has an airbag system.
Before attempting to add anything
electrical to the vehicle, see
Servicing the Airbag-Equipped
Vehicle 081 and Adding Equipment
to the Airbag-Equipped
Vehicle 081.
Page 245 of 348
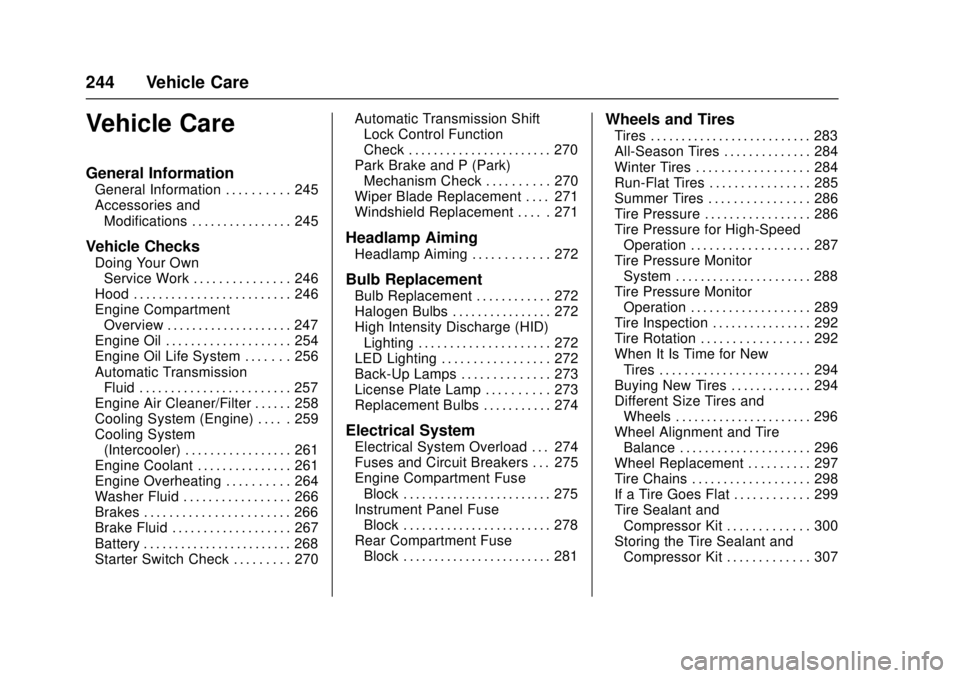
Cadillac ATS/ATS-V Owner Manual (GMNA-Localizing-MidEast-9369639) -
2016 - crc - 12/9/15
244 Vehicle Care
Vehicle Care
General Information
General Information . . . . . . . . . . 245
Accessories andModifications . . . . . . . . . . . . . . . . 245
Vehicle Checks
Doing Your OwnService Work . . . . . . . . . . . . . . . 246
Hood . . . . . . . . . . . . . . . . . . . . . . . . . 246
Engine Compartment Overview . . . . . . . . . . . . . . . . . . . . 247
Engine Oil . . . . . . . . . . . . . . . . . . . . 254
Engine Oil Life System . . . . . . . 256
Automatic Transmission Fluid . . . . . . . . . . . . . . . . . . . . . . . . 257
Engine Air Cleaner/Filter . . . . . . 258
Cooling System (Engine) . . . . . 259
Cooling System (Intercooler) . . . . . . . . . . . . . . . . . 261
Engine Coolant . . . . . . . . . . . . . . . 261
Engine Overheating . . . . . . . . . . 264
Washer Fluid . . . . . . . . . . . . . . . . . 266
Brakes . . . . . . . . . . . . . . . . . . . . . . . 266
Brake Fluid . . . . . . . . . . . . . . . . . . . 267
Battery . . . . . . . . . . . . . . . . . . . . . . . . 268
Starter Switch Check . . . . . . . . . 270 Automatic Transmission Shift
Lock Control Function
Check . . . . . . . . . . . . . . . . . . . . . . . 270
Park Brake and P (Park) Mechanism Check . . . . . . . . . . 270
Wiper Blade Replacement . . . . 271
Windshield Replacement . . . . . 271
Headlamp Aiming
Headlamp Aiming . . . . . . . . . . . . 272
Bulb Replacement
Bulb Replacement . . . . . . . . . . . . 272
Halogen Bulbs . . . . . . . . . . . . . . . . 272
High Intensity Discharge (HID) Lighting . . . . . . . . . . . . . . . . . . . . . 272
LED Lighting . . . . . . . . . . . . . . . . . 272
Back-Up Lamps . . . . . . . . . . . . . . 273
License Plate Lamp . . . . . . . . . . 273
Replacement Bulbs . . . . . . . . . . . 274
Electrical System
Electrical System Overload . . . 274
Fuses and Circuit Breakers . . . 275
Engine Compartment Fuse Block . . . . . . . . . . . . . . . . . . . . . . . . 275
Instrument Panel Fuse Block . . . . . . . . . . . . . . . . . . . . . . . . 278
Rear Compartment Fuse Block . . . . . . . . . . . . . . . . . . . . . . . . 281
Wheels and Tires
Tires . . . . . . . . . . . . . . . . . . . . . . . . . . 283
All-Season Tires . . . . . . . . . . . . . . 284
Winter Tires . . . . . . . . . . . . . . . . . . 284
Run-Flat Tires . . . . . . . . . . . . . . . . 285
Summer Tires . . . . . . . . . . . . . . . . 286
Tire Pressure . . . . . . . . . . . . . . . . . 286
Tire Pressure for High-SpeedOperation . . . . . . . . . . . . . . . . . . . 287
Tire Pressure Monitor System . . . . . . . . . . . . . . . . . . . . . . 288
Tire Pressure Monitor Operation . . . . . . . . . . . . . . . . . . . 289
Tire Inspection . . . . . . . . . . . . . . . . 292
Tire Rotation . . . . . . . . . . . . . . . . . 292
When It Is Time for New Tires . . . . . . . . . . . . . . . . . . . . . . . . 294
Buying New Tires . . . . . . . . . . . . . 294
Different Size Tires and Wheels . . . . . . . . . . . . . . . . . . . . . . 296
Wheel Alignment and Tire Balance . . . . . . . . . . . . . . . . . . . . . 296
Wheel Replacement . . . . . . . . . . 297
Tire Chains . . . . . . . . . . . . . . . . . . . 298
If a Tire Goes Flat . . . . . . . . . . . . 299
Tire Sealant and Compressor Kit . . . . . . . . . . . . . 300
Storing the Tire Sealant and Compressor Kit . . . . . . . . . . . . . 307