clock CADILLAC ATS 2016 1.G Owners Manual
[x] Cancel search | Manufacturer: CADILLAC, Model Year: 2016, Model line: ATS, Model: CADILLAC ATS 2016 1.GPages: 348, PDF Size: 3.38 MB
Page 104 of 348
Cadillac ATS/ATS-V Owner Manual (GMNA-Localizing-MidEast-9369639) -
2016 - crc - 12/9/15
Instruments and Controls 103
Instruments and
Controls
Controls
Steering Wheel Adjustment . . . 104
Steering Wheel Controls . . . . . . 105
Heated Steering Wheel . . . . . . . 105
Horn . . . . . . . . . . . . . . . . . . . . . . . . . . 105
Windshield Wiper/Washer . . . . 105
Clock . . . . . . . . . . . . . . . . . . . . . . . . . 107
Power Outlets . . . . . . . . . . . . . . . . 107
Wireless Charging . . . . . . . . . . . . 109
Warning Lights, Gauges, and
Indicators
Warning Lights, Gauges, andIndicators . . . . . . . . . . . . . . . . . . . 110
Instrument Cluster . . . . . . . . . . . . 111
Speedometer . . . . . . . . . . . . . . . . . 113
Odometer . . . . . . . . . . . . . . . . . . . . . 113
Trip Odometer . . . . . . . . . . . . . . . . 114
Tachometer . . . . . . . . . . . . . . . . . . . 114
Fuel Gauge . . . . . . . . . . . . . . . . . . . 114
Engine Coolant Temperature Gauge . . . . . . . . . . . . . . . . . . . . . . 115
Safety Belt Reminders . . . . . . . . 116
Airbag Readiness Light . . . . . . . 116
Passenger Airbag Status Indicator . . . . . . . . . . . . . . . . . . . . . 117 Charging System Light . . . . . . . 117
Malfunction Indicator Lamp
(Check Engine Light) . . . . . . . . 118
Brake System Warning Light . . . . . . . . . . . . . . . . . . . . . . . . 120
Parking Brake Light . . . . . . . . . . 120
Service Electric Parking Brake Light . . . . . . . . . . . . . . . . . . . . . . . . 121
Antilock Brake System (ABS) Warning Light . . . . . . . . . . . . . . . 121
Lane Keep Assist (LKA) Light . . . . . . . . . . . . . . . . . . . . . . . . 121
Vehicle Ahead Indicator . . . . . . 122
Traction Off Light . . . . . . . . . . . . . 122
StabiliTrak
®OFF Light . . . . . . . . 122
Traction Control System (TCS)/ StabiliTrak
®Light . . . . . . . . . . . 123
Engine Coolant Temperature Warning Light . . . . . . . . . . . . . . . 123
Tire Pressure Light . . . . . . . . . . . 123
Engine Oil Pressure Light . . . . 124
Low Fuel Warning Light . . . . . . 124
Security Light . . . . . . . . . . . . . . . . . 125
High-Beam On Light . . . . . . . . . . 125
Adaptive Forward Lighting (AFL) Light . . . . . . . . . . . . . . . . . . 125
Lamps On Reminder . . . . . . . . . 125
Cruise Control Light . . . . . . . . . . 126
Information Displays
Driver Information Center (DIC) . . . . . . . . . . . . . . . . 126
Head-Up Display (HUD) . . . . . . 128
Vehicle Messages
Vehicle Messages . . . . . . . . . . . . 131
Battery Voltage and Charging Messages . . . . . . . . . . . . . . . . . . . 132
Brake System Messages . . . . . 132
Cruise Control Messages . . . . . 133
Door Ajar Messages . . . . . . . . . . 133
Engine Cooling System Messages . . . . . . . . . . . . . . . . . . . 134
Engine Oil Messages . . . . . . . . . 134
Engine Power Messages . . . . . 135
Fuel System Messages . . . . . . . 135
Key and Lock Messages . . . . . 135
Lamp Messages . . . . . . . . . . . . . . 136
Object Detection System Messages . . . . . . . . . . . . . . . . . . . 136
Ride Control System Messages . . . . . . . . . . . . . . . . . . . 139
Airbag System Messages . . . . 139
Safety Belt Messages . . . . . . . . 139
Security Messages . . . . . . . . . . . 139
Service Vehicle Messages . . . . 139
Starting the Vehicle Messages . . . . . . . . . . . . . . . . . . . 140
Tire Messages . . . . . . . . . . . . . . . . 140
Transmission Messages . . . . . . 141
Page 108 of 348
Cadillac ATS/ATS-V Owner Manual (GMNA-Localizing-MidEast-9369639) -
2016 - crc - 12/9/15
Instruments and Controls 107
{Warning
In freezing weather, do not use
the washer until the windshield is
warmed. Otherwise the washer
fluid can form ice on the
windshield, blocking your vision.
Clock
The infotainment system controls
are used to access the time and
date settings through the menu
system. See“Overview”in the
infotainment manual for information
about how to use the menu system.
Setting the Time
To set the time:
1. Press the SETTINGS screen button and press Time
and Date.
2. Press Set Time and press + or −to increase or decrease
hours, minutes, and AM or PM.
Press 12Hr or 24Hr for 12 or
24 hour clock. 3. Press
}to go back to the
previous menu.
If auto timing is set, the time
displayed on the clock may not
update immediately when driving
into a new time zone.
To set the date: 1. Press the SETTINGS screen button and press Time
and Date.
2. Press Set Date and press + or −to increase or decrease
month, day, or year.
3. Press
}to go back to the
previous menu.
To set the clock display: 1. Press the SETTINGS screen button and press Time
and Date.
2. Press Clock Display and press OFF or ON to turn the clock
display off or on.
3. Press
}to go back to the
previous menu.
Power Outlets
Power Outlet 12 Volt Direct
Current
The accessory power outlets can be
used to plug in electrical equipment,
such as a cell phone or MP3 player.
The vehicle has two accessory
power outlets:
. Inside the front storage bin
below the climate control
system.
. On the rear of the center floor
console.
Lift the cover to access the
accessory power outlet.
Certain electrical accessories may
not be compatible with the
accessory power outlet and could
overload a vehicle circuit breaker or
adapter fuse. If overloaded, the
circuit breaker will reset after all
devices are disconnected or if
Retained Accessory Power (RAP) is
turned off and then back on. See
Retained Accessory Power (RAP)
0 195. Wait one minute to allow the
circuit breaker to reset before
Page 143 of 348
Cadillac ATS/ATS-V Owner Manual (GMNA-Localizing-MidEast-9369639) -
2016 - crc - 12/9/15
142 Instruments and Controls
Vehicle
Personalization
Use the audio system controls to
access the personalization menus
for customizing vehicle features.
The following are all possible
personalization features. Depending
on the vehicle, some may not be
available.
Infotainment System Audio
System Controls
To access the
personalization menu:1. Press SETTINGS on the Home page on the infotainment
system display.
2. Press the desired feature to display a list of available
options.
3. Press to select the desired feature setting.
4. Press
0to return to the
previous menu. Personalization Menus
The following list of menu items may
be available:
.
Time and Date
. Driving Mode
. Language (Language)
. Valet Mode
. Radio
. Vehicle
. Bluetooth
. Apple CarPlay
. Android Auto
. Voice
. Display
. Rear Camera
. Return to Factory Settings
. Software Information
Each menu is detailed in the
following information.Time and Date
Manually set the time and date. See
Clock 0107.
Driving Mode
Select and the following may
display:
.
Engine Sound Management
Engine Sound Management
Select Engine Sound Management,
then choose from the available
options. See Driver Mode
Control 0207.
Language (Language)
Select Language, then select from
the available language(s).
Select the language. The selected
language will display on the system,
and voice recognition (if equipped)
will reflect the selected language.
Valet Mode (If Equipped)
This will lock the infotainment
system and steering wheel controls.
It may also limit access to vehicle
storage locations (if equipped).
To enable valet mode:
1. Enter a four-digit code on the keypad.
Page 237 of 348
Cadillac ATS/ATS-V Owner Manual (GMNA-Localizing-MidEast-9369639) -
2016 - crc - 12/9/15
236 Driving and Operating
Warning (Continued)
.Fuel can spray out if the fuel
cap is opened too quickly.
This spray can happen if the
tank is nearly full, and is
more likely in hot weather.
Open the fuel cap slowly
and wait for any hiss noise
to stop, then unscrew the
cap all the way.
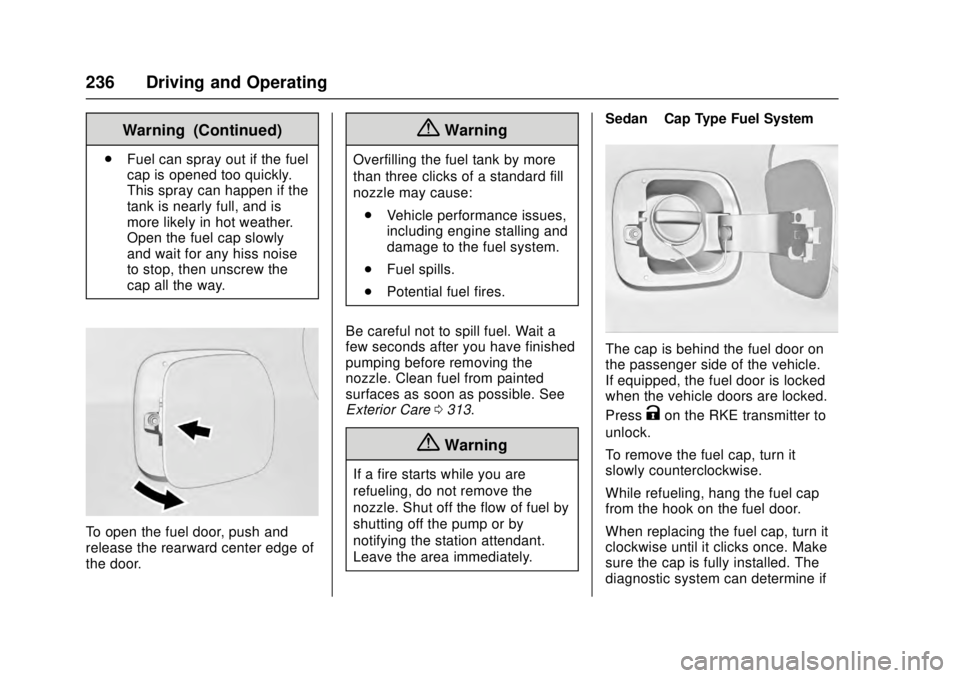
To open the fuel door, push and
release the rearward center edge of
the door.
{Warning
Overfilling the fuel tank by more
than three clicks of a standard fill
nozzle may cause:
. Vehicle performance issues,
including engine stalling and
damage to the fuel system.
. Fuel spills.
. Potential fuel fires.
Be careful not to spill fuel. Wait a
few seconds after you have finished
pumping before removing the
nozzle. Clean fuel from painted
surfaces as soon as possible. See
Exterior Care 0313.
{Warning
If a fire starts while you are
refueling, do not remove the
nozzle. Shut off the flow of fuel by
shutting off the pump or by
notifying the station attendant.
Leave the area immediately. Sedan
–Cap Type Fuel System
The cap is behind the fuel door on
the passenger side of the vehicle.
If equipped, the fuel door is locked
when the vehicle doors are locked.
Press
Kon the RKE transmitter to
unlock.
To remove the fuel cap, turn it
slowly counterclockwise.
While refueling, hang the fuel cap
from the hook on the fuel door.
When replacing the fuel cap, turn it
clockwise until it clicks once. Make
sure the cap is fully installed. The
diagnostic system can determine if
Page 264 of 348
Cadillac ATS/ATS-V Owner Manual (GMNA-Localizing-MidEast-9369639) -
2016 - crc - 12/9/15
Vehicle Care 263
of the fill neck, add a 50/50 mixture
of clean, drinkable water and
DEX-COOL coolant at the coolant
surge tank, but be sure the cooling
system, including the coolant surge
tank pressure cap, is cool before
you do it.
{Warning
Steam and scalding liquids from a
hot cooling system can blow out
and burn you badly. Never turn
the cap when the cooling system,
including the surge tank pressure
cap, is hot. Wait for the cooling
system and surge tank pressure
cap to cool.
{Warning
Adding only plain water or some
other liquid to the cooling system
can be dangerous. Plain water
and other liquids, can boil before
the proper coolant mixture will.
The coolant warning system is set(Continued)
Warning (Continued)
for the proper coolant mixture.
With plain water or the wrong
mixture, the engine could get too
hot but you would not get the
overheat warning. The engine
could catch fire and you or others
could be burned. Use a 50/
50 mixture of clean, drinkable
water and DEX-COOL coolant.
Caution
In cold weather, water can freeze
and crack the engine, radiator,
heater core, and other parts. Use
the recommended coolant and
the proper coolant mixture.
{Warning
You can be burned if you spill
coolant on hot engine parts.
Coolant contains ethylene glycol
and it will burn if the engine parts
are hot enough. Do not spill
coolant on a hot engine.
1. Remove the coolant surge tank pressure cap from the top
chamber when the cooling
system, including the coolant
surge tank pressure cap and
upper radiator hose, is no
longer hot.
Turn the pressure cap slowly
counterclockwise. If you hear a
hiss, wait for that to stop. This
will allow any pressure still left
to be vented out the
discharge hose.
2. Keep turning the pressure cap slowly and remove it. Open the
surge tank service port cap to
the lower chamber
Page 274 of 348
Cadillac ATS/ATS-V Owner Manual (GMNA-Localizing-MidEast-9369639) -
2016 - crc - 12/9/15
Vehicle Care 273
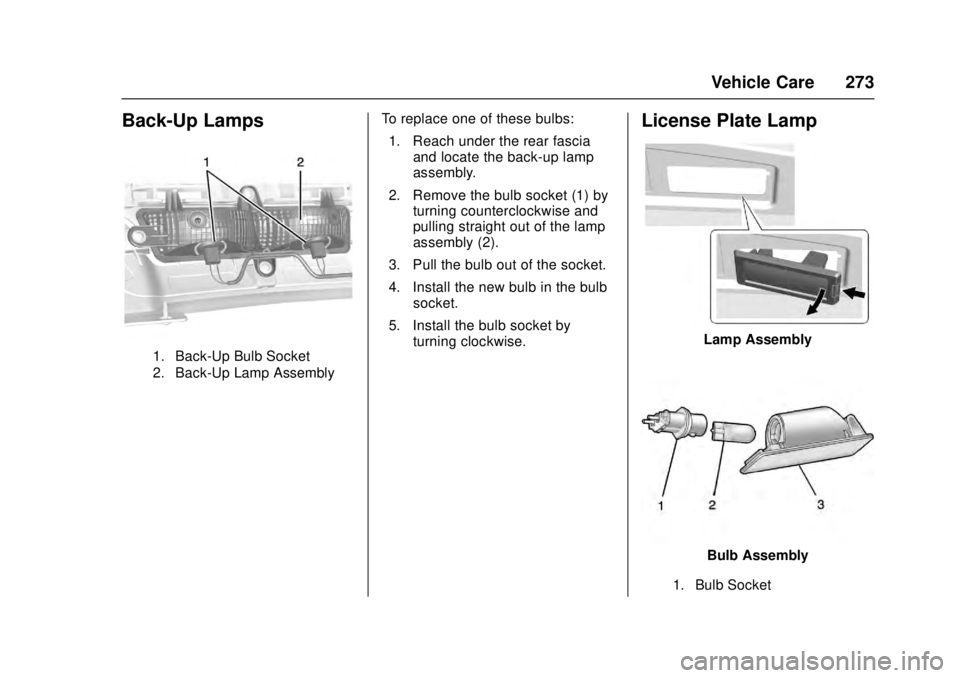
Back-Up Lamps
1. Back-Up Bulb Socket
2. Back-Up Lamp Assembly
To replace one of these bulbs:1. Reach under the rear fascia and locate the back-up lamp
assembly.
2. Remove the bulb socket (1) by turning counterclockwise and
pulling straight out of the lamp
assembly (2).
3. Pull the bulb out of the socket.
4. Install the new bulb in the bulb socket.
5. Install the bulb socket by turning clockwise.License Plate Lamp
Lamp Assembly
Bulb Assembly
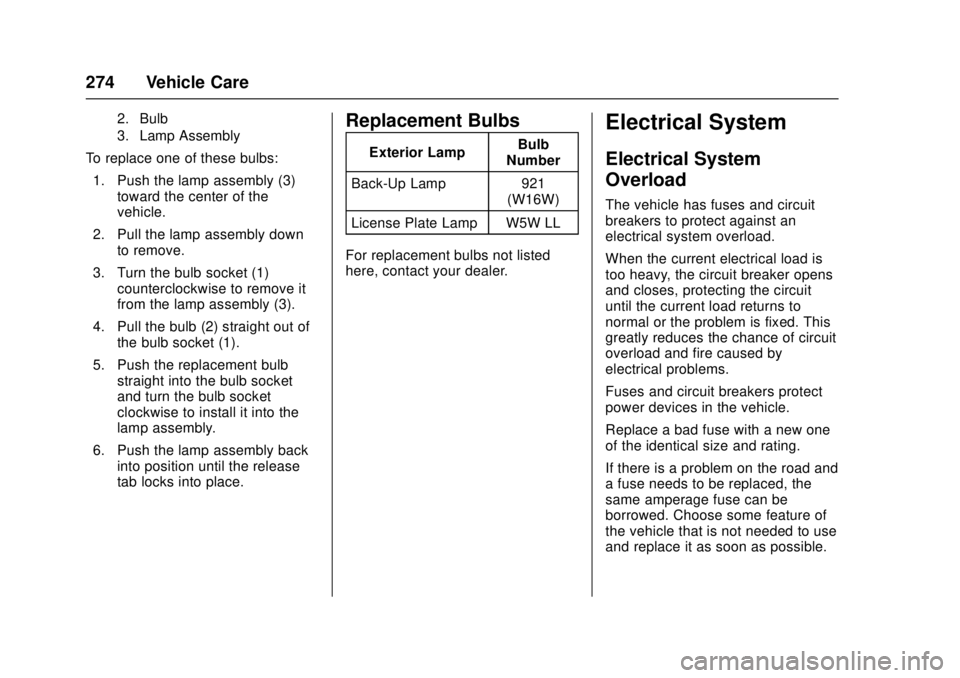
1. Bulb Socket
Page 275 of 348
Cadillac ATS/ATS-V Owner Manual (GMNA-Localizing-MidEast-9369639) -
2016 - crc - 12/9/15
274 Vehicle Care
2. Bulb
3. Lamp Assembly
To replace one of these bulbs:1. Push the lamp assembly (3) toward the center of the
vehicle.
2. Pull the lamp assembly down to remove.
3. Turn the bulb socket (1) counterclockwise to remove it
from the lamp assembly (3).
4. Pull the bulb (2) straight out of the bulb socket (1).
5. Push the replacement bulb straight into the bulb socket
and turn the bulb socket
clockwise to install it into the
lamp assembly.
6. Push the lamp assembly back into position until the release
tab locks into place.
Replacement Bulbs
Exterior Lamp Bulb
Number
Back-Up Lamp 921
(W16W)
License Plate Lamp W5W LL
For replacement bulbs not listed
here, contact your dealer.
Electrical System
Electrical System
Overload
The vehicle has fuses and circuit
breakers to protect against an
electrical system overload.
When the current electrical load is
too heavy, the circuit breaker opens
and closes, protecting the circuit
until the current load returns to
normal or the problem is fixed. This
greatly reduces the chance of circuit
overload and fire caused by
electrical problems.
Fuses and circuit breakers protect
power devices in the vehicle.
Replace a bad fuse with a new one
of the identical size and rating.
If there is a problem on the road and
a fuse needs to be replaced, the
same amperage fuse can be
borrowed. Choose some feature of
the vehicle that is not needed to use
and replace it as soon as possible.
Page 303 of 348
Cadillac ATS/ATS-V Owner Manual (GMNA-Localizing-MidEast-9369639) -
2016 - crc - 12/9/15
302 Vehicle Care
Using the Tire Sealant and
Compressor Kit to Temporarily
Seal and Inflate a
Punctured Tire
Follow the directions closely for
correct sealant usage.
When using the tire sealant and
compressor kit during cold
temperatures, warm the kit in aheated environment for five minutes.
This will help to inflate the tire
faster.
If a tire goes flat, avoid further tire
and wheel damage by driving slowly
to a level place. Turn on the hazard
warning flashers. See
Hazard
Warning Flashers 0154.
See If a Tire Goes Flat 0299 for
other important safety warnings.
Do not remove any objects that
have penetrated the tire.
1. Remove the tire sealant and compressor kit from its storage
location. See Storing the Tire
Sealant and Compressor
Kit 0307.
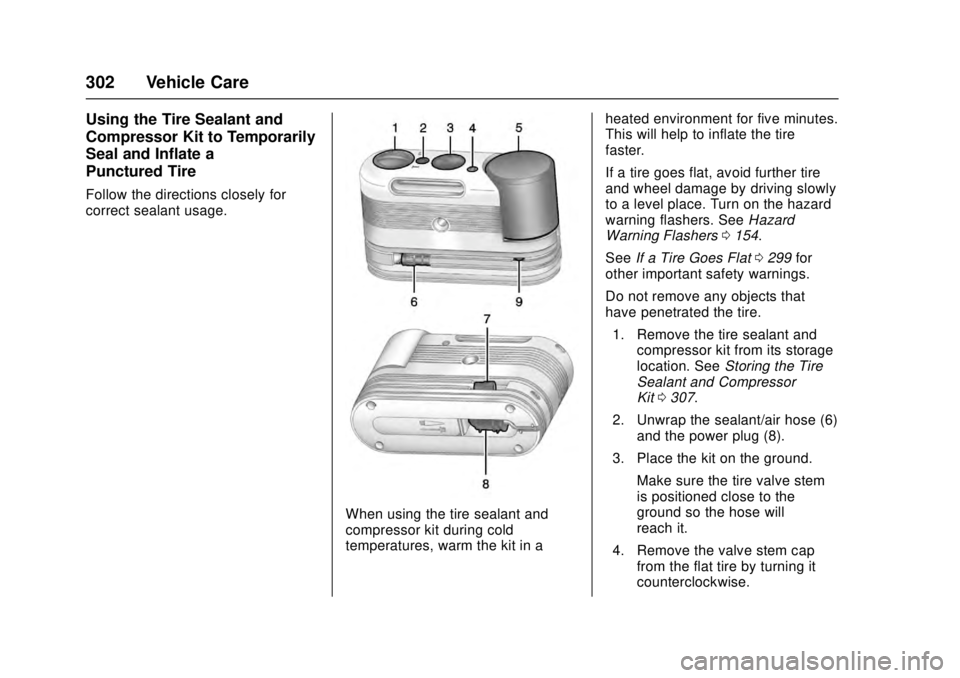
2. Unwrap the sealant/air hose (6) and the power plug (8).
3. Place the kit on the ground.
Make sure the tire valve stem
is positioned close to the
ground so the hose will
reach it.
4. Remove the valve stem cap from the flat tire by turning it
counterclockwise.
Page 304 of 348

Cadillac ATS/ATS-V Owner Manual (GMNA-Localizing-MidEast-9369639) -
2016 - crc - 12/9/15
Vehicle Care 303
5. Attach the sealant/air hose (6)onto the tire valve stem. Turn it
clockwise until it is tight.
6. Plug the power plug (8) into the accessory power outlet in the
vehicle. Unplug all items from
other accessory power outlets.
See Power Outlets 0107.
If the vehicle has an accessory
power outlet, do not use the
cigarette lighter.
If the vehicle only has a
cigarette lighter, use the
cigarette lighter.
Do not pinch the power plug
cord in the door or window.
7. Start the vehicle. The vehicle must be running while using
the air compressor.
8. Press and turn the selector switch (1) counterclockwise to
the Sealant + Air position.
9. Press the on/off (2) button to turn the tire sealant and
compressor kit on.
The compressor will inject
sealant and air into the tire. The pressure gauge (3) will
initially show a high pressure
while the compressor pushes
the sealant into the tire. Once
the sealant is completely
dispersed into the tire, the
pressure will quickly drop and
start to rise again as the tire
inflates with air only.
10. Inflate the tire to the recommended inflation
pressure using the pressure
gauge (3). The recommended
inflation pressure can be found
on the Tire and Loading
Information label. See Tire
Pressure 0286.
The pressure gauge (3) may
read higher than the actual tire
pressure while the compressor
is on. Turn the compressor off
to get an accurate pressure
reading. The compressor may
be turned on/off until the
correct pressure is reached.Caution
If the recommended pressure
cannot be reached after
approximately 25 minutes, the
vehicle should not be driven
farther. The tire is too severely
damaged and the tire sealant and
compressor kit cannot inflate the
tire. Remove the power plug from
the accessory power outlet and
unscrew the inflating hose from
the tire valve.
11. Press the on/off button (2) to turn the tire sealant and
compressor kit off.
The tire is not sealed and will
continue to leak air until the
vehicle is driven and the
sealant is distributed in the tire,
therefore, Steps 12–18 must be
done immediately after
Step 11.
Be careful while handling the
tire sealant and compressor kit
as it could be warm after
usage.
Page 305 of 348

Cadillac ATS/ATS-V Owner Manual (GMNA-Localizing-MidEast-9369639) -
2016 - crc - 12/9/15
304 Vehicle Care
12. Unplug the power plug (8) fromthe accessory power outlet in
the vehicle.
13. Turn the sealant/air hose (6) counterclockwise to remove it
from the tire valve stem.
14. Replace the tire valve stem cap.
15. Replace the sealant/air hose (6), and the power plug (8)
back in their original location.
16. If the flat tire was able to inflateto the recommended inflation
pressure, remove the
maximum speed label from the
sealant canister (5) and place it
in a highly visible location. Do
not exceed the speed on this
label until the damaged tire is
repaired or replaced. 17. Return the equipment to its
original storage location in the
vehicle.
18. Immediately drive the vehicle 8 km (5 mi) to distribute the
sealant in the tire.
19. Stop at a safe location and check the tire pressure. Refer
to Steps 1–11 under “Using the
Tire Sealant and Compressor
Kit without Sealant to Inflate a
Tire (Not Punctured).”
If the tire pressure has fallen
more than 68 kPa (10 psi)
below the recommended
inflation pressure, stop driving
the vehicle. The tire is too
severely damaged and the tire
sealant cannot seal the tire.
If the tire pressure has not
dropped more than 68 kPa
(10 psi) from the recommended
inflation pressure, inflate the
tire to the recommended
inflation pressure.
20. Wipe off any sealant from the wheel, tire, and vehicle. 21. Dispose of the used sealant
canister (5) and sealant/air
hose (6) assembly at a local
dealer or in accordance with
local regulations and practices.
22. Replace with a new canister assembly available from your
dealer.
23. After temporarily sealing the tire using the tire sealant and
compressor kit, take the
vehicle to an authorized dealer
within 161 km (100 mi) of
driving to have the tire repaired
or replaced.