ECO mode CADILLAC ATS COUPE 2017 1.G Owner's Manual
[x] Cancel search | Manufacturer: CADILLAC, Model Year: 2017, Model line: ATS COUPE, Model: CADILLAC ATS COUPE 2017 1.GPages: 335, PDF Size: 3.73 MB
Page 187 of 335
Cadillac ATS/ATS-V Owner Manual (GMNA-Localizing-MidEast-10287885) -
2017 - crc - 6/16/16
186 DRIVING AND OPERATING
{Warning
Turning off the vehicle while
moving may cause loss of power
assist in the brake and steering
systems and disable the airbags.
While driving, only shut the vehicle
off in an emergency.
If the vehicle cannot be pulled over,
and must be shut off while driving,
press and hold ENGINE START/STOP
for longer than two seconds, or press
twice within five seconds.
ACC/ACCESSORY (Amber Indicator
Light) : This mode allows you to use
some electrical accessories when the
engine is off.
With the ignition off, pressing the
button one time without the brake
pedal applied will place the ignition
system in ACC/ACCESSORY.
The ignition will switch from ACC/
ACCESSORY to OFF after five minutes
to prevent battery rundown. ON/RUN/START (Green Indicator
Light) :
This mode is for driving and
starting. With the ignition off, and the
brake pedal applied, pressing the
button once will place the ignition
system in ON/RUN/START. Once
engine cranking begins, release the
button. Engine cranking will continue
until the engine starts. See Starting the
Engine 0186. The ignition will then
remain in ON/RUN.
Service Only Mode
This power mode is available for
service and diagnostics, and to verify
the proper operation of the
malfunction indicator lamp as may be
required for emission inspection
purposes. With the vehicle off, and the
brake pedal not applied, pressing and
holding the button for more than
five seconds will place the vehicle in
Service Only Mode. The instruments
and audio systems will operate as they
do in ON/RUN, but the vehicle will
not be able to be driven. The engine
will not start in Service Only Mode.
Push the button again to turn the
vehicle off.
Starting the Engine
Move the shift lever to P (Park) or
N (Neutral). To restart the vehicle
when it is already moving, use
N (Neutral) only.
Caution
If you add electrical parts or
accessories, you could change the
way the engine operates. Any
resulting damage would not be
covered by the vehicle warranty. See
Add-On Electrical Equipment 0230.
Caution
Do not try to shift to P (Park) if the
vehicle is moving. If you do, you
could damage the transmission.
Shift to P (Park) only when the
vehicle is stopped.
Page 194 of 335
Cadillac ATS/ATS-V Owner Manual (GMNA-Localizing-MidEast-10287885) -
2017 - crc - 6/16/16
DRIVING AND OPERATING 193
D :This position is for normal driving.
It provides the best fuel economy.
If you need more power for passing,
and you are:
. Going less than 55 km/h (35 mph),
push the accelerator pedal about
halfway down.
. Going about 55 km/h (35 mph) or
more, push the accelerator all the
way down.
The transmission will shift down
to a lower gear and have more
power.
Downshifting the transmission in
slippery road conditions could result
in skidding; see “Skidding”underLoss
of Control 0173.
Caution
Spinning the tires or holding the
vehicle in one place on a hill using
only the accelerator pedal may
damage the transmission. The
repair will not be covered by the
vehicle warranty. If you are stuck,
(Continued)
Caution (Continued)
do not spin the tires. When
stopping on a hill, use the brakes to
hold the vehicle in place.
While in Sport Mode, the vehicle
monitors driving behavior, and
automatically enables Performance
Shift Features when spirited driving is
detected. These features maintain
lower transmission gears to increase
available engine braking and improve
acceleration response. The vehicle will
exit these features and return to
normal operation after a short period
when no spirited driving is detected.
See Driver Mode Control 0199.
Manual Mode
Driver Shift Control (DSC)
Caution
Driving with the engine at a high
rpm without upshifting while using
Driver Shift Control (DSC), could
damage the vehicle. Always upshift
when necessary while using DSC.
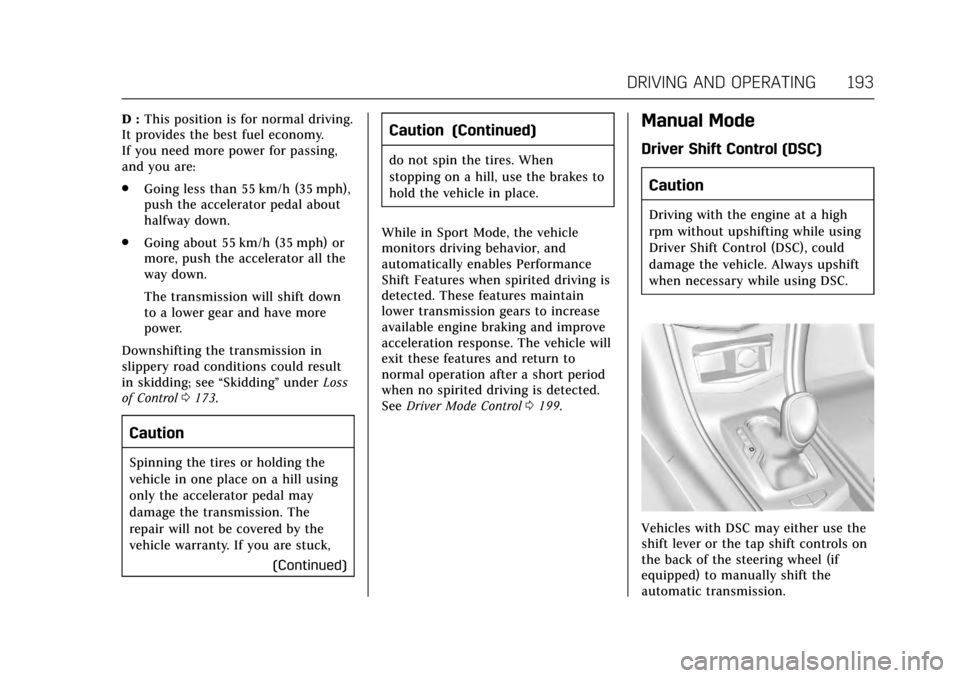
Vehicles with DSC may either use the
shift lever or the tap shift controls on
the back of the steering wheel (if
equipped) to manually shift the
automatic transmission.
Page 195 of 335
Cadillac ATS/ATS-V Owner Manual (GMNA-Localizing-MidEast-10287885) -
2017 - crc - 6/16/16
194 DRIVING AND OPERATING
To use DSC using the shift lever:1. Move the shift lever to the left from D (Drive) to M (Manual
Mode). The transmission will be
in Manual Mode and will hold
the current gear.
2. Move the shift lever forward to upshift or rearward to downshift.
3. To cancel DSC, move the shift lever back to D (Drive).
Tap Shift
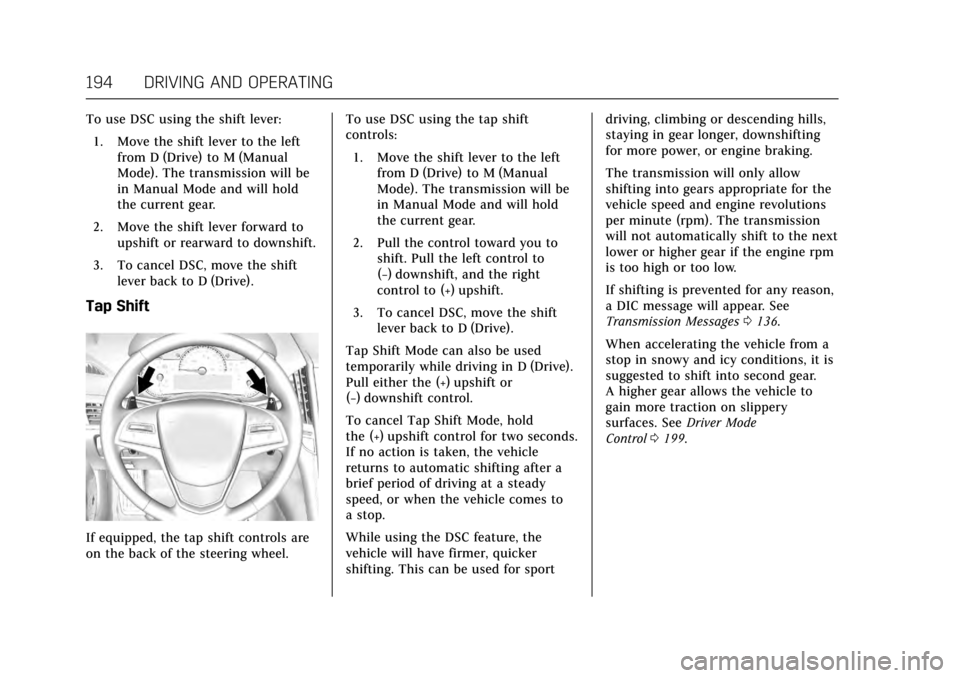
If equipped, the tap shift controls are
on the back of the steering wheel. To use DSC using the tap shift
controls:
1. Move the shift lever to the left from D (Drive) to M (Manual
Mode). The transmission will be
in Manual Mode and will hold
the current gear.
2. Pull the control toward you to shift. Pull the left control to
(−) downshift, and the right
control to (+) upshift.
3. To cancel DSC, move the shift lever back to D (Drive).
Tap Shift Mode can also be used
temporarily while driving in D (Drive).
Pull either the (+) upshift or
(−) downshift control.
To cancel Tap Shift Mode, hold
the (+) upshift control for two seconds.
If no action is taken, the vehicle
returns to automatic shifting after a
brief period of driving at a steady
speed, or when the vehicle comes to
a stop.
While using the DSC feature, the
vehicle will have firmer, quicker
shifting. This can be used for sport driving, climbing or descending hills,
staying in gear longer, downshifting
for more power, or engine braking.
The transmission will only allow
shifting into gears appropriate for the
vehicle speed and engine revolutions
per minute (rpm). The transmission
will not automatically shift to the next
lower or higher gear if the engine rpm
is too high or too low.
If shifting is prevented for any reason,
a DIC message will appear. See
Transmission Messages
0136.
When accelerating the vehicle from a
stop in snowy and icy conditions, it is
suggested to shift into second gear.
A higher gear allows the vehicle to
gain more traction on slippery
surfaces. See Driver Mode
Control 0199.
Page 200 of 335
Cadillac ATS/ATS-V Owner Manual (GMNA-Localizing-MidEast-10287885) -
2017 - crc - 6/16/16
DRIVING AND OPERATING 199
The indicator light for both systems is
in the instrument cluster. This
light will:
.Flash when TCS is limiting
wheel spin.
. Flash when StabiliTrak is
activated.
. Turn on and stay on when either
system is not working.
If either system fails to turn on or to
activate, a message displays in the
Driver Information Center (DIC), and
dcomes on and stays on to indicate
that the system is inactive and is not
assisting the driver in maintaining
control. The vehicle is safe to drive,
but driving should be adjusted
accordingly.
If
dcomes on and stays on:
1. Stop the vehicle.
2. Turn the engine off and wait 15 seconds.
3. Start the engine.
4. Drive the vehicle. If
dcomes on and stays on, the
vehicle may need more time to
diagnose the problem. If the condition
persists, see your dealer.
Turning the Systems Off and On
Thegbutton for TCS and StabiliTrak
is on the center console (ATS) or the
steering wheel (ATS-V).
Caution
Do not repeatedly brake or
accelerate heavily when TCS is off.
The vehicle driveline could be
damaged.
To turn off only TCS, press and
release
g. The Traction Off lighti
displays in the instrument cluster and
the appropriate DIC message displays.
See Ride Control System
Messages 0134.
To turn TCS on again, press and
release
g. The Traction Off lighti
displayed in the instrument cluster
will turn off. If TCS is limiting wheel spin when
g
is pressed, the system will not turn off
until the wheels stop spinning.
To turn off both TCS and StabiliTrak,
press and hold
guntil the Traction
Off light
iand StabiliTrak OFF light
gcome on and stay on in the
instrument cluster. The appropriate
DIC message displays. See Ride Control
System Messages 0134.
To turn TCS and StabiliTrak on again,
press and release
g. The Traction Off
light
iand StabiliTrak OFF lightg
in the instrument cluster turn off.
Adding accessories can affect the
vehicle performance. See Accessories
and Modifications 0232.
Driver Mode Control
Driver Mode Control attempts to add
a sportier feel, provide a more
comfortable ride, or assist in different
weather conditions or terrain. This
system simultaneously changes the
software calibration of various
sub-systems. Depending on the option
package, available features, and mode
Page 201 of 335
Cadillac ATS/ATS-V Owner Manual (GMNA-Localizing-MidEast-10287885) -
2017 - crc - 6/16/16
200 DRIVING AND OPERATING
selected, the suspension, steering, and
powertrain will change calibrations to
achieve the desired mode
characteristics. If the vehicle is
equipped with Magnetic Ride Control,
selecting the various Driver Modes
adjusts the ride of the vehicle to
enhance the ride performance for the
road conditions and the
selected mode.
The Driver Mode Control has three or
four modes: Tour, Sport, Snow/Ice,
and Track (V-Series Only). Press and
release the MODE button (ATS) or
press the
yorzbutton (ATS-V) on
the center console to activate the
mode menu in the cluster. The first
press of the button will show the
current mode. Subsequent presses will
scroll though the available modes. The
Tour and Sport modes will feel similar
on a smooth road. Select a new
setting whenever driving conditions
change.
Tour Mode
Use for normal city and highway
driving to provide a smooth, soft ride.
Sport Mode
Use where road conditions or personal
preference demand a more controlled
response.
When selected, the Sport mode
indicator will display in the Driver
Information Center (DIC).
When in Sport or Track mode, the
vehicle will shift automatically but
may hold a lower gear longer than it
would in the normal driving mode
based on braking, throttle input, and
vehicle lateral acceleration. See
Automatic Transmission 0191. The
steering will change to provide more
precise control. If the vehicle has
Magnetic Ride Control, the suspension
will change to provide better
cornering performance.
Competitive Driving Mode can be
accessed through this mode.
Snow/Ice Mode
Use when more traction is needed
during slippery conditions. The
transmission will use 2 (Second) gear
instead of 1 (First) gear when accelerating from a stop. The vehicle
will upshift normally when the vehicle
is moving.
For V-Series only, Snow/Ice mode will
use a different accelerator pedal map
to optimize traction on a slippery
surface. The accelerator pedal will
reduce engine torque at small pedal
inputs. The transmission will also
shift differently to assist in
maintaining traction.
When selected, the Snow/Ice mode
indicator will display in the DIC.
This feature is not intended for use
when the vehicle is stuck in sand,
mud, ice, snow, or gravel. If the
vehicle becomes stuck, see
If the
Vehicle Is Stuck 0180.
Track Mode (V-Series Only)
Use when maximum vehicle handling
is desired. When selected, the Track
Mode indicator will display in the DIC.
Accelerator pedal is adjusted to give
maximum control during the highest
level of spirited driving.
Page 203 of 335
Cadillac ATS/ATS-V Owner Manual (GMNA-Localizing-MidEast-10287885) -
2017 - crc - 6/16/16
202 DRIVING AND OPERATING
Performance Traction
Management (V-Series Only)
Performance Traction Management
(PTM) integrates the Traction Control,
StabiliTrak, and Magnetic Ride
Control systems to provide improved
and consistent performance when
cornering. The amount of available
engine power is based on the mode
selected, track conditions, driver skill,
and the radius of each corner.
This light is on when the vehicle is in
the PTM mode.
To select this optional handling mode,
the vehicle mode must be Track. Then
quickly press
Yon the center
console two times. PERF TRAC 1 -
WET ACTIVE HANDLING ON displays
in the DIC. When PTM is active, the up and down
buttons will no longer change Drive
Modes, but instead change PTM
modes.
To select a mode while in PTM, press
the Driver Mode Control/PTM buttons
on the center console.
To experience the performance benefit
of this system, after entering a curve
and at the point where normal
acceleration occurs, fully push the
accelerator pedal. The PTM system
will modify the level of engine power
for a smooth and consistent
corner exit.
The PTM system contains five modes.
These modes are selected by pressing
the Driver Mode Control/PTM buttons
on the center console. Scroll up or
down through modes 1-5 by pressing
the MODE SELECT up and down
button The following is a DIC display
description and the recommended
usage of each mode:
PERF TRAC 1
–WET ACTIVE
HANDLING ON
. Intended for all driver skill levels.
. Wet or damp conditions only —
not intended for use in heavy rain
or standing water.
. StabiliTrak is on and engine power
is reduced based on conditions.
PERF TRAC 2 –DRY ACTIVE
HANDLING ON
. For use by less experienced drivers
or while learning a new track.
. Dry conditions only.
. StabiliTrak is on and engine power
is slightly reduced.
PERF TRAC 3 –SPORT ACTIVE
HANDLING ON
. For use by drivers who are familiar
with the track.
. Dry conditions only.
. Requires more driving skill than
mode 2.
. StabiliTrak is on and more engine
power is available than in mode 2.
Page 205 of 335
Cadillac ATS/ATS-V Owner Manual (GMNA-Localizing-MidEast-10287885) -
2017 - crc - 6/16/16
204 DRIVING AND OPERATING
compensate for lack of driver
experience or familiarity with the race
track.
Limited-Slip Rear Axle
(Except V-Series)
If equipped, the mechanical
limited-slip differential can give more
traction on snow, mud, ice, sand,
or gravel. It works like a standard axle
most of the time, but when traction is
low, this feature allows the drive
wheel with the most traction to move
the vehicle. For vehicles with
limited-slip differential, driven under
severe conditions, the rear axle fluid
should be changed. SeeCompetitive
Driving Mode (FE4 Only) 0201 and
Maintenance Schedule 0307.
Limited-Slip Rear Axle
(V-Series Only)
If equipped, the Electronic
Limited-Slip Differential (ELSD) is
automatically activated. ELSD actively
monitors vehicle sensors and driver
inputs to determine the amount of
change for the conditions. With ELSD,
the vehicle has:
.
Enhanced high-speed control.
. Improved traction through
corners, allowing more
acceleration.
. More precise steering.
. Increased vehicle agility.
. Integration with StabiliTrak.
For vehicles with ELSD, driven under
severe conditions, the rear axle fluid
should be changed. See Competitive
Driving Mode (FE4 Only) 0201 and
Maintenance Schedule 0307.
Cruise Control
With cruise control, a speed of about
40 km/h (25 mph) or more can be
maintained without keeping your foot
on the accelerator. Cruise control does
not work at speeds below about
40 km/h (25 mph).
{Warning
Cruise control can be dangerous
where you cannot drive safely at a
steady speed. Do not use cruise
control on winding roads or in
heavy traffic.
Cruise control can be dangerous on
slippery roads. On such roads, fast
changes in tire traction can cause
excessive wheel slip, and you could
lose control. Do not use cruise
control on slippery roads.
If the StabiliTrak
®system begins to
limit wheel spin while using cruise
control, the cruise control
automatically disengages. See Traction
Control/Electronic Stability Control
0 198. If a collision alert occurs when
Page 207 of 335
Cadillac ATS/ATS-V Owner Manual (GMNA-Localizing-MidEast-10287885) -
2017 - crc - 6/16/16
206 DRIVING AND OPERATING
.To increase vehicle speed in small
increments, briefly press +RES up
to the first detent. For each press,
the vehicle goes about 1 km/h
(1 mph) faster.
. To increase vehicle speed in larger
increments, briefly press +RES up
to the second detent. For each
press, the vehicle speed increases
to the next 5 km/h (5 mph) mark
on the speedometer.
The speedometer reading can be
displayed in either English or metric
units. See Instrument Cluster 0107.
The increment value used depends on
the units displayed.
Reducing Speed While Cruise
Control is at a Set Speed
If the cruise control system is already
activated:
. Press and hold SET− down until
the desired lower speed is reached,
then release it.
. To decrease the vehicle speed in
small increments, briefly press
SET− down to the first detent. For
each press, the vehicle goes about
1 km/h (1 mph) slower. .
To decrease the vehicle speed in
larger increments, briefly press
SET− down to the second detent.
For each press, the vehicle speed
decreases to the next 5 km/h
(5 mph) mark on the speedometer.
The cruise control system may
automatically brake to slow the
vehicle down (ATS model only).
The speedometer reading can be
displayed in either English or metric
units. See Instrument Cluster 0107.
The increment value used depends on
the units displayed.
Passing Another Vehicle While
Using Cruise Control
Use the accelerator pedal to increase
the vehicle speed. When you take your
foot off the pedal, the vehicle will slow
down to the previously set cruise
speed. While pressing the accelerator
pedal or shortly following the release
to override cruise control, briefly
applying the SET– switch will result in
cruise control set to the current
vehicle speed. Using Cruise Control on Hills
How well the cruise control will work
on hills depends upon the vehicle
speed, load, and the steepness of the
hills. When going up steep hills, you
might have to step on the accelerator
pedal to maintain the vehicle speed.
When going downhill, the cruise
control system may automatically
brake to slow the vehicle down (ATS
model only). Also, you may have to
brake or shift to a lower gear to keep
the vehicle speed down. If the brake
pedal is applied, cruise control will
disengage.
Ending Cruise Control
There are four ways to end cruise
control:
.
Step lightly on the brake pedal.
. Shift the transmission to
N (Neutral).
. Press
*.
. Press
J.
Page 273 of 335
Cadillac ATS/ATS-V Owner Manual (GMNA-Localizing-MidEast-10287885) -
2017 - crc - 6/16/16
272 VEHICLE CARE
not drive too far or too fast. Driving
on the tire may not be possible if
there is permanent damage. To
prevent permanent damage, keep
speed below 80 km/h (50 mph). With
a light load the vehicle can be driven
up to 100 km (60 mi); with a
moderate load 80 km (50 mi); and a
heavy load 45 km (25 mi). As soon as
possible, contact the nearest
authorized GM or run-flat servicing
facility for inspection and repair or
replacement.
When driving on a deflated run-flat
tire, avoid potholes and other road
hazards that could damage the tire
and/or wheel beyond repair. When a
tire has been damaged, or driven any
distance while deflated, check with an
authorized run-flat tire service center
to determine whether the tire can be
repaired or should be replaced. To
maintain the run-flat feature, all
replacement tires must be run-flat
tires.
To locate the nearest GM or run-flat
servicing facility, call Customer
Assistance.The valve stems on run-flat tires have
sensors that are part of the TPMS. See
Tire Pressure Monitor System
0274.
These sensors contain batteries that
are designed to last for 10 years under
normal driving conditions. See your
dealer for wheel or sensor
replacement.
Caution
Using liquid sealants can damage
the tire valves and tire pressure
monitor sensors in the run-flat
tires. This damage is not covered by
the vehicle warranty. Do not use
liquid sealants in run-flat tires.
Summer Tires
This vehicle may come with high
performance summer tires. These tires
have a special tread and compound
that are optimized for maximum dry
and wet road performance. This
special tread and compound will have
decreased performance in cold
climates, and on ice and snow. It is
recommended that winter tires be
installed on the vehicle if frequent driving at temperatures below
approximately 5 °C (40 °F) or on ice or
snow covered roads is expected. See
Winter Tires
0271.
Caution
High performance summer tires
have rubber compounds that lose
flexibility and may develop surface
cracks in the tread area at
temperatures below −7 °C (20 °F).
Always store high performance
summer tires indoors and at
temperatures above −7 °C (20 °F)
when not in use. If the tires have
been subjected to −7 °C (20 °F) or
less, let them warm up in a heated
space to at least 5 °C (40 °F) for
24 hours or more before being
installed or driving a vehicle on
which they are installed. Do not
apply heat or blow heated air
directly on the tires. Always inspect
tires before use. See Tire
Inspection 0278.
Page 278 of 335
Cadillac ATS/ATS-V Owner Manual (GMNA-Localizing-MidEast-10287885) -
2017 - crc - 6/16/16
VEHICLE CARE 277
performed successfully. See“TPMS
Sensor Matching Process ”later in
this section.
. The TPMS sensor matching
process was not done or not
completed successfully after
rotating the tires. The malfunction
light and the DIC message should
go off after successfully
completing the sensor matching
process. See "TPMS Sensor
Matching Process" later in this
section.
. One or more TPMS sensors are
missing or damaged. The
malfunction light and the DIC
message should go off when the
TPMS sensors are installed and
the sensor matching process is
performed successfully. See your
dealer for service.
. Replacement tires or wheels do
not match the original equipment
tires or wheels. Tires and wheels
other than those recommended
could prevent the TPMS from
functioning properly. See Buying
New Tires 0280. .
Operating electronic devices or
being near facilities using radio
wave frequencies similar to the
TPMS could cause the TPMS
sensors to malfunction.
If the TPMS is not functioning
properly it cannot detect or signal a
low tire condition. See your dealer for
service if the TPMS malfunction light
and DIC message comes on and
stays on.
TPMS Sensor Matching Process
Each TPMS sensor has a unique
identification code. The identification
code needs to be matched to a new
tire/wheel position after rotating the
vehicle’s tires or replacing one or more
of the TPMS sensors. The TPMS
sensor matching process should also
be performed after replacing a spare
tire with a road tire containing the
TPMS sensor. The malfunction light
and the DIC message should go off at
the next ignition cycle. The sensors
are matched to the tire/wheel
positions, using a TPMS relearn tool,
in the following order: driver side
front tire, passenger side front tire, passenger side rear tire, and driver
side rear. See your dealer for service or
to purchase a relearn tool.
There are two minutes to match the
first tire/wheel position, and
five minutes overall to match all four
tire/wheel positions. If it takes longer,
the matching process stops and must
be restarted.
The TPMS sensor matching process is:
1. Set the parking brake.
2. Place the vehicle power mode in ON/RUN/START. See Ignition
Positions 0185.
3. Make sure the Tire Pressure info display option is turned on. The
info displays on the DIC can be
turned on and off through the
Settings menu. See Driver
Information Center (DIC) 0122.
4. Use the five-way DIC control on the right side of the steering
wheel to scroll to the Tire
Pressure screen under the DIC
info page. See Driver Information
Center (DIC) 0122.