check engine light CADILLAC ATS V 2017 1.G User Guide
[x] Cancel search | Manufacturer: CADILLAC, Model Year: 2017, Model line: ATS V, Model: CADILLAC ATS V 2017 1.GPages: 335, PDF Size: 3.73 MB
Page 128 of 335
Cadillac ATS/ATS-V Owner Manual (GMNA-Localizing-MidEast-10287885) -
2017 - crc - 6/16/16
INSTRUMENTS AND CONTROLS 127
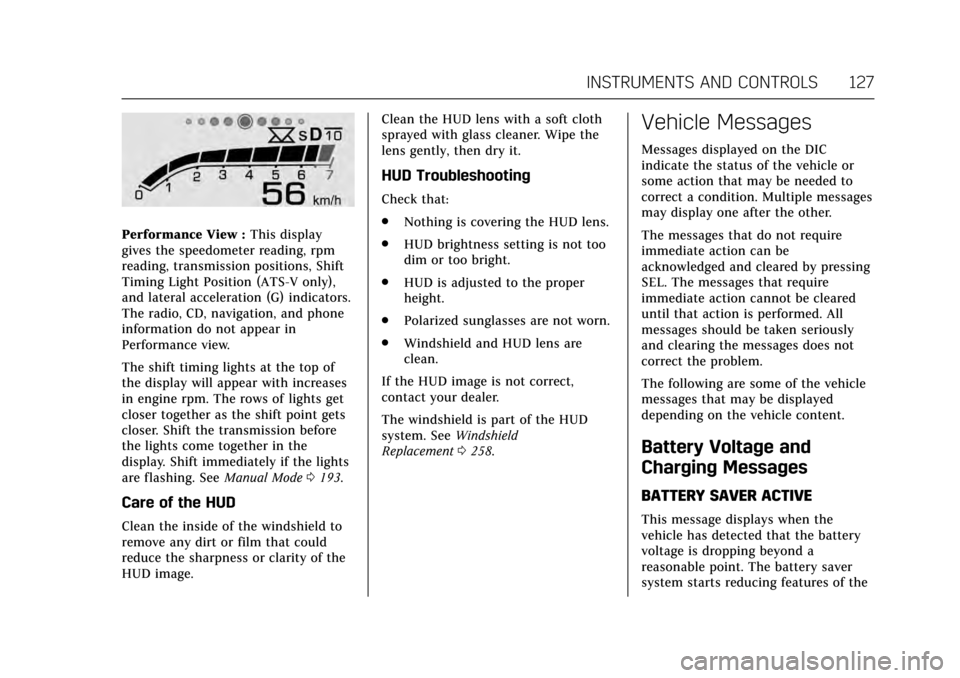
Performance View :This display
gives the speedometer reading, rpm
reading, transmission positions, Shift
Timing Light Position (ATS-V only),
and lateral acceleration (G) indicators.
The radio, CD, navigation, and phone
information do not appear in
Performance view.
The shift timing lights at the top of
the display will appear with increases
in engine rpm. The rows of lights get
closer together as the shift point gets
closer. Shift the transmission before
the lights come together in the
display. Shift immediately if the lights
are flashing. See Manual Mode0193.
Care of the HUD
Clean the inside of the windshield to
remove any dirt or film that could
reduce the sharpness or clarity of the
HUD image. Clean the HUD lens with a soft cloth
sprayed with glass cleaner. Wipe the
lens gently, then dry it.
HUD Troubleshooting
Check that:
.
Nothing is covering the HUD lens.
. HUD brightness setting is not too
dim or too bright.
. HUD is adjusted to the proper
height.
. Polarized sunglasses are not worn.
. Windshield and HUD lens are
clean.
If the HUD image is not correct,
contact your dealer.
The windshield is part of the HUD
system. See Windshield
Replacement 0258.
Vehicle Messages
Messages displayed on the DIC
indicate the status of the vehicle or
some action that may be needed to
correct a condition. Multiple messages
may display one after the other.
The messages that do not require
immediate action can be
acknowledged and cleared by pressing
SEL. The messages that require
immediate action cannot be cleared
until that action is performed. All
messages should be taken seriously
and clearing the messages does not
correct the problem.
The following are some of the vehicle
messages that may be displayed
depending on the vehicle content.
Battery Voltage and
Charging Messages
BATTERY SAVER ACTIVE
This message displays when the
vehicle has detected that the battery
voltage is dropping beyond a
reasonable point. The battery saver
system starts reducing features of the
Page 131 of 335
Cadillac ATS/ATS-V Owner Manual (GMNA-Localizing-MidEast-10287885) -
2017 - crc - 6/16/16
130 INSTRUMENTS AND CONTROLS
ENGINE OVERHEATED—TURN
VEHICLE OFF
This message displays and a
continuous chime sounds if the
engine cooling system reaches unsafe
temperatures for operation. The
engine coolant temperature warning
light will flash. Stop and turn off the
vehicle as soon as it is safe to do so to
avoid severe damage. This message
clears when the engine has cooled to a
safe operating temperature.
Engine Oil Messages
CHANGE ENGINE OIL SOON
This message displays when the
engine oil needs to be changed. When
you change the engine oil, be sure to
reset the oil life system. See Engine Oil
Life System 0243, Driver Information
Center (DIC) 0122, Engine Oil 0241,
and Maintenance Schedule 0307.
ENGINE OIL HOT, IDLE ENGINE
This message displays when the
engine oil temperature is too hot. Stop
and allow the vehicle to idle until it
cools down.
ENGINE OIL LOW —ADD OIL
On some vehicles, this message
displays when the engine oil level may
be too low. Check the oil level before
filling to the recommended level.
If the oil is not low and this message
remains on, take the vehicle to your
dealer for service. See Engine
Oil 0241.
OIL PRESSURE LOW —STOP
ENGINE
This message displays if low oil
pressure levels occur. Stop the vehicle
as soon as safely possible and do not
operate it until the cause of the low
oil pressure has been corrected. Check
the oil as soon as possible and have
the vehicle serviced by your dealer.
Engine Power Messages
ENGINE POWER IS REDUCED
This message displays when the
vehicle's engine power is reduced.
Reduced engine power can affect the
vehicle's ability to accelerate. If this
message is on, but there is no
reduction in performance, proceed to
your destination. The performance may be reduced the next time the
vehicle is driven. The vehicle may be
driven at a reduced speed while this
message is on, but maximum
acceleration and speed may be
reduced. Anytime this message stays
on, or displays repeatedly, the vehicle
should be taken to your dealer for
service as soon as possible.
Fuel System Messages
FUEL LEVEL LOW
This message displays when the
vehicle is low on fuel. Refuel as soon
as possible.
TIGHTEN GAS CAP
This message displays when the fuel
cap is not on tight. Tighten the
fuel cap.
Page 197 of 335
Cadillac ATS/ATS-V Owner Manual (GMNA-Localizing-MidEast-10287885) -
2017 - crc - 6/16/16
196 DRIVING AND OPERATING
To set the parking brake, hold the
regular brake pedal down, then push
the parking brake pedal down.
If the ignition is on, the brake system
warning light will come on. SeeBrake
System Warning Light 0116.
Caution
Driving with the parking brake on
can overheat the brake system and
cause premature wear or damage to
brake system parts. Make sure that
the parking brake is fully released
and the brake warning light is off
before driving.
To release the parking brake, hold the
regular brake pedal down, then push
down momentarily on the parking
brake pedal until you feel the pedal
release. Slowly pull your foot up off
the parking brake pedal. If the parking
brake is not released when you begin
to drive, the brake system warning
light will be on and a chime will
sound warning you that the parking
brake is still on.
Parking Brake (Electric)
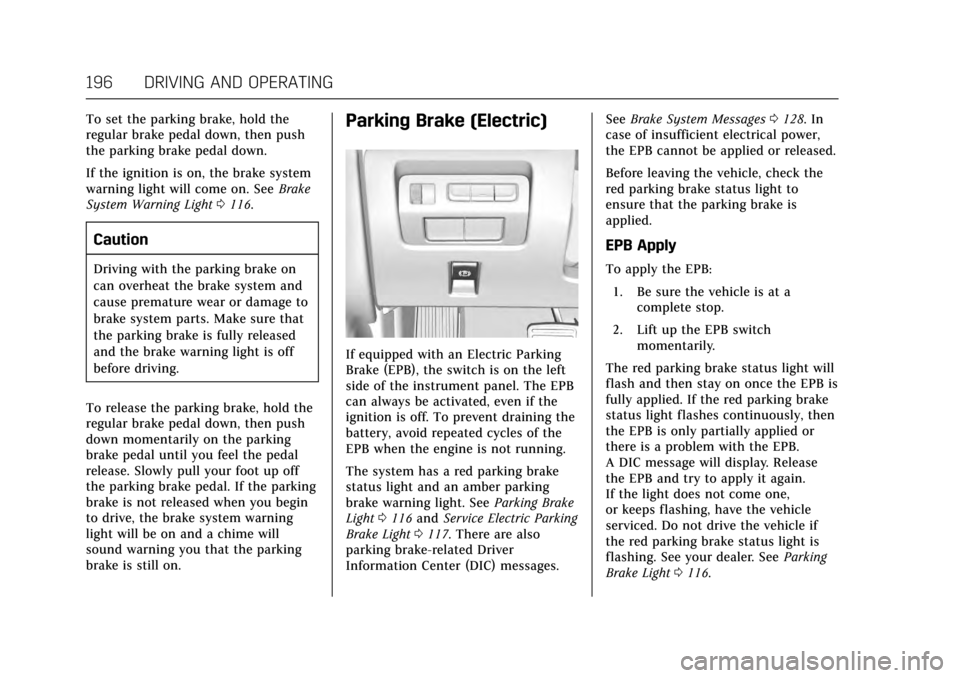
If equipped with an Electric Parking
Brake (EPB), the switch is on the left
side of the instrument panel. The EPB
can always be activated, even if the
ignition is off. To prevent draining the
battery, avoid repeated cycles of the
EPB when the engine is not running.
The system has a red parking brake
status light and an amber parking
brake warning light. See Parking Brake
Light 0116 and Service Electric Parking
Brake Light 0117. There are also
parking brake-related Driver
Information Center (DIC) messages. See
Brake System Messages 0128. In
case of insufficient electrical power,
the EPB cannot be applied or released.
Before leaving the vehicle, check the
red parking brake status light to
ensure that the parking brake is
applied.
EPB Apply
To apply the EPB:
1. Be sure the vehicle is at a complete stop.
2. Lift up the EPB switch momentarily.
The red parking brake status light will
flash and then stay on once the EPB is
fully applied. If the red parking brake
status light flashes continuously, then
the EPB is only partially applied or
there is a problem with the EPB.
A DIC message will display. Release
the EPB and try to apply it again.
If the light does not come one,
or keeps flashing, have the vehicle
serviced. Do not drive the vehicle if
the red parking brake status light is
flashing. See your dealer. See Parking
Brake Light 0116.
Page 229 of 335
Cadillac ATS/ATS-V Owner Manual (GMNA-Localizing-MidEast-10287885) -
2017 - crc - 6/16/16
228 DRIVING AND OPERATING
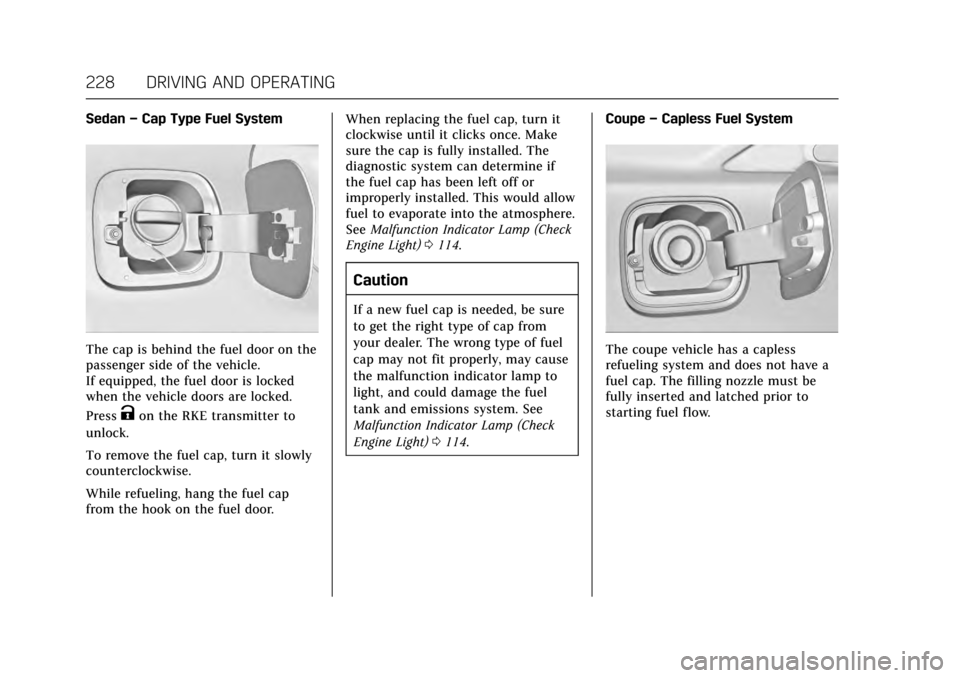
Sedan–Cap Type Fuel System
The cap is behind the fuel door on the
passenger side of the vehicle.
If equipped, the fuel door is locked
when the vehicle doors are locked.
Press
Kon the RKE transmitter to
unlock.
To remove the fuel cap, turn it slowly
counterclockwise.
While refueling, hang the fuel cap
from the hook on the fuel door. When replacing the fuel cap, turn it
clockwise until it clicks once. Make
sure the cap is fully installed. The
diagnostic system can determine if
the fuel cap has been left off or
improperly installed. This would allow
fuel to evaporate into the atmosphere.
See
Malfunction Indicator Lamp (Check
Engine Light) 0114.
Caution
If a new fuel cap is needed, be sure
to get the right type of cap from
your dealer. The wrong type of fuel
cap may not fit properly, may cause
the malfunction indicator lamp to
light, and could damage the fuel
tank and emissions system. See
Malfunction Indicator Lamp (Check
Engine Light) 0114. Coupe
–Capless Fuel System
The coupe vehicle has a capless
refueling system and does not have a
fuel cap. The filling nozzle must be
fully inserted and latched prior to
starting fuel flow.
Page 231 of 335
Cadillac ATS/ATS-V Owner Manual (GMNA-Localizing-MidEast-10287885) -
2017 - crc - 6/16/16
230 DRIVING AND OPERATING
Trailer Towing
General Towing
Information
The vehicle is neither designed nor
intended to tow a trailer or another
vehicle.
For information on towing a disabled
vehicle, seeTowing the Vehicle 0295.
For information on towing the vehicle
behind another vehicle such as a
motor home, see Recreational Vehicle
Towing 0296.
Conversions and
Add-Ons
Add-On Electrical
Equipment
{Warning
The Data Link Connector (DLC) is
used for vehicle service and
Emission Inspection/Maintenance
testing. See Malfunction Indicator
Lamp (Check Engine Light) 0114.
A device connected to the DLC —
such as an aftermarket fleet or
driver-behavior tracking device —
may interfere with vehicle systems.
This could affect vehicle operation
and cause a crash. Such devices
may also access information stored
in the vehicle’s systems.
Caution
Some electrical equipment can
damage the vehicle or cause
components to not work and would
not be covered by the vehicle
warranty. Always check with your
dealer before adding electrical
equipment.
Add-on equipment can drain the
vehicle's 12-volt battery, even if the
vehicle is not operating.
The vehicle has an airbag system.
Before attempting to add anything
electrical to the vehicle, see Servicing
the Airbag-Equipped Vehicle 077 and
Adding Equipment to the
Airbag-Equipped Vehicle 077.
Page 232 of 335
Cadillac ATS/ATS-V Owner Manual (GMNA-Localizing-MidEast-10287885) -
2017 - crc - 6/16/16
VEHICLE CARE 231
Vehicle Care
General Information
General Information . . . . . . . . . . . . . 232
Accessories andModifications . . . . . . . . . . . . . . . . . . . 232
Vehicle Checks
Doing Your OwnService Work . . . . . . . . . . . . . . . . . . . . 233
Hood . . . . . . . . . . . . . . . . . . . . . . . . . . . . . . 233
Engine Compartment Overview . . . . . . . . . . . . . . . . . . . . . . . . . 234
Engine Oil . . . . . . . . . . . . . . . . . . . . . . . . . 241
Engine Oil Life System . . . . . . . . . . . 243
Automatic Transmission Fluid . . . . . . . . . . . . . . . . . . . . . . . . . . . . . 244
Engine Air Cleaner/Filter . . . . . . . . . 245
Cooling System (Engine) . . . . . . . . . 246
Cooling System (Intercooler) . . . . 248
Engine Coolant . . . . . . . . . . . . . . . . . . . 248
Engine Overheating . . . . . . . . . . . . . . 251
Washer Fluid . . . . . . . . . . . . . . . . . . . . . 253
Brakes . . . . . . . . . . . . . . . . . . . . . . . . . . . . . 253
Brake Fluid . . . . . . . . . . . . . . . . . . . . . . . 254
Battery . . . . . . . . . . . . . . . . . . . . . . . . . . . . 255
Starter Switch Check . . . . . . . . . . . . . 256
Automatic Transmission Shift Lock Control Function
Check . . . . . . . . . . . . . . . . . . . . . . . . . . . . 257 Park Brake and P (Park)
Mechanism Check . . . . . . . . . . . . . . 257
Wiper Blade Replacement . . . . . . . 257
Windshield Replacement . . . . . . . . 258
Headlamp Aiming
Headlamp Aiming . . . . . . . . . . . . . . . . 258
Bulb Replacement
Bulb Replacement . . . . . . . . . . . . . . . . 259
Halogen Bulbs . . . . . . . . . . . . . . . . . . . . 259
High Intensity Discharge (HID) Lighting . . . . . . . . . . . . . . . . . . . . . . . . . 259
LED Lighting . . . . . . . . . . . . . . . . . . . . . 259
Back-Up Lamps . . . . . . . . . . . . . . . . . . . 259
License Plate Lamp . . . . . . . . . . . . . . 260
Replacement Bulbs . . . . . . . . . . . . . . . 261
Electrical System
Electrical System Overload . . . . . . 261
Fuses and Circuit Breakers . . . . . . 261
Engine Compartment Fuse Block . . . . . . . . . . . . . . . . . . . . . . . . . . . . 262
Instrument Panel Fuse Block . . . . 265
Rear Compartment Fuse Block . . . . . . . . . . . . . . . . . . . . . . . . . . . . 267
Wheels and Tires
Tires . . . . . . . . . . . . . . . . . . . . . . . . . . . . . . . 270
All-Season Tires . . . . . . . . . . . . . . . . . . 271
Winter Tires . . . . . . . . . . . . . . . . . . . . . . 271
Run-Flat Tires . . . . . . . . . . . . . . . . . . . . 271 Summer Tires . . . . . . . . . . . . . . . . . . . . 272
Tire Pressure . . . . . . . . . . . . . . . . . . . . . . 273
Tire Pressure for High-Speed
Operation . . . . . . . . . . . . . . . . . . . . . . . . 274
Tire Pressure Monitor System . . . 274
Tire Pressure Monitor
Operation . . . . . . . . . . . . . . . . . . . . . . . . 275
Tire Inspection . . . . . . . . . . . . . . . . . . . 278
Tire Rotation . . . . . . . . . . . . . . . . . . . . . 278
When It Is Time for New Tires . . . . . . . . . . . . . . . . . . . . . . . . . . . . . 280
Buying New Tires . . . . . . . . . . . . . . . . 280
Different Size Tires and Wheels . . . . . . . . . . . . . . . . . . . . . . . . . . 282
Wheel Alignment and Tire Balance . . . . . . . . . . . . . . . . . . . . . . . . . . 282
Wheel Replacement . . . . . . . . . . . . . . 282
Tire Chains . . . . . . . . . . . . . . . . . . . . . . . 284
If a Tire Goes Flat . . . . . . . . . . . . . . . . 284
Tire Sealant and Compressor Kit . . . . . . . . . . . . . . . . . 286
Storing the Tire Sealant and Compressor Kit . . . . . . . . . . . . . . . . . 292
Jump Starting
Jump Starting . . . . . . . . . . . . . . . . . . . . . 292
Towing the Vehicle
Towing the Vehicle . . . . . . . . . . . . . . . 295
Recreational Vehicle Towing . . . . 296
Page 246 of 335
Cadillac ATS/ATS-V Owner Manual (GMNA-Localizing-MidEast-10287885) -
2017 - crc - 6/16/16
VEHICLE CARE 245
reason for fluid loss. If a leak occurs,
take the vehicle to your dealer and
have it repaired as soon as possible.
The vehicle is not equipped with a
transmission fluid level dipstick.
There is a special procedure for
checking and changing the
transmission fluid. Because this
procedure is difficult, this should be
done at the dealer. Contact your dealer
for additional information.
Change the fluid and filter at the
intervals listed inMaintenance
Schedule 0307, and be sure to use the
fluid listed in Recommended Fluids and
Lubricants 0314.
Engine Air Cleaner/Filter
The engine air cleaner/filter is in the
engine compartment on the driver
side of the vehicle. See Engine
Compartment Overview 0234 for
location.
When to Inspect the Engine Air
Cleaner/Filter
For intervals on changing and
inspecting the engine air cleaner/filter,
see Maintenance Schedule 0307.
How to Inspect the Engine Air
Cleaner/Filter
Do not start the engine or have the
engine running with the engine air
cleaner/filter housing open. Before
removing the engine air cleaner/filter,
make sure that the engine air cleaner/
filter housing and nearby components
are free of dirt and debris. Remove the
engine air cleaner/filter. Lightly tap
and shake the engine air cleaner/filter
(away from the vehicle), to release
loose dust and dirt. Inspect the engine
air cleaner/filter for damage, and
replace if damaged. Do not clean the
engine air cleaner/filter or
components with water or
compressed air. To inspect or replace the air cleaner/
filter:
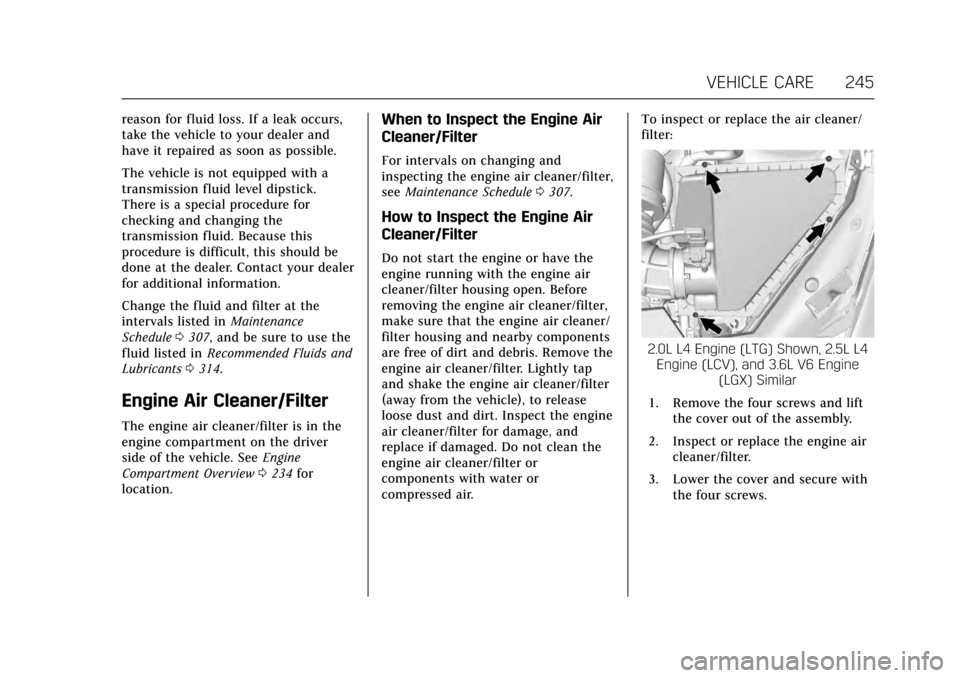
2.0L L4 Engine (LTG) Shown, 2.5L L4
Engine (LCV), and 3.6L V6 Engine (LGX) Similar
1. Remove the four screws and lift the cover out of the assembly.
2. Inspect or replace the engine air cleaner/filter.
3. Lower the cover and secure with the four screws.
Page 252 of 335
Cadillac ATS/ATS-V Owner Manual (GMNA-Localizing-MidEast-10287885) -
2017 - crc - 6/16/16
VEHICLE CARE 251
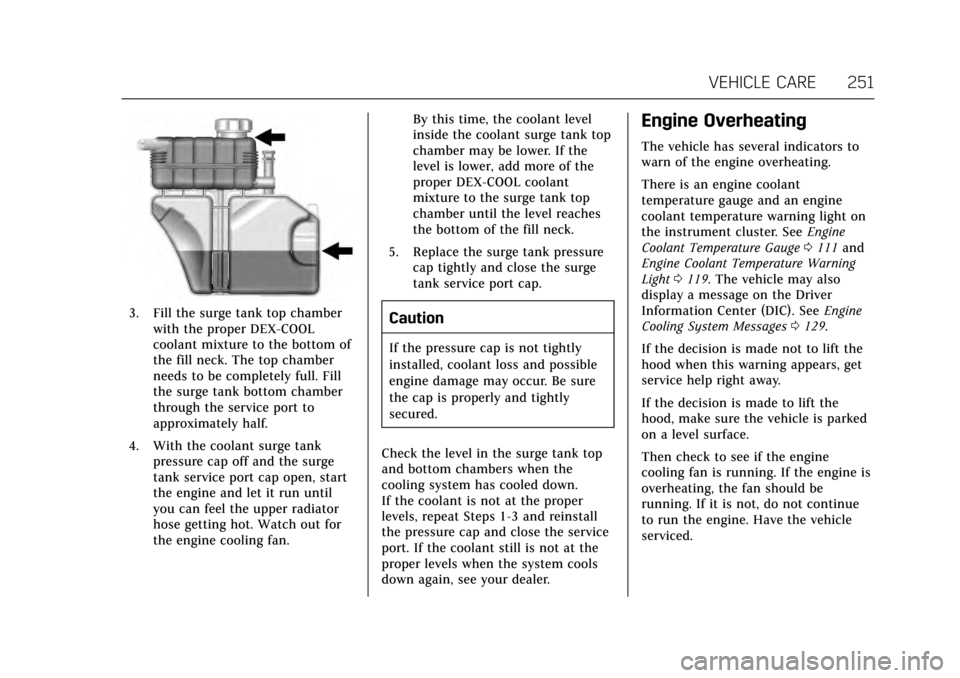
3. Fill the surge tank top chamberwith the proper DEX-COOL
coolant mixture to the bottom of
the fill neck. The top chamber
needs to be completely full. Fill
the surge tank bottom chamber
through the service port to
approximately half.
4. With the coolant surge tank pressure cap off and the surge
tank service port cap open, start
the engine and let it run until
you can feel the upper radiator
hose getting hot. Watch out for
the engine cooling fan. By this time, the coolant level
inside the coolant surge tank top
chamber may be lower. If the
level is lower, add more of the
proper DEX-COOL coolant
mixture to the surge tank top
chamber until the level reaches
the bottom of the fill neck.
5. Replace the surge tank pressure cap tightly and close the surge
tank service port cap.Caution
If the pressure cap is not tightly
installed, coolant loss and possible
engine damage may occur. Be sure
the cap is properly and tightly
secured.
Check the level in the surge tank top
and bottom chambers when the
cooling system has cooled down.
If the coolant is not at the proper
levels, repeat Steps 1-3 and reinstall
the pressure cap and close the service
port. If the coolant still is not at the
proper levels when the system cools
down again, see your dealer.
Engine Overheating
The vehicle has several indicators to
warn of the engine overheating.
There is an engine coolant
temperature gauge and an engine
coolant temperature warning light on
the instrument cluster. See Engine
Coolant Temperature Gauge 0111 and
Engine Coolant Temperature Warning
Light 0119. The vehicle may also
display a message on the Driver
Information Center (DIC). See Engine
Cooling System Messages 0129.
If the decision is made not to lift the
hood when this warning appears, get
service help right away.
If the decision is made to lift the
hood, make sure the vehicle is parked
on a level surface.
Then check to see if the engine
cooling fan is running. If the engine is
overheating, the fan should be
running. If it is not, do not continue
to run the engine. Have the vehicle
serviced.
Page 253 of 335
Cadillac ATS/ATS-V Owner Manual (GMNA-Localizing-MidEast-10287885) -
2017 - crc - 6/16/16
252 VEHICLE CARE
Caution
Running the engine without coolant
may cause damage or a fire. Vehicle
damage would not be covered by
the vehicle warranty.
If Steam Is Coming from the
Engine Compartment
{Warning
Steam from an overheated engine
can burn you badly, even if you just
open the hood. Stay away from the
engine if you see or hear steam
coming from it. Just turn it off and
get everyone away from the vehicle
until it cools down. Wait until there
is no sign of steam or coolant
before you open the hood.
If you keep driving when the engine
is overheated, the liquids in it can
catch fire. You or others could be
badly burned. Stop the engine if it
overheats, and get out of the
vehicle until the engine is cool.
If Steam Is Coming from the
Engine Compartment with No
Overheat Warning
(V-Series Only)
The V-Series hood vent is functional,
and will allow water from rain and car
washes to enter the engine
compartment and contact hot
surfaces. If steam is seen coming from
the hood vent with no accompanying
overheat warning, no action is
required.
If No Steam Is Coming from the
Engine Compartment
If an engine overheat warning is
displayed but no steam can be seen or
heard, the problem may not be too
serious. Sometimes the engine can get
a little too hot when the vehicle:
.Climbs a long hill on a hot day.
. Stops after high-speed driving.
. Idles for long periods in traffic.
If the overheat warning is displayed
with no sign of steam: 1. Turn the air conditioning off. 2. Turn the heater on to the highest
temperature and to the highest
fan speed. Open the windows as
necessary.
3. When it is safe to do so, pull off the road, shift to P (Park) or
N (Neutral) and let the
engine idle.
If the engine coolant temperature
gauge is no longer in the overheated
area or the engine coolant
temperature warning light no longer
displays, the vehicle can be driven.
Continue to drive the vehicle slowly
for about 10 minutes. Keep a safe
distance from the vehicle in front.
If the warning does not come back on,
continue to drive normally and have
the cooling system checked for proper
fill and function.
If the warning continues, pull over,
stop, and park the vehicle right away.
If there is no sign of steam, idle the
engine for three minutes while parked.
If the warning is still displayed, turn
off the engine until it cools down.
Page 255 of 335
Cadillac ATS/ATS-V Owner Manual (GMNA-Localizing-MidEast-10287885) -
2017 - crc - 6/16/16
254 VEHICLE CARE
Caution
Continuing to drive with worn-out
brake pads could result in costly
brake repair.
Some driving conditions or climates
can cause a brake squeal when the
brakes are first applied or lightly
applied. This does not mean
something is wrong with the brakes.
If equipped with high performance
brake linings, there could be an
increased build-up of brake dust as
well as minor noises as compared to
standard brake linings.
Properly torqued wheel nuts are
necessary to help prevent brake
pulsation. When tires are rotated,
inspect brake pads for wear and
evenly tighten wheel nuts in the
proper sequence to torque
specifications. See Capacities and
Specifications 0319.
Brake pads should be replaced as
complete sets.
Brake Pedal Travel
See your dealer if the brake pedal does
not return to normal height, or if
there is a rapid increase in pedal
travel. This could be a sign that brake
service may be required.
Replacing Brake System Parts
Always replace brake system parts
with new, approved replacement parts.
If this is not done, the brakes may not
work properly. The braking
performance expected can change in
many other ways if the wrong
replacement brake parts are installed
or parts are improperly installed.
Brake Fluid
The brake master cylinder reservoir is
filled with GM approved DOT 3 brake
fluid as indicated on the reservoir cap.
See Engine Compartment Overview
0 234 for the location of the reservoir.
Checking Brake Fluid
With the vehicle in P (Park) on a level
surface, the brake fluid level should be
between the minimum and maximum
marks on the brake fluid reservoir.
There are only two reasons why the
brake fluid level in the reservoir may
go down:
. Normal brake lining wear. When
new linings are installed, the fluid
level goes back up.
. A fluid leak in the brake hydraulic
system. Have the brake hydraulic
system fixed. With a leak, the
brakes will not work well.
Always clean the brake fluid reservoir
cap and the area around the cap
before removing it.
Do not top off the brake fluid. Adding
fluid does not correct a leak. If fluid is
added when the linings are worn,
there will be too much fluid when