display CADILLAC CT4 2020 Convenience & Personalization Guide
[x] Cancel search | Manufacturer: CADILLAC, Model Year: 2020, Model line: CT4, Model: CADILLAC CT4 2020Pages: 20, PDF Size: 3.25 MB
Page 2 of 20
2
Review this quick reference guide for an overview of some important feat\
ures in your Cadillac CT4. Some optional equipment described in this guide (denoted by ♦) may not be included in your vehicle. More information can be found in your Owner's Manual and at my.cadillac.com.
Certain restrictions, precautions and safety procedures apply to your vehicle. Please read your Owner’s Manual for complete instructions.
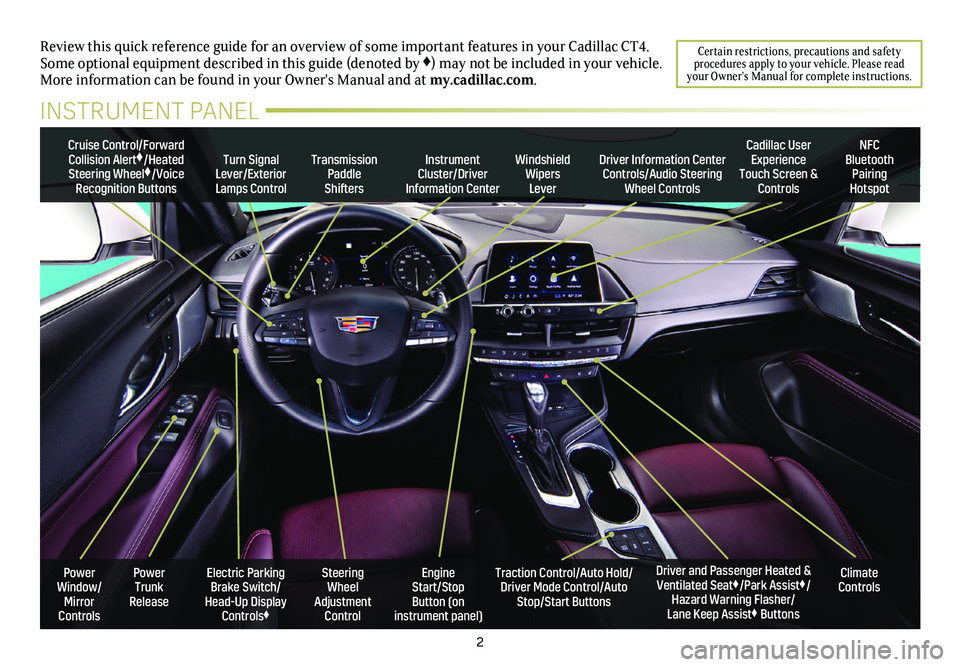
INSTRUMENT PANEL
Cruise Control/Forward Collision Alert♦/Heated Steering Wheel♦/Voice Recognition Buttons
Instrument Cluster/Driver Information Center
Windshield Wipers Lever
Transmission Paddle Shifters
Driver Information Center Controls/Audio Steering Wheel Controls
Turn Signal Lever/Exterior Lamps Control
Cadillac User Experience Touch Screen & Controls
NFC Bluetooth Pairing Hotspot
Climate ControlsPower Trunk Release
Steering Wheel Adjustment Control
Engine Start/Stop Button (on instrument panel)
Electric Parking Brake Switch/ Head-Up Display Controls♦
Driver and Passenger Heated & Ventilated Seat♦/Park Assist♦/Hazard Warning Flasher/ Lane Keep Assist♦ Buttons
Traction Control/Auto Hold/ Driver Mode Control/Auto Stop/Start Buttons
Power Window/ Mirror Controls
Page 5 of 20
5
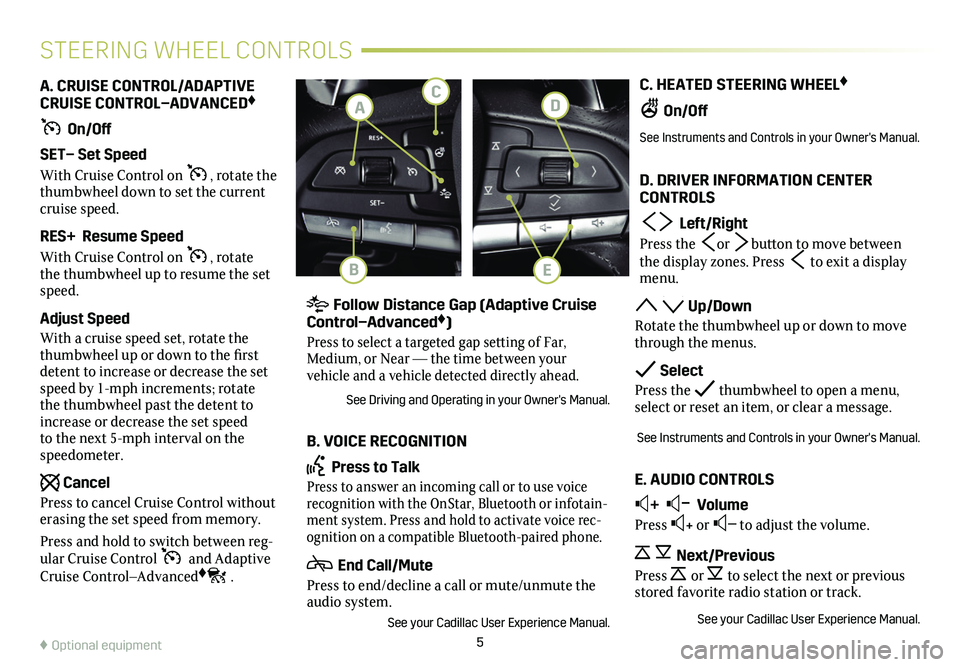
C. HEATED STEERING WHEEL♦
On/Off
See Instruments and Controls in your Owner's Manual.
D. DRIVER INFORMATION CENTER CONTROLS
Left/Right
Press the or button to move between the display zones. Press to exit a display menu.
Up/Down
Rotate the thumbwheel up or down to move through the menus.
Select
Press the thumbwheel to open a menu, select or reset an item, or clear a message.
See Instruments and Controls in your Owner's Manual.
E. AUDIO CONTROLS
+ – Volume
Press + or – to adjust the volume.
Next/Previous
Press or to select the next or previous stored favorite radio station or track.
See your Cadillac User Experience Manual.
A. CRUISE CONTROL/ADAPTIVE CRUISE CONTROL–ADVANCED♦
On/Off
SET– Set Speed
With Cruise Control on , rotate the thumbwheel down to set the current cruise speed.
RES+ Resume Speed
With Cruise Control on , rotate the thumbwheel up to resume the set speed.
Adjust Speed
With a cruise speed set, rotate the thumbwheel up or down to the first detent to increase or decrease the set speed by 1-mph increments; rotate the thumbwheel past the detent to increase or decrease the set speed to the next 5-mph interval on the speedometer.
Cancel
Press to cancel Cruise Control without erasing the set speed from memory.
Press and hold to switch between reg-ular Cruise Control and Adaptive Cruise Control–Advanced♦.
STEERING WHEEL CONTROLS
Follow Distance Gap (Adaptive Cruise Control–Advanced♦)
Press to select a targeted gap setting of Far, Medium, or Near — the time between your
vehicle and a vehicle detected directly ahead.
See Driving and Operating in your Owner's Manual.
B. VOICE RECOGNITION
Press to Talk
Press to answer an incoming call or to use voice recognition with the OnStar, Bluetooth or infotain-ment system. Press and hold to activate voice rec-ognition on a compatible Bluetooth-paired phone.
End Call/Mute
Press to end/decline a call or mute/unmute the audio system.
See your Cadillac User Experience Manual.
♦ Optional equipment
D
B
CA
E
Page 6 of 20
6
DRIVER INFORMATION CENTER
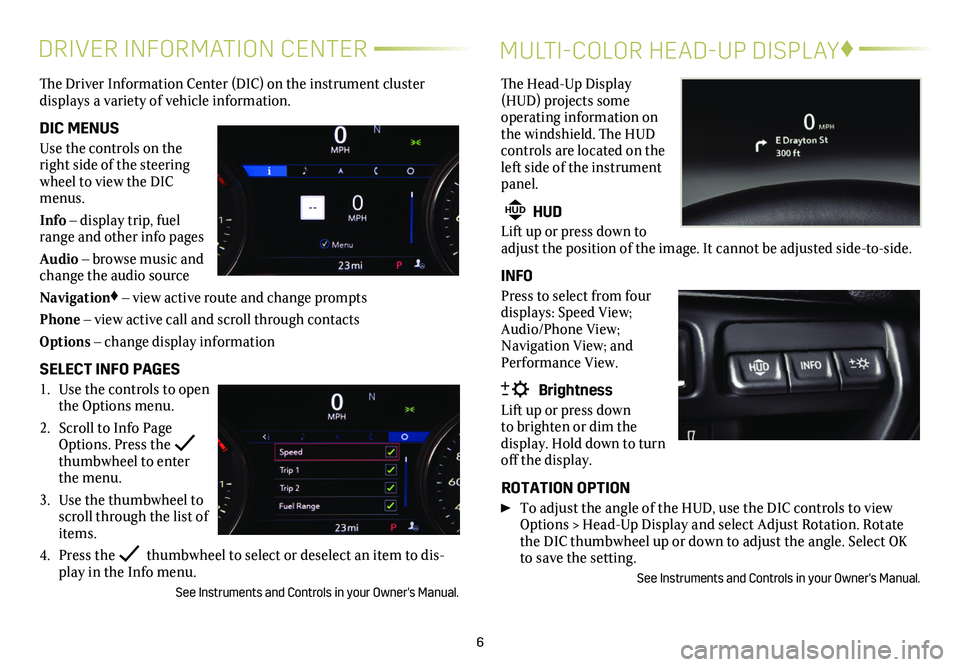
The Driver Information Center (DIC) on the instrument cluster
displays a variety of vehicle information.
DIC MENUS
Use the controls on the right side of the steering wheel to view the DIC menus.
Info – display trip, fuel range and other info pages
Audio – browse music and change the audio source
Navigation♦ – view active route and change prompts
Phone – view active call and scroll through contacts
Options – change display information
SELECT INFO PAGES
1. Use the controls to open the Options menu.
2. Scroll to Info Page Options. Press the thumbwheel to enter the menu.
3. Use the thumbwheel to scroll through the list of items.
4. Press the thumbwheel to select or deselect an item to dis-play in the Info menu.
See Instruments and Controls in your Owner's Manual.
MULTI-COLOR HEAD-UP DISPLAY♦
The Head-Up Display (HUD) projects some operating information on the windshield. The HUD
controls are located on the left side of the instrument panel.
HUD HUD
Lift up or press down to adjust the position of the image. It cannot be adjusted side-to-side.
INFO
Press to select from four displays: Speed View; Audio/Phone View; Navigation View; and Performance View.
Brightness
Lift up or press down to brighten or dim the
display. Hold down to turn off the display.
ROTATION OPTION
To adjust the angle of the HUD, use the DIC controls to view Options > Head-Up Display and select Adjust Rotation. Rotate the DIC thumbwheel up or down to adjust the angle. Select OK to save the setting.
See Instruments and Controls in your Owner's Manual.
Page 8 of 20
8
CADILLAC USER EXPERIENCE FEATURES
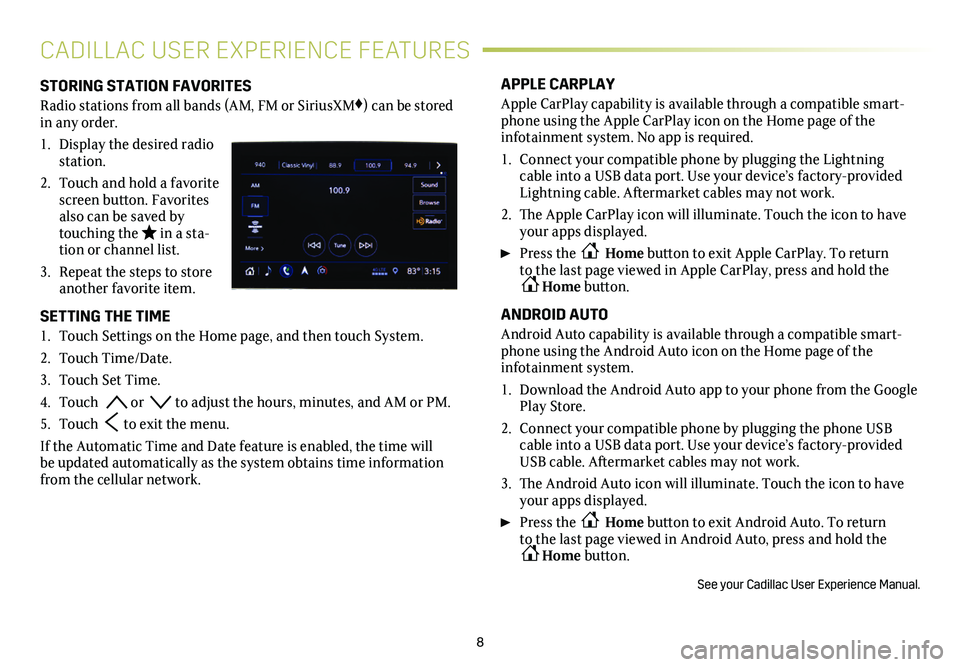
STORING STATION FAVORITES
Radio stations from all bands (AM, FM or SiriusXM♦) can be stored in any order.
1. Display the desired radio station.
2. Touch and hold a favorite screen button. Favorites also can be saved by touching the in a sta-tion or channel list.
3. Repeat the steps to store another favorite item.
SETTING THE TIME
1. Touch Settings on the Home page, and then touch System.
2. Touch Time/Date.
3. Touch Set Time.
4. Touch or to adjust the hours, minutes, and AM or PM.
5. Touch to exit the menu.
If the Automatic Time and Date feature is enabled, the time will be updated automatically as the system obtains time information from the cellular network.
APPLE CARPLAY
Apple CarPlay capability is available through a compatible smart-phone using the Apple CarPlay icon on the Home page of the
infotainment system. No app is required.
1. Connect your compatible phone by plugging the Lightning cable into a USB data port. Use your device’s factory-provided Lightning cable. Aftermarket cables may not work.
2. The Apple CarPlay icon will illuminate. Touch the icon to have your apps displayed.
Press the Home button to exit Apple CarPlay. To return to the last page viewed in Apple CarPlay, press and hold the Home button.
ANDROID AUTO
Android Auto capability is available through a compatible smart-phone using the Android Auto icon on the Home page of the infotainment system.
1. Download the Android Auto app to your phone from the Google Play Store.
2. Connect your compatible phone by plugging the phone USB cable into a USB data port. Use your device’s factory-provided USB cable. Aftermarket cables may not work.
3. The Android Auto icon will illuminate. Touch the icon to have your apps displayed.
Press the Home button to exit Android Auto. To return to the last page viewed in Android Auto, press and hold the Home button.
See your Cadillac User Experience Manual.
Page 10 of 20
10
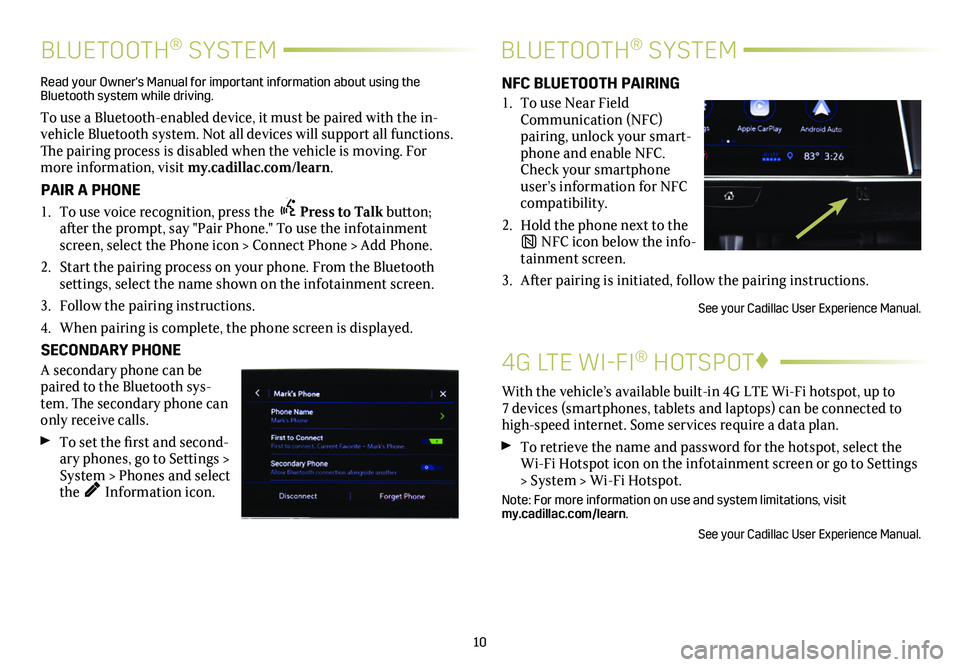
4G LTE WI-FI® HOTSPOT♦
With the vehicle’s available built-in 4G LTE Wi-Fi hotspot, up to 7 devices (smartphones, tablets and laptops) can be connected to high-speed internet. Some services require a data plan.
To retrieve the name and password for the hotspot, select the Wi-Fi Hotspot icon on the infotainment screen or go to Settings > System > Wi-Fi Hotspot.
Note: For more information on use and system limitations, visit my.cadillac.com/learn.
See your Cadillac User Experience Manual.
BLUETOOTH® SYSTEMBLUETOOTH® SYSTEM
Read your Owner's Manual for important information about using the Bluetooth system while driving.
To use a Bluetooth-enabled device, it must be paired with the in-vehicle Bluetooth system. Not all devices will support all functions. The pairing process is disabled when the vehicle is moving. For more information, visit my.cadillac.com/learn.
PAIR A PHONE
1. To use voice recognition, press the Press to Talk button; after the prompt, say "Pair Phone." To use the infotainment screen, select the Phone icon > Connect Phone > Add Phone.
2. Start the pairing process on your phone. From the Bluetooth
settings, select the name shown on the infotainment screen.
3. Follow the pairing instructions.
4. When pairing is complete, the phone screen is displayed.
SECONDARY PHONE
A secondary phone can be paired to the Bluetooth sys-tem. The
secondary phone can only receive calls.
To set the first and second-ary phones, go to Settings > System > Phones and select the Information icon.
NFC BLUETOOTH PAIRING
1. To use Near Field Communication (NFC) pairing, unlock your smart-phone and enable NFC. Check your smartphone user’s information for NFC compatibility.
2. Hold the phone next to the
NFC icon below the info-tainment screen.
3. After pairing is initiated, follow the pairing instructions.
See your Cadillac User Experience Manual.
Page 11 of 20
TEEN DRIVER
Teen Driver allows multiple keys to be registered for beginning
drivers. When active, the system automatically activates certain safety systems, allows setting of some features, and limits the use of others. An in-vehicle Report Card records vehicle data about driving behavior. When the vehicle is started with a registered key, a Driver Information Center message displays that Teen Driver is active.
To create a Personal Identification Number, register a key, change Teen Driver settings, or access the Report Card, go to Settings > Vehicle > Teen Driver.
See your Cadillac User Experience Manual.
11
The Universal Remote System on the overhead console enables your vehicle to control 3 different devices, ranging from garage doors and gates to home lighting. Go to homelink.com for detailed videos and instructions on how to program the Universal Remote System. For additional assistance, call 1-800-355-3515.
See Instruments and Controls in your Owner’s Manual.
UNIVERSAL REMOTE SYSTEM♦
WIRELESS CHARGING♦
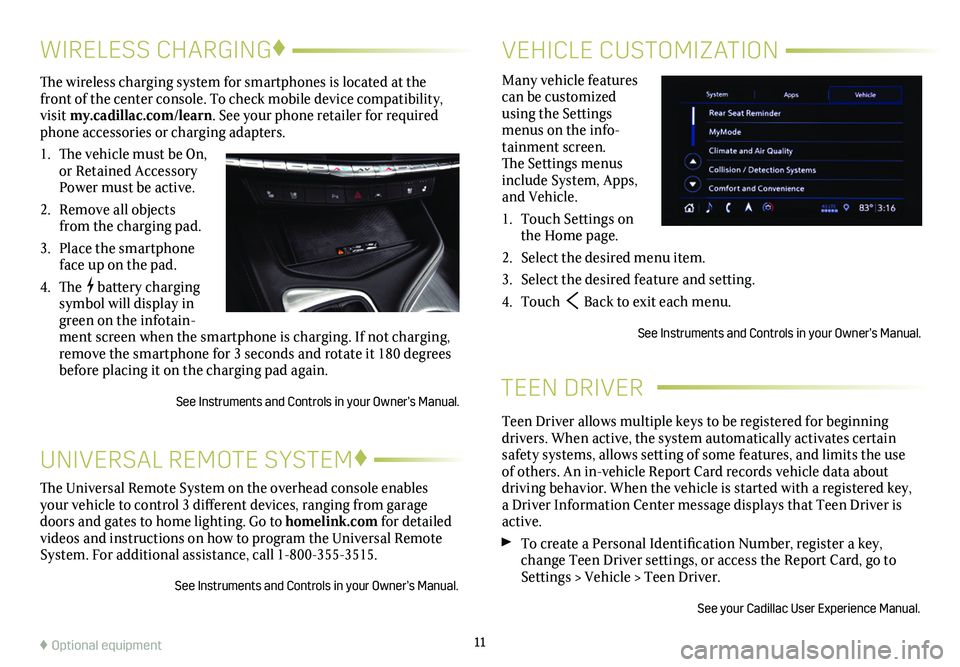
The wireless charging system for smartphones is located at the front of the center console. To check mobile device compatibility, visit my.cadillac.com/learn. See your phone retailer for required phone accessories or charging adapters.
1. The vehicle must be On, or Retained Accessory Power must be active.
2. Remove all objects from the charging pad.
3. Place the smartphone face up on the pad.
4. The battery charging symbol will display in green on the infotain-ment screen when the smartphone is charging. If not charging, remove the smartphone for 3 seconds and rotate it 180 degrees before placing it on the charging pad again.
See Instruments and Controls in your Owner’s Manual.
VEHICLE CUSTOMIZATION
Many vehicle features can be customized using the Settings menus on the info-tainment screen. The Settings menus include System, Apps, and Vehicle.
1. Touch Settings on the Home page.
2. Select the desired menu item.
3. Select the desired feature and setting.
4. Touch Back to exit each menu.
See Instruments and Controls in your Owner’s Manual.
♦ Optional equipment
Page 12 of 20
12
CLIMATE CONTROLS
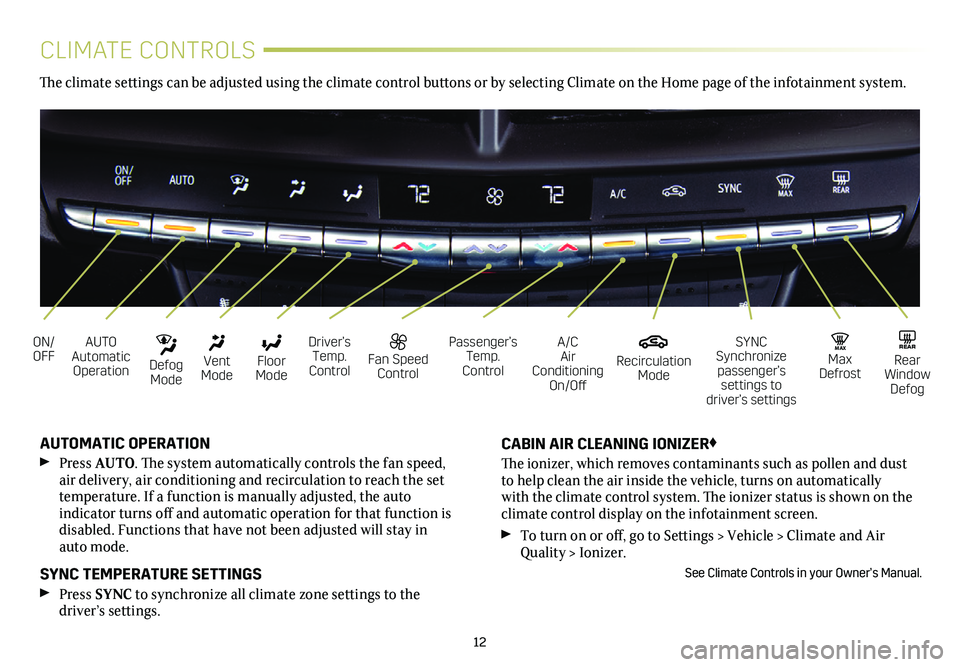
AUTO Automatic Operation
ON/OFFA/C Air Conditioning On/Off
Driver’s Temp. Control
SYNC Synchronize passenger’s settings to driver’s settings
Floor Mode
Vent Mode
Defog Mode
Recirculation Mode
Fan Speed Control
MAX Max Defrost
Passenger’s Temp. Control
REAR Rear Window Defog
AUTOMATIC OPERATION
Press AUTO. The system automatically controls the fan speed, air delivery, air conditioning and recirculation to reach the set temperature. If a function is manually adjusted, the auto
indicator turns off and automatic operation for that function is disabled. Functions that have not been adjusted will stay in auto mode.
SYNC TEMPERATURE SETTINGS
Press SYNC to synchronize all climate zone settings to the
driver’s
settings.
CABIN AIR CLEANING IONIZER♦
The ionizer, which removes contaminants such as pollen and dust to help clean the air inside the vehicle, turns on automatically with the climate control system. The ionizer status is shown on the
climate control display on the infotainment screen.
To turn on or off, go to Settings > Vehicle > Climate and Air Quality > Ionizer.
See Climate Controls in your Owner’s Manual.
The climate settings can be adjusted using the climate control buttons or by selecting Climate on the Home page of the infotainment system.
Page 13 of 20
13
EXTERIOR LIGHTINGWINDSHIELD WIPERS
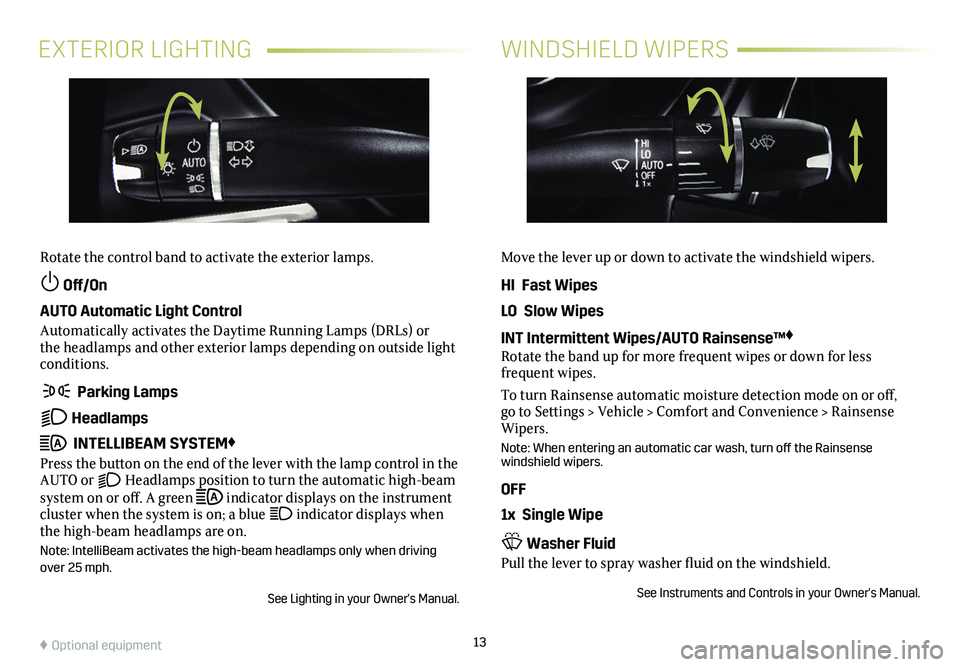
Rotate the control band to activate the exterior lamps.
Off/On
AUTO Automatic Light Control
Automatically activates the Daytime Running Lamps (DRLs) or the headlamps and other exterior lamps depending on outside light conditions.
Parking Lamps
Headlamps
INTELLIBEAM SYSTEM♦
Press the button on the end of the lever with the lamp control in the AUTO or Headlamps position to turn the automatic high-beam system on or off. A green indicator displays on the instrument cluster when the system is on; a blue indicator displays when the high-beam headlamps are on.
Note: IntelliBeam activates the high-beam headlamps only when driving over 25 mph.
See Lighting in your Owner's Manual.
Move the lever up or down to activate the windshield wipers.
HI Fast Wipes
LO Slow Wipes
INT Intermittent Wipes/AUTO Rainsense™♦
Rotate the band up for more frequent wipes or down for less frequent wipes.
To turn Rainsense automatic moisture detection mode on or off, go to Settings > Vehicle > Comfort and Convenience > Rainsense Wipers.
Note: When entering an automatic car wash, turn off the Rainsense windshield wipers.
OFF
1x Single Wipe
Washer Fluid
Pull the lever to spray washer fluid on the windshield.
See Instruments and Controls in your Owner's Manual.
♦ Optional equipment
Page 15 of 20
15
The traction control system limits wheelspin and the StabiliTrak stability control system assists with directional control of the vehicle in difficult driving conditions. Both systems turn on auto-matically every time the vehicle is started. Turn off traction control if the vehicle is stuck and rocking the vehicle is required.
Press the Traction Control button on the center console. The Traction Control Off light will illuminate on the instru-ment cluster. Press the button again to turn on
traction control.
See Driving and Operating in your Owner’s Manual.
TRACTION CONTROL
ELECTRONIC PRECISION SHIFT♦
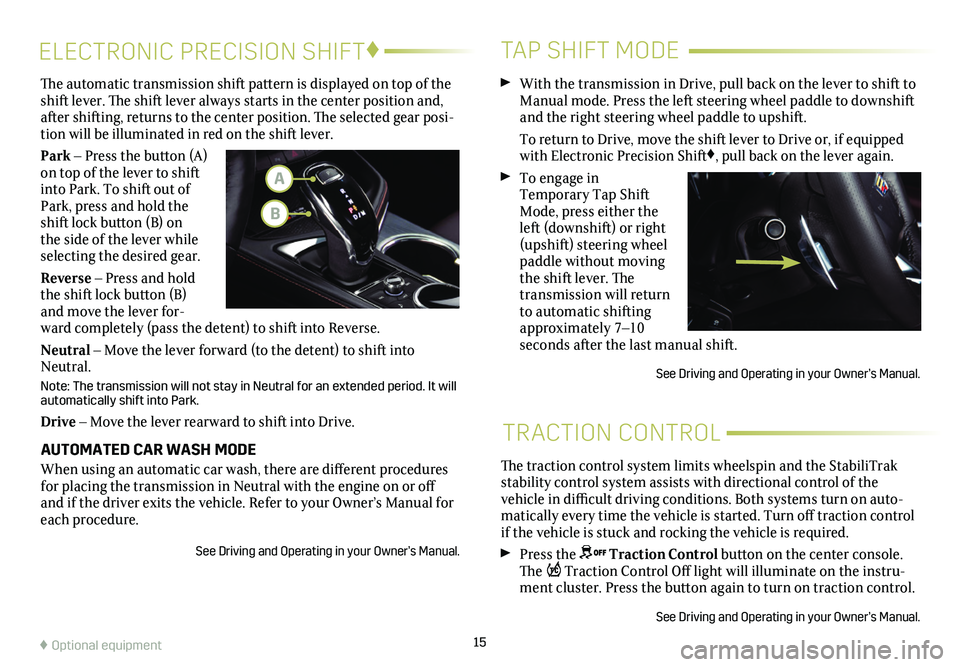
The automatic transmission shift pattern is displayed on top of the shift lever. The shift lever always starts in the center position and, after shifting, returns to the center position. The selected gear posi-tion will be illuminated in red on the shift lever.
Park – Press the button (A) on top of the lever to shift into Park. To shift out of Park, press and hold the shift lock button (B) on the side of the lever while selecting the desired gear.
Reverse – Press and hold the shift lock button (B) and move the lever for-ward completely (pass the detent) to shift into Reverse.
Neutral – Move the lever forward (to the detent) to shift into Neutral.
Note: The transmission will not stay in Neutral for an extended period. It will automatically shift into Park.
Drive – Move the lever rearward to shift into Drive.
AUTOMATED CAR WASH MODE
When using an automatic car wash, there are different procedures for placing the transmission in Neutral with the engine on or off and if the driver exits the vehicle. Refer to your Owner’s Manual for\
each procedure.
See Driving and Operating in your Owner’s Manual.
TAP SHIFT MODE
With the transmission in Drive, pull back on the lever to shift to Manual mode. Press the left steering wheel paddle to downshift and the right steering wheel paddle to upshift.
To return to Drive, move the shift lever to Drive or, if equipped with Electronic Precision Shift♦, pull back on the lever again.
To engage in Temporary Tap Shift Mode, press either the left (downshift) or right (upshift) steering wheel paddle without moving the shift lever. The transmission will return to automatic shifting approximately 7–10 seconds after the last manual shift.
See Driving and Operating in your Owner’s Manual.
♦ Optional equipment
A
B
Page 16 of 20
16
DRIVER MODE CONTROL
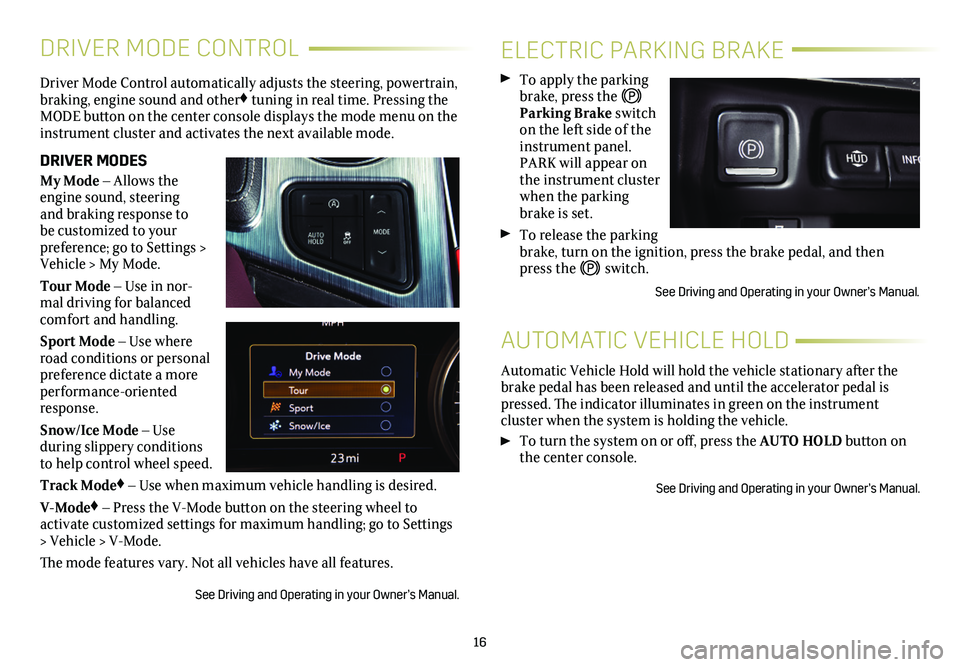
Driver Mode Control automatically adjusts the steering, powertrain, braking, engine sound and other♦ tuning in real time. Pressing the MODE button on the center console displays the mode menu on the instrument cluster and activates the next available mode.
DRIVER MODES
My Mode – Allows the engine sound, steering and braking response to be customized to your preference; go to Settings > Vehicle > My Mode.
Tour Mode – Use in nor-mal driving for balanced comfort and handling.
Sport Mode – Use where road conditions or personal preference dictate a more performance-oriented response.
Snow/Ice Mode – Use
during slippery conditions to help control wheel speed.
Track Mode♦ – Use when maximum vehicle handling is desired.
V-Mode♦ – Press the V-Mode button on the steering wheel to
activate customized settings for maximum handling; go to Settings > Vehicle > V-Mode.
The mode features vary. Not all vehicles have all features.
See Driving and Operating in your Owner’s Manual.
ELECTRIC PARKING BRAKE
To apply the parking brake, press the Parking Brake switch on the left side of the instrument panel. PARK will appear on the instrument cluster when the parking brake is set.
To release the parking brake, turn on the ignition, press the brake pedal, and then press the switch.
See Driving and Operating in your Owner’s Manual.
Automatic Vehicle Hold will hold the vehicle stationary after the brake pedal has been released and until the accelerator pedal is pressed. The indicator illuminates in green on the instrument
cluster when the system is holding the vehicle.
To turn the system on or off, press the AUTO HOLD button on the center console.
See Driving and Operating in your Owner’s Manual.
AUTOMATIC VEHICLE HOLD