center console CADILLAC CT5 2020 Convenience & Personalization Guide
[x] Cancel search | Manufacturer: CADILLAC, Model Year: 2020, Model line: CT5, Model: CADILLAC CT5 2020Pages: 20, PDF Size: 3.55 MB
Page 4 of 20
4
KEYLESS START
The Remote Keyless Entry (RKE) transmitter must be in the vehicle to turn on the ignition.
START
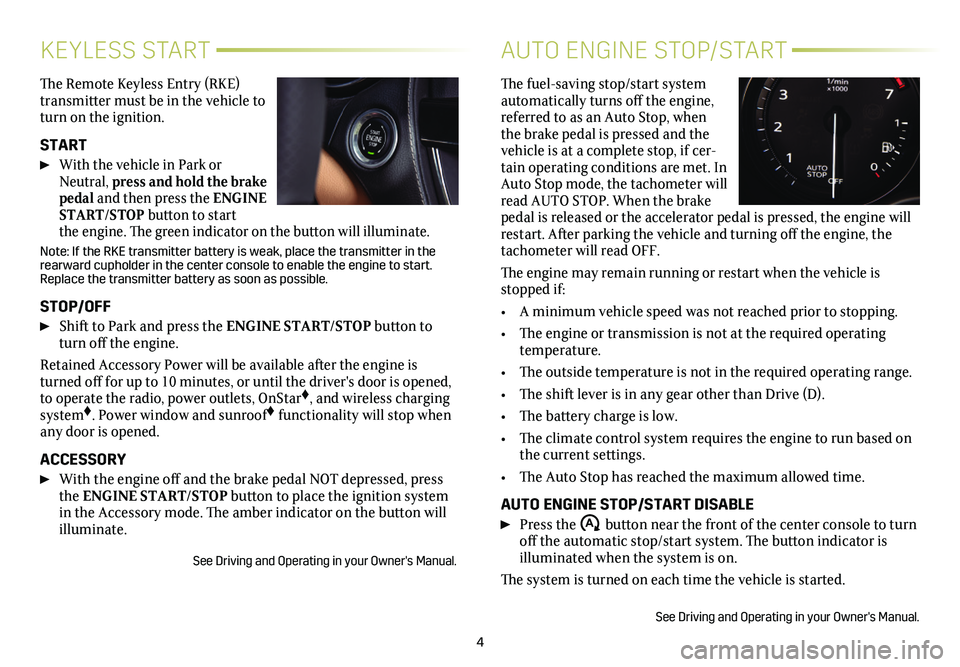
With the vehicle in Park or Neutral, press and hold the brake pedal and then press the ENGINE START/STOP button to start the engine. The green indicator on the button will illuminate.
Note: If the RKE transmitter battery is weak, place the transmitter in t\
he rearward cupholder in the center console to enable the engine to start. Replace the transmitter battery as soon as possible.
STOP/OFF
Shift to Park and press the ENGINE START/STOP button to turn off the engine.
Retained Accessory Power will be available after the engine is turned off for up to 10 minutes, or until the driver's door is opened, to operate the radio, power outlets, OnStar♦, and wireless charging system♦. Power window and sunroof♦ functionality will stop when any door is opened.
ACCESSORY
With the engine off and the brake pedal NOT depressed, press the ENGINE START/STOP button to place the ignition system in the Accessory mode. The amber indicator on the button will illuminate.
See Driving and Operating in your Owner's Manual.
AUTO ENGINE STOP/START
The fuel-saving stop/start system automatically turns off the engine, referred to as an Auto Stop, when the brake pedal is pressed and the vehicle is at a complete stop, if cer-tain operating conditions are met. In Auto Stop mode, the tachometer will read AUTO STOP. When the brake pedal is released or the accelerator pedal is pressed, the engine will restart. After parking the vehicle and turning off the engine, the tachometer will read OFF.
The engine may remain running or restart when the vehicle is stopped if:
• A minimum vehicle speed was not reached prior to stopping.
• The engine or transmission is not at the required operating temperature.
• The outside temperature is not in the required operating range.
• The shift lever is in any gear other than Drive (D).
• The battery charge is low.
• The climate control system requires the engine to run based on the current settings.
• The Auto Stop has reached the maximum allowed time.
AUTO ENGINE STOP/START DISABLE
Press the �$ button near the front of the center console to turn off the automatic stop/start system. The button indicator is
illuminated when the system is on.
The system is turned on each time the vehicle is started.
See Driving and Operating in your Owner's Manual.
Page 5 of 20
5
Driver Mode Control can automatically adjust the steering,
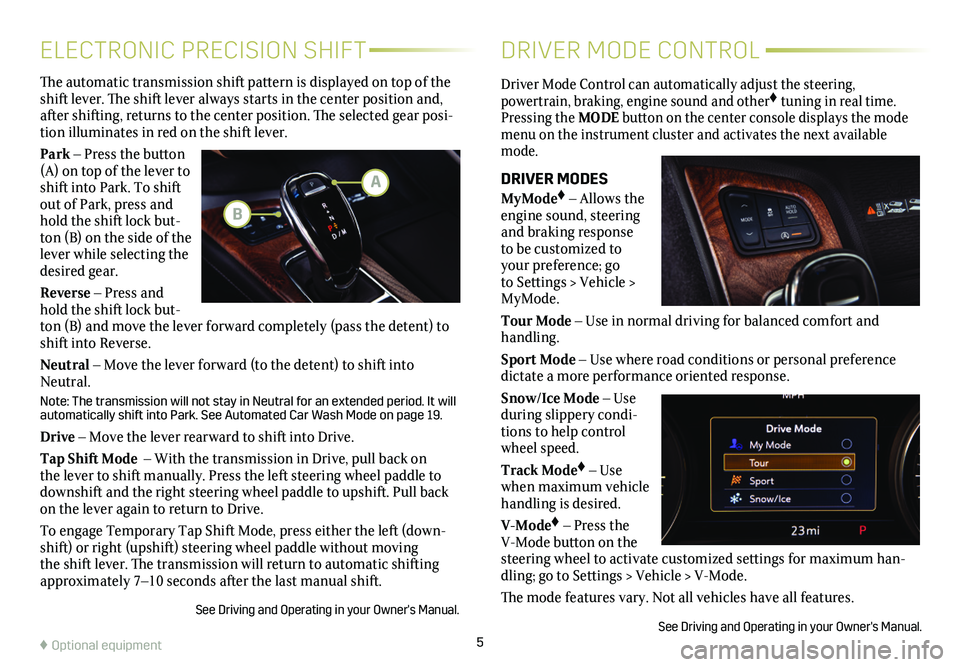
powertrain, braking, engine sound and other♦ tuning in real time. Pressing the MODE button on the center console displays the mode menu on the instrument cluster and activates the next available mode.
DRIVER MODES
MyMode♦ – Allows the engine sound, steering and braking response to be customized to your preference; go to Settings > Vehicle > MyMode.
Tour Mode – Use in normal driving for balanced comfort and handling.
Sport Mode – Use where road conditions or personal preference dictate a more performance oriented response.
Snow/Ice Mode – Use during slippery condi-tions to help control wheel speed.
Track Mode♦ – Use when maximum vehicle handling is desired.
V-Mode♦ – Press the V-Mode button on the steering wheel to activate customized settings for maximum han-dling; go to Settings > Vehicle > V-Mode.
The mode features vary. Not all vehicles have all features.
See Driving and Operating in your Owner's Manual.
The automatic transmission shift pattern is displayed on top of the shift lever. The shift lever always starts in the
center position and, after shifting, returns to the center position. The selected gear posi-tion illuminates in red on the shift lever.
Park – Press the button (A) on top of the lever to shift into Park. To shift out of Park, press and hold the shift lock but-ton (B) on the side of the lever while selecting the desired gear.
Reverse – Press and hold the shift lock but-ton (B) and move the lever forward completely (pass the detent) to shift into Reverse.
Neutral – Move the lever forward (to the detent) to shift into Neutral.
Note: The transmission will not stay in Neutral for an extended period. It will automatically shift into Park. See Automated Car Wash Mode on page 19.
Drive – Move the lever rearward to shift into Drive.
Tap Shift Mode – With the transmission in Drive, pull back on the lever to shift manually. Press the left steering wheel paddle to downshift and the right steering wheel paddle to upshift. Pull back on the lever again to return to Drive.
To engage Temporary Tap Shift Mode, press either the left (down-shift) or right (upshift) steering wheel paddle without moving the shift lever. The transmission will return to automatic shifting approximately 7–10 seconds after the last manual shift.
See Driving and Operating in your Owner's Manual.
ELECTRONIC PRECISION SHIFTDRIVER MODE CONTROL
A
B
♦ Optional equipment
Page 9 of 20
9
CADILLAC USER EXPERIENCE FEATURES
STORING STATION FAVORITES
Radio stations from all bands (AM, FM or SiriusXM♦) can be stored in any order.
1. Display the desired radio station.
2. Touch and hold a favorite screen button. Favorites also can be saved by touching the in a station or channel list.
3. Repeat the steps to store another favorite item.
SIRIUSXM® WITH 360L♦
SiriusXM with 360L provides subscribers an enhanced in-vehicle listening experience with unique satellite and streaming channels, on-demand content, personalized recommendations and an inter-active interface. Learn more at siriusxm.com. For the full SiriusXM with 360L experience, OnStar Connected Access is required. Learn more about OnStar services at onstar.com.
APPLE CARPLAY
Apple CarPlay capability is available through a compatible smart-phone using the Apple CarPlay icon on the Home page of the
infotainment system. No app is required.
1. Connect your compatible phone by plugging the Lightning cable into a USB data port. Use your device’s factory-provided Lightning cable. Aftermarket cables may not work.
2. The Apple CarPlay icon will illuminate. Touch the icon to have your apps displayed.
Press the Home button to exit Apple CarPlay. To return to the last page viewed in Apple CarPlay, press and hold the Home button.
ANDROID AUTO
Android Auto capability is available through a compatible smart-phone using the Android Auto icon on the Home page of the info-tainment system.
1. Download the Android Auto app to your phone from the Google Play Store.
2. Connect your compatible phone by plugging the phone USB cable into a USB data port. Use your device’s factory-provided USB cable. Aftermarket cables may not work.
3. The Android Auto icon will illuminate. Touch the icon to have your apps displayed.
Press the Home button to exit Android Auto. To return to the last page viewed in Android Auto, press and hold the Home button.
PORTABLE AUDIO DEVICES
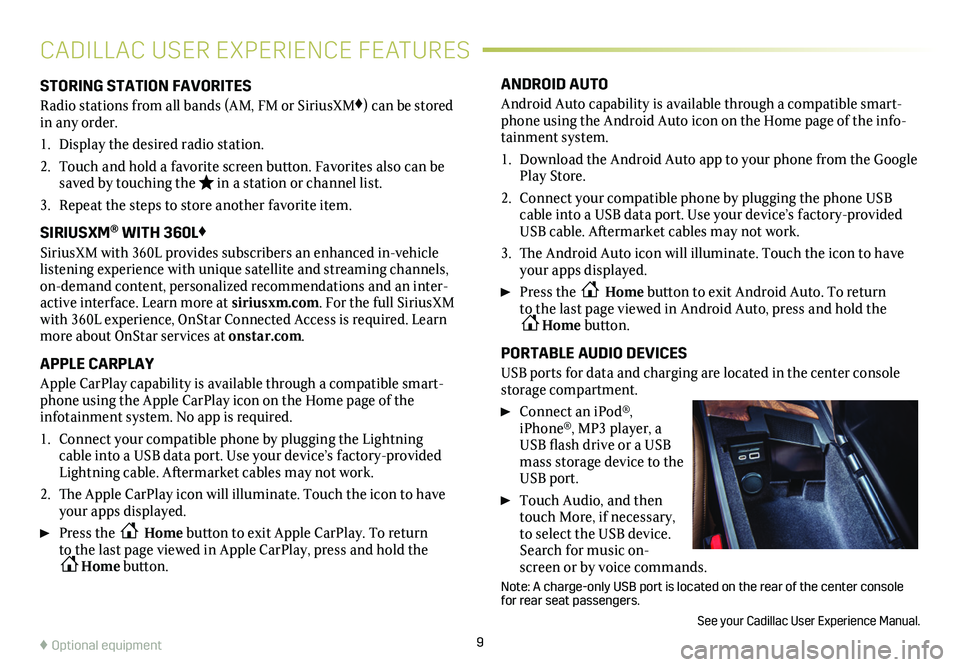
USB ports for data and charging are located in the center console storage compartment.
Connect an iPod®, iPhone®, MP3 player, a USB flash drive or a USB mass storage device to the USB port.
Touch Audio, and then touch More, if necessary, to select the USB device. Search for music on-screen or by voice commands.
Note: A charge-only USB port is located on the rear of the center consol\
e for rear seat passengers.
See your Cadillac User Experience Manual.
♦ Optional equipment
Page 11 of 20
11
4G LTE WI-FI® HOTSPOT
VEHICLE CUSTOMIZATION
WIRELESS CHARGING
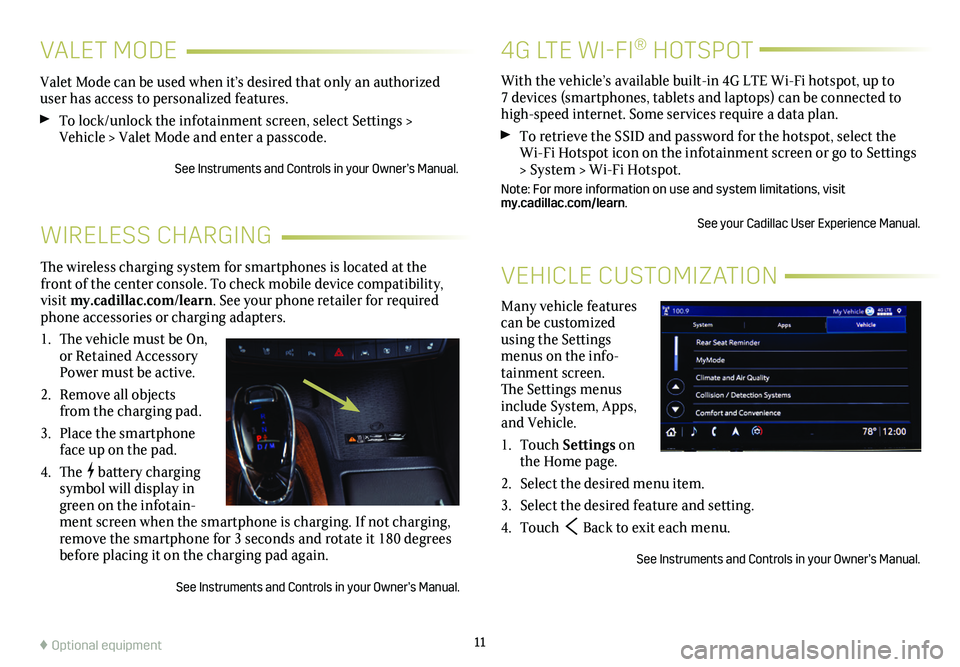
Many vehicle features can be customized using the Settings menus on the info-tainment screen. The Settings menus include System, Apps, and Vehicle.
1. Touch Settings on the Home page.
2. Select the desired menu item.
3. Select the desired feature and setting.
4. Touch Back to exit each menu.
See Instruments and Controls in your Owner’s Manual.
The wireless charging system for smartphones is located at the front of the center console. To check mobile device compatibility, visit my.cadillac.com/learn. See your phone retailer for required phone accessories or charging adapters.
1. The vehicle must be On, or Retained Accessory Power must be active.
2. Remove all objects from the charging pad.
3. Place the smartphone face up on the pad.
4. The battery charging symbol will display in green on the infotain-ment screen when the smartphone is charging. If not charging, remove the smartphone for 3 seconds and rotate it 180 degrees before placing it on the charging pad again.
See Instruments and Controls in your Owner’s Manual.
With the vehicle’s available built-in 4G LTE Wi-Fi hotspot, up to 7 devices (smartphones, tablets and laptops) can be connected to high-speed internet. Some services require a data plan.
To retrieve the SSID and password for the hotspot, select the Wi-Fi Hotspot icon on the infotainment screen or go to Settings > System > Wi-Fi Hotspot.
Note: For more information on use and system limitations, visit my.cadillac.com/learn.
See your Cadillac User Experience Manual.
Valet Mode can be used when it’s desired that only an authorized user has access to personalized features.
To lock/unlock the infotainment screen, select Settings > Vehicle > Valet Mode and enter a passcode.
See Instruments and Controls in your Owner’s Manual.
VALET MODE
♦ Optional equipment
Page 12 of 20
TEEN DRIVER
Teen Driver allows multiple keys to be registered for beginning
drivers. When active, the system automatically activates certain safety systems, allows setting of some features, and limits the use of others. An in-vehicle Report Card records vehicle data about driving behavior. When the vehicle is started with a registered key, a Driver Information Center message displays that Teen Driver is active.
To create a Personal Identification Number, register a key, change Teen Driver settings, or access the Report Card, go to Settings > Vehicle > Teen Driver.
See your Cadillac User Experience Manual.
12
The Universal Remote System on the overhead console enables your vehicle to control 3 different devices, ranging from garage doors and gates to home lighting. Go to homelink.com for detailed videos and instructions on how to program the Universal Remote System. For additional assistance, call 1-800-355-3515.
See Instruments and Controls in your Owner’s Manual.
UNIVERSAL REMOTE SYSTEM
ULTRAVIEW SUNROOF♦
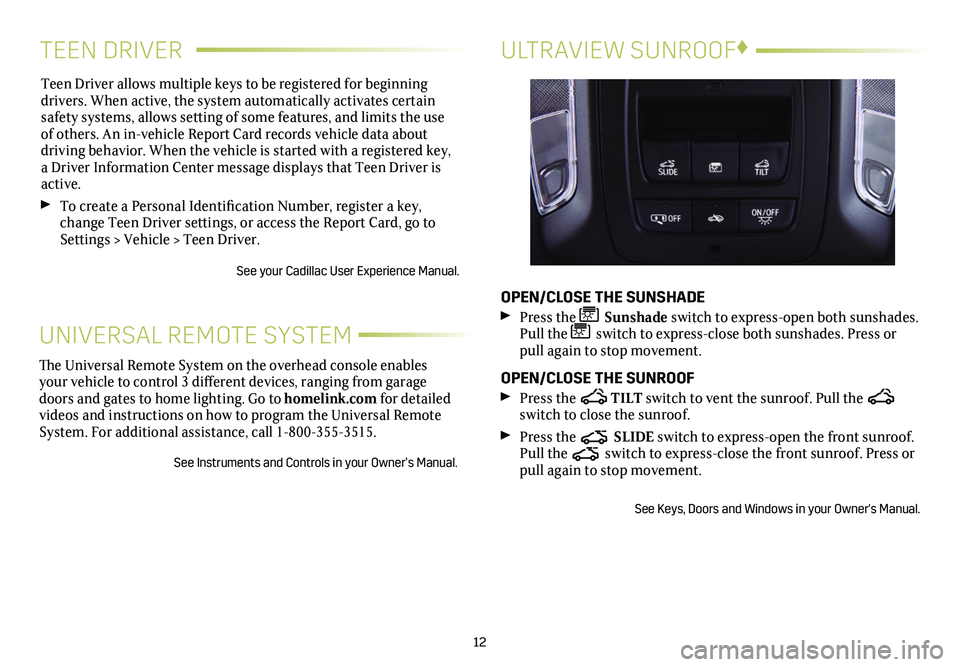
OPEN/CLOSE THE SUNSHADE
Press the Sunshade switch to express-open both sunshades. Pull the switch to express-close both sunshades. Press or pull again to stop movement.
OPEN/CLOSE THE SUNROOF
Press the TILT switch to vent the sunroof. Pull the switch to close the sunroof.
Press the SLIDE switch to express-open the front sunroof. Pull the switch to express-close the front sunroof. Press or pull again to stop movement.
See Keys, Doors and Windows in your Owner's Manual.
Page 18 of 20
18
DRIVER ASSISTANCE SYSTEMS
AUTOMATIC PARKING ASSIST WITH BRAKING♦
The Automatic Parking Assist with Braking system steers the
vehicle at idle speed and applies the brakes to help you park the vehicle while you follow commands and control the gear selection.
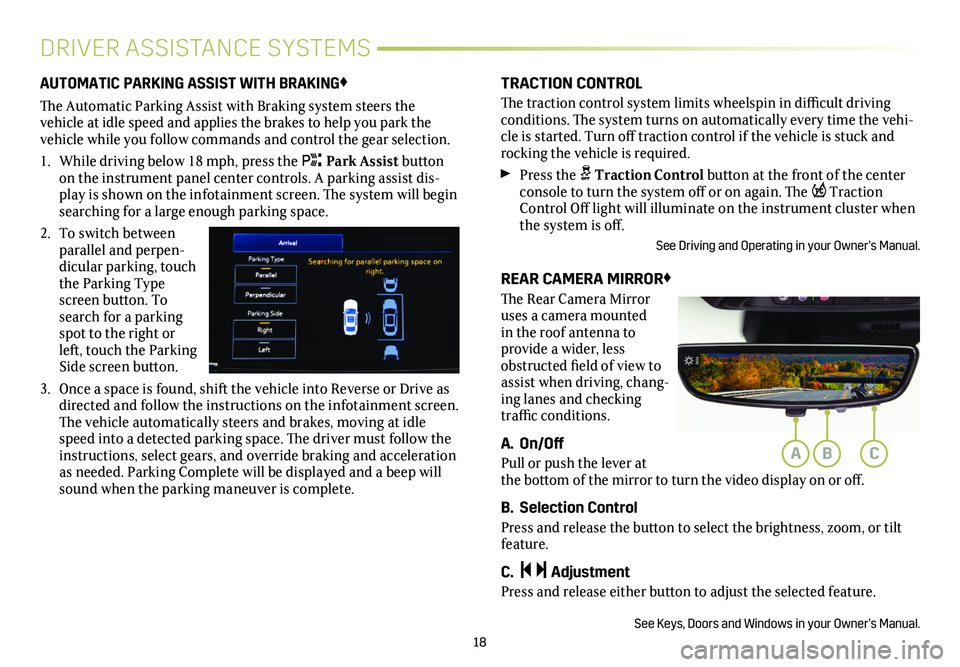
1. While driving below 18 mph, press the Park Assist button on the instrument panel center controls. A parking assist dis-play is shown on the infotainment screen. The system will begin searching for a large enough parking space.
2. To switch between parallel and perpen-dicular parking, touch the Parking Type screen button. To search for a parking spot to the right or left, touch the Parking Side screen button.
3. Once a space is found, shift the vehicle into Reverse or Drive as directed and follow the instructions on the infotainment screen. The vehicle automatically steers and brakes, moving at idle speed into a detected parking space. The driver must follow the instructions, select gears, and override braking and acceleration as needed. Parking Complete will be displayed and a beep will sound when the parking maneuver is complete.
TRACTION CONTROL
The traction control system limits wheelspin in difficult driving conditions. The system turns on automatically every time the vehi-cle is started. Turn off traction control if the vehicle is stuck and rocking the vehicle is required.
Press the Traction Control button at the front of the center console to turn the system off or on again. The Traction Control Off light will illuminate on the instrument cluster when the system is off.
See Driving and Operating in your Owner’s Manual.
REAR CAMERA MIRROR♦
The Rear Camera Mirror uses a camera mounted in the roof antenna to
provide a wider, less obstructed field of view to assist when driving, chang-ing lanes and checking traffic conditions.
A. On/Off
Pull or push the lever at the bottom of the mirror to turn the video display on or off.
B. Selection Control
Press and release the button to select the brightness, zoom, or tilt feature.
C. Adjustment
Press and release either button to adjust the selected feature.
See Keys, Doors and Windows in your Owner’s Manual.
ABC
Page 19 of 20
19
TIRE PRESSURE MONITOR
ELECTRIC PARKING BRAKE
AUTOMATED CAR WASH MODE
POWER RELEASE TRUNK
The Low Tire Pressure warning light on the instrument cluster illuminates when one or more of the vehicle’s tires is
significantly underinflated. Fill the tires to the proper tire
pressures listed on the Tire and Loading Information label, located below the driver’s door latch. Current tire pressures can be viewed on the Driver Information Center.
With the ignition On or in Accessory mode, the Tire Fill Alert will provide visual and audible alerts when inflating a tire.
See Vehicle Care in your Owner's Manual.
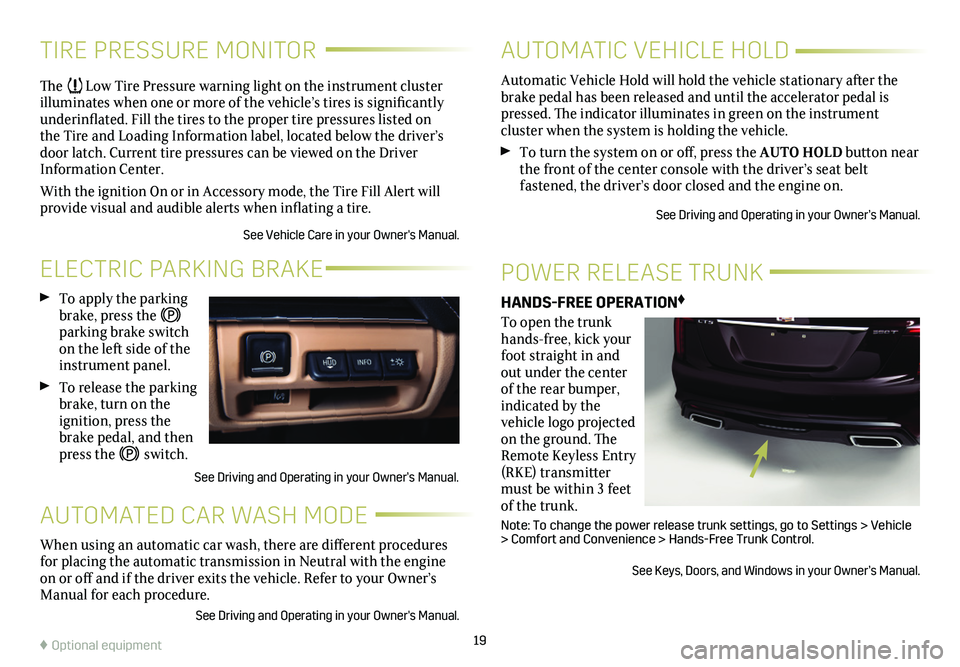
To apply the parking brake, press the parking brake switch on the left side of the instrument panel.
To release the parking brake, turn on the ignition, press the brake pedal, and then press the switch.
See Driving and Operating in your Owner’s Manual.
When using an automatic car wash, there are different procedures for placing the automatic transmission in Neutral with the engine on or off and if the driver exits the vehicle. Refer to your Owner’s Manual for each procedure.
See Driving and Operating in your Owner's Manual.
HANDS-FREE OPERATION♦
To open the trunk hands-free, kick your foot straight in and out under the center of the rear bumper, indicated by the vehicle logo projected on the ground. The Remote Keyless Entry (RKE) transmitter must be within 3 feet of the trunk.
Note: To change the power release trunk settings, go to Settings > Vehicle > Comfort and Convenience > Hands-Free Trunk Control.
See Keys, Doors, and Windows in your Owner’s Manual.
♦ Optional equipment
Automatic Vehicle Hold will hold the vehicle stationary after the brake pedal has been released and until the accelerator pedal is pressed. The indicator illuminates in green on the instrument
cluster when the system is holding the vehicle.
To turn the system on or off, press the AUTO HOLD button near the front of the center console with the driver’s seat belt
fastened, the driver’s door closed and the engine on.
See Driving and Operating in your Owner’s Manual.
AUTOMATIC VEHICLE HOLD