Remove CADILLAC CT5 2020 Owner's Guide
[x] Cancel search | Manufacturer: CADILLAC, Model Year: 2020, Model line: CT5, Model: CADILLAC CT5 2020Pages: 359, PDF Size: 6.04 MB
Page 155 of 359
Cadillac CT5 Owner Manual (GMNA-Localizing-U.S./Canada-13060105) -
2020 - CRC - 2/14/20
154 DRIVING AND OPERATING
Axle Fluid
Axles must have 2400 km (1500 mi)
before being used in track driving.
The front, if equipped with AWD, and
rear axle fluid temperatures may be
higher than when driving in severe
conditions. Drain and refill with new
fluid after the first racing or
competitive driving event, and then
after every 24 hours of racing or
competitive driving. SeeRecommended
Fluids and Lubricants 0317.
Caution
During a first time track or racing
event, high axle temperatures can
occur. Damage could be caused to
the axle and would not be covered
by the vehicle warranty. Do not
drive as long or as fast the first
time the vehicle is driven on the
track or raced.
Engine Oil
Check the oil level often during track
events and competitive driving and
keep the oil level at or near the
upper mark.
Fuel
Use premium unleaded gasoline with
a posted octane rating of 93 at a track
event. Unleaded gasoline with a
posted octane rating of 91 may be
used, but performance will be
degraded. See Prohibited Fuels 0227.
Automatic Transmission Fluid
Have the transmission fluid set to the
track specific oil level prior to track
usage. Transmission fluid should be
changed after every 15 hours of track
usage. Any transmission level set or
change should be performed at your
dealer.
Brakes
Brake Fluid
For track events and competitive
driving, it is recommended that the
brake fluid be replaced with a high
performance brake fluid that has a dry boiling point greater than 279 °C
(534 °F). After conversion to the high
performance brake fluid, follow the
brake fluid service recommendations
outlined by the fluid manufacturer. Do
not use silicone or DOT-5 brake fluids.
Caution
Removing the splash shield can
degrade wet braking performance,
as well as introduce brake pedal
pulsation, due to brake disc
exposure to road debris. Only
remove the front brake disc splash
shield and front tire deflector when
driving in track events.
Brake cooling can be improved if the
front brake disc splash shield and
front tire deflector are removed.
Removing the shield will require that
the suspension bushings and wheel
speed sensor wires visible to the brake
disc be protected with insulated
thermal wrapping.
Check the fluid level before each
competitive driving event.
Page 172 of 359

Cadillac CT5 Owner Manual (GMNA-Localizing-U.S./Canada-13060105) -
2020 - CRC - 2/14/20
DRIVING AND OPERATING 171
This vehicle includes a manual park
release that can be used to shift the
vehicle into N (Neutral) when the
engine is not running.
Pulling the manual park release while
the vehicle is on or turning the
ignition on while the manual park
release is pulled, will cause a DIC
message to display.
To place the vehicle in N (Neutral)
using the manual park release:1. Ensure the vehicle is on level ground and set the parking
brake. Release the brake pedal.
2. Turn the vehicle off.3. Use a flat-bladed tool to remove the interior trim panel.
4. Ensure more than one minute has passed since Step 2. Apply
the brake pedal.
5. Pull the manual park releaselever 90° to the latched position.
6. With the brake pedal released, place the ignition in ACC/
ACCESSORY. Then apply the
brake pedal and release the
parking brake.
7. Ensure there are no loose objects in the area that could bump the
manual park release lever. To return the vehicle to P (Park) using
the manual park release:
1. Bring the vehicle to a complete stop.
2. Turn the manual park release lever 90° back to its original
position.
3. Apply the parking brake.
4. Confirm that the vehicle is in P (Park) by turning the ignition
on or by placing the vehicle in
ACC/ACCESSORY, then ensure
that the indicator displays P.
5. Reinstall the interior trim panel.
Parking over Things
That Burn
{Warning
Things that can burn could touch
hot exhaust parts under the vehicle
and ignite. Do not park over papers,
leaves, dry grass, or other things
that can burn.
Page 195 of 359
Cadillac CT5 Owner Manual (GMNA-Localizing-U.S./Canada-13060105) -
2020 - CRC - 2/14/20
194 DRIVING AND OPERATING
J:Press to turn the system on and
off. A white indicator appears in the
instrument cluster when cruise is
turned on.
RES+ : If there is a set speed in
memory, press briefly to resume to
that speed or press and hold to
accelerate. If the cruise control is
already active, use to increase vehicle
speed. To increase speed by 1 km/h
(1 mph), press RES+ to the first detent.
To increase speed to the next 5 km/h
(5 mph) mark on the speedometer,
press RES+ to the second detent.
SET− :Press briefly to set the speed
and activate cruise control. If the
cruise control is already active, use to
decrease vehicle speed. To decrease
speed by 1 km/h (1 mph), press SET−
to the first detent. To decrease speed
to the next 5 km/h (5 mph) mark on
the speedometer, press SET− to the
second detent.
*: Press to disengage cruise control
without erasing the set speed from
memory. Setting Cruise Control
If
Jis on when not in use, SET−
or
RES+ could get pressed and go into
cruise when not desired. Keep
Joff
when cruise is not being used.
1. Press
J.
2. Get up to the desired speed.
3. Press and release SET−. The desired set speed briefly appears
in the instrument cluster.
4. Remove your foot from the accelerator.
When the cruise control has been set
to the desired speed, a green cruise
control indicator appears on the
instrument cluster and a cruise set
speed message appears on the
Head-Up Display (HUD), if equipped.
Resuming a Set Speed
If the cruise control is set at a desired
speed and then the brakes are applied
or
*is pressed, the cruise control is
disengaged without erasing the set
speed from memory. Once the vehicle speed reaches about
40 km/h (25 mph) or more, press RES+
briefly. The vehicle returns to the
previous set speed.
Increasing Speed While Using
Cruise Control
If the cruise control system is already
activated:
.
Press and hold RES+ until the
desired speed is reached, then
release it.
. To increase vehicle speed in small
increments, briefly press RES+ to
the first detent. For each press, the
vehicle goes about 1 km/h (1 mph)
faster.
. To increase vehicle speed in larger
increments, briefly press RES+ to
the second detent. For each press,
the vehicle speed increases to the
next 5 km/h (5 mph) mark on the
speedometer.
The speedometer reading can be
displayed in either English or metric
units. See Instrument Cluster 0101.
The increment value used depends on
the units displayed.
Page 199 of 359
Cadillac CT5 Owner Manual (GMNA-Localizing-U.S./Canada-13060105) -
2020 - CRC - 2/14/20
198 DRIVING AND OPERATING
To set ACC while moving:1. Press
J.
2. Get up to the desired speed.
3. Press and release SET−.
4. Remove your foot from the accelerator.
After ACC is set, it may immediately
apply the brakes if a vehicle ahead is
detected closer than the selected
following gap.
ACC can also be set while the vehicle
is stopped if ACC is on and the brake
pedal is applied.
The ACC indicator displays on the
instrument cluster and Head-Up
Display (HUD), if equipped. When ACC
is turned on, the indicator will be lit
white. When ACC is engaged, the
indicator will turn green.
Be mindful of speed limits,
surrounding traffic speeds, and
weather conditions when selecting the
set speed. Resuming a Set Speed
If ACC is set at a desired speed and
then the brakes are applied, ACC is
disengaged without erasing the set
speed from memory.
To begin using ACC again, press RES+
up briefly while moving more than
5 kph (5 mph). The vehicle returns to
the previous set speed.
If the vehicle is stopped with the
brake pedal applied, press RES+ and
release the brake pedal. ACC will hold
the vehicle until RES+ or the
accelerator pedal is pressed.
A green ACC indicator and the set
speed display on the instrument
cluster. The vehicle ahead indicator
may be flashing if a vehicle ahead was
present and moved. See
“Approaching
and Following a Vehicle ”later in this
section.
Once ACC has resumed, if there is no
vehicle ahead, if the vehicle ahead is
beyond the selected following gap,
or if the vehicle has exited a sharp
curve, then the vehicle speed will
increase to the set speed. Increasing Speed While ACC Is at a
Set Speed
If ACC is already activated, do one of
the following:
.
Use the accelerator to get to the
higher speed. Press SET– . Release
the control and the accelerator
pedal. The vehicle will now cruise
at the higher speed.
When the accelerator pedal is
pressed, ACC will not brake
because it is overridden. The ACC
indicator will turn blue on the
instrument panel and heads up
display, if equipped
. Press and hold RES+ until the
desired set speed is displayed,
then release it.
. To increase speed in smaller
increments, press RES+ to the first
detent. For each press, the vehicle
goes 1 km/h (1 mph) faster.
. To increase speed in larger
increments, press RES+ to the
second detent. For each press, the
vehicle speed increases to the next
5 km/h (5 mph) mark on the
speedometer.
Page 210 of 359
Cadillac CT5 Owner Manual (GMNA-Localizing-U.S./Canada-13060105) -
2020 - CRC - 2/14/20
DRIVING AND OPERATING 209
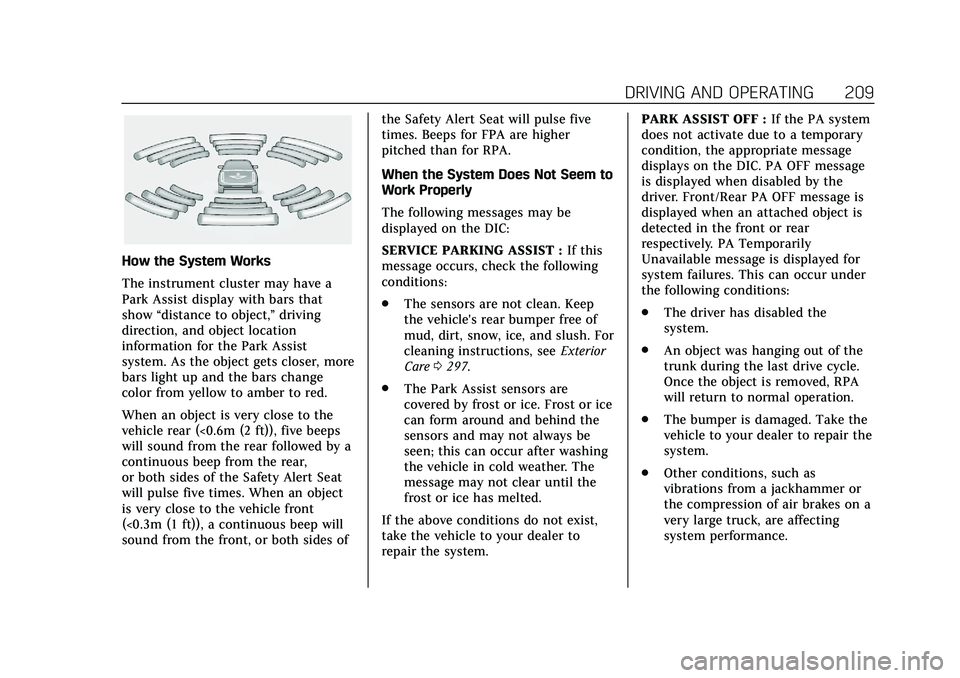
How the System Works
The instrument cluster may have a
Park Assist display with bars that
show“distance to object,” driving
direction, and object location
information for the Park Assist
system. As the object gets closer, more
bars light up and the bars change
color from yellow to amber to red.
When an object is very close to the
vehicle rear (<0.6m (2 ft)), five beeps
will sound from the rear followed by a
continuous beep from the rear,
or both sides of the Safety Alert Seat
will pulse five times. When an object
is very close to the vehicle front
(<0.3m (1 ft)), a continuous beep will
sound from the front, or both sides of the Safety Alert Seat will pulse five
times. Beeps for FPA are higher
pitched than for RPA.
When the System Does Not Seem to
Work Properly
The following messages may be
displayed on the DIC:
SERVICE PARKING ASSIST :
If this
message occurs, check the following
conditions:
. The sensors are not clean. Keep
the vehicle's rear bumper free of
mud, dirt, snow, ice, and slush. For
cleaning instructions, see Exterior
Care 0297.
. The Park Assist sensors are
covered by frost or ice. Frost or ice
can form around and behind the
sensors and may not always be
seen; this can occur after washing
the vehicle in cold weather. The
message may not clear until the
frost or ice has melted.
If the above conditions do not exist,
take the vehicle to your dealer to
repair the system. PARK ASSIST OFF :
If the PA system
does not activate due to a temporary
condition, the appropriate message
displays on the DIC. PA OFF message
is displayed when disabled by the
driver. Front/Rear PA OFF message is
displayed when an attached object is
detected in the front or rear
respectively. PA Temporarily
Unavailable message is displayed for
system failures. This can occur under
the following conditions:
. The driver has disabled the
system.
. An object was hanging out of the
trunk during the last drive cycle.
Once the object is removed, RPA
will return to normal operation.
. The bumper is damaged. Take the
vehicle to your dealer to repair the
system.
. Other conditions, such as
vibrations from a jackhammer or
the compression of air brakes on a
very large truck, are affecting
system performance.
Page 213 of 359
Cadillac CT5 Owner Manual (GMNA-Localizing-U.S./Canada-13060105) -
2020 - CRC - 2/14/20
212 DRIVING AND OPERATING
Warning (Continued)
APA does not detect or avoid traffic
that is behind or alongside of the
vehicle. Always be prepared to stop
the vehicle during the parking
maneuver.
Touch
Oon the center stack to
enable the system to search for a
parking space that is large enough and
within 1.5 m (5 ft) of the vehicle. The
vehicle speed must be below
30 km/h (18 mph). The system cannot:
. Detect whether it is a legal parking
space.
. Park exactly lined up with the
vehicle next to it if the spot is
approached at an angle or if the
parking space is angled.
. Park exactly centered in a spot
that is marked too large.
. Always detect short curbs.
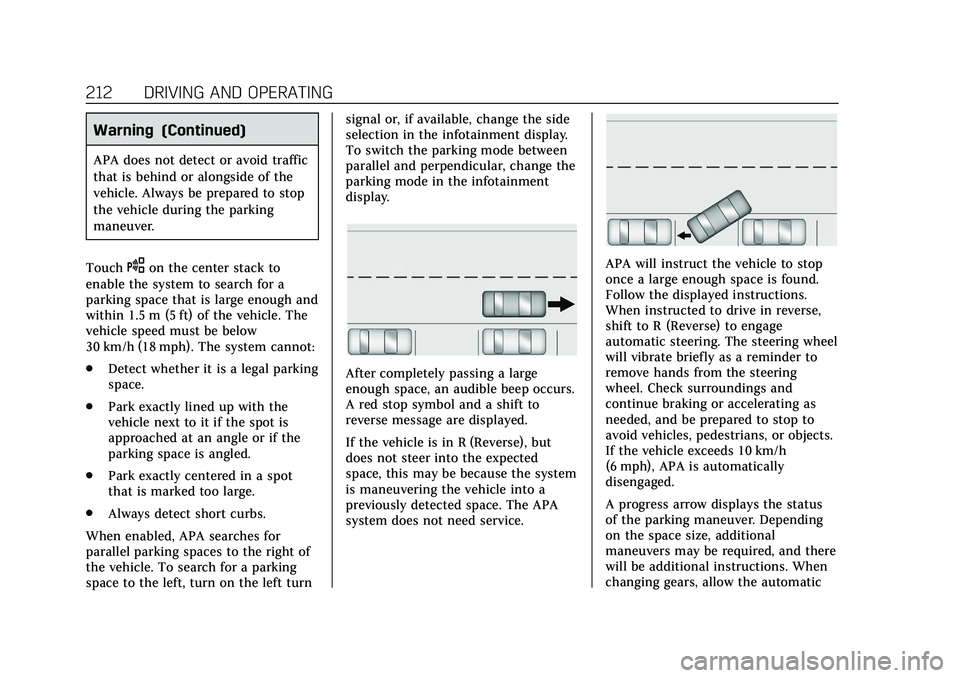
When enabled, APA searches for
parallel parking spaces to the right of
the vehicle. To search for a parking
space to the left, turn on the left turn signal or, if available, change the side
selection in the infotainment display.
To switch the parking mode between
parallel and perpendicular, change the
parking mode in the infotainment
display.
After completely passing a large
enough space, an audible beep occurs.
A red stop symbol and a shift to
reverse message are displayed.
If the vehicle is in R (Reverse), but
does not steer into the expected
space, this may be because the system
is maneuvering the vehicle into a
previously detected space. The APA
system does not need service.
APA will instruct the vehicle to stop
once a large enough space is found.
Follow the displayed instructions.
When instructed to drive in reverse,
shift to R (Reverse) to engage
automatic steering. The steering wheel
will vibrate briefly as a reminder to
remove hands from the steering
wheel. Check surroundings and
continue braking or accelerating as
needed, and be prepared to stop to
avoid vehicles, pedestrians, or objects.
If the vehicle exceeds 10 km/h
(6 mph), APA is automatically
disengaged.
A progress arrow displays the status
of the parking maneuver. Depending
on the space size, additional
maneuvers may be required, and there
will be additional instructions. When
changing gears, allow the automatic
Page 225 of 359

Cadillac CT5 Owner Manual (GMNA-Localizing-U.S./Canada-13060105) -
2020 - CRC - 2/14/20
224 DRIVING AND OPERATING
three times, on the right or left,
depending on the lane departure
direction.
Take Steering
The LKA system does not
continuously steer the vehicle. If LKA
does not detect active driver steering,
an alert and chime may be provided.
Steer the vehicle to dismiss. LKA may
become temporarily unavailable after
repeated take steering alerts.
When the System Does Not
Seem to Work Properly
The system performance may be
affected by:
.Close vehicles ahead.
. Sudden lighting changes, such as
when driving through tunnels.
. Banked roads.
. Roads with poor lane markings,
such as two-lane roads.
If the LKA system is not functioning
properly when lane markings are
clearly visible, cleaning the windshield
may help. A camera blocked message may
display if the camera is blocked. Some
driver assistance systems may have
reduced performance or not work at
all. An LKA or LDW unavailable
message may display if the systems
are temporarily unavailable. This
message could be due to a blocked
camera. The LKA system does not
need service. Clean the outside of the
windshield behind the rearview mirror.
LKA assistance and/or LDW alerts
may occur due to tar marks, shadows,
cracks in the road, temporary or
construction lane markings, or other
road imperfections. This is normal
system operation; the vehicle does not
need service. Turn LKA off if these
conditions continue.
Surround Vision Recorder
If equipped, this system records the
360° camera views to an SD card. Only
images are recorded, no sound. An SD
card will be needed for this system.
The recommended SD card is a 32GB
SDHC card with FAT32 file system,
Class 10 and over.
Insert an SD card into the card reader
in the trunk. Disable the system from
the playback screen before removing
the SD card from the reader. Do not
remove the card while recording is
enabled. This could corrupt the video
file and/or the SD card.
Other files should not be stored on
the same SD card as the surround
vision recorder files. Storing other files
on the same card may increase
recording start up and playback time
or result in a loss of data.
Page 226 of 359
Cadillac CT5 Owner Manual (GMNA-Localizing-U.S./Canada-13060105) -
2020 - CRC - 2/14/20
DRIVING AND OPERATING 225
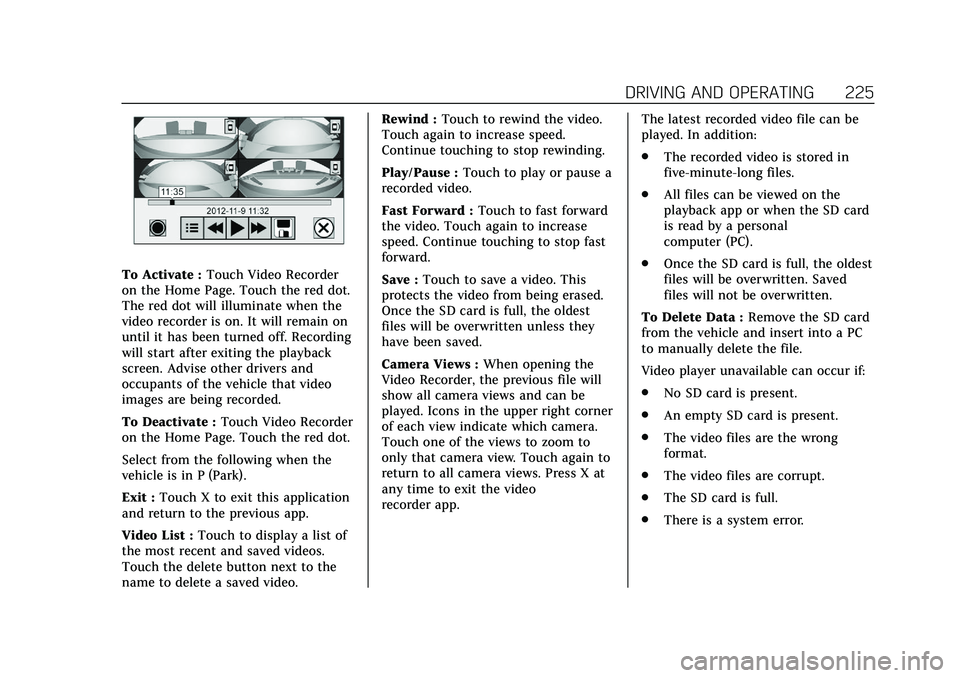
To Activate :Touch Video Recorder
on the Home Page. Touch the red dot.
The red dot will illuminate when the
video recorder is on. It will remain on
until it has been turned off. Recording
will start after exiting the playback
screen. Advise other drivers and
occupants of the vehicle that video
images are being recorded.
To Deactivate : Touch Video Recorder
on the Home Page. Touch the red dot.
Select from the following when the
vehicle is in P (Park).
Exit : Touch X to exit this application
and return to the previous app.
Video List : Touch to display a list of
the most recent and saved videos.
Touch the delete button next to the
name to delete a saved video. Rewind :
Touch to rewind the video.
Touch again to increase speed.
Continue touching to stop rewinding.
Play/Pause : Touch to play or pause a
recorded video.
Fast Forward : Touch to fast forward
the video. Touch again to increase
speed. Continue touching to stop fast
forward.
Save : Touch to save a video. This
protects the video from being erased.
Once the SD card is full, the oldest
files will be overwritten unless they
have been saved.
Camera Views : When opening the
Video Recorder, the previous file will
show all camera views and can be
played. Icons in the upper right corner
of each view indicate which camera.
Touch one of the views to zoom to
only that camera view. Touch again to
return to all camera views. Press X at
any time to exit the video
recorder app. The latest recorded video file can be
played. In addition:
.
The recorded video is stored in
five-minute-long files.
. All files can be viewed on the
playback app or when the SD card
is read by a personal
computer (PC).
. Once the SD card is full, the oldest
files will be overwritten. Saved
files will not be overwritten.
To Delete Data : Remove the SD card
from the vehicle and insert into a PC
to manually delete the file.
Video player unavailable can occur if:
. No SD card is present.
. An empty SD card is present.
. The video files are the wrong
format.
. The video files are corrupt.
. The SD card is full.
. There is a system error.
Page 230 of 359

Cadillac CT5 Owner Manual (GMNA-Localizing-U.S./Canada-13060105) -
2020 - CRC - 2/14/20
DRIVING AND OPERATING 229
The capless refueling system does not
have a fuel cap. Fully insert and latch
the fill nozzle, begin fueling.
{Warning
Overfilling the fuel tank by more
than three clicks of a standard fill
nozzle may cause:. Vehicle performance issues,
including engine stalling and
damage to the fuel system.
. Fuel spills.
. Under certain conditions, fuel
fires.
Be careful not to spill fuel. Wait
five seconds after you have finished
pumping before removing the fill
nozzle. Clean fuel from painted
surfaces as soon as possible. See
Exterior Care 0297. Push the fuel door
closed until it latches.
{Warning
If a fire starts while you are
refueling, do not remove the fill
nozzle. Shut off the flow of fuel by
shutting off the pump or by
notifying the station attendant.
Leave the area immediately.
Filling the Tank with a Portable Fuel
Container
If the vehicle runs out of fuel and
must be filled from a portable fuel
container:
1. Locate the capless funnel adapter.
2. Insert and latch the funnel into the capless fuel system.
{Warning
Attempting to refuel from a
portable fuel container without
using the funnel adapter may cause
fuel spillage and damage the
capless fuel system. This could
cause a fire. You or others could be
badly burned and the vehicle could
be damaged.
3. Remove and clean the funnel adapter and return it to the
storage location.
Filling a Portable Fuel
Container
{Warning
Never fill a portable fuel container
while it is in the vehicle. Static
electricity discharge from the
container can ignite the fuel vapor.
You or others could be badly
(Continued)
Page 236 of 359

Cadillac CT5 Owner Manual (GMNA-Localizing-U.S./Canada-13060105) -
2020 - CRC - 2/14/20
DRIVING AND OPERATING 235
Trailer Load Balance
The correct trailer load balance must
be maintained to ensure trailer
stability. Incorrect load balance is a
leading cause of trailer sway.
The trailer tongue weight (1) should
be 10–15% of the loaded trailer
weight (2). Some specific trailer types,
such as boat trailers, fall outside of
this range. Always refer to the trailer
owner’s manual for the recommended
trailer tongue weight for each trailer.
Never exceed the maximum loads for
your vehicle, hitch, and trailer.After loading the trailer, separately
weigh the trailer and then the trailer
tongue and calculate the trailer load
balance percentage to see if the
weights and distribution are
appropriate for your vehicle. If the
trailer weight is too high, it may be
possible to transfer some of the cargo
into your vehicle. If the trailer tongue
weight is too high or too low, it may
be possible to rearrange some of the
cargo inside of the trailer.
Do not exceed the maximum
allowable tongue weight for your
vehicle. Use the shortest hitch
extension available to position the
hitch ball closer to your vehicle. This
will help reduce the effect of the
trailer tongue weight on the trailer
hitch and the rear axle.
If a cargo carrier is used in the trailer
hitch receiver, choose a carrier that
positions the load as close to the
vehicle as possible. Make sure the
total weight, including the carrier, is
no more than half of the maximum
allowable tongue weight for the
vehicle or 227 kg (500 lb), whichever
is less.Ask your dealer for trailering
information or assistance.
Towing Equipment
Hitches
Always use the correct hitch
equipment for your vehicle.
Crosswinds, large trucks going by, and
rough roads can affect the trailer and
the hitch.
Never attach rental hitches or other
bumper-type hitches. Only use
frame-mounted hitches that do not
attach to the bumper.
Always seal any holes in your vehicle
if the trailer hitch removed. If not
sealed, dirt, water, and carbon
monoxide (CO) from the exhaust may
enter your vehicle. See
Engine Exhaust
0 172.
Consider using mechanical sway
controls with any trailer. Ask a
trailering professional about sway
controls or refer to the trailer
manufacturer's recommendations and
instructions.