info CADILLAC CT5 2020 Owner's Manual
[x] Cancel search | Manufacturer: CADILLAC, Model Year: 2020, Model line: CT5, Model: CADILLAC CT5 2020Pages: 359, PDF Size: 6.04 MB
Page 2 of 359
Cadillac CT5 Owner Manual (GMNA-Localizing-U.S./Canada-13060105) -
2020 - CRC - 2/14/20
ContentsIntroduction . . . . . . . . . . . . . . . . . . . . . . . . . . 2
Keys, Doors, and Windows . . . . . . . . . . 7
Seats and Restraints . . . . . . . . . . . . . . . 39
Storage . . . . . . . . . . . . . . . . . . . . . . . . . . . . . . 90
Instruments and Controls . . . . . . . . . . 93
Lighting . . . . . . . . . . . . . . . . . . . . . . . . . . . . 133
Infotainment System . . . . . . . . . . . . . 141
Climate Controls . . . . . . . . . . . . . . . . . . 142
Driving and Operating . . . . . . . . . . . . 148
Vehicle Care . . . . . . . . . . . . . . . . . . . . . . . 238
Service and Maintenance . . . . . . . . . 306
Technical Data . . . . . . . . . . . . . . . . . . . . 320
Customer Information . . . . . . . . . . . . 324
Reporting Safety Defects . . . . . . . . . 334
OnStar . . . . . . . . . . . . . . . . . . . . . . . . . . . . . . 338
Connected Services . . . . . . . . . . . . . . . 344
Index . . . . . . . . . . . . . . . . . . . . . . . . 347
Page 3 of 359
Cadillac CT5 Owner Manual (GMNA-Localizing-U.S./Canada-13060105) -
2020 - CRC - 2/14/20
2 INTRODUCTION
Introduction
The names, logos, emblems, slogans,
vehicle model names, and vehicle
body designs appearing in this manual
including, but not limited to, GM, the
GM logo, CADILLAC, the CADILLAC
Emblem, and CT5, are trademarks
and/or service marks of General
Motors LLC, its subsidiaries, affiliates,
or licensors.For vehicles first sold in Canada,
substitute the name
“General Motors
of Canada Company ”for Cadillac
Motor Car Division wherever it
appears in this manual.
This manual describes features that
may or may not be on the vehicle
because of optional equipment that
was not purchased on the vehicle,
model variants, country specifications,
features/applications that may not be
available in your region, or changes
subsequent to the printing of this
owner’s manual.
Refer to the purchase documentation
relating to your specific vehicle to
confirm the features.
Keep this manual in the vehicle for
quick reference.
Canadian Vehicle Owners
A French language manual can be
obtained from your dealer, at
www.helminc.com, or from:
Propriétaires Canadiens
On peut obtenir un exemplaire de ce
guide en français auprès du
concessionnaire ou à l'adresse
suivante:
Helm, Incorporated
Attention: Customer Service
47911 Halyard Drive
Plymouth, MI 48170
USA
Using this Manual
To quickly locate information about
the vehicle, use the Index in the back
of the manual. It is an alphabetical
list of what is in the manual and the
page number where it can be found.
Litho in U.S.A.
Part No. 84863110 B Second Printing©2020 General Motors LLC. All Rights Reserved.
Page 4 of 359
Cadillac CT5 Owner Manual (GMNA-Localizing-U.S./Canada-13060105) -
2020 - CRC - 2/14/20
INTRODUCTION 3
Danger, Warning, and
Caution
Warning messages found on vehicle
labels and in this manual describe
hazards and what to do to avoid or
reduce them.
{Danger
Danger indicates a hazard with a
high level of risk which will result
in serious injury or death.
{Warning
Warning indicates a hazard that
could result in injury or death.
Caution
Caution indicates a hazard that
could result in property or vehicle
damage.
A circle with a slash through it is a
safety symbol which means“Do not,”
“Do not do this,” or“Do not let this
happen.”
Symbols
The vehicle has components and
labels that use symbols instead of
text. Symbols are shown along with
the text describing the operation or
information relating to a specific
component, control, message, gauge,
or indicator.
M: Shown when the owner’s manual
has additional instructions or
information.
*: Shown when the service manual
has additional instructions or
information.
0: Shown when there is more
information on another page —
“see page.”
Vehicle Symbol Chart
Here are some additional symbols that
may be found on the vehicle and what
they mean. See the features in this
manual for information.
u: Air Conditioning System
G:Air Conditioning Refrigerant Oil
9:Airbag Readiness Light
!:Antilock Brake System (ABS)
$:Brake System Warning Light
9:Dispose of Used Components
Properly
P: Do Not Apply High Pressure
Water
B: Engine Coolant Temperature
_:Flame/Fire Prohibited
H: Flammable
[:Forward Collision Alert
Page 7 of 359
Cadillac CT5 Owner Manual (GMNA-Localizing-U.S./Canada-13060105) -
2020 - CRC - 2/14/20
6 INTRODUCTION
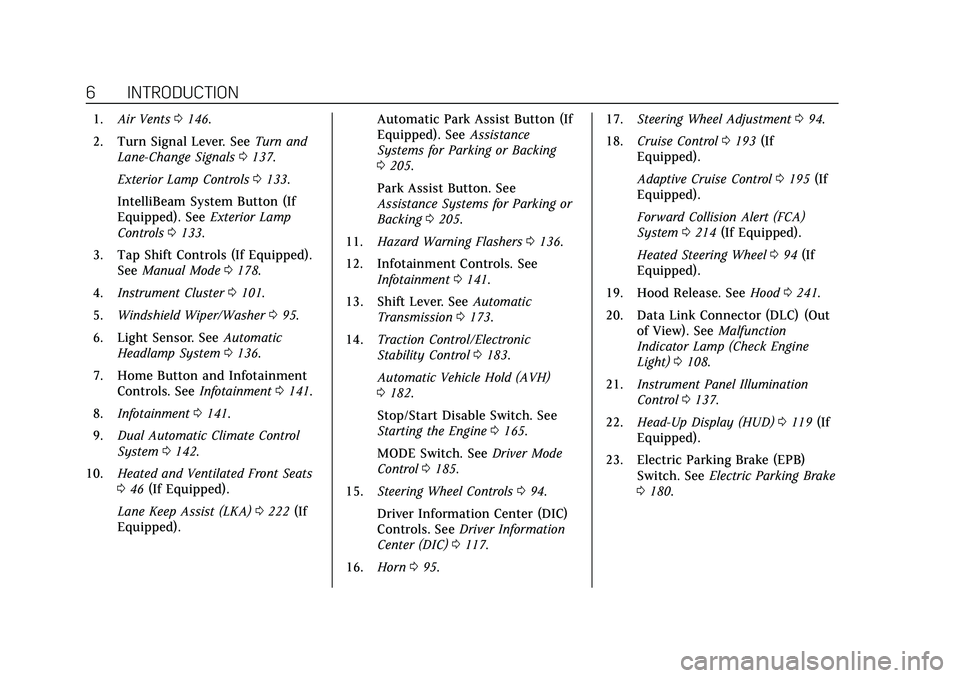
1.Air Vents 0146.
2. Turn Signal Lever. See Turn and
Lane-Change Signals 0137.
Exterior Lamp Controls 0133.
IntelliBeam System Button (If
Equipped). See Exterior Lamp
Controls 0133.
3. Tap Shift Controls (If Equipped). See Manual Mode 0178.
4. Instrument Cluster 0101.
5. Windshield Wiper/Washer 095.
6. Light Sensor. See Automatic
Headlamp System 0136.
7. Home Button and Infotainment Controls. See Infotainment0141.
8. Infotainment 0141.
9. Dual Automatic Climate Control
System 0142.
10. Heated and Ventilated Front Seats
046 (If Equipped).
Lane Keep Assist (LKA) 0222 (If
Equipped). Automatic Park Assist Button (If
Equipped). See
Assistance
Systems for Parking or Backing
0 205.
Park Assist Button. See
Assistance Systems for Parking or
Backing 0205.
11. Hazard Warning Flashers 0136.
12. Infotainment Controls. See Infotainment 0141.
13. Shift Lever. See Automatic
Transmission 0173.
14. Traction Control/Electronic
Stability Control 0183.
Automatic Vehicle Hold (AVH)
0 182.
Stop/Start Disable Switch. See
Starting the Engine 0165.
MODE Switch. See Driver Mode
Control 0185.
15. Steering Wheel Controls 094.
Driver Information Center (DIC)
Controls. See Driver Information
Center (DIC) 0117.
16. Horn 095. 17.
Steering Wheel Adjustment 094.
18. Cruise Control 0193 (If
Equipped).
Adaptive Cruise Control 0195 (If
Equipped).
Forward Collision Alert (FCA)
System 0214 (If Equipped).
Heated Steering Wheel 094 (If
Equipped).
19. Hood Release. See Hood0241.
20. Data Link Connector (DLC) (Out of View). See Malfunction
Indicator Lamp (Check Engine
Light) 0108.
21. Instrument Panel Illumination
Control 0137.
22. Head-Up Display (HUD) 0119 (If
Equipped).
23. Electric Parking Brake (EPB) Switch. See Electric Parking Brake
0 180.
Page 13 of 359
Cadillac CT5 Owner Manual (GMNA-Localizing-U.S./Canada-13060105) -
2020 - CRC - 2/14/20
12 KEYS, DOORS, AND WINDOWS
Remote Key No Longer In Vehicle
Alert
If the vehicle is on, with a door open,
and then all doors are closed, the
vehicle will check for a remote key
inside. If a remote key is not detected,
the Driver Information Center (DIC)
will display NO KEY FOUND and the
horn will chirp three times.
This occurs only once each time the
vehicle is driven. SeeVehicle
Personalization 0124.
Keyless Trunk Opening
Press the touch pad on the rear of the
trunk above the license plate if the
remote key is within 1 m (3 ft).
Mechanical Key Access
To access a vehicle with a weak
remote key battery, see Door Locks
0 16.
Programming Remote Keys to
the Vehicle
Only remote keys programmed to the
vehicle will work. If a remote key is
lost or stolen, a replacement can be
purchased and programmed through your dealer. The vehicle can be
reprogrammed so that lost or stolen
remote keys no longer work. Each
vehicle can have up to eight remote
keys matched to it.
Programming with Recognized
Remote Keys
A new key can be programmed to the
vehicle when there are two
recognized keys.
To program, the vehicle must be in
RUN and all remote keys, both
currently recognized and new, must
be with you.
1. Place the two recognized remote keys on the passenger seat.
2. Scroll to the DIC menu to "Remote Key Learn" menu and
select.
The DIC displays READY FOR
REMOTE #3, 4, 5, ETC.
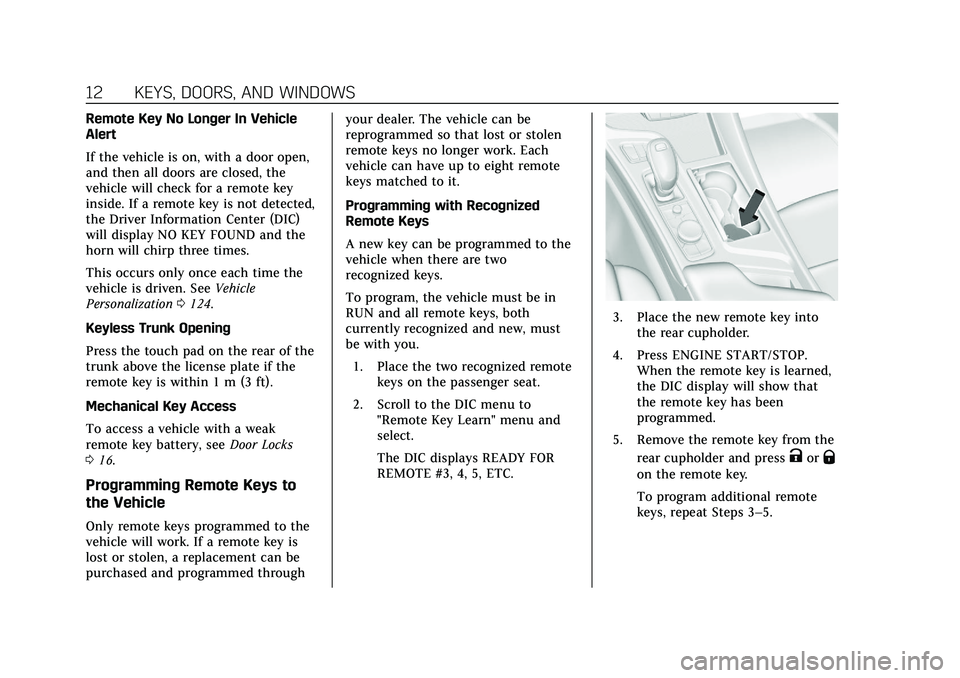
3. Place the new remote key intothe rear cupholder.
4. Press ENGINE START/STOP. When the remote key is learned,
the DIC display will show that
the remote key has been
programmed.
5. Remove the remote key from the rear cupholder and press
KorQ
on the remote key.
To program additional remote
keys, repeat Steps 3–5.
Page 20 of 359

Cadillac CT5 Owner Manual (GMNA-Localizing-U.S./Canada-13060105) -
2020 - CRC - 2/14/20
KEYS, DOORS, AND WINDOWS 19
Q:Press to lock the doors. The
indicator light in the switch will
illuminate when locked.
K: Press to unlock the doors.
The fuel door is also locked or
unlocked using these features.
Delayed Locking
This feature delays the actual locking
of the doors until five seconds after all
doors are closed.
When
Qis pressed on the power door
lock switch with the door open, a
chime will sound three times
indicating that delayed locking is
active.
The doors will then lock automatically
five seconds after all doors are closed.
If a door is reopened before
five seconds have elapsed, the
five-second timer will reset once all
the doors are closed again.
Press
Qon the door lock switch again,
or press
Qon the key, to override this
feature and lock the doors
immediately. Delayed locking can be programmed
through the Driver Information Center
(DIC). See
Vehicle Personalization
0 124.
Automatic Door Locks
The doors will lock automatically
when all doors are closed, the ignition
is on, and the vehicle is shifted out of
P (Park).
If a vehicle door is unlocked, and then
opened and closed, the doors will lock
either when your foot is removed from
the brake or the vehicle speed
becomes faster than 13 km/h (8 mph).
To unlock the doors:
.
Press
Kon the power door lock
switch.
. Shift the transmission into
P (Park).
Automatic door locking cannot be
disabled. Automatic door unlocking
can be programmed. See Vehicle
Personalization 0124.
Lockout Protection
If the vehicle is on or in ACC/
ACCESSORY and the power door lock
switch is pressed with the driver door
open, all the doors will lock and only
the driver door will unlock.
If the vehicle is off and locking is
requested while a door is open, when
all doors are closed the vehicle will
check for keys inside. If any remote
key programmed to the vehicle is
detected and the number of keys
inside has not reduced, the driver door
will unlock and the horn will chirp
three times.
Lockout Protection can be manually
overridden with the driver door open
by pressing and holding
Qon the
power door lock switch.
Page 28 of 359
Cadillac CT5 Owner Manual (GMNA-Localizing-U.S./Canada-13060105) -
2020 - CRC - 2/14/20
KEYS, DOORS, AND WINDOWS 27
The power sounder provides an
audible alarm which is distinct from
the vehicle’s horn. It has its own
power source, and can sound an alarm
if the vehicle’s battery is
compromised.
The inclination sensor can set off the
alarm if it senses movement of the
vehicle, such as when a tire is
removed. Make sure the vehicle's
alarm is not armed prior to any
jacking.
The intrusion sensor monitors the
vehicle interior, and can activate the
alarm if it senses unauthorized entry
into the vehicle's interior. Do not allow
passengers or pets to remain in the
vehicle when the intrusion sensor is
activated.
Before arming the theft-deterrent
system and activating the intrusion
sensor:
.Make sure all doors and windows
are completely closed.
. Secure any loose items such as
sun glasses. .
Make sure there are no
obstructions blocking the sensors
in the front overhead console.
. Close DVD screens before leaving
the vehicle.
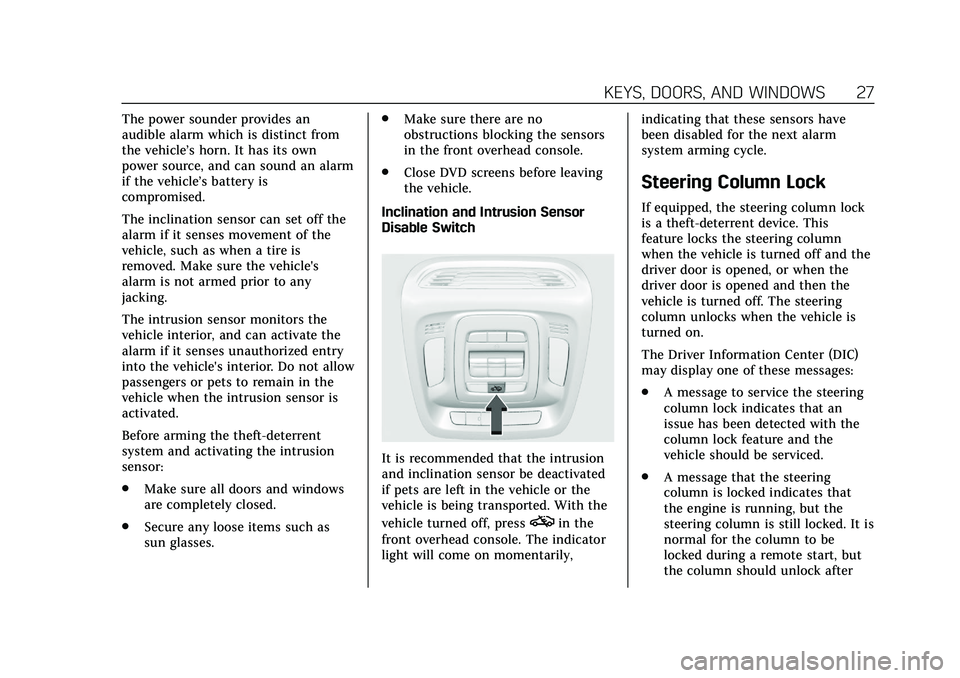
Inclination and Intrusion Sensor
Disable Switch
It is recommended that the intrusion
and inclination sensor be deactivated
if pets are left in the vehicle or the
vehicle is being transported. With the
vehicle turned off, press
oin the
front overhead console. The indicator
light will come on momentarily, indicating that these sensors have
been disabled for the next alarm
system arming cycle.
Steering Column Lock
If equipped, the steering column lock
is a theft-deterrent device. This
feature locks the steering column
when the vehicle is turned off and the
driver door is opened, or when the
driver door is opened and then the
vehicle is turned off. The steering
column unlocks when the vehicle is
turned on.
The Driver Information Center (DIC)
may display one of these messages:
.
A message to service the steering
column lock indicates that an
issue has been detected with the
column lock feature and the
vehicle should be serviced.
. A message that the steering
column is locked indicates that
the engine is running, but the
steering column is still locked. It is
normal for the column to be
locked during a remote start, but
the column should unlock after
Page 45 of 359
Cadillac CT5 Owner Manual (GMNA-Localizing-U.S./Canada-13060105) -
2020 - CRC - 2/14/20
44 SEATS AND RESTRAINTS
.Tilt the top of the control
rearward to recline.
. Tilt the top of the control forward
to raise.
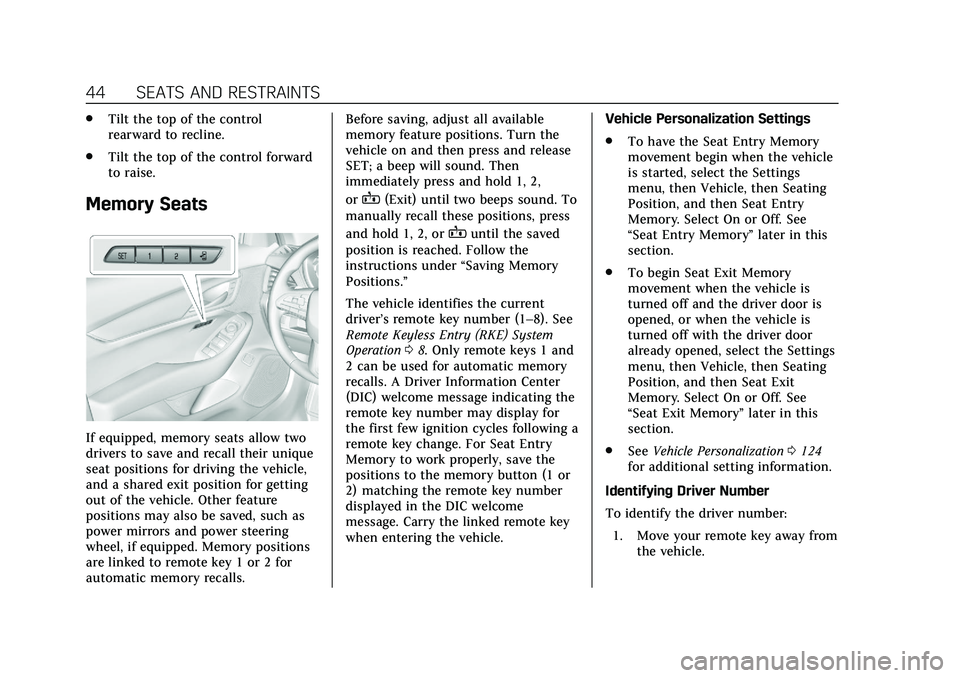
Memory Seats
If equipped, memory seats allow two
drivers to save and recall their unique
seat positions for driving the vehicle,
and a shared exit position for getting
out of the vehicle. Other feature
positions may also be saved, such as
power mirrors and power steering
wheel, if equipped. Memory positions
are linked to remote key 1 or 2 for
automatic memory recalls. Before saving, adjust all available
memory feature positions. Turn the
vehicle on and then press and release
SET; a beep will sound. Then
immediately press and hold 1, 2,
or
B(Exit) until two beeps sound. To
manually recall these positions, press
and hold 1, 2, or
Buntil the saved
position is reached. Follow the
instructions under “Saving Memory
Positions.”
The vehicle identifies the current
driver’s remote key number (1–8). See
Remote Keyless Entry (RKE) System
Operation 08. Only remote keys 1 and
2 can be used for automatic memory
recalls. A Driver Information Center
(DIC) welcome message indicating the
remote key number may display for
the first few ignition cycles following a
remote key change. For Seat Entry
Memory to work properly, save the
positions to the memory button (1 or
2) matching the remote key number
displayed in the DIC welcome
message. Carry the linked remote key
when entering the vehicle. Vehicle Personalization Settings
.
To have the Seat Entry Memory
movement begin when the vehicle
is started, select the Settings
menu, then Vehicle, then Seating
Position, and then Seat Entry
Memory. Select On or Off. See
“Seat Entry Memory” later in this
section.
. To begin Seat Exit Memory
movement when the vehicle is
turned off and the driver door is
opened, or when the vehicle is
turned off with the driver door
already opened, select the Settings
menu, then Vehicle, then Seating
Position, and then Seat Exit
Memory. Select On or Off. See
“Seat Exit Memory” later in this
section.
. See Vehicle Personalization 0124
for additional setting information.
Identifying Driver Number
To identify the driver number: 1. Move your remote key away from the vehicle.
Page 56 of 359
Cadillac CT5 Owner Manual (GMNA-Localizing-U.S./Canada-13060105) -
2020 - CRC - 2/14/20
SEATS AND RESTRAINTS 55
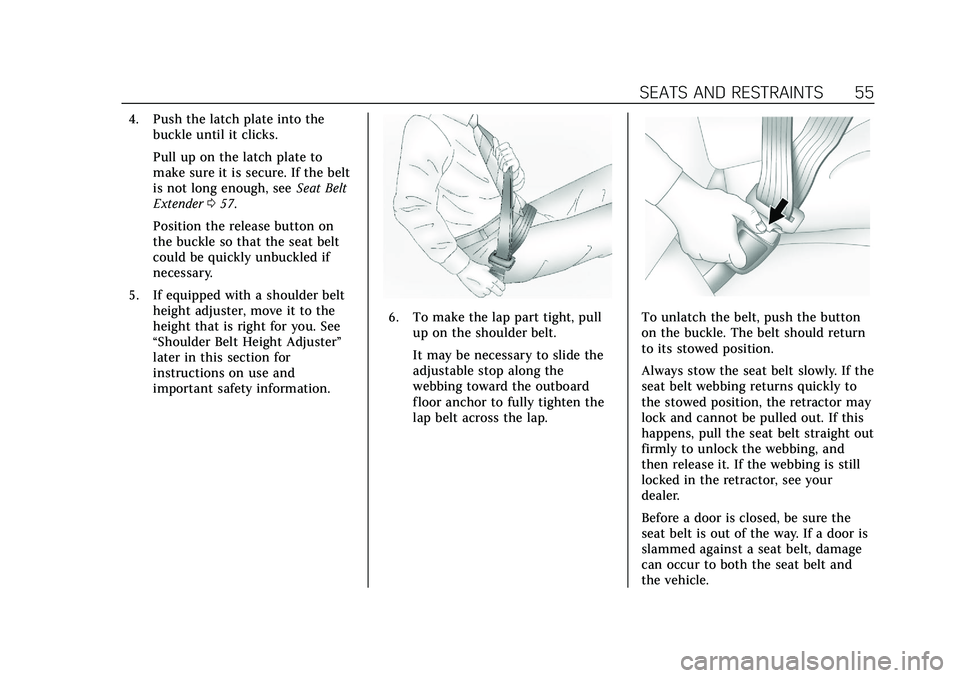
4. Push the latch plate into thebuckle until it clicks.
Pull up on the latch plate to
make sure it is secure. If the belt
is not long enough, see Seat Belt
Extender 057.
Position the release button on
the buckle so that the seat belt
could be quickly unbuckled if
necessary.
5. If equipped with a shoulder belt height adjuster, move it to the
height that is right for you. See
“Shoulder Belt Height Adjuster”
later in this section for
instructions on use and
important safety information.
6. To make the lap part tight, pullup on the shoulder belt.
It may be necessary to slide the
adjustable stop along the
webbing toward the outboard
floor anchor to fully tighten the
lap belt across the lap.To unlatch the belt, push the button
on the buckle. The belt should return
to its stowed position.
Always stow the seat belt slowly. If the
seat belt webbing returns quickly to
the stowed position, the retractor may
lock and cannot be pulled out. If this
happens, pull the seat belt straight out
firmly to unlock the webbing, and
then release it. If the webbing is still
locked in the retractor, see your
dealer.
Before a door is closed, be sure the
seat belt is out of the way. If a door is
slammed against a seat belt, damage
can occur to both the seat belt and
the vehicle.
Page 57 of 359
Cadillac CT5 Owner Manual (GMNA-Localizing-U.S./Canada-13060105) -
2020 - CRC - 2/14/20
56 SEATS AND RESTRAINTS
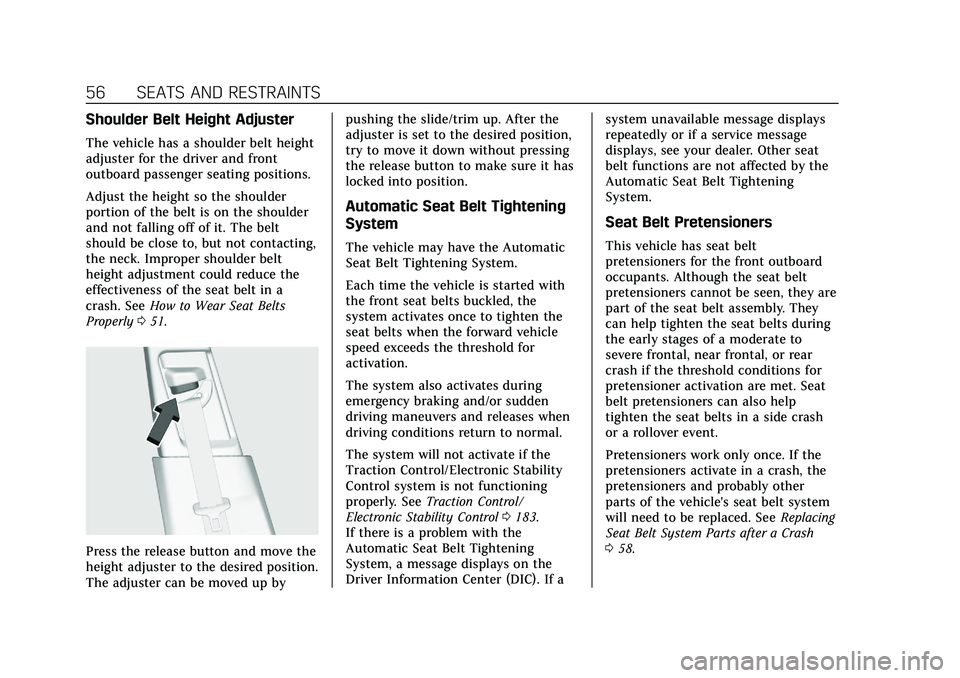
Shoulder Belt Height Adjuster
The vehicle has a shoulder belt height
adjuster for the driver and front
outboard passenger seating positions.
Adjust the height so the shoulder
portion of the belt is on the shoulder
and not falling off of it. The belt
should be close to, but not contacting,
the neck. Improper shoulder belt
height adjustment could reduce the
effectiveness of the seat belt in a
crash. SeeHow to Wear Seat Belts
Properly 051.
Press the release button and move the
height adjuster to the desired position.
The adjuster can be moved up by pushing the slide/trim up. After the
adjuster is set to the desired position,
try to move it down without pressing
the release button to make sure it has
locked into position.
Automatic Seat Belt Tightening
System
The vehicle may have the Automatic
Seat Belt Tightening System.
Each time the vehicle is started with
the front seat belts buckled, the
system activates once to tighten the
seat belts when the forward vehicle
speed exceeds the threshold for
activation.
The system also activates during
emergency braking and/or sudden
driving maneuvers and releases when
driving conditions return to normal.
The system will not activate if the
Traction Control/Electronic Stability
Control system is not functioning
properly. See
Traction Control/
Electronic Stability Control 0183.
If there is a problem with the
Automatic Seat Belt Tightening
System, a message displays on the
Driver Information Center (DIC). If a system unavailable message displays
repeatedly or if a service message
displays, see your dealer. Other seat
belt functions are not affected by the
Automatic Seat Belt Tightening
System.
Seat Belt Pretensioners
This vehicle has seat belt
pretensioners for the front outboard
occupants. Although the seat belt
pretensioners cannot be seen, they are
part of the seat belt assembly. They
can help tighten the seat belts during
the early stages of a moderate to
severe frontal, near frontal, or rear
crash if the threshold conditions for
pretensioner activation are met. Seat
belt pretensioners can also help
tighten the seat belts in a side crash
or a rollover event.
Pretensioners work only once. If the
pretensioners activate in a crash, the
pretensioners and probably other
parts of the vehicle's seat belt system
will need to be replaced. See
Replacing
Seat Belt System Parts after a Crash
0 58.