check engine CADILLAC CT5 2023 Owner's Guide
[x] Cancel search | Manufacturer: CADILLAC, Model Year: 2023, Model line: CT5, Model: CADILLAC CT5 2023Pages: 526, PDF Size: 6.85 MB
Page 396 of 526

Cadillac CT5 Owner Manual (GMNA-Localizing-U.S./Canada-16500419) -
2023 - CRC - 5/6/22
Vehicle Care 395
Check to see if coolant is
visible in the coolant surge
tank. If the coolant inside the
coolant surge tank is boiling,
do not do anything else until it
cools down.
If coolant is visible but the
coolant level is not at or above
the indicated mark, add a
50/50 mixture of clean
drinkable water and
DEX-COOL coolant.
Be sure the cooling system is
cool before this is done.If no coolant is visible in the
coolant surge tank, add
coolant as follows:
How to Add Coolant to the
Coolant Surge Tank
{Warning
Spilling coolant on hot
engine parts can burn you.
Coolant contains ethylene
glycol and it will burn if the
engine parts are hot enough.
{Warning
Plain water, or other liquids
such as alcohol, can boil
before the proper coolant
mixture will. With plain water
or the wrong mixture, the
engine could get too hot but
there would not be an
overheat warning. The
engine could catch fire and
you or others could be
burned.
{Warning
Steam and scalding liquids
from a hot cooling system
are under pressure. Turning
the pressure cap, even a
little, can cause them to
come out at high speed and
you could be burned. Never
turn the cap when the
cooling system, including the
pressure cap, is hot. Wait for
the cooling system and
pressure cap to cool.
Caution
Failure to follow the specific
coolant fill procedure could
cause the engine to
overheat and could cause
system damage. If coolant is
not visible in the surge tank,
contact your dealer.
Page 397 of 526

Cadillac CT5 Owner Manual (GMNA-Localizing-U.S./Canada-16500419) -
2023 - CRC - 5/6/22
396 Vehicle Care
If no problem is found, check
to see if coolant is visible in
the coolant surge tank.
If coolant is visible but the
coolant level is not at or above
the indicated mark, add a
50/50 mixture of clean,
drinkable water and
DEX-COOL coolant at the
coolant surge tank, but be
sure the cooling system,
including the coolant surge
tank pressure cap, is cool
before you do it.
2.0L L4 Engine
Automatic Coolant Service
Fill Instructions
The vehicle is equipped with a
service feature that assists
with filling and removing air
from the cooling system after
service of components or
when coolant is added after
being too low.To use the service feature:
1. With a cold system, add
coolant to the indicated
line on the surge tank.
2. Replace the pressure cap on the surge tank.
To activate the service
feature: 1. Connect the vehicle to a battery charger.
2. Turn the ignition on. See Ignition Positions 0267.
3. Turn off the air conditioning.
4. Set the parking brake. 5. At the same time, press
the accelerator and the
brake pedal for
two seconds, then release.
6. At the end of the cycle, check the coolant level in
the surge tank and add
coolant if it is below the
indicated line. Turn the
ignition off, allow the
Electronic Control Module
(ECM) to go to sleep, about
two minutes, and repeat
Steps 2–6.
Listen for pump activation and
movement of the control
valves while watching the level
of the coolant in the surge
tank. If the tank empties, turn
the ignition off, carefully
remove the pressure cap, refill
to the indicated line, replace
the pressure cap, and repeat
Steps 2–6.
The fill and air removal
process will run for
approximately 15 minutes.
Page 399 of 526

Cadillac CT5 Owner Manual (GMNA-Localizing-U.S./Canada-16500419) -
2023 - CRC - 5/6/22
398 Vehicle Care
to the surge tank until the
level reaches the indicated
level mark.
5. Replace the pressure cap tightly.
6. Check the level in the surge tank after the engine
is shut off and the cooling
system has cooled down.
If the coolant is not at the
proper level, repeat
Steps 1–6. If the coolant
still is not at the proper
level when the system
cools down again, see your
dealer.
Caution
If the pressure cap is not
tightly installed, coolant loss
and engine damage may
occur. Be sure the cap is
properly and tightly secured.
Engine Overheating
The vehicle has an indicator to
warn of the engine
overheating. If the decision is made not to
lift the hood when this
warning appears, get service
help right away. See Roadside
Assistance Program
0489.
If the decision is made to lift
the hood, make sure the
vehicle is parked on a level
surface.
Then check to see if the
engine cooling fan is running.
If the engine is overheating,
the fan should be running. If it
is not, do not continue to run
the engine. Have the vehicle
serviced.
Caution
Do not run the engine if
there is a leak in the engine
cooling system. This can
cause a loss of all coolant
and can damage the system
and vehicle. Have any leaks
fixed right away.
If Steam Is Coming from
the Engine Compartment
{Warning
Steam and scalding liquids
from a hot cooling system
are under pressure. Turning
the pressure cap, even a
little, can cause them to
come out at high speed and
you could be burned. Never
turn the cap when the
cooling system, including the
pressure cap, is hot. Wait for
the cooling system and
pressure cap to cool.
If No Steam Is Coming
from the Engine
Compartment
If an engine overheat warning
is displayed but no steam can
be seen or heard, the problem
may not be too serious.
Sometimes the engine can get
a little too hot when the
vehicle:
Page 400 of 526

Cadillac CT5 Owner Manual (GMNA-Localizing-U.S./Canada-16500419) -
2023 - CRC - 5/6/22
Vehicle Care 399
.Climbs a long hill on a
hot day.
.Stops after high-speed
driving.
.Idles for long periods in
traffic.
If the overheat warning is
displayed with no sign of
steam: 1. Turn the air conditioning off.
2. Turn the heater on to the highest temperature and
to the highest fan speed.
Open the windows as
necessary.
3. When it is safe to do so, pull off the road, shift to
P (Park) or N (Neutral) and
let the engine idle.
If the overheat warning no
longer displays, the vehicle
can be driven. Continue to
drive the vehicle slowly for
about 10 minutes. Keep a safe
vehicle distance from the
vehicle in front. If the warning
does not come back on, continue to drive normally and
have the cooling system
checked for proper fill and
function.
If the warning continues, pull
over, stop, and park the
vehicle right away.
If there is no sign of steam,
idle the engine for
three minutes while parked.
If the warning is still displayed,
turn off the engine until it
cools down.
Washer Fluid
What to Use
When windshield washer fluid
is needed, be sure to read the
manufacturer's instructions
before use. If operating the
vehicle in an area where the
temperature may fall below
freezing, use a fluid that has
sufficient protection against
freezing.
Adding Washer Fluid
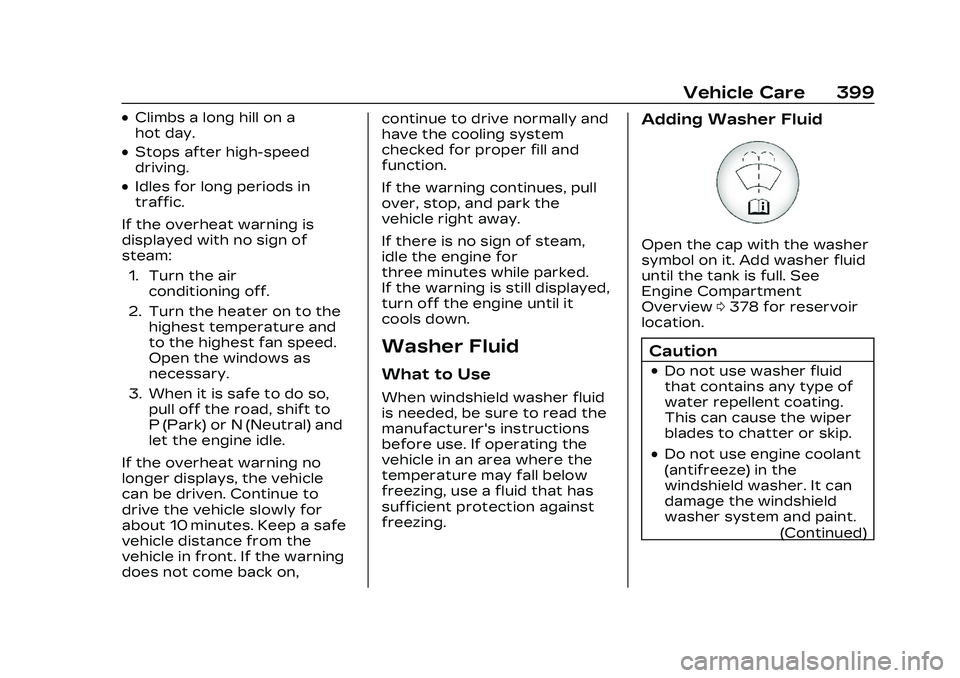
Open the cap with the washer
symbol on it. Add washer fluid
until the tank is full. See
Engine Compartment
Overview
0378 for reservoir
location.
Caution
.Do not use washer fluid
that contains any type of
water repellent coating.
This can cause the wiper
blades to chatter or skip.
.Do not use engine coolant
(antifreeze) in the
windshield washer. It can
damage the windshield
washer system and paint.
(Continued)
Page 405 of 526

Cadillac CT5 Owner Manual (GMNA-Localizing-U.S./Canada-16500419) -
2023 - CRC - 5/6/22
404 Vehicle Care
when the brake pads are worn
can still determine when the
pads should be replaced. See
Brakes0400.
To turn off the brake pad life
system: 1. Display Brake Pad Life on the DIC. See Driver
Information Center (DIC)
(Base Level) 0136 or
Driver Information Center
(DIC) (Uplevel) 0139.
2. Select the Brake Pad Life menu.
3. Select DISABLE.
To turn the brake pad life
system back on, follow the
above steps but select
ENABLE in Step 2.
Brake Pad Sensor System
(V-Series Blackwing)
The V-Series Blackwing has
electronic brake pad wear
sensors, when the brake pads
need to be replaced, a
message displays in the Driver
Information Center (DIC). When the message displays,
install new brake pads and
brake pad wear sensors on
the vehicle.
When the ignition is turned on
after new brake pads and
brake pad wear sensors are
installed, the message should
no longer display.
The brake pad sensor system
can only be reset by replacing
the brake pads and brake pad
wear sensors.
Brake Fluid
The brake/clutch master
cylinder reservoir is filled with
GM approved DOT 4 brake
fluid as indicated on the
reservoir cap. See Engine
Compartment Overview
0378
for the location of the
reservoir. Checking Brake Fluid
Place the vehicle in P (Park) or
Neutral with the parking brake
applied if equipped with a
manual transmission. On a
level surface, the brake fluid
level should be between the
minimum and maximum marks
on the brake fluid reservoir.
There are only two reasons
why the brake fluid level in the
reservoir may go down:
.Normal brake lining wear.
When new linings are
installed, the fluid level goes
back up.
.A fluid leak in the brake/
clutch hydraulic system.
Have the brake/clutch
hydraulic system fixed. With
a leak, the brakes will not
work well.
Always clean the brake fluid
reservoir cap and the area
around the cap before
removing it.
Page 407 of 526

Cadillac CT5 Owner Manual (GMNA-Localizing-U.S./Canada-16500419) -
2023 - CRC - 5/6/22
406 Vehicle Care
charger. If available, use the
AGM setting on the charger,
to limit charge voltage to
14.8 volts. Follow the charger
manufacturer's instructions.
For replacement of the
battery, see your dealer.
Stop/Start System
This vehicle has a Stop/Start
system to shut off the engine
to help conserve fuel. See
Stop/Start System0270.
{Warning
WARNING: Battery posts,
terminals and related
accessories can expose you
to chemicals including lead
and lead compounds, which
are known to the State of
California to cause cancer
and birth defects or other
reproductive harm. Wash
hands after handling. For
more information go to
www.P65Warnings.ca.gov. See the warning on the back
cover.
Vehicle Storage
{Warning
Batteries have acid that can
burn you and gas that can
explode. You can be badly
hurt if you are not careful.
See Jump Starting - North
America
0452 for tips on
working around a battery
without getting hurt.
Infrequent Usage: Remove the
black, negative (−) cable from
the battery to keep the
battery from running down.
Extended Storage: Remove
the black, negative (−) cable
from the battery or use a
battery trickle charger.
All-Wheel Drive
If the vehicle is equipped with
All-Wheel-Drive (AWD), this is
an additional system that
needs lubrication.
Transfer Case
Under normal driving
conditions, transfer case fluid
does not require maintenance
unless there is a fluid leak or
unusual noise. If required, have
the transfer case serviced by
your dealer.
Park Brake and
P (Park) Mechanism
Check
{Warning
When you are doing this
check, the vehicle could
begin to move. You or
others could be injured and
property could be damaged.
Make sure there is room in
front of the vehicle in case it
begins to roll. Be ready to
apply the regular brake at
once should the vehicle
begin to move.
Page 408 of 526

Cadillac CT5 Owner Manual (GMNA-Localizing-U.S./Canada-16500419) -
2023 - CRC - 5/6/22
Vehicle Care 407
Park on a fairly steep hill, with
the vehicle facing downhill.
Keeping your foot on the
regular brake, set the parking
brake.
.To check the parking brake's
holding ability: With the
engine running and the
transmission in N (Neutral),
slowly remove foot pressure
from the regular brake pedal.
Do this until the vehicle is
held by the parking
brake only.
.Automatic transmission
vehicles only: To check the
P (Park) mechanism's holding
ability: With the engine
running, shift to P (Park).
Then release the parking
brake followed by the
regular brake.
Contact your dealer if service
is required.
Wiper Blade
Replacement
Windshield wiper blades
should be inspected for wear
or cracking.
It is a good idea to clean or
replace the wiper blade
assembly on a regular basis or
when worn. For proper
windshield wiper blade length
and type, see Maintenance
Replacement Parts 0477.
Caution
Allowing the wiper arm to
touch the windshield when
no wiper blade is installed
could damage the
windshield. Any damage that
occurs would not be
covered by the vehicle
warranty. Do not allow the
wiper arm to touch the
windshield.
To replace the wiper blade
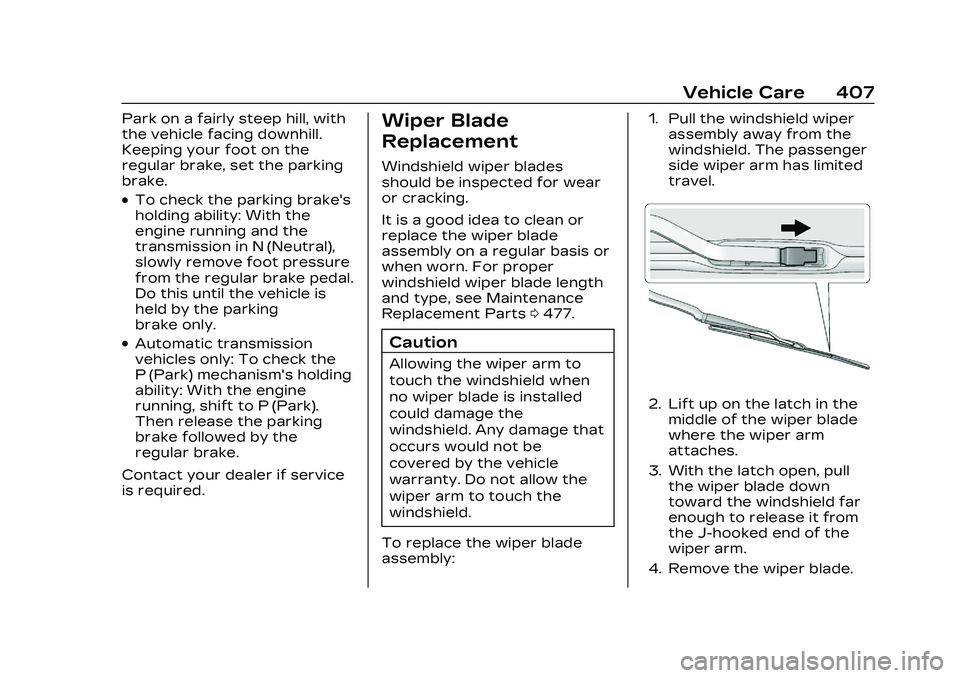
assembly: 1. Pull the windshield wiper
assembly away from the
windshield. The passenger
side wiper arm has limited
travel.
2. Lift up on the latch in themiddle of the wiper blade
where the wiper arm
attaches.
3. With the latch open, pull the wiper blade down
toward the windshield far
enough to release it from
the J-hooked end of the
wiper arm.
4. Remove the wiper blade.
Page 411 of 526

Cadillac CT5 Owner Manual (GMNA-Localizing-U.S./Canada-16500419) -
2023 - CRC - 5/6/22
410 Vehicle Care
Fuses and circuit breakers
protect power devices in the
vehicle.
If there is a problem on the
road and a fuse needs to be
replaced, the same amperage
fuse can be borrowed. Choose
some feature of the vehicle
that is not needed to use and
replace it as soon as possible.
To check a fuse, look at the
band inside the fuse. If the
band is broken or melted,
replace the fuse. Be sure to
replace a bad fuse with a fuse
of the identical size and rating.
Replacing a Blown Fuse
1. Turn off the ignition.
2. Locate the fuse puller inthe engine compartment
fuse block.
3. Use the fuse puller toremove the fuse from the
top or side, as shown
above.
Page 413 of 526

Cadillac CT5 Owner Manual (GMNA-Localizing-U.S./Canada-16500419) -
2023 - CRC - 5/6/22
412 Vehicle Care
{Warning
Installation or use of fuses
that do not meet GM’s
original fuse specifications is
dangerous. The fuses could
fail, and result in a fire. You
or others could be injured or
killed, and the vehicle could
be damaged.
See Accessories and
Modifications 0374 and
General Information 0374.
To check or replace a blown
fuse, see Electrical System
Overload 0409.
Engine Compartment
Fuse Block
The engine compartment fuse
block is on the driver side of
the engine compartment.
Lift the fuse block cover to
access the fuses. The vehicle may not be
equipped with all of the fuses
and relays shown.
Caution
Spilling liquid on any
electrical component on the
vehicle may damage it.
Always keep the covers on
any electrical component.
Page 454 of 526

Cadillac CT5 Owner Manual (GMNA-Localizing-U.S./Canada-16500419) -
2023 - CRC - 5/6/22
Vehicle Care 453
2.0L L4 Engine Shown, 3.0L
V6 Engine and 6.2L DI Engine Similar
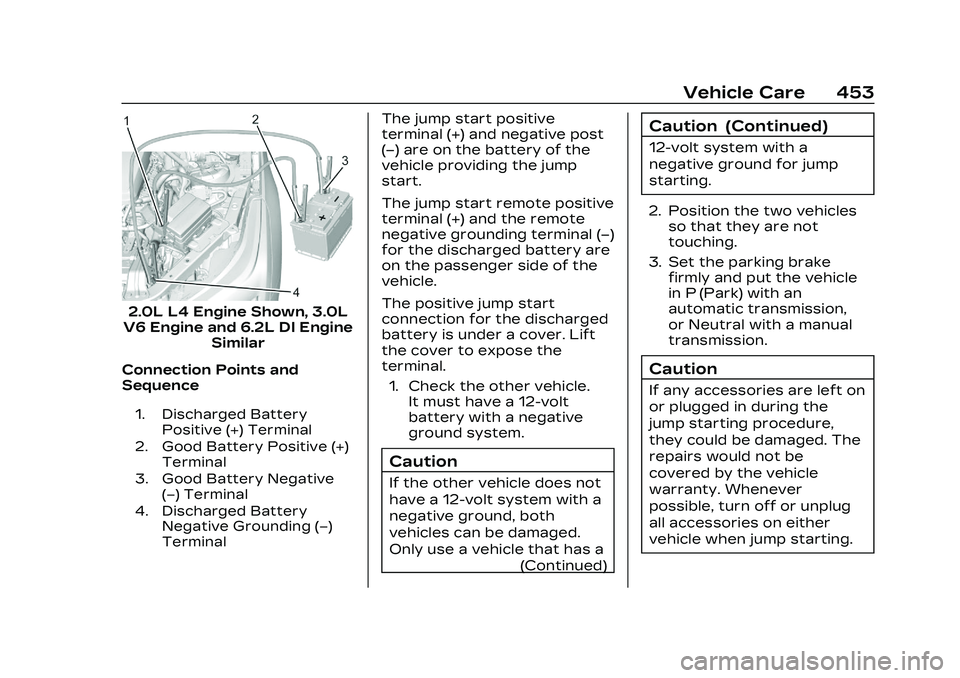
Connection Points and
Sequence
1. Discharged Battery Positive (+) Terminal
2. Good Battery Positive (+) Terminal
3. Good Battery Negative (−) Terminal
4. Discharged Battery Negative Grounding (−)
Terminal
The jump start positive
terminal (+) and negative post
(−) are on the battery of the
vehicle providing the jump
start.
The jump start remote positive
terminal (+) and the remote
negative grounding terminal (−)
for the discharged battery are
on the passenger side of the
vehicle.
The positive jump start
connection for the discharged
battery is under a cover. Lift
the cover to expose the
terminal.
1. Check the other vehicle. It must have a 12-volt
battery with a negative
ground system.
Caution
If the other vehicle does not
have a 12-volt system with a
negative ground, both
vehicles can be damaged.
Only use a vehicle that has a
(Continued)
Caution (Continued)
12-volt system with a
negative ground for jump
starting.
2. Position the two vehicles so that they are not
touching.
3. Set the parking brake firmly and put the vehicle
in P (Park) with an
automatic transmission,
or Neutral with a manual
transmission.
Caution
If any accessories are left on
or plugged in during the
jump starting procedure,
they could be damaged. The
repairs would not be
covered by the vehicle
warranty. Whenever
possible, turn off or unplug
all accessories on either
vehicle when jump starting.