clock CADILLAC CT5 2023 Owners Manual
[x] Cancel search | Manufacturer: CADILLAC, Model Year: 2023, Model line: CT5, Model: CADILLAC CT5 2023Pages: 526, PDF Size: 6.85 MB
Page 21 of 526

Cadillac CT5 Owner Manual (GMNA-Localizing-U.S./Canada-16500419) -
2023 - CRC - 5/6/22
20 Keys, Doors, and Windows
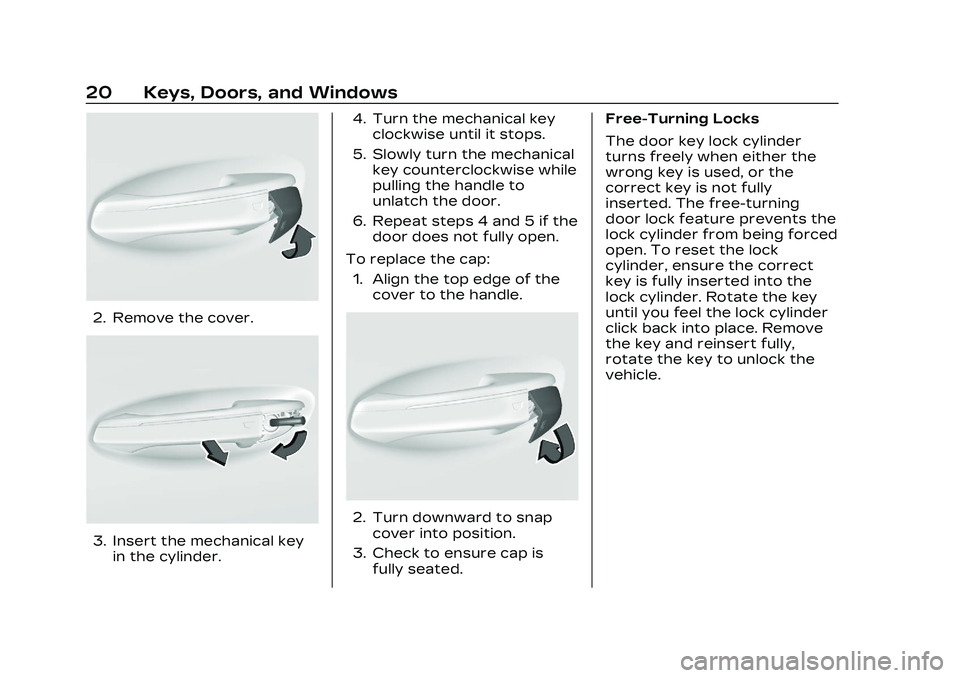
2. Remove the cover.
3. Insert the mechanical keyin the cylinder. 4. Turn the mechanical key
clockwise until it stops.
5. Slowly turn the mechanical key counterclockwise while
pulling the handle to
unlatch the door.
6. Repeat steps 4 and 5 if the door does not fully open.
To replace the cap: 1. Align the top edge of the cover to the handle.
2. Turn downward to snapcover into position.
3. Check to ensure cap is fully seated. Free-Turning Locks
The door key lock cylinder
turns freely when either the
wrong key is used, or the
correct key is not fully
inserted. The free-turning
door lock feature prevents the
lock cylinder from being forced
open. To reset the lock
cylinder, ensure the correct
key is fully inserted into the
lock cylinder. Rotate the key
until you feel the lock cylinder
click back into place. Remove
the key and reinsert fully,
rotate the key to unlock the
vehicle.
Page 104 of 526

Cadillac CT5 Owner Manual (GMNA-Localizing-U.S./Canada-16500419) -
2023 - CRC - 5/6/22
Instruments and Controls 103
Instruments and
Controls
Controls
Steering WheelAdjustment . . . . . . . . . . . . . . . . . 104
Heated Steering Wheel . . . . . . . . . . . . . . . . . . . . . . . . 105
Horn . . . . . . . . . . . . . . . . . . . . . . . . . . . 105
Windshield Wiper/ Washer . . . . . . . . . . . . . . . . . . . . . . 105
Compass . . . . . . . . . . . . . . . . . . . . . 107
Clock . . . . . . . . . . . . . . . . . . . . . . . . . . 108
Power Outlets . . . . . . . . . . . . . . 108
Wireless Charging . . . . . . . . . 109
Warning Lights, Gauges,
and Indicators
Warning Lights, Gauges, and Indicators . . . . . . . . . . . . . . 112
Instrument Cluster (Base
Level) . . . . . . . . . . . . . . . . . . . . . . . . . 113
Instrument Cluster (Uplevel) . . . . . . . . . . . . . . . . . . . . . 115
Speedometer . . . . . . . . . . . . . . . . 119
Odometer . . . . . . . . . . . . . . . . . . . . . 119
Trip Odometer . . . . . . . . . . . . . . . 119
Tachometer . . . . . . . . . . . . . . . . . 120
Fuel Gauge . . . . . . . . . . . . . . . . . . . 120 Engine Coolant
Temperature Gauge
(Base Level) . . . . . . . . . . . . . . . . . 121
Engine Coolant Temperature Gauge
(Uplevel) . . . . . . . . . . . . . . . . . . . . . 122
Seat Belt Reminders . . . . . . 122
Airbag Readiness Light . . . . . . . . . . . . . . . . . . . . . . . . . . 123
Passenger Airbag Status Indicator . . . . . . . . . . . . . . . . . . . . . 124
Charging System Light . . . 124
Malfunction Indicator Lamp (Check Engine
Light) . . . . . . . . . . . . . . . . . . . . . . . . . 125
Brake System Warning Light . . . . . . . . . . . . . . . . . . . . . . . . . . 127
Electric Parking Brake Light . . . . . . . . . . . . . . . . . . . . . . . . . . 128
Service Electric Parking Brake Light . . . . . . . . . . . . . . . . . 128
Antilock Brake System (ABS) Warning Light . . . . . 128
Performance Shifting Light . . . . . . . . . . . . . . . . . . . . . . . . . . 129
Automatic Vehicle Hold (AVH) Light . . . . . . . . . . . . . . . . . 129
Lane Keep Assist (LKA) Light . . . . . . . . . . . . . . . . . . . . . . . . . . 129 Automatic Emergency
Braking (AEB) Disabled
Light . . . . . . . . . . . . . . . . . . . . . . . . . 130
Vehicle Ahead Indicator . . . . . . . . . . . . . . . . . . . . 130
Pedestrian Ahead Indicator . . . . . . . . . . . . . . . . . . . . 130
Traction Off Light . . . . . . . . . 130
StabiliTrak OFF Light . . . . . 131
Traction Control System (TCS)/StabiliTrak
Light . . . . . . . . . . . . . . . . . . . . . . . . . . 131
Engine Coolant Temperature Warning
Light . . . . . . . . . . . . . . . . . . . . . . . . . . 131
Driver Mode Control Light . . . . . . . . . . . . . . . . . . . . . . . . . . 132
Tire Pressure Light . . . . . . . 133
Engine Oil Pressure Light . . . . . . . . . . . . . . . . . . . . . . . . . 134
Low Fuel Warning Light . . . . . . . . . . . . . . . . . . . . . . . . . 134
Security Light . . . . . . . . . . . . . . . 135
High-Beam On Light . . . . . . 135
Lamps On Reminder . . . . . . 135
Cruise Control Light . . . . . . 135
Door Ajar Light . . . . . . . . . . . . . 136
Page 109 of 526

Cadillac CT5 Owner Manual (GMNA-Localizing-U.S./Canada-16500419) -
2023 - CRC - 5/6/22
108 Instruments and Controls
The compass system is
designed to operate for a
certain number of miles or
degrees of turn before
needing a signal from the GPS
satellites. When the compass
display shows CAL, drive the
vehicle for a short distance in
an open area where it can
receive a GPS signal. The
compass system will
automatically determine when
a GPS signal is restored and
provide a heading again.
Clock
Set the time and date using
the infotainment system. See
"Time/Date" under Settings
0215.
Power Outlets
The accessory power outlets
can be used to plug in
electrical equipment, such as a
cell phone or MP3 player. The vehicle has two accessory
power outlets:
.Inside the center console
storage area.
.On the rear of the center
floor console.
Lift the cover to access the
accessory power outlet.
Certain electrical accessories
may not be compatible with
the accessory power outlet
and could overload a vehicle
circuit breaker or adapter
fuse. If overloaded, the circuit
breaker will reset after all
devices are disconnected or if
Retained Accessory Power
(RAP) is turned off and then
back on. See Retained
Accessory Power (RAP) 0273.
Wait one minute to allow the
circuit breaker to reset before
reconnecting devices or
turning RAP back on. If the
problem continues, the issue
could be within your device.
Try another known good
device to make sure the circuit breaker is operating properly.
If this does not resolve your
problem, see your dealer.
It is possible to replace the
factory power outlet with a
cigar lighter receptacle,
if desired. This requires the
factory installed circuit
breaker to be replaced with a
standard minifuse by the
dealer. A minifuse will not
reset and will have to be
replace if blown.
Caution
Failure to replace the circuit
breaker with the minifuse
could overheat the cigar
lighter and damage the
vehicle.
When adding electrical
equipment, be sure to follow
the proper installation
instructions included with the
equipment. See Add-On
Electrical Equipment 0372.
Page 216 of 526

Cadillac CT5 Owner Manual (GMNA-Localizing-U.S./Canada-16500419) -
2023 - CRC - 5/6/22
Infotainment System 215
Apple CarPlay and Android
Auto can be disabled from the
infotainment system. To do
this, touch Home, Settings,
and then touch the Apps tab
along the top of the display.
Use the On/Off toggled to
turn off Apple CarPlay or
Android Auto.
Settings
Certain settings can be
managed in the Online
Account sites when an
account is established, and
may be modified if other users
have accessed the vehicle or
created accounts. This may
result in changes to the
security or functionality of the
infotainment system. Some
settings may also be
transferred to a new vehicle,
if equipped. For instructions,
visit your brand website.
Refer to the User Terms and
Privacy Statement for
important details. To view,touch the Settings icon on the
Home Page of the
infotainment display.
The settings menu may be
organized into four categories.
Select the desired category by
touching System, Apps,
Vehicle, or Personal.
To access the personalization
menus:
1. Touch Settings on the Home Page on the
infotainment display.
2. Touch the desired category to display a list of
available options.
3. Touch to select the desired feature setting.
4. Touch the options on the infotainment display to
disable or enable a feature.
5. Touch
zto go to the top
level of the Settings menu.
System
The menu may contain the
following:
Time / Date
Allows setting of the clock.
Language
Sets the display language
used on the infotainment
display. It may also use the
selected language for voice
recognition and audio
feedback.
Phones
Allows connecting to a
different cell phone or mobile
device source, disconnect a
cell phone or media device,
or delete a cell phone or media
device.
Wi-Fi Networks
Shows connected and
available Wi-Fi networks.
If a 4G LTE data package is
not active on the vehicle, the
infotainment system can be
connected to an external
Page 398 of 526

Cadillac CT5 Owner Manual (GMNA-Localizing-U.S./Canada-16500419) -
2023 - CRC - 5/6/22
Vehicle Care 397
Caution
If the pressure cap is not
tightly installed, coolant loss
and engine damage may
occur. Be sure the cap is
properly and tightly secured.
3.0L V6 Engine and 6.2L
V8 Engine
1. Remove the coolant surgetank pressure cap when
the cooling system,
including the coolant surge
tank pressure cap and
upper radiator hose, is no
longer hot. Turn the pressure cap
slowly counterclockwise.
If you hear a hiss, wait for
that to stop. This will allow
any pressure still left to be
vented out the
discharge hose.
2. Keep turning the pressure cap slowly and remove it.
2.0L L4 Engine and 3.0L V6 Engine Coolant Surge Tank
6.2L V8 Engine Coolant Surge Tank
3. Fill the surge tank with the proper mixture to the
indicated level mark.
4. With the coolant surge tank pressure cap off,
start the engine and let it
run until you can feel the
upper radiator hose
getting hot. Watch out for
the engine cooling fan.
By this time, the coolant
level inside the coolant
surge tank may be lower.
If the level is lower, add
more of the proper mixture
Page 447 of 526

Cadillac CT5 Owner Manual (GMNA-Localizing-U.S./Canada-16500419) -
2023 - CRC - 5/6/22
446 Vehicle Care
If a tire goes flat, avoid further
tire and wheel damage by
driving slowly to a level place.
Turn on the hazard warning
flashers. See Hazard Warning
Flashers0156.
See If a Tire Goes Flat 0443
for other important safety
warnings.
Do not remove any objects
that have penetrated the tire.
1. Remove the tire sealant canister (4) and
compressor from its
storage location. See
Storing the Tire Sealant
and Compressor Kit 0451.
2. Remove the air only hose (10) and the power plug (9)
from the bottom of the
compressor.
3. Place the compressor on the ground near the
flat tire.
4. Attach the air only hose(10) to the sealant canister
inlet valve (1) by turning it
clockwise until tight.
5. Slide the base of the tiresealant canister (3) into
the slot on the top of the
compressor (6) to hold it
upright.
Make sure the tire valve
stem is positioned close to
the ground so the hose will
reach it.
6. Remove the valve stem cap from the flat tire by
turning it
counterclockwise.
Page 448 of 526

Cadillac CT5 Owner Manual (GMNA-Localizing-U.S./Canada-16500419) -
2023 - CRC - 5/6/22
Vehicle Care 447
7. Attach the sealant/airhose (2) to the tire valve
stem by turning it
clockwise until tight.
8. Plug the power plug (9) into the accessory power
outlet in the vehicle.
Unplug all items from other
accessory power outlets.
See Power Outlets 0108.
If the vehicle has an
accessory power outlet, do
not use the cigarette
lighter.
If the vehicle only has a
cigarette lighter, use the
cigarette lighter.
Do not pinch the power
plug cord in the door or
window.
9. Start the vehicle. The vehicle must be running
while using the air
compressor.
10. Press the on/off button (5) to turn the tire sealant and
compressor kit on. The compressor will inject
sealant and air into
the tire.
The pressure gauge (8) will
initially show a high
pressure while the
compressor pushes the
sealant into the tire. Once
the sealant is completely
dispersed into the tire, the
pressure will quickly drop
and start to rise again as
the tire inflates with
air only.
11. Inflate the tire to the recommended inflation
pressure using the
pressure gauge (8). The
recommended inflation
pressure can be found on
the Tire and Loading
Information label. See Tire
Pressure 0427.
The pressure gauge (8)
may read higher than the
actual tire pressure while
the compressor is on. Turn
the compressor off to get
an accurate pressure reading. The compressor
may be turned on/off until
the correct pressure is
reached.
Caution
If the recommended
pressure cannot be reached
after approximately
25 minutes, the vehicle
should not be driven farther.
The tire is too severely
damaged and the tire
sealant and compressor kit
cannot inflate the tire.
Remove the power plug
from the accessory power
outlet and unscrew the
inflating hose from the tire
valve. See Roadside
Assistance Program
0489.
12. Press the on/off button (5) to turn the tire sealant and
compressor kit off.
The tire is not sealed and
will continue to leak air
until the vehicle is driven
and the sealant is
Page 449 of 526

Cadillac CT5 Owner Manual (GMNA-Localizing-U.S./Canada-16500419) -
2023 - CRC - 5/6/22
448 Vehicle Care
distributed in the tire.
Therefore, Steps 13–
21 must be done
immediately after Step 12.
Be careful while handling
the tire sealant and
compressor kit as it could
be warm after usage.
13. Unplug the power plug (9) from the accessory power
outlet in the vehicle.
14. Turn the sealant/air hose (2) counterclockwise
to remove it from the tire
valve stem.
15. Replace the tire valve stem cap.
16. Remove the tire sealant canister (4) from the slot
on top of the
compressor (6).
17. Turn the air only hose (10) counterclockwise to
remove it from the tire
sealant canister inlet
valve (1). 18. Turn the sealant/air
hose (2) clockwise onto the
sealant canister inlet
valve (1) to prevent sealant
leakage.
19. Return the air only hose (10) and power plug (9)
back to their original
storage location.
20. If the flat tire was able toinflate to the
recommended inflation
pressure, remove the
maximum speed label from
the sealant canister and
place it in a highly visible
location.
Do not exceed the speed
on this label until the
damaged tire is repaired or
replaced. 21. Return the equipment to
its original storage location
in the vehicle.
22. Immediately drive the vehicle 8 km (5 mi) to
distribute the sealant in
the tire.
23. Stop at a safe location and check the tire pressure.
Refer to Steps 1–10 under
“Using the Tire Sealant and
Compressor Kit without
Sealant to Inflate a Tire
(Not Punctured).”
If the tire pressure has
fallen more than 68 kPa
(10 psi) below the
recommended inflation
pressure, stop driving the
vehicle. The tire is too
severely damaged and the
tire sealant cannot seal the
tire. See Roadside
Assistance Program 0489.
Page 451 of 526

Cadillac CT5 Owner Manual (GMNA-Localizing-U.S./Canada-16500419) -
2023 - CRC - 5/6/22
450 Vehicle Care
1. Remove the compressorfrom its storage location.
See Storing the Tire
Sealant and Compressor
Kit 0451.
2. Remove the air only hose (10) and the power plug (9)
from the bottom of the
compressor.
3. Place the compressor on the ground near the
flat tire.
Make sure the tire valve
stem is positioned close to
the ground so the hose will
reach it.
4. Remove the valve stem cap from the flat tire by
turning it
counterclockwise.
5. Attach the air only hose (10) to the tire valve stem
by turning it clockwise until
tight.
6. Plug the power plug (9) into the accessory power
outlet in the vehicle. Unplug all items from other
accessory power outlets.
See Power Outlets
0108.
If the vehicle has an
accessory power outlet, do
not use the cigarette
lighter.
If the vehicle only has a
cigarette lighter, use the
cigarette lighter.
Do not pinch the power
plug cord in the door or
window.
7. Start the vehicle. The vehicle must be running
while using the air
compressor.
8. Press the on/off button (5) to turn the tire sealant and
compressor kit on.
The compressor will inflate
the tire with air only.
9. Inflate the tire to the recommended inflation
pressure using the
pressure gauge (8). The
recommended inflation
pressure can be found on the Tire and Loading
Information label. See Tire
Pressure
0427.
The pressure gauge (8)
may read higher than the
actual tire pressure while
the compressor is on. Turn
the compressor off to get
an accurate pressure
reading. The compressor
may be turned on/off until
the correct pressure is
reached.
Caution
If the recommended
pressure cannot be reached
after approximately
25 minutes, the vehicle
should not be driven farther.
The tire is too severely
damaged and the tire
sealant and compressor kit
cannot inflate the tire.
Remove the power plug
from the accessory power
outlet and unscrew the (Continued)
Page 452 of 526

Cadillac CT5 Owner Manual (GMNA-Localizing-U.S./Canada-16500419) -
2023 - CRC - 5/6/22
Vehicle Care 451
Caution (Continued)
inflating hose from the tire
valve. See Roadside
Assistance Program0489.
10. Press the on/off button (5) to turn the tire sealant and
compressor kit off.
Be careful while handling
the compressor as it could
be warm after usage.
11. Unplug the power plug (9) from the accessory power
outlet in the vehicle.
12. Turn the air only hose (10) counterclockwise to
remove it from the tire
valve stem.
13. Replace the tire valve stem cap.
14. Return the air only hose (10) and power plug (9)
back to their original
storage location. 15. Return the equipment to
its original storage location
in the vehicle.
The tire sealant and
compressor kit has accessory
adapters located in a
compartment on the bottom
of its housing that can be used
to inflate air mattresses,
balls, etc.
Storing the Tire
Sealant and
Compressor Kit
The tire sealant and
compressor kit is in a bag in
the trunk. 1. Open the trunk. See Trunk 023.
2. Lift the load floor.
3. Remove the tire sealant and compressor kit bag.
4. Remove the tire sealant and compressor kit from
the bag.
To store the tire sealant and
compressor kit, reverse the
steps.