check engine CADILLAC CT6 2017 1.G User Guide
[x] Cancel search | Manufacturer: CADILLAC, Model Year: 2017, Model line: CT6, Model: CADILLAC CT6 2017 1.GPages: 337, PDF Size: 3.89 MB
Page 135 of 337
Cadillac CT6 Owner Manual (GMNA-Localizing-MidEast-10293390) - 2017 -
CRC - 6/21/16
134 INSTRUMENTS AND CONTROLS
If the light comes on and stays on, it
means that oil is not flowing through
the engine properly. The vehicle could
be low on oil and might have some
other system problem. See your dealer.
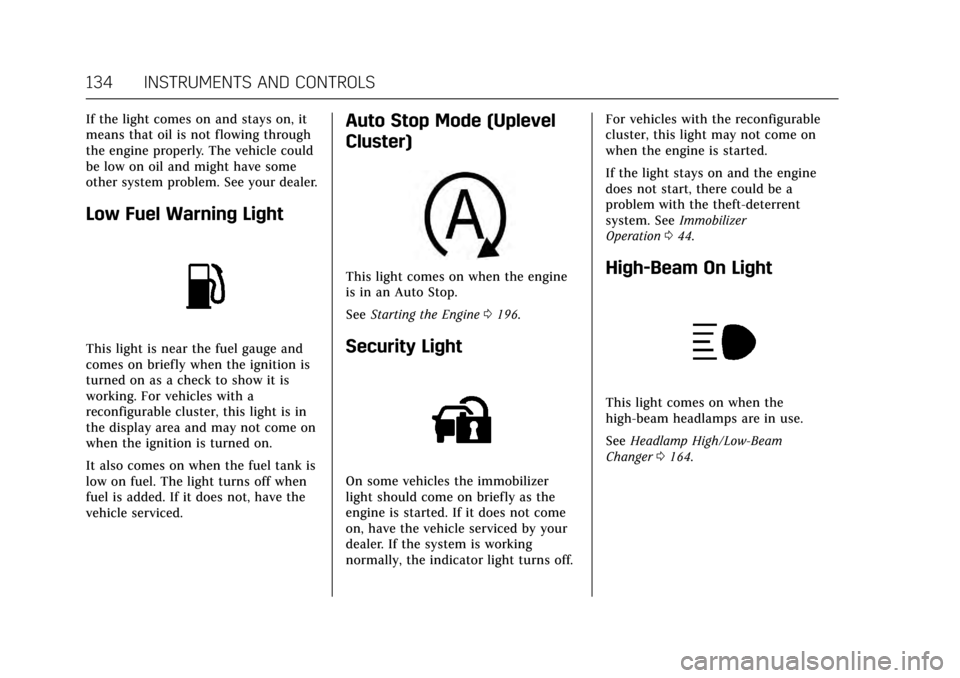
Low Fuel Warning Light
This light is near the fuel gauge and
comes on briefly when the ignition is
turned on as a check to show it is
working. For vehicles with a
reconfigurable cluster, this light is in
the display area and may not come on
when the ignition is turned on.
It also comes on when the fuel tank is
low on fuel. The light turns off when
fuel is added. If it does not, have the
vehicle serviced.
Auto Stop Mode (Uplevel
Cluster)
This light comes on when the engine
is in an Auto Stop.
SeeStarting the Engine 0196.
Security Light
On some vehicles the immobilizer
light should come on briefly as the
engine is started. If it does not come
on, have the vehicle serviced by your
dealer. If the system is working
normally, the indicator light turns off. For vehicles with the reconfigurable
cluster, this light may not come on
when the engine is started.
If the light stays on and the engine
does not start, there could be a
problem with the theft-deterrent
system. See
Immobilizer
Operation 044.
High-Beam On Light
This light comes on when the
high-beam headlamps are in use.
See Headlamp High/Low-Beam
Changer 0164.
Page 145 of 337
Cadillac CT6 Owner Manual (GMNA-Localizing-MidEast-10293390) - 2017 -
CRC - 6/21/16
144 INSTRUMENTS AND CONTROLS
If this message continues to appear,
have the system repaired by your
dealer as soon as possible to avoid
damage to the engine.
COOLANT LEVEL LOW ADD
COOLANT
This message will display if the
coolant is low. SeeEngine
Coolant 0256.
ENGINE OVERHEATED —IDLE
ENGINE
This message displays when the
engine coolant temperature is too hot.
Stop and allow the vehicle to idle until
it cools down.
ENGINE OVERHEATED —STOP
ENGINE
This message displays and a
continuous chime sounds if the
engine cooling system reaches unsafe
temperatures for operation. Stop and
turn off the vehicle as soon as it is
safe to do so to avoid severe damage.
This message clears when the engine
has cooled to a safe operating
temperature.
HIGH COOLANT TEMPERATURE
This message may display if the
coolant temperature is hot. See Engine
Overheating 0259.
Engine Oil Messages
CHANGE ENGINE OIL SOON
This message displays when the
engine oil needs to be changed. When
you change the engine oil, be sure to
reset the oil life system. See Engine Oil
Life System 0252, Driver Information
Center (DIC) 0136, Engine Oil 0250,
and Maintenance Schedule 0311.
ENGINE OIL HOT, IDLE ENGINE
This message displays when the
engine oil temperature is too hot. Stop
and allow the vehicle to idle until it
cools down.
ENGINE OIL LOW —ADD OIL
On some vehicles, this message
displays when the engine oil level may
be too low. Check the oil level before
filling to the recommended level.
If the oil is not low and this message remains on, take the vehicle to your
dealer for service. See
Engine
Oil 0250.
OIL PRESSURE LOW —TURN
VEHICLE OFF
This message displays if low oil
pressure levels occur. Stop the vehicle
as soon as safely possible and do not
operate it until the cause of the low
oil pressure has been corrected. Check
the oil as soon as possible and have
the vehicle serviced by your dealer.
Engine Power Messages
ENGINE POWER IS REDUCED
This message displays when the
vehicle's engine power is reduced.
Reduced engine power can affect the
vehicle's ability to accelerate. If this
message is on, but there is no
reduction in performance, proceed to
your destination. The performance
may be reduced the next time the
vehicle is driven. The vehicle may be
driven at a reduced speed while this
message is on, but maximum
acceleration and speed may be
reduced. Anytime this message stays
Page 167 of 337

Cadillac CT6 Owner Manual (GMNA-Localizing-MidEast-10293390) - 2017 -
CRC - 6/21/16
166 LIGHTING
Lights On with Wipers
If the windshield wipers are activated
in daylight with the engine on, and
the exterior lamp control is in AUTO,
the headlamps, parking lamps, and
other exterior lamps come on. The
transition time for the lamps coming
on varies based on wiper speed. When
the wipers are not operating, these
lamps turn off. Move the exterior
lamp control to
Oor;to disable
this feature.
Hazard Warning Flashers
|: Touch this button to make the
front and rear turn signal lamps flash
on and off. Touch again to turn the
flashers off. The hazard warning flashers turn on
automatically if the airbags deploy.
Turn and Lane-Change
Signals
Move the lever all the way up or down
to signal a turn.
An arrow on the instrument cluster
flashes in the direction of the turn or
lane change.
Raise or lower the lever until the
arrow starts to flash to signal a lane
change. Hold it there until the lane
change is completed. If the lever is
briefly pressed and released, the turn
signal flashes three times.
The turn and lane-change signal can
be turned off manually by moving the
lever back to its original position.
If after signaling a turn or lane
change, the arrow flashes rapidly or
does not come on, a signal bulb may
be burned out.
Replace any burned out bulbs. If a
bulb is not burned out, check the fuse.
See
Fuses and Circuit Breakers 0269.
Page 195 of 337
Cadillac CT6 Owner Manual (GMNA-Localizing-MidEast-10293390) - 2017 -
CRC - 6/21/16
194 DRIVING AND OPERATING
{Warning
Things inside the vehicle can
strike and injure people in a
sudden stop or turn, or in a
crash.
.Put things in the cargo
area of the vehicle. In the
cargo area, put them as far
forward as possible. Try to
spread the weight evenly.
.Never stack heavier things,
like suitcases, inside the
vehicle so that some of
them are above the tops of
the seats.
.Do not leave an unsecured
child restraint in the
vehicle.
.Secure loose items in the
vehicle.
.Do not leave a seat folded
down unless needed.
Starting and Operating
New Vehicle Break-In
Follow these recommended guidelines
during the first 2 400 km (1,500 mi) of
driving this vehicle. Parts have a
break-in period and performance will
be better in the long run.
For the first 2 400 km (1,500 mi):
. Avoid full throttle starts and
abrupt stops.
. Do not exceed 4000 engine rpm.
. Avoid driving at any one constant
speed, fast or slow.
. Avoid downshifting to brake or
slow the vehicle when the engine
speed will exceed 4000 rpm.
. Do not let the engine labor. Never
lug the engine in high gear at low
speeds.
. Do not participate in track events,
sport driving schools, or similar
activities during this break-in
period. .
Check engine oil with every
refueling and add if necessary. Oil
and fuel consumption may be
higher than normal during the
first 2 400 km (1,500 mi).
. To break in new tires, drive at
moderate speeds and avoid hard
cornering for the first
300 km (200 mi). New tires do not
have maximum traction and may
tend to slip.
. New brake linings also need a
break–in period. Avoid making
hard stops during the first
300 km (200 mi). This is
recommended every time brake
linings are replaced.
Page 207 of 337

Cadillac CT6 Owner Manual (GMNA-Localizing-MidEast-10293390) - 2017 -
CRC - 6/21/16
206 DRIVING AND OPERATING
The vehicle has an Electric Parking
Brake (EPB). The EPB can always be
activated, even if the ignition is off. To
prevent draining the battery, avoid
repeated cycles of the EPB system
when the engine is not running.
The system has a red parking brake
status light and an amber parking
brake warning light. SeeElectric
Parking Brake Light 0130 and Service
Electric Parking Brake Light 0130.
There are also parking brake-related
Driver Information Center (DIC)
messages. See Brake System Messages
0 142. In case of insufficient electrical
power, the EPB cannot be applied or
released.
Before leaving the vehicle, check the
red parking brake status light to
ensure that the parking brake is
applied.
EPB Apply
To apply the EPB:
1. Be sure the vehicle is at a complete stop.
2. Press the EPB switch momentarily. The red parking brake status light will
flash and then stay on once the EPB is
fully applied. If the red parking brake
status light flashes continuously, then
the EPB is only partially applied or
there is a problem with the EPB.
A DIC message will display. Release
the EPB and try to apply it again.
If the light does not come on, or keeps
flashing, have the vehicle serviced. Do
not drive the vehicle if the red parking
brake status light is flashing. See your
dealer. See
Electric Parking Brake
Light 0130.
If the amber parking brake warning
light is on, press the EPB switch and
hold it. Continue to hold the switch
until the red parking brake status light
remains on. If the amber parking
brake warning light remains on, see
your dealer.
If the EPB is applied while the vehicle
is moving, the vehicle will decelerate
as long as the switch is pressed. If the
switch is pressed until the vehicle
comes to a stop, the EPB will remain
applied. The vehicle may automatically apply
the EPB in some situations when the
vehicle is not moving. This is normal,
and is done to periodically check the
correct operation of the EPB system.
If the EPB fails to apply, block the rear
wheels to prevent vehicle movement.
EPB Release
To release the EPB:
1. Place the ignition in the ACC/ ACCESSORY or ON/RUN mode.
2. Apply and hold the brake pedal.
3. Push down momentarily on the EPB switch.
The EPB is released when the red
parking brake status light is off.
If the amber parking brake warning
light is on, release the EPB by pushing
down on the EPB switch and holding
it down. Continue to hold the switch
until the red parking brake status light
is off. If either light stays on after
release is attempted, see your dealer.
Page 209 of 337

Cadillac CT6 Owner Manual (GMNA-Localizing-MidEast-10293390) - 2017 -
CRC - 6/21/16
208 DRIVING AND OPERATING
accelerator pedal has been pressed,
AVH uses braking pressure to hold the
vehicle stationary. In addition, the
ABS pump motor may activate to
build brake pressure to maintain the
vehicle at a standstill if necessary.
If AVH is holding the vehicle, the AVH
indicator will change to green. Once
AVH is active it will hold the vehicle
for a defined time period then engage
the parking brake. While AVH is
holding the vehicle, the parking brake
will engage if the driver door is
opened or the driver safety belt is
unfastened.Ride Control Systems
Traction Control/Electronic
Stability Control
System Operation
The vehicle has a Traction Control
System (TCS) and StabiliTrak®, an
electronic stability control system.
These systems help limit wheel spin
and assist the driver in maintaining
control, especially on slippery road
conditions.
TCS activates if it senses that any of
the drive wheels are spinning or
beginning to lose traction. When this
happens, TCS applies the brakes to the
spinning wheels and reduces engine
power to limit wheel spin.
StabiliTrak activates when the vehicle
senses a difference between the
intended path and the direction the
vehicle is actually traveling.
StabiliTrak selectively applies braking
pressure to any one of the vehicle
wheel brakes to assist the driver in
keeping the vehicle on the
intended path. If cruise control is being used and
traction control or StabiliTrak begins
to limit wheel spin, cruise control will
disengage. Cruise control may be
turned back on when road conditions
allow.
Both systems come on automatically
when the vehicle is started and begins
to move. The systems may be heard or
felt while they are operating or while
performing diagnostic checks. This is
normal and does not mean there is a
problem with the vehicle.
It is recommended to leave both
systems on for normal driving
conditions, but it may be necessary to
turn TCS off if the vehicle gets stuck
in sand, mud, ice, or snow. See
If the
Vehicle Is Stuck 0190 and “Turning
the Systems Off and On ”later in this
section.
Page 244 of 337

Cadillac CT6 Owner Manual (GMNA-Localizing-MidEast-10293390) - 2017 -
CRC - 6/21/16
DRIVING AND OPERATING 243
Trailer Towing
General Towing
Information
The vehicle is neither designed nor
intended to tow a trailer.
Conversions and
Add-Ons
Add-On Electrical
Equipment
{Warning
The Data Link Connector (DLC) is
used for vehicle service and
Emission Inspection/Maintenance
testing. SeeMalfunction Indicator
Lamp (Check Engine Light) 0127.
A device connected to the DLC —
such as an aftermarket fleet or
driver-behavior tracking device —
may interfere with vehicle systems.
This could affect vehicle operation
and cause a crash. Such devices
may also access information stored
in the vehicle’s systems.
Caution
Some electrical equipment can
damage the vehicle or cause
components to not work and would
not be covered by the vehicle
warranty. Always check with your
dealer before adding electrical
equipment.
Add-on equipment can drain the
vehicle's 12-volt battery, even if the
vehicle is not operating.
The vehicle has an airbag system.
Before attempting to add anything
electrical to the vehicle, see Servicing
the Airbag-Equipped Vehicle 083 and
Adding Equipment to the
Airbag-Equipped Vehicle 084.
Page 245 of 337
Cadillac CT6 Owner Manual (GMNA-Localizing-MidEast-10293390) - 2017 -
CRC - 6/21/16
244 VEHICLE CARE
Vehicle Care
General Information
General Information . . . . . . . . . . . . . 245
Accessories andModifications . . . . . . . . . . . . . . . . . . . 245
Vehicle Checks
Doing Your OwnService Work . . . . . . . . . . . . . . . . . . . . 245
Hood . . . . . . . . . . . . . . . . . . . . . . . . . . . . . . 246
Engine Compartment Overview . . . . . . . . . . . . . . . . . . . . . . . . . 247
Engine Oil . . . . . . . . . . . . . . . . . . . . . . . . . 250
Engine Oil Life System . . . . . . . . . . . 252
Automatic Transmission Fluid . . . . . . . . . . . . . . . . . . . . . . . . . . . . . 253
Engine Air Cleaner/Filter . . . . . . . . . 254
Cooling System . . . . . . . . . . . . . . . . . . . 255
Engine Coolant . . . . . . . . . . . . . . . . . . . 256
Engine Overheating . . . . . . . . . . . . . . 259
Washer Fluid . . . . . . . . . . . . . . . . . . . . . 260
Brakes . . . . . . . . . . . . . . . . . . . . . . . . . . . . . 261
Brake Fluid . . . . . . . . . . . . . . . . . . . . . . . 262
Battery . . . . . . . . . . . . . . . . . . . . . . . . . . . . 263
All-Wheel Drive . . . . . . . . . . . . . . . . . . 264
Starter Switch Check . . . . . . . . . . . . . 264
Automatic Transmission Shift Lock Control Function
Check . . . . . . . . . . . . . . . . . . . . . . . . . . . . 264 Park Brake and P (Park)
Mechanism Check . . . . . . . . . . . . . . 265
Wiper Blade Replacement . . . . . . . 265
Windshield Replacement . . . . . . . . 266
Headlamp Aiming
Headlamp Aiming . . . . . . . . . . . . . . . . 266
Bulb Replacement
Bulb Replacement . . . . . . . . . . . . . . . . 267
LED Lighting . . . . . . . . . . . . . . . . . . . . . 267
License Plate Lamp . . . . . . . . . . . . . . 267
Replacement Bulbs . . . . . . . . . . . . . . . 267
Electrical System
Electrical System Overload . . . . . . 268
Fuses and Circuit Breakers . . . . . . 269
Engine Compartment Fuse Block . . . . . . . . . . . . . . . . . . . . . . . . . . . . 269
Instrument Panel Fuse Block . . . . 272
Rear Compartment Fuse Block . . . . . . . . . . . . . . . . . . . . . . . . . . . . 274
Wheels and Tires
Tires . . . . . . . . . . . . . . . . . . . . . . . . . . . . . . . 276
All-Season Tires . . . . . . . . . . . . . . . . . . 277
Winter Tires . . . . . . . . . . . . . . . . . . . . . . 277
Low-Profile Tires . . . . . . . . . . . . . . . . . 278
Summer Tires . . . . . . . . . . . . . . . . . . . . 278
Tire Pressure . . . . . . . . . . . . . . . . . . . . . . 279
Tire Pressure for High-SpeedOperation . . . . . . . . . . . . . . . . . . . . . . . . 280 Tire Pressure Monitor System . . . 280
Tire Pressure Monitor
Operation . . . . . . . . . . . . . . . . . . . . . . . . 281
Tire Inspection . . . . . . . . . . . . . . . . . . . 284
Tire Rotation . . . . . . . . . . . . . . . . . . . . . 284
When It Is Time for New Tires . . . . . . . . . . . . . . . . . . . . . . . . . . . . . 286
Buying New Tires . . . . . . . . . . . . . . . . 286
Different Size Tires and Wheels . . . . . . . . . . . . . . . . . . . . . . . . . . 288
Wheel Alignment and Tire Balance . . . . . . . . . . . . . . . . . . . . . . . . . . 288
Wheel Replacement . . . . . . . . . . . . . . 288
Tire Chains . . . . . . . . . . . . . . . . . . . . . . . 289
If a Tire Goes Flat . . . . . . . . . . . . . . . . 289
Tire Changing . . . . . . . . . . . . . . . . . . . . . 291
Compact Spare Tire . . . . . . . . . . . . . . 295
Jump Starting
Jump Starting . . . . . . . . . . . . . . . . . . . . . 296
Towing the Vehicle
Towing the Vehicle . . . . . . . . . . . . . . . 299
Recreational Vehicle Towing . . . . 299
Appearance Care
Exterior Care . . . . . . . . . . . . . . . . . . . . . . 301
Interior Care . . . . . . . . . . . . . . . . . . . . . . 305
Floor Mats . . . . . . . . . . . . . . . . . . . . . . . . 308
Page 247 of 337

Cadillac CT6 Owner Manual (GMNA-Localizing-MidEast-10293390) - 2017 -
CRC - 6/21/16
246 VEHICLE CARE
Caution
Even small amounts of
contamination can cause damage to
vehicle systems. Do not allow
contaminants to contact the fluids,
reservoir caps, or dipsticks.
Hood
{Warning
Gas struts and other metal
components under the hood can get
hot after running the engine. Do
not touch these components as
they can burn unprotected skin and
could cause serious injury.Clear any snow from the hood before
opening.
To open the hood:
1. Pull the hood release handle. It is
on the lower left side of the
instrument panel between the
door and the steering wheel.
2. Release the handle, then pull the handle again to fully open
the hood.
3. Go to the front of the vehicle and lift the hood open.
Caution
Be sure the hood is completely
closed before driving. Damage may
occur if it is not.
To close the hood: 1. Before closing the hood, be sure all filler caps are properly
installed.
2. Lower the hood approximately 46 cm (18 in) from the closed
position.
3. Then push the front center of the hood with a swift, firm motion.
4. Check to make sure the hood is closed. If not, release the hood
from inside and repeat Steps 1–3.
Page 251 of 337
Cadillac CT6 Owner Manual (GMNA-Localizing-MidEast-10293390) - 2017 -
CRC - 6/21/16
250 VEHICLE CARE
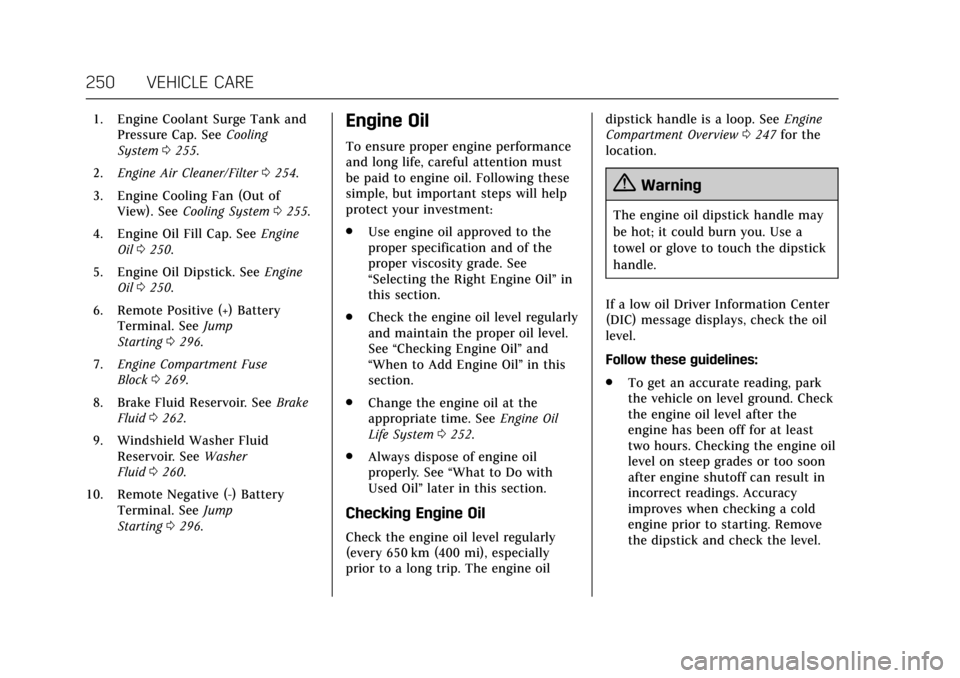
1. Engine Coolant Surge Tank andPressure Cap. See Cooling
System 0255.
2. Engine Air Cleaner/Filter 0254.
3. Engine Cooling Fan (Out of View). See Cooling System 0255.
4. Engine Oil Fill Cap. See Engine
Oil 0250.
5. Engine Oil Dipstick. See Engine
Oil 0250.
6. Remote Positive (+) Battery Terminal. See Jump
Starting 0296.
7. Engine Compartment Fuse
Block 0269.
8. Brake Fluid Reservoir. See Brake
Fluid 0262.
9. Windshield Washer Fluid Reservoir. See Washer
Fluid 0260.
10. Remote Negative (-) Battery Terminal. See Jump
Starting 0296.Engine Oil
To ensure proper engine performance
and long life, careful attention must
be paid to engine oil. Following these
simple, but important steps will help
protect your investment:
.
Use engine oil approved to the
proper specification and of the
proper viscosity grade. See
“Selecting the Right Engine Oil” in
this section.
. Check the engine oil level regularly
and maintain the proper oil level.
See “Checking Engine Oil” and
“When to Add Engine Oil” in this
section.
. Change the engine oil at the
appropriate time. See Engine Oil
Life System 0252.
. Always dispose of engine oil
properly. See “What to Do with
Used Oil” later in this section.
Checking Engine Oil
Check the engine oil level regularly
(every 650 km (400 mi), especially
prior to a long trip. The engine oil dipstick handle is a loop. See
Engine
Compartment Overview 0247 for the
location.
{Warning
The engine oil dipstick handle may
be hot; it could burn you. Use a
towel or glove to touch the dipstick
handle.
If a low oil Driver Information Center
(DIC) message displays, check the oil
level.
Follow these guidelines:
. To get an accurate reading, park
the vehicle on level ground. Check
the engine oil level after the
engine has been off for at least
two hours. Checking the engine oil
level on steep grades or too soon
after engine shutoff can result in
incorrect readings. Accuracy
improves when checking a cold
engine prior to starting. Remove
the dipstick and check the level.