warning CADILLAC CT6 2019 Service Manual
[x] Cancel search | Manufacturer: CADILLAC, Model Year: 2019, Model line: CT6, Model: CADILLAC CT6 2019Pages: 438, PDF Size: 7.6 MB
Page 106 of 438
Cadillac CT6 Owner Manual (GMNA-Localizing-U.S./Canada-12533370) -
2019 - crc - 1/23/19
SEATS AND RESTRAINTS 105
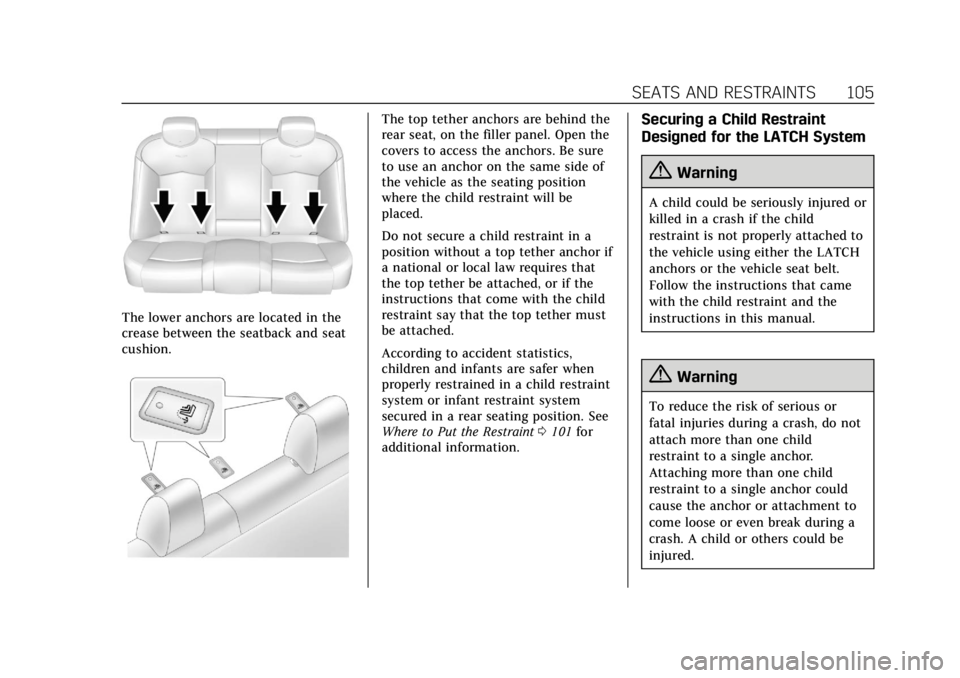
The lower anchors are located in the
crease between the seatback and seat
cushion.
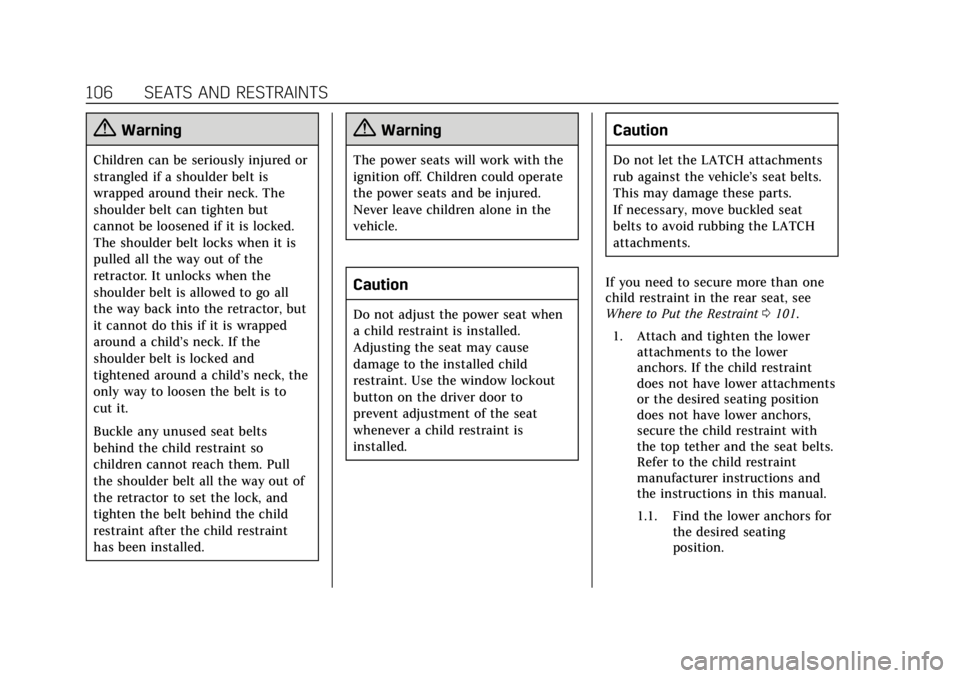
The top tether anchors are behind the
rear seat, on the filler panel. Open the
covers to access the anchors. Be sure
to use an anchor on the same side of
the vehicle as the seating position
where the child restraint will be
placed.
Do not secure a child restraint in a
position without a top tether anchor if
a national or local law requires that
the top tether be attached, or if the
instructions that come with the child
restraint say that the top tether must
be attached.
According to accident statistics,
children and infants are safer when
properly restrained in a child restraint
system or infant restraint system
secured in a rear seating position. See
Where to Put the Restraint0101 for
additional information.Securing a Child Restraint
Designed for the LATCH System
{Warning
A child could be seriously injured or
killed in a crash if the child
restraint is not properly attached to
the vehicle using either the LATCH
anchors or the vehicle seat belt.
Follow the instructions that came
with the child restraint and the
instructions in this manual.
{Warning
To reduce the risk of serious or
fatal injuries during a crash, do not
attach more than one child
restraint to a single anchor.
Attaching more than one child
restraint to a single anchor could
cause the anchor or attachment to
come loose or even break during a
crash. A child or others could be
injured.
Page 107 of 438
Cadillac CT6 Owner Manual (GMNA-Localizing-U.S./Canada-12533370) -
2019 - crc - 1/23/19
106 SEATS AND RESTRAINTS
{Warning
Children can be seriously injured or
strangled if a shoulder belt is
wrapped around their neck. The
shoulder belt can tighten but
cannot be loosened if it is locked.
The shoulder belt locks when it is
pulled all the way out of the
retractor. It unlocks when the
shoulder belt is allowed to go all
the way back into the retractor, but
it cannot do this if it is wrapped
around a child’s neck. If the
shoulder belt is locked and
tightened around a child’s neck, the
only way to loosen the belt is to
cut it.
Buckle any unused seat belts
behind the child restraint so
children cannot reach them. Pull
the shoulder belt all the way out of
the retractor to set the lock, and
tighten the belt behind the child
restraint after the child restraint
has been installed.
{Warning
The power seats will work with the
ignition off. Children could operate
the power seats and be injured.
Never leave children alone in the
vehicle.
Caution
Do not adjust the power seat when
a child restraint is installed.
Adjusting the seat may cause
damage to the installed child
restraint. Use the window lockout
button on the driver door to
prevent adjustment of the seat
whenever a child restraint is
installed.
Caution
Do not let the LATCH attachments
rub against the vehicle’s seat belts.
This may damage these parts.
If necessary, move buckled seat
belts to avoid rubbing the LATCH
attachments.
If you need to secure more than one
child restraint in the rear seat, see
Where to Put the Restraint 0101.
1. Attach and tighten the lower attachments to the lower
anchors. If the child restraint
does not have lower attachments
or the desired seating position
does not have lower anchors,
secure the child restraint with
the top tether and the seat belts.
Refer to the child restraint
manufacturer instructions and
the instructions in this manual.
1.1. Find the lower anchors for the desired seating
position.
Page 109 of 438

Cadillac CT6 Owner Manual (GMNA-Localizing-U.S./Canada-12533370) -
2019 - crc - 1/23/19
108 SEATS AND RESTRAINTS
If the position you are
using has an adjustable
headrest or head restraint
and you are using a dual
tether, fully raise the head
restraint and route the
tethers around the out
board side of the Head
Restraint posts.
3. Before placing a child in the child restraint, make sure it is
securely held in place. To check,
grasp the child restraint at the
LATCH path and attempt to
move it side to side and back
and forth. There should be no
more than 2.5 cm (1 in) of
movement for proper
installation.
Replacing LATCH System
Parts After a Crash
{Warning
A crash can damage the LATCH
system in the vehicle. A damaged
LATCH system may not properly
secure the child restraint, resulting
in serious injury or even death in a
crash. To help make sure the
LATCH system is working properly
after a crash, see your dealer to
have the system inspected and any
necessary replacements made as
soon as possible.
If the vehicle has the LATCH system
and it was being used during a crash,
new LATCH system parts may be
needed.
New parts and repairs may be
necessary even if the LATCH system
was not being used at the time of the
crash.
Securing Child Restraints
(With the Seat Belt in the
Rear Seat)
When securing a child restraint with
the seat belts in a rear seat position,
study the instructions that came with
the child restraint to make sure it is
compatible with this vehicle.
If the child restraint has the LATCH
system, see Lower Anchors and Tethers
for Children (LATCH System) 0102 for
how and where to install the child
restraint using LATCH. If a child
restraint is secured in the vehicle
using a seat belt and it uses a top
tether, see Lower Anchors and Tethers
for Children (LATCH System) 0102 for
top tether anchor locations.
Do not secure a child seat in a
position without a top tether anchor if
a national or local law requires that
the top tether be anchored, or if the
instructions that come with the child
restraint say that the top tether must
be anchored.
Page 110 of 438
Cadillac CT6 Owner Manual (GMNA-Localizing-U.S./Canada-12533370) -
2019 - crc - 1/23/19
SEATS AND RESTRAINTS 109
In Canada, the law requires that
forward-facing child restraints have a
top tether, and that the tether be
attached.
If the child restraint or vehicle seat
position does not have the LATCH
system, you will be using the seat belt
to secure the child restraint. Be sure
to follow the instructions that came
with the child restraint.
If more than one child restraint needs
to be installed in the rear seat, be sure
to readWhere to Put the Restraint
0 101.
{Warning
The power seats will work with the
ignition off. Children could operate
the power seats and be injured.
Never leave children alone in the
vehicle.
Caution
Do not adjust the power seat when
a child restraint is installed.
Adjusting the seat may cause
damage to the installed child
restraint. Use the window lockout
button on the driver door to
prevent adjustment of the seat
whenever a child restraint is
installed.
If the rear seat is adjustable, make
sure the rear seat is positioned fully
rearward before installing a child
restraint. 1. Put the child restraint on the seat.
2. Pick up the latch plate, and run the lap and shoulder portions of
the vehicle's seat belt through or
around the child restraint. The
child restraint instructions will
show you how.
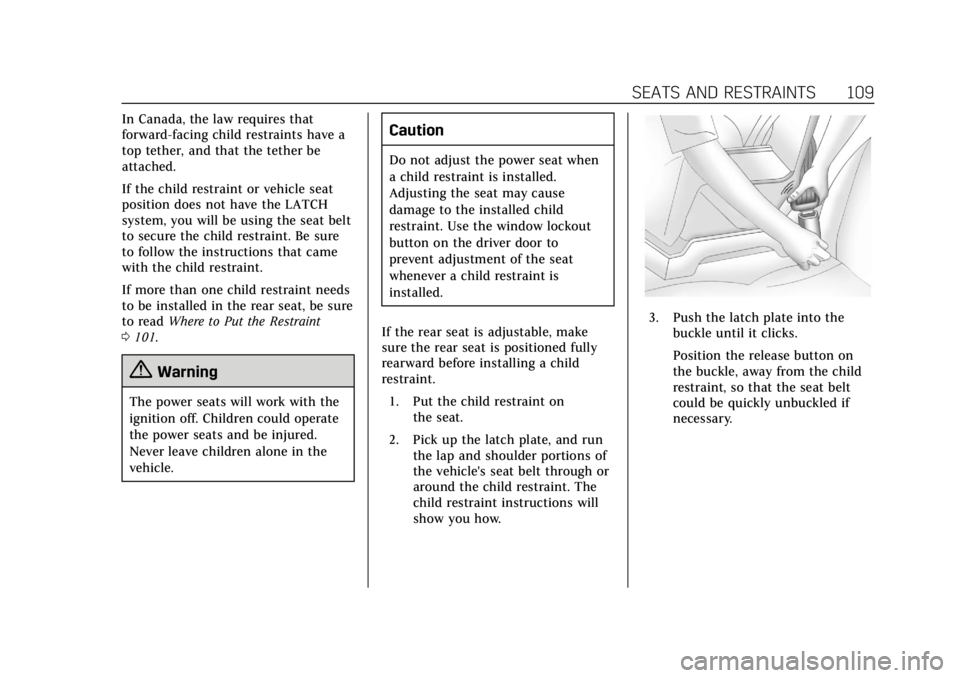
3. Push the latch plate into thebuckle until it clicks.
Position the release button on
the buckle, away from the child
restraint, so that the seat belt
could be quickly unbuckled if
necessary.
Page 112 of 438

Cadillac CT6 Owner Manual (GMNA-Localizing-U.S./Canada-12533370) -
2019 - crc - 1/23/19
SEATS AND RESTRAINTS 111
Securing Child Restraints
(With the Seat Belt in the
Front Seat)
This vehicle has airbags. A rear seat is
a safer place to secure a
forward-facing child restraint. See
Where to Put the Restraint0101.
In addition, the vehicle has a
passenger sensing system which is
designed to turn off the front
outboard passenger frontal airbag and
knee airbag under certain conditions.
See Passenger Sensing System 090 and
Passenger Airbag Status Indicator 0138
for more information, including
important safety information.
Never put a rear-facing child seat in
the front. This is because the risk to
the rear-facing child is so great if the
airbag deploys.
{Warning
A child in a rear-facing child
restraint can be seriously injured or
killed if the front outboard
(Continued)
Warning (Continued)
passenger frontal airbag inflates.
This is because the back of the
rear-facing child restraint would be
very close to the inflating airbag.
A child in a forward-facing child
restraint can be seriously injured or
killed if the front outboard
passenger frontal airbag inflates
and the passenger seat is in a
forward position.
Even if the passenger sensing
system has turned off the front
outboard passenger airbag(s), no
system is fail-safe. No one can
guarantee that an airbag will not
deploy under some unusual
circumstance, even though the
airbag(s) are off.
Secure rear-facing child restraints
in a rear seat, even if the airbag(s)
are off. If you secure a
forward-facing child restraint in the
front outboard passenger seat,(Continued)
Warning (Continued)
always move the seat as far back as
it will go. It is better to secure the
child restraint in a rear seat.
SeePassenger Sensing System 090
for additional information.
If the child restraint uses a top tether,
see Lower Anchors and Tethers for
Children (LATCH System) 0102 for top
tether anchor locations.
Do not secure a child seat in a
position without a top tether anchor if
a national or local law requires that
the top tether be anchored, or if the
instructions that come with the child
restraint say that the top tether must
be anchored.
In Canada, the law requires that
forward-facing child restraints have a
top tether, and that the tether be
attached.
Page 115 of 438
Cadillac CT6 Owner Manual (GMNA-Localizing-U.S./Canada-12533370) -
2019 - crc - 1/23/19
114 STORAGE
Storage
Storage Compartments
Storage Compartments . . . . . . . . . . 114
Instrument Panel Storage . . . . . . . . 114
Glove Box . . . . . . . . . . . . . . . . . . . . . . . . . 114
Cupholders . . . . . . . . . . . . . . . . . . . . . . . . 115
Armrest Storage . . . . . . . . . . . . . . . . . . 115
Rear Storage . . . . . . . . . . . . . . . . . . . . . . 116
Center Console Storage . . . . . . . . . . 116
Additional Storage Features
Cargo Tie-Downs . . . . . . . . . . . . . . . . . 117
Convenience Net . . . . . . . . . . . . . . . . . 117
Storage Compartments
{Warning
Do not store heavy or sharp objects
in storage compartments. In a
crash, these objects may cause the
cover to open and could result in
injury.
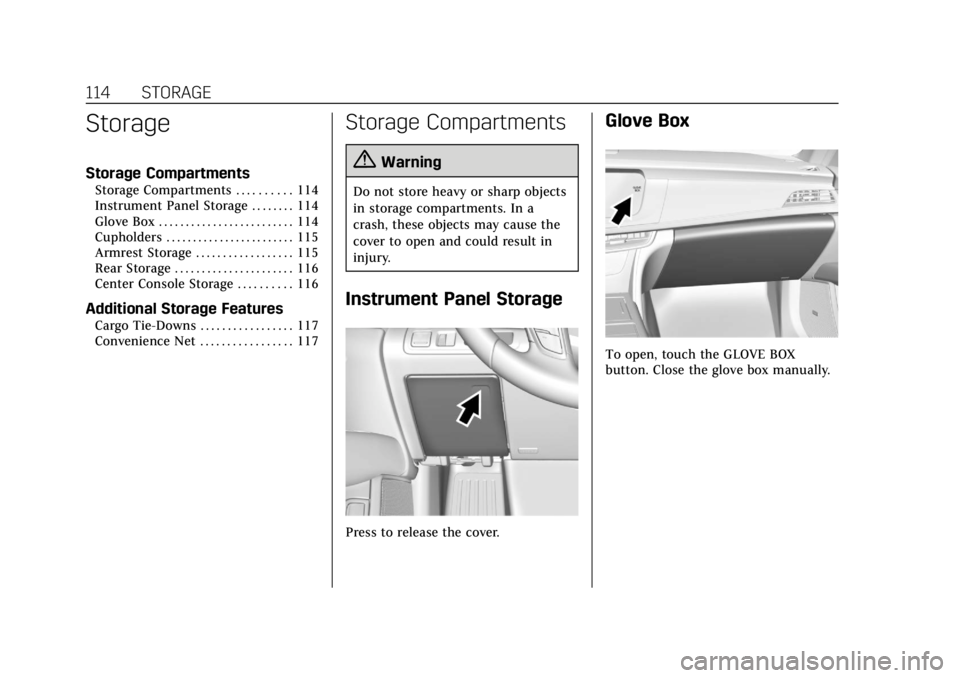
Instrument Panel Storage
Press to release the cover.
Glove Box
To open, touch the GLOVE BOX
button. Close the glove box manually.
Page 119 of 438
Cadillac CT6 Owner Manual (GMNA-Localizing-U.S./Canada-12533370) -
2019 - crc - 1/23/19
118 INSTRUMENTS AND CONTROLS
Instruments and
Controls
Controls
Steering Wheel Adjustment . . . . . 119
Steering Wheel Controls . . . . . . . . . 119
Heated Steering Wheel . . . . . . . . . . 119
Horn . . . . . . . . . . . . . . . . . . . . . . . . . . . . . . . 120
Windshield Wiper/Washer . . . . . . . 120
Compass . . . . . . . . . . . . . . . . . . . . . . . . . . 122
Clock . . . . . . . . . . . . . . . . . . . . . . . . . . . . . . 122
Power Outlets . . . . . . . . . . . . . . . . . . . . . 122
Wireless Charging . . . . . . . . . . . . . . . . 123
Cigarette Lighter . . . . . . . . . . . . . . . . . . 125
Ashtrays . . . . . . . . . . . . . . . . . . . . . . . . . . 125
Warning Lights, Gauges, and
Indicators
Warning Lights, Gauges, andIndicators . . . . . . . . . . . . . . . . . . . . . . . 126
Instrument Cluster (Base
Level) . . . . . . . . . . . . . . . . . . . . . . . . . . . . 127
Instrument Cluster (Uplevel) . . . . 130
Speedometer . . . . . . . . . . . . . . . . . . . . . . 133
Odometer . . . . . . . . . . . . . . . . . . . . . . . . . 133
Trip Odometer . . . . . . . . . . . . . . . . . . . . 133
Tachometer . . . . . . . . . . . . . . . . . . . . . . . 133
Fuel Gauge . . . . . . . . . . . . . . . . . . . . . . . . 133 Engine Oil Pressure Gauge (Base
Level Cluster Only) . . . . . . . . . . . . . 134
Engine Coolant Temperature Gauge . . . . . . . . . . . . . . . . . . . . . . . . . . . . 135
Voltmeter Gauge (Base Level
Cluster Only) . . . . . . . . . . . . . . . . . . . . 136
Seat Belt Reminders . . . . . . . . . . . . . . 137
Airbag Readiness Light . . . . . . . . . . 138
Passenger Airbag Status Indicator . . . . . . . . . . . . . . . . . . . . . . . . . 138
Charging System Light . . . . . . . . . . . 139
Malfunction Indicator Lamp (Check Engine Light) . . . . . . . . . . . 139
Brake System Warning Light (3.0L Twin Turbo and 3.6L
V6 Engines) . . . . . . . . . . . . . . . . . . . . . 141
Brake System Warning Light (2.0L L4 Turbo and 4.2L Twin
Turbo V8 Engines) . . . . . . . . . . . . . . 142
Electric Parking Brake Light . . . . . 143
Service Electric Parking Brake Light . . . . . . . . . . . . . . . . . . . . . . . . . . . . . 143
Antilock Brake System (ABS) Warning Light . . . . . . . . . . . . . . . . . . 143
Gear Shifting Light . . . . . . . . . . . . . . . 144
Automatic Vehicle Hold (AVH) Light . . . . . . . . . . . . . . . . . . . . . . . . . . . . . 144
Lane Keep Assist (LKA) Light . . . 144
Vehicle Ahead Indicator . . . . . . . . . 144
Pedestrian Ahead Indicator . . . . . . 145 Traction Off Light . . . . . . . . . . . . . . . . 145
StabiliTrak OFF Light . . . . . . . . . . . . 145
Traction Control System (TCS)/
StabiliTrak Light . . . . . . . . . . . . . . . . 146
Engine Coolant Temperature
Warning Light . . . . . . . . . . . . . . . . . . 146
Driver Mode Control Light . . . . . . . 146
Tire Pressure Light . . . . . . . . . . . . . . . 147
Engine Oil Pressure Light . . . . . . . . 147
Low Fuel Warning Light . . . . . . . . . 148
Security Light . . . . . . . . . . . . . . . . . . . . . 148
High-Beam On Light . . . . . . . . . . . . . 148
Lamps On Reminder . . . . . . . . . . . . . 149
Cruise Control Light . . . . . . . . . . . . . . 149
Door Ajar Light . . . . . . . . . . . . . . . . . . . 149
Information Displays
Driver Information Center (DIC) . . . . . . . . . . . . . . . . . . . . . 150
Head-Up Display (HUD) . . . . . . . . . 152
Vehicle Messages
Vehicle Messages . . . . . . . . . . . . . . . . . 156
Engine Power Messages . . . . . . . . . . 156
Vehicle Speed Messages . . . . . . . . . 156
Vehicle Personalization
Vehicle Personalization . . . . . . . . . . 157
Universal Remote System
Universal Remote System . . . . . . . . 162
Page 122 of 438
Cadillac CT6 Owner Manual (GMNA-Localizing-U.S./Canada-12533370) -
2019 - crc - 1/23/19
INSTRUMENTS AND CONTROLS 121
windshield wiper lever is released,
additional wipes may occur depending
on how long the windshield washer
had been activated. SeeWasher Fluid
0 313 for information on filling the
windshield washer fluid reservoir.
{Warning
In freezing weather, do not use the
washer until the windshield is
warmed. Otherwise the washer fluid
can form ice on the windshield,
blocking your vision.
Clear snow and ice from the wiper
blades and windshield before using
them. If frozen to the windshield,
carefully loosen or thaw them.
Damaged blades should be replaced.
See Wiper Blade Replacement 0319.
Heavy snow or ice can overload the
wiper motor.
Wiper Parking
If the ignition is turned off while the
wipers are on LO, HI, or AUTO with
Rainsense disabled, they will
immediately stop. If the windshield wiper lever is then
moved to OFF before the driver door is
opened or within 10 minutes after the
ignition is off, the wipers will restart
and move to the base of the
windshield.
If the ignition is turned off while the
wipers are performing wipes due to
windshield washing or Rainsense, the
wipers continue to run until they
reach the base of the windshield.
Rainsense
With Rainsense, a sensor near the top
center of the windshield detects the
amount of water on the windshield
and controls the sensitivity of the
windshield wiper.
Keep this area of the windshield clear
of debris to allow for best system
performance.
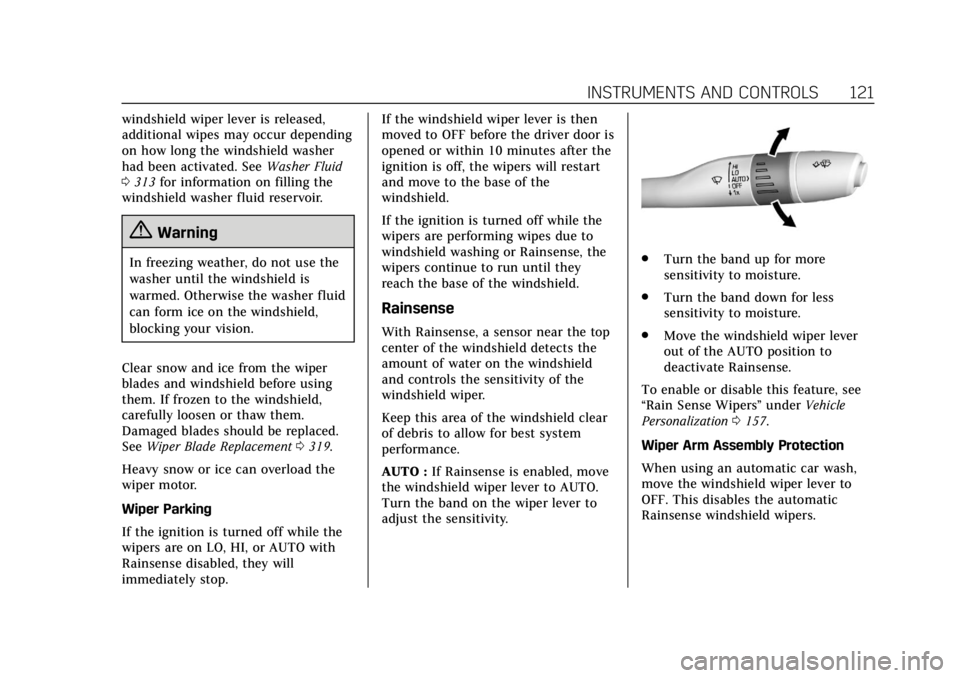
AUTO :
If Rainsense is enabled, move
the windshield wiper lever to AUTO.
Turn the band on the wiper lever to
adjust the sensitivity.
. Turn the band up for more
sensitivity to moisture.
. Turn the band down for less
sensitivity to moisture.
. Move the windshield wiper lever
out of the AUTO position to
deactivate Rainsense.
To enable or disable this feature, see
“Rain Sense Wipers ”under Vehicle
Personalization 0157.
Wiper Arm Assembly Protection
When using an automatic car wash,
move the windshield wiper lever to
OFF. This disables the automatic
Rainsense windshield wipers.
Page 124 of 438

Cadillac CT6 Owner Manual (GMNA-Localizing-U.S./Canada-12533370) -
2019 - crc - 1/23/19
INSTRUMENTS AND CONTROLS 123
Lift the cover to access the accessory
power outlet.
Certain accessory power plugs may
not be compatible with the accessory
power outlet and could overload
vehicle or adapter fuses. If a problem
is experienced, see your dealer.
When adding electrical equipment, be
sure to follow the proper installation
instructions included with the
equipment. SeeAdd-On Electrical
Equipment 0287.
Caution
Hanging heavy equipment from the
power outlet can cause damage not
covered by the vehicle warranty.
The power outlets are designed for
accessory power plugs only, such as
cell phone charge cords.
Always unplug electrical equipment
when not in use and do not plug in
equipment that exceeds the maximum
20 amp rating.
Wireless Charging
The system operates at 145 kHz and
wirelessly charges one Qi compatible
smartphone. The power output of the
system is capable of charging at a rate
up to 1 amp (5W), as requested by the
compatible smartphone. See Radio
Frequency Statement 0411.
{Warning
Wireless charging can affect the
operation of an implanted
pacemaker or other medical devices.
If you have one, it is recommended
to consult with your doctor before
using the wireless charging system.
The vehicle must be on, in ACC/
ACCESSORY, or Retained Accessory
Power (RAP) must be active. The
wireless charging feature may not
correctly indicate charging when the
vehicle is in RAP. See Retained
Accessory Power (RAP) 0206. The operating temperature is
−20 °C
(−4 °F) to 60 °C (140 °F) for the
charging system and 0 °C (32 °F) to
35 °C (95 °F) for the smartphone.
{Warning
Remove all objects from the
charging pad before charging your
compatible smartphone. Objects,
such as coins, keys, rings, paper
clips, or cards, between the
smartphone and charging pad will
become very hot. On the rare
occasion that the charging system
does not detect an object, and the
object gets wedged between the
smartphone and charger, remove
the smartphone and allow the
object to cool before removing it
from the charging pad, to prevent
burns.
Page 127 of 438

Cadillac CT6 Owner Manual (GMNA-Localizing-U.S./Canada-12533370) -
2019 - crc - 1/23/19
126 INSTRUMENTS AND CONTROLS
Warning Lights, Gauges,
and Indicators
Warning lights and gauges can signal
that something is wrong before it
becomes serious enough to cause an
expensive repair or replacement.
Paying attention to the warning lights
and gauges could prevent injury.Some warning lights come on briefly
when the engine is started to indicate
they are working. When one of the
warning lights comes on and stays on
while driving, or when one of the
gauges shows there may be a problem,
check the section that explains what
to do. Waiting to do repairs can be
costly and even dangerous.