infotainment CADILLAC CT6 2020 Convenience & Personalization Guide
[x] Cancel search | Manufacturer: CADILLAC, Model Year: 2020, Model line: CT6, Model: CADILLAC CT6 2020Pages: 20, PDF Size: 3.17 MB
Page 2 of 20
2
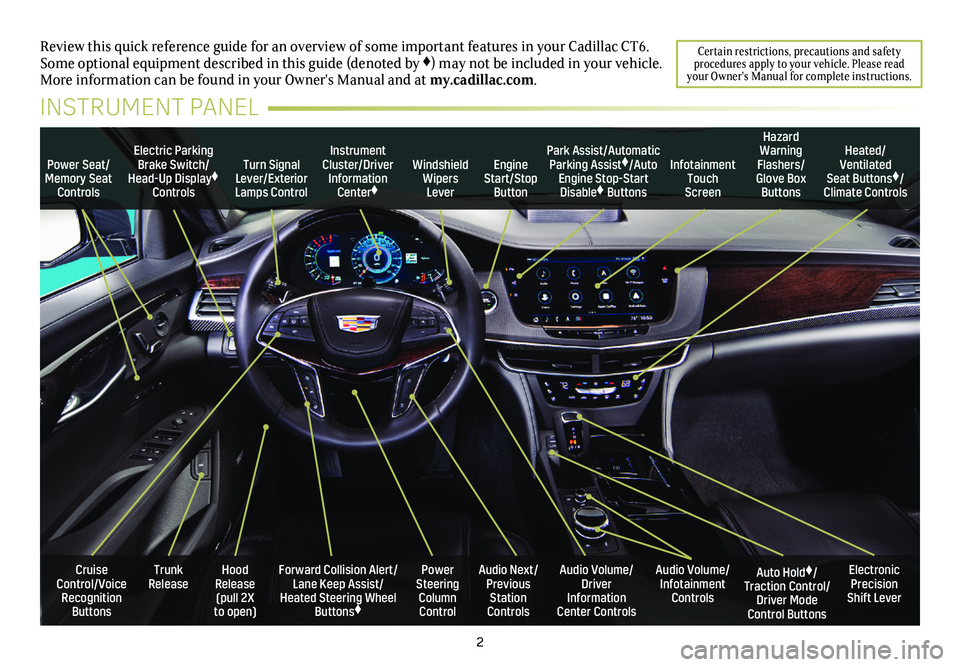
Power Seat/Memory Seat Controls
Turn Signal Lever/Exterior Lamps Control
Windshield Wipers Lever
Forward Collision Alert/Lane Keep Assist/Heated Steering Wheel Buttons♦
Cruise Control/Voice Recognition Buttons
Instrument Cluster/Driver Information Center♦
Power Steering Column Control
Electric Parking Brake Switch/Head-Up Display♦ Controls
Hood Release (pull 2X to open)
Trunk Release
Review this quick reference guide for an overview of some important feat\
ures in your Cadillac CT6. Some optional equipment described in this guide (denoted by ♦) may not be included in your vehicle. More information can be found in your Owner's Manual and at my.cadillac.com.
INSTRUMENT PANEL
Park Assist/Automatic Parking Assist♦/Auto Engine Stop-Start Disable♦ Buttons
Auto Hold♦/Traction Control/Driver Mode Control Buttons
Audio Volume/ Infotainment Controls
Audio Volume/ Driver Information Center Controls
Heated/Ventilated Seat Buttons♦/Climate Controls
Audio Next/Previous Station Controls
Engine Start/Stop Button
Hazard Warning Flashers/Glove Box Buttons
Infotainment Touch Screen
Electronic Precision Shift Lever
Certain restrictions, precautions and safety procedures apply to your vehicle. Please read your Owner’s Manual for complete instructions.
Page 4 of 20
4
KEYLESS STARTAUTO ENGINE STOP/START
(IF EQUIPPED)The Remote Keyless Entry (RKE) transmitter must be in the vehicle to turn on the ignition.
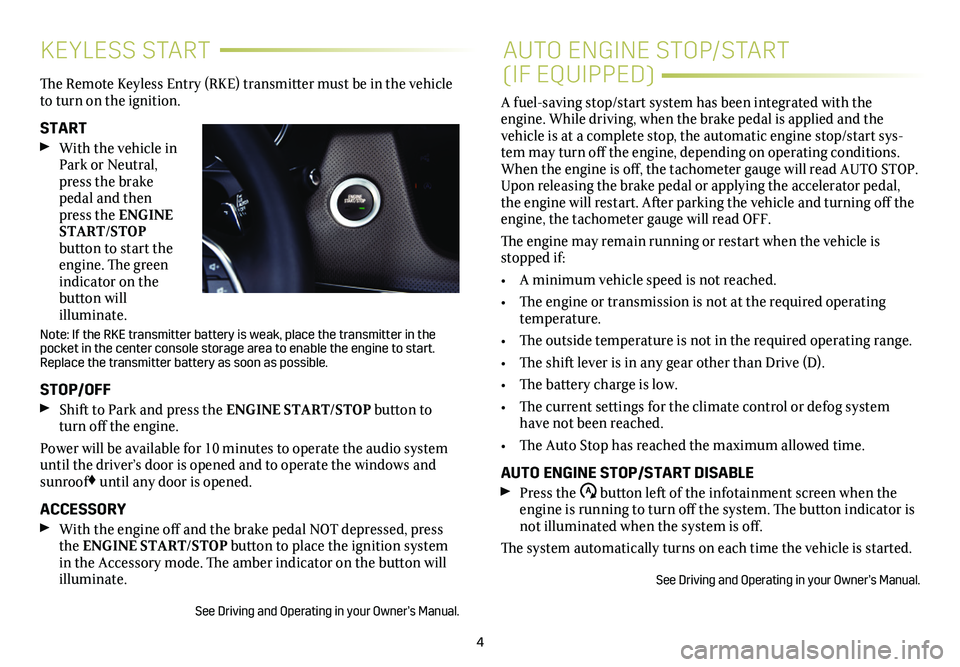
START With the vehicle in Park or Neutral, press the brake pedal and then press the ENGINE START/STOP button to start the engine. The green indicator on the button will illuminate.
Note: If the RKE transmitter battery is weak, place the transmitter in t\
he pocket in the center console storage area to enable the engine to start. Replace the transmitter battery as soon as possible.
STOP/OFF Shift to Park and press the ENGINE START/STOP button to turn off the engine.
Power will be available for 10 minutes to operate the audio system until the driver’s door is opened and to operate the windows and sunroof♦ until any door is opened.
ACCESSORY With the engine off and the brake pedal NOT depressed, press the ENGINE START/STOP button to place the ignition system in the Accessory mode. The amber indicator on the button will illuminate.
See Driving and Operating in your Owner’s Manual.
A fuel-saving stop/start system has been integrated with the engine. While driving, when the brake pedal is applied and the vehicle is at a complete stop, the automatic engine stop/start sys-tem may turn off the engine, depending on operating conditions. When the engine is off, the tachometer gauge will read AUTO STOP. Upon releasing the brake pedal or applying the accelerator pedal, the engine will restart. After parking the vehicle and turning off the engine, the tachometer gauge will read OFF.
The engine may remain running or restart when the vehicle is stopped if:
• A minimum vehicle speed is not reached.
• The engine or transmission is not at the required operating temperature.
• The outside temperature is not in the required operating range.
• The shift lever is in any gear other than Drive (D).
• The battery charge is low.
• The current settings for the climate control or defog system have not been reached.
• The Auto Stop has reached the maximum allowed time.
AUTO ENGINE STOP/START DISABLE Press the button left of the infotainment screen when the engine is running to turn off the system. The button indicator is not illuminated when the system is off.
The system automatically turns on each time the vehicle is started.
See Driving and Operating in your Owner’s Manual.
Page 6 of 20
6
STEERING WHEEL CONTROLS
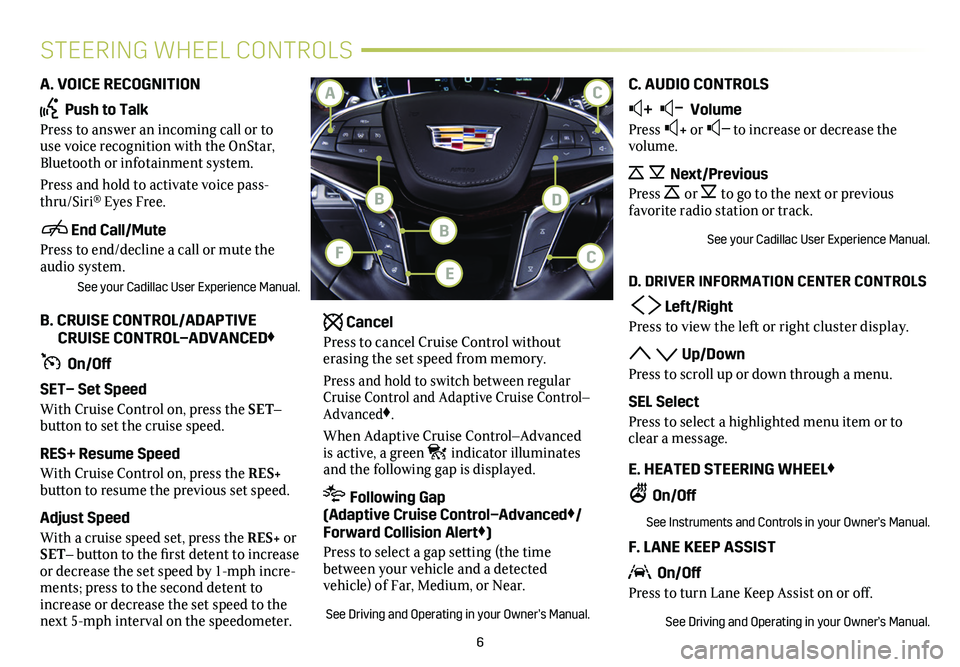
A. VOICE RECOGNITION
Push to Talk
Press to answer an incoming call or to use voice recognition with the OnStar, Bluetooth or infotainment system.
Press and hold to activate voice pass-thru/Siri® Eyes Free.
End Call/Mute
Press to end/decline a call or mute the audio system.
See your Cadillac User Experience Manual.
B. CRUISE CONTROL/ADAPTIVE CRUISE CONTROL–ADVANCED♦
On/Off
SET– Set Speed
With Cruise Control on, press the SET–
button to set the cruise speed.
RES+ Resume Speed
With Cruise Control on, press the RES+
button to resume the previous set speed.
Adjust Speed
With a cruise speed set, press the RES+ or SET– button to the first detent to increase or decrease the set speed by 1-mph incre-ments; press to the second detent to increase or decrease the set speed to the next 5-mph interval on the speedometer.
Cancel
Press to cancel Cruise Control without erasing the set speed from memory.
Press and hold to switch between regular Cruise Control and Adaptive Cruise Control–Advanced♦.
When Adaptive Cruise Control–Advanced is active, a green indicator illuminates and the following gap is displayed.
Following Gap (Adaptive Cruise Control–Advanced♦/ Forward Collision Alert♦)
Press to select a gap setting (the time between your vehicle and a detected
vehicle) of Far, Medium, or Near.
See Driving and Operating in your Owner’s Manual.
C. AUDIO CONTROLS
+ – Volume
Press + or – to increase or decrease the volume.
Next/Previous
Press or to go to the next or previous favorite radio station or track.
See your Cadillac User Experience Manual.
D. DRIVER INFORMATION CENTER CONTROLS
Left/Right
Press to view the left or right cluster display.
Up/Down
Press to scroll up or down through a menu.
SEL Select
Press to select a highlighted menu item or to clear a message.
E. HEATED STEERING WHEEL♦
On/Off
See Instruments and Controls in your Owner’s Manual.
F. LANE KEEP ASSIST
On/Off
Press to turn Lane Keep Assist on or off.
See Driving and Operating in your Owner’s Manual.
B
F
BD
CA
EC
Page 9 of 20
9
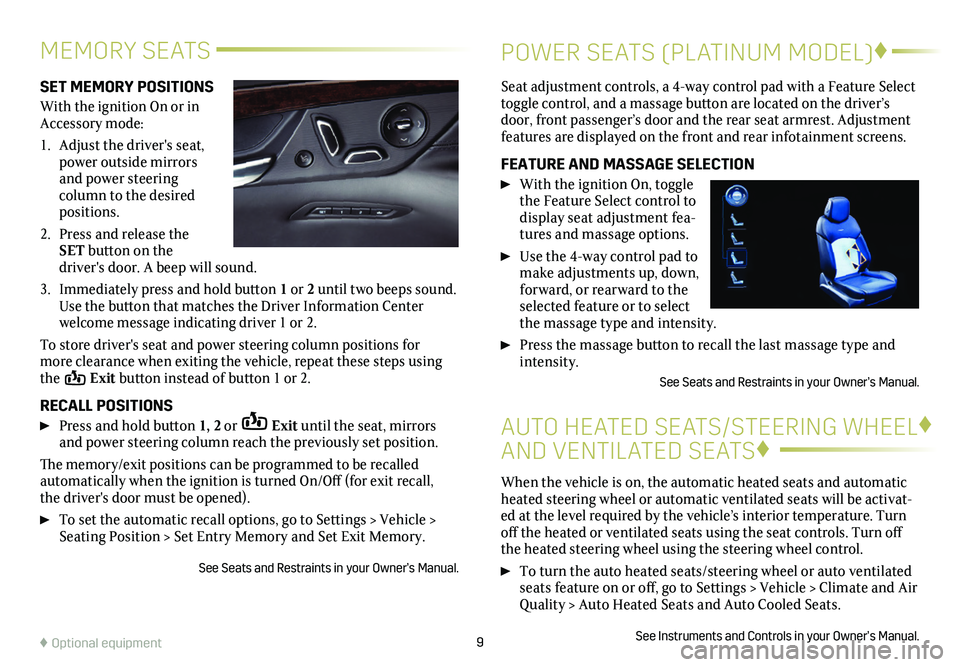
SET MEMORY POSITIONS
With the ignition On or in Accessory mode:
1. Adjust the driver's seat, power outside mirrors and power steering
column to the desired positions.
2. Press and release the SET button on the
driver's door. A beep will sound.
3. Immediately press and hold button 1 or 2 until two beeps sound. Use the button that matches the Driver Information Center
welcome message indicating driver 1 or 2.
To store driver's seat and power steering column positions for more clearance when exiting the vehicle, repeat these steps using the Exit button instead of button 1 or 2.
RECALL POSITIONS
Press and hold button 1, 2 or Exit until the seat, mirrors and power steering column reach the previously set position.
The memory/exit positions can be programmed to be recalled automatically when the ignition is turned On/Off (for exit recall, the driver's door must be opened).
To set the automatic recall options, go to Settings > Vehicle > Seating Position > Set Entry Memory and Set Exit Memory.
See Seats and Restraints in your Owner’s Manual.
MEMORY SEATS
AUTO HEATED SEATS/STEERING WHEEL♦
AND VENTILATED SEATS♦
When the vehicle is on, the automatic heated seats and automatic heated steering wheel or automatic ventilated seats will be activat-ed at the level required by the vehicle’s interior temperature. Turn \
off the heated or ventilated seats using the seat controls. Turn off the heated steering wheel using the steering wheel control.
To turn the auto heated seats/steering wheel or auto ventilated seats feature on or off, go to Settings > Vehicle > Climate and Air Quality > Auto Heated Seats and Auto Cooled Seats.
See Instruments and Controls in your Owner’s Manual.
Seat adjustment controls, a 4-way control pad with a Feature Select toggle
control, and a massage button are located on the driver’s door, front passenger’s door and the rear seat armrest. Adjustment features are displayed on the front and rear infotainment screens.
FEATURE AND MASSAGE SELECTION
With the ignition On, toggle the Feature Select control to
display seat adjustment fea-tures and massage options.
Use the 4-way control pad to make adjustments up, down,
forward, or rearward to the selected feature or to select the massage type and intensity.
Press the massage button to recall the last massage type and intensity.
See Seats and Restraints in your Owner’s Manual.
POWER SEATS (PLATINUM MODEL)♦
♦ Optional equipment
Page 10 of 20
10
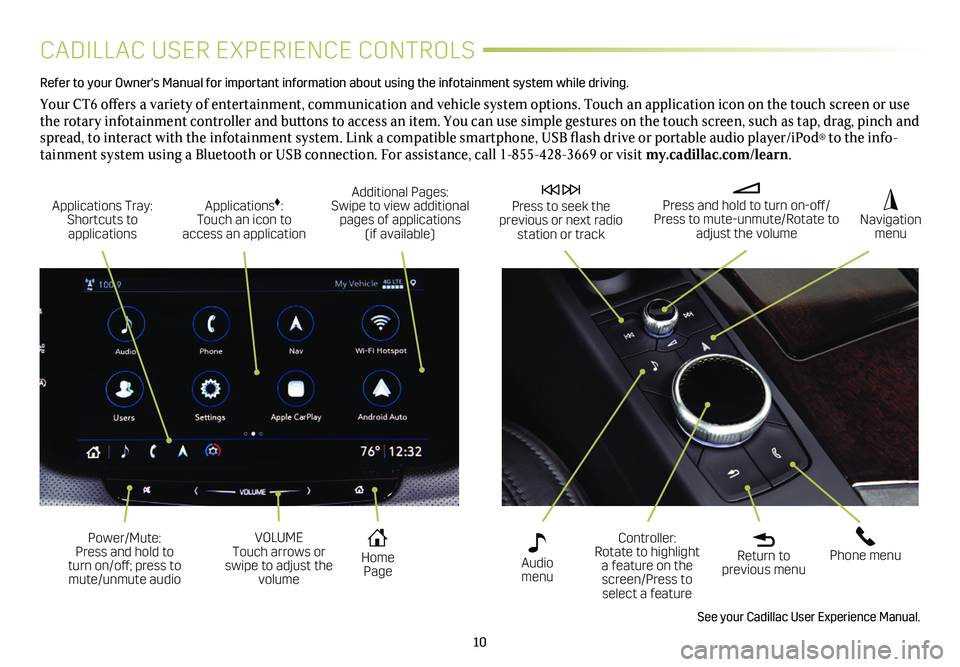
CADILLAC USER EXPERIENCE CONTROLS
Refer to your Owner's Manual for important information about using the infotai\
nment system while driving.
Your CT6 offers a variety of entertainment, communication and vehicle system options. Touch an application icon on the touch screen or use the rotary infotainment controller and buttons to access an item. You can use simple gestures on the touch screen, such as tap, drag, pinch and spread, to interact with the infotainment system. Link a compatible smartphone, USB flash drive or portable audio player/iPod® to the info-tainment system using a Bluetooth or USB connection. For assistance, call 1-855-428-3669 or visit my.cadillac.com/learn.
Applications Tray: Shortcuts to applications
Home Page
Additional Pages: Swipe to view additional pages of applications (if available)
Applications♦: Touch an icon to access an application
Press and hold to turn on-off/Press to mute-unmute/Rotate to adjust the volume
Press to seek the previous or next radio station or track
Return to previous menu
Controller: Rotate to highlight a feature on the screen/Press to select a feature
Phone menu
Navigation menu
Audio menu
See your Cadillac User Experience Manual.
Power/Mute: Press and hold to turn on/off; press to mute/unmute audio
VOLUME Touch arrows or swipe to adjust the volume
Page 11 of 20
11
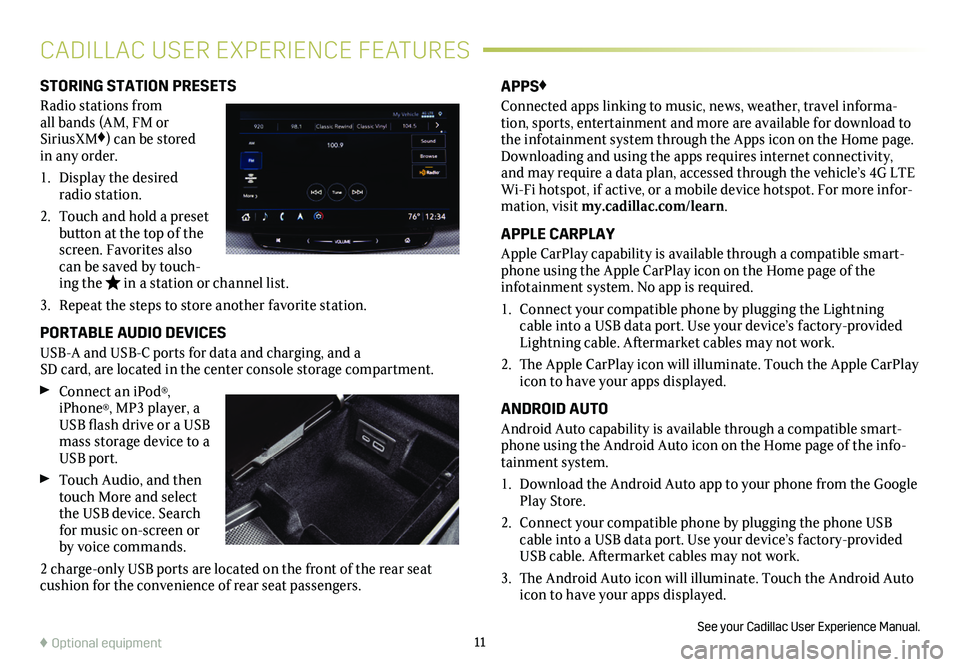
STORING STATION PRESETS
Radio stations from all bands (AM, FM or SiriusXM♦) can be stored in any order.
1. Display the desired radio station.
2. Touch and hold a preset button at the top of the screen. Favorites also can be saved by touch-ing the in a station or channel list.
3. Repeat the steps to store another favorite station.
PORTABLE AUDIO DEVICES
USB-A and USB-C ports for data and charging, and a SD card, are located in the center console storage
compartment.
Connect an iPod®, iPhone®, MP3 player, a USB flash drive or a USB mass storage device to a USB port.
Touch Audio, and then touch More and select the USB device. Search for music on-screen or by voice commands.
2 charge-only USB ports are located on the front of the rear seat cushion for the convenience of rear seat passengers.
APPS♦
Connected apps linking to music, news, weather, travel informa-tion, sports, entertainment and more are available for download to the infotainment system through the Apps icon on the Home page. Downloading and using the apps requires internet connectivity, and may require a data plan, accessed through the vehicle’s 4G LTE Wi-Fi hotspot, if active, or a mobile device hotspot. For more infor-mation, visit my.cadillac.com/learn.
APPLE CARPLAY
Apple CarPlay capability is available through a compatible smart-phone using the Apple CarPlay icon on the Home page of the
infotainment system. No app is required.
1. Connect your compatible phone by plugging the Lightning cable into a USB data port. Use your device’s factory-provided Lightning cable. Aftermarket cables may not work.
2. The Apple CarPlay icon will illuminate. Touch the Apple CarPlay icon to have your apps displayed.
ANDROID AUTO
Android Auto capability is available through a compatible smart-phone using the Android Auto icon on the Home page of the info-tainment system.
1. Download the Android Auto app to your phone from the Google Play Store.
2. Connect your compatible phone by plugging the phone USB cable into a USB data port. Use your device’s factory-provided USB cable. Aftermarket cables may not work.
3. The Android Auto icon will illuminate. Touch the Android Auto icon to have your apps displayed.
See your Cadillac User Experience Manual.♦ Optional equipment
CADILLAC USER EXPERIENCE FEATURES
Page 12 of 20
12
VOICE RECOGNITION
Control the music source and navigation destination♦, and make phone calls hands-free, using the natural voice recognition system.
1. Press the Push to Talk button on the steering wheel.
2. The system will play a prompt.
3. After the prompt, say what you want it to do.
• Example hands-free calling command: “Call Dave” or “Dial 555-1212”
• Example connected music device search command: “Play artist [name]” or “Play song [name]”
• Example radio control command: "Tune to 99.5 FM"
• Help: Say “Help” for voice recognition assistance.
BLUETOOTH VOICE RECOGNITION
Bluetooth Voice Recognition allows access to the voice recognition commands on a compatible, paired cell phone; e.g. Siri® Eyes free or Voice Command.
To activate Bluetooth Voice Recognition, press and hold the Push to Talk steering wheel button.
VALET MODE
To lock/unlock the infotainment screen and the glove box, select Settings > Vehicle > Valet Mode and enter a passcode. It can be used when it’s desired that only an authorized user has access to personalized features.
See your Cadillac User Experience Manual.
CADILLAC USER
EXPERIENCE FEATURES
BLUETOOTH® SYSTEM
Refer to your Owner's Manual for important information about using the Bluetooth system while driving.
Before using a Bluetooth-enabled device in the vehicle, it must be paired with the in-vehicle Bluetooth system. Not all devices will support all functions. The pairing process is disabled when the vehi-cle is moving. For more information, visit my.cadillac.com/learn.
PAIR A PHONE USING VOICE/INFOTAINMENT SCREEN
1. To use voice recognition, press the Push to Talk button; after the tone, say "Pair Phone." To use the infotainment screen, select the Phone icon > Connect Phone > Add Phone.
2. Start the pairing process on the phone. From your phone's Bluetooth settings, select the name shown on the infotainment screen.
3. Follow the pairing instructions.
4. When pairing is complete, the phone screen is displayed. Your phone book may be downloaded depending on the phone.
SECONDARY PHONE
A secondary phone can be paired to the Bluetooth system. The system connects to the phone that is set to First to Connect. The secondary phone can only receive calls.
To set the first and secondary phones, go to Settings > System > Phones and select the Information icon next to the phone name.
See your Cadillac User Experience Manual.
Page 13 of 20
13
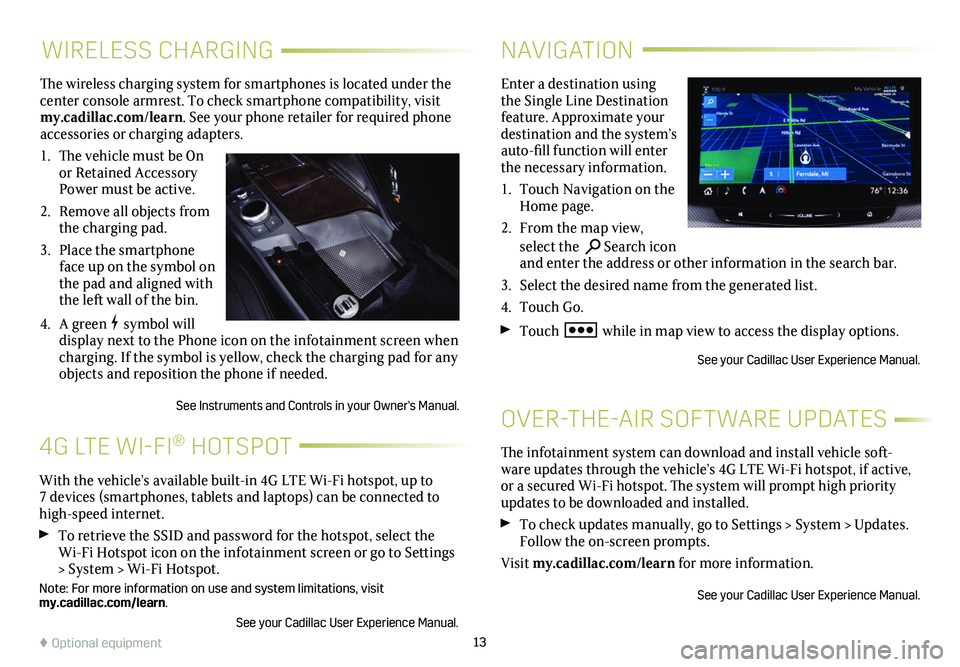
WIRELESS CHARGING
The wireless charging system for smartphones is located under the center console armrest. To check smartphone compatibility, visit my.cadillac.com/learn. See your phone retailer for required phone accessories or charging adapters.
1. The vehicle must be On or Retained Accessory Power must be active.
2. Remove all objects from the charging pad.
3. Place the smartphone face up on the symbol on the pad and aligned with the left wall of the bin.
4. A green symbol will display next to the Phone icon on the infotainment screen when charging. If the symbol is yellow, check the charging pad for any objects and reposition the phone if needed.
See Instruments and Controls in your Owner's Manual.
NAVIGATION
Enter a destination using the Single Line Destination feature. Approximate your destination and the system’s auto-fill function will enter the necessary information.
1. Touch Navigation on the Home page.
2. From the map view, select the Search icon and enter the address or other information in the search bar.
3. Select the desired name from the generated list.
4. Touch Go.
Touch while in map view to access the display options.
See your Cadillac User Experience Manual.
The infotainment system can download and install vehicle soft-ware updates through the vehicle’s 4G LTE Wi-Fi hotspot, if active, or a secured Wi-Fi hotspot. The system will prompt high priority updates to be downloaded and installed.
To check updates manually, go to Settings > System > Updates. Follow the on-screen prompts.
Visit my.cadillac.com/learn for more information.
See your Cadillac User Experience Manual.
OVER-THE-AIR SOFTWARE UPDATES
With the vehicle’s available built-in 4G LTE Wi-Fi hotspot, up to 7 devices (smartphones, tablets and laptops) can be connected to high-speed internet.
To retrieve the SSID and password for the hotspot, select the Wi-Fi Hotspot icon on the infotainment screen or go to Settings > System > Wi-Fi Hotspot.
Note: For more information on use and system limitations, visit my.cadillac.com/learn.
See your Cadillac User Experience Manual.
4G LTE WI-FI® HOTSPOT
♦ Optional equipment
Page 14 of 20
14
VEHICLE CUSTOMIZATION
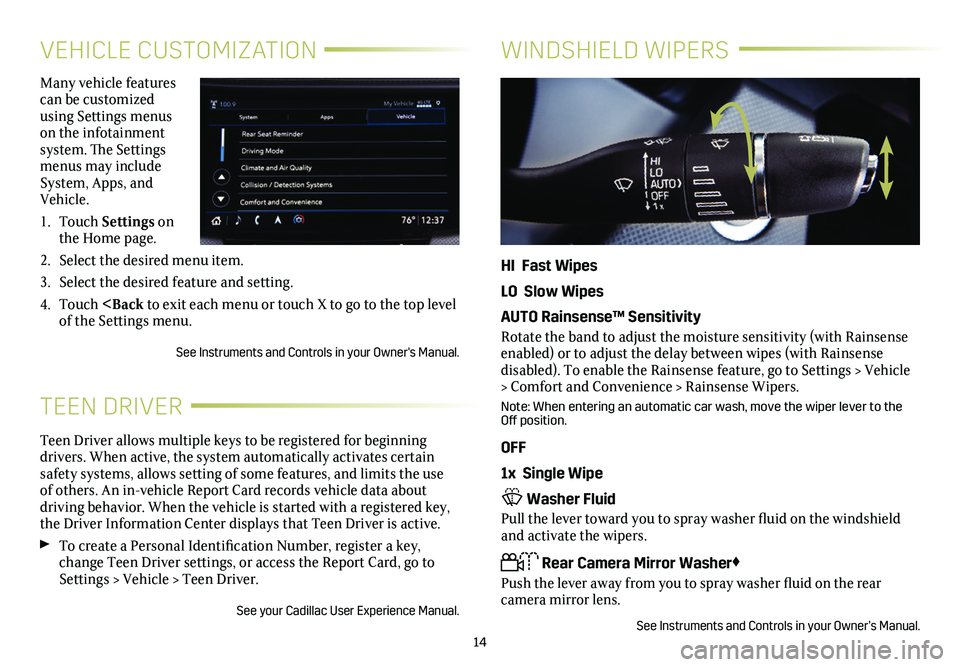
Many vehicle features can be customized using Settings menus on the infotainment system. The Settings menus may include System, Apps, and Vehicle.
1. Touch Settings on the Home page.
2. Select the desired menu item.
3. Select the desired feature and setting.
4. Touch
Teen Driver allows multiple keys to be registered for beginning drivers. When active, the system automatically activates certain safety systems, allows setting of some features, and limits the use of others. An in-vehicle Report Card records vehicle data about driving behavior. When the vehicle is started with a registered key, the Driver Information Center displays that Teen Driver is active.
To create a Personal Identification Number, register a key, change Teen Driver settings, or access the Report Card, go to Settings > Vehicle > Teen Driver.
See your Cadillac User Experience Manual.
TEEN DRIVER
WINDSHIELD WIPERS
HI Fast Wipes
LO Slow Wipes
AUTO Rainsense™ Sensitivity
Rotate the band to adjust the moisture sensitivity (with Rainsense enabled) or to adjust the delay between wipes (with Rainsense
disabled). To enable the Rainsense feature, go to Settings > Vehicle > Comfort and Convenience > Rainsense Wipers.
Note: When entering an automatic car wash, move the wiper lever to the Off position.
OFF
1x Single Wipe
Washer Fluid
Pull the lever toward you to spray washer fluid on the windshield and activate the wipers.
Rear Camera Mirror Washer♦
Push the lever away from you to spray washer fluid on the rear
camera mirror lens.
See Instruments and Controls in your Owner’s Manual.
Page 15 of 20
15
CLIMATE CONTROLS
FRONT CLIMATE CONTROLS
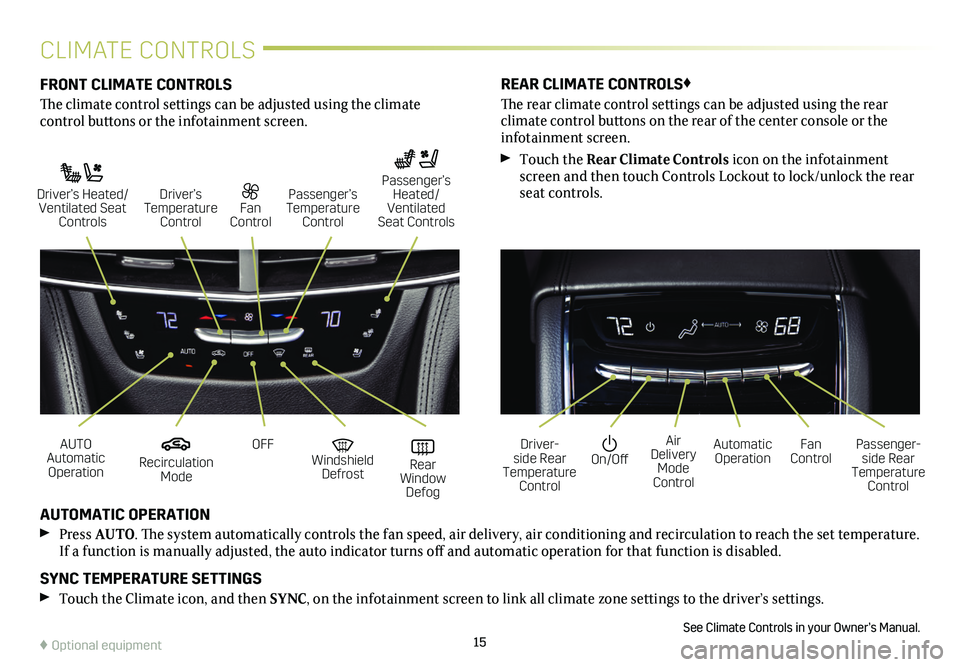
The climate control settings can be adjusted using the climate
control buttons or the infotainment screen.
AUTOMATIC OPERATION
Press AUTO. The system automatically controls the fan speed, air delivery, air conditioning and recirculation to reach the set temperature. If a function is manually adjusted, the auto indicator turns off and automatic operation for that function is disabled.
SYNC TEMPERATURE SETTINGS
Touch the Climate icon, and then SYNC, on the infotainment screen to link all climate zone settings to the driver’s settings.
See Climate Controls in your Owner’s Manual.
REAR CLIMATE CONTROLS♦
The rear climate control settings can be adjusted using the rear
climate control buttons on the rear of the center console or the infotainment screen.
Touch the Rear Climate Controls icon on the infotainment screen and then touch Controls Lockout to lock/unlock the rear seat controls.
Recirculation Mode
On/OffAUTO Automatic Operation
Driver-side Rear Temperature Control
OFFAir Delivery Mode Control
Windshield Defrost
Automatic Operation Rear Window Defog
Fan ControlPassenger-side Rear Temperature Control
Driver’s Heated/ Ventilated Seat Controls
Fan Control
Passenger’s Temperature Control
Passenger’s Heated/ Ventilated Seat Controls
Driver’s Temperature Control
♦ Optional equipment