light CADILLAC CT6 2020 Convenience & Personalization Guide
[x] Cancel search | Manufacturer: CADILLAC, Model Year: 2020, Model line: CT6, Model: CADILLAC CT6 2020Pages: 20, PDF Size: 3.17 MB
Page 6 of 20
6
STEERING WHEEL CONTROLS
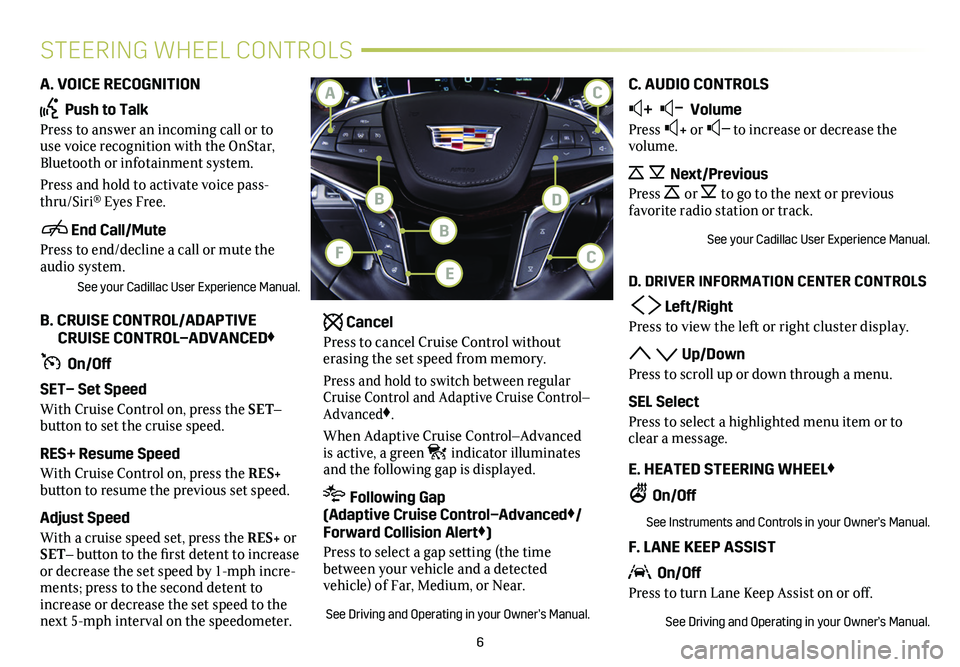
A. VOICE RECOGNITION
Push to Talk
Press to answer an incoming call or to use voice recognition with the OnStar, Bluetooth or infotainment system.
Press and hold to activate voice pass-thru/Siri® Eyes Free.
End Call/Mute
Press to end/decline a call or mute the audio system.
See your Cadillac User Experience Manual.
B. CRUISE CONTROL/ADAPTIVE CRUISE CONTROL–ADVANCED♦
On/Off
SET– Set Speed
With Cruise Control on, press the SET–
button to set the cruise speed.
RES+ Resume Speed
With Cruise Control on, press the RES+
button to resume the previous set speed.
Adjust Speed
With a cruise speed set, press the RES+ or SET– button to the first detent to increase or decrease the set speed by 1-mph incre-ments; press to the second detent to increase or decrease the set speed to the next 5-mph interval on the speedometer.
Cancel
Press to cancel Cruise Control without erasing the set speed from memory.
Press and hold to switch between regular Cruise Control and Adaptive Cruise Control–Advanced♦.
When Adaptive Cruise Control–Advanced is active, a green indicator illuminates and the following gap is displayed.
Following Gap (Adaptive Cruise Control–Advanced♦/ Forward Collision Alert♦)
Press to select a gap setting (the time between your vehicle and a detected
vehicle) of Far, Medium, or Near.
See Driving and Operating in your Owner’s Manual.
C. AUDIO CONTROLS
+ – Volume
Press + or – to increase or decrease the volume.
Next/Previous
Press or to go to the next or previous favorite radio station or track.
See your Cadillac User Experience Manual.
D. DRIVER INFORMATION CENTER CONTROLS
Left/Right
Press to view the left or right cluster display.
Up/Down
Press to scroll up or down through a menu.
SEL Select
Press to select a highlighted menu item or to clear a message.
E. HEATED STEERING WHEEL♦
On/Off
See Instruments and Controls in your Owner’s Manual.
F. LANE KEEP ASSIST
On/Off
Press to turn Lane Keep Assist on or off.
See Driving and Operating in your Owner’s Manual.
B
F
BD
CA
EC
Page 7 of 20
7♦ Optional equipment
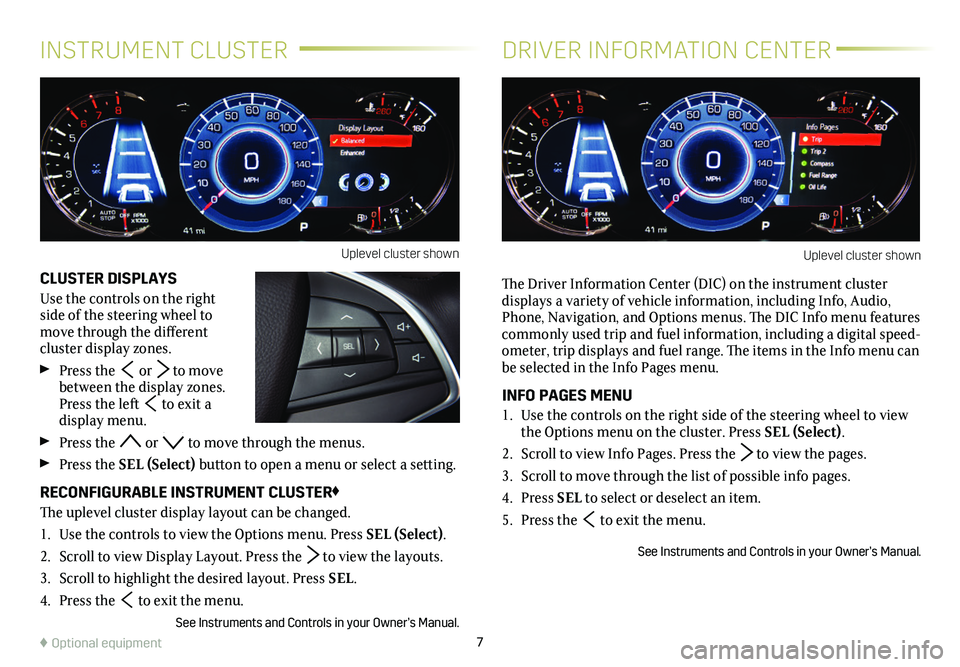
CLUSTER DISPLAYS
Use the controls on the right side of the steering wheel to move through the different
cluster display zones.
Press the or to move between the display zones. Press the left to exit a display menu.
Press the or to move through the menus.
Press the SEL (Select) button to open a menu or select a
setting.
RECONFIGURABLE INSTRUMENT CLUSTER♦
The uplevel cluster display layout can be changed.
1. Use the controls to view the Options menu. Press SEL (Select).
2. Scroll to view Display Layout. Press the to view the layouts.
3. Scroll to highlight the desired layout. Press SEL.
4. Press the to exit the menu.
See Instruments and Controls in your Owner’s Manual.
INSTRUMENT CLUSTERDRIVER INFORMATION CENTER
The Driver Information Center (DIC) on the instrument cluster
displays a variety of vehicle information, including Info, Audio, Phone, Navigation, and Options menus. The DIC Info menu features commonly used trip and fuel information, including a digital speed-ometer, trip displays and fuel range. The items in the Info menu can be selected in the Info Pages menu.
INFO PAGES MENU
1. Use the controls on the right side of the steering wheel to view the Options menu on the cluster. Press SEL (Select).
2. Scroll to view Info Pages. Press the to view the pages.
3. Scroll to move through the list of possible info pages.
4. Press SEL to select or deselect an item.
5. Press the to exit the menu.
See Instruments and Controls in your Owner’s Manual.
Uplevel cluster shownUplevel cluster shown
Page 8 of 20
8
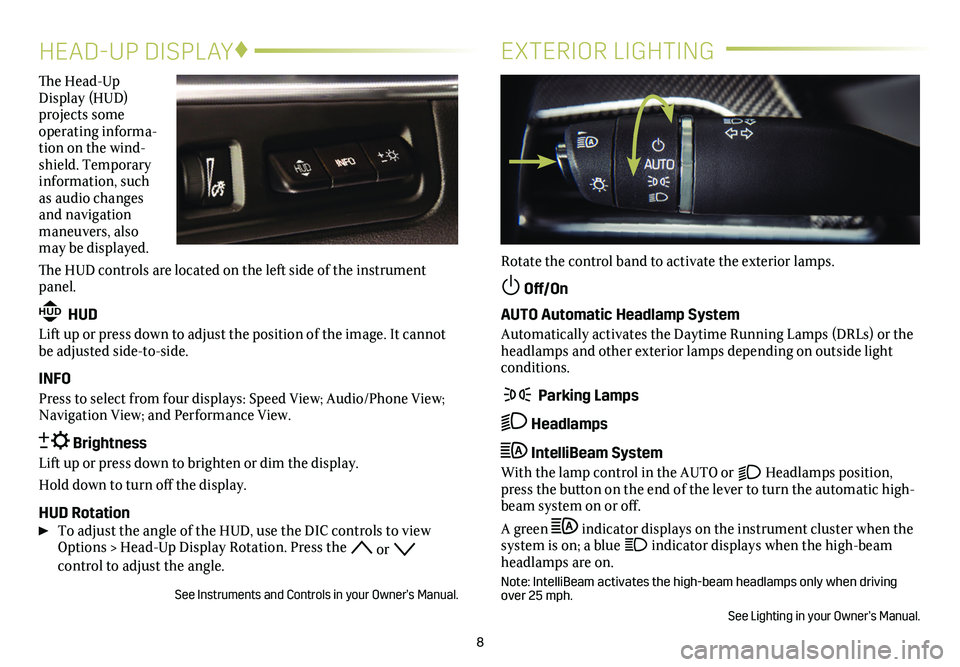
The Head-Up Display (HUD)
projects some operating informa-tion on the wind-shield. Temporary information, such as audio changes and navigation maneuvers, also may be displayed.
The HUD controls are located on the left side of the instrument panel.
HUD HUD
Lift up or press down to adjust the position of the image. It cannot be adjusted side-to-side.
INFO
Press to select from four displays: Speed View; Audio/Phone View; Navigation View; and Performance View.
Brightness
Lift up or press down to brighten or dim the display.
Hold down to turn off the display.
HUD Rotation To adjust the angle of the HUD, use the DIC controls to view Options > Head-Up Display Rotation. Press the or
control to adjust the angle.
See Instruments and Controls in your Owner’s Manual.
EXTERIOR LIGHTING
Rotate the control band to activate the exterior lamps.
Off/On
AUTO Automatic Headlamp System
Automatically activates the Daytime Running Lamps (DRLs) or the headlamps and other exterior lamps depending on outside light conditions.
Parking Lamps
Headlamps
IntelliBeam System
With the lamp control in the AUTO or Headlamps position, press the button on the end of the lever to turn the automatic high-beam system on or off.
A green indicator displays on the instrument cluster when the system is on; a blue indicator displays when the high-beam headlamps are on.
Note: IntelliBeam activates the high-beam headlamps only when driving over 25 mph.
See Lighting in your Owner’s Manual.
HEAD-UP DISPLAY♦
Page 10 of 20
10
CADILLAC USER EXPERIENCE CONTROLS
Refer to your Owner's Manual for important information about using the infotai\
nment system while driving.
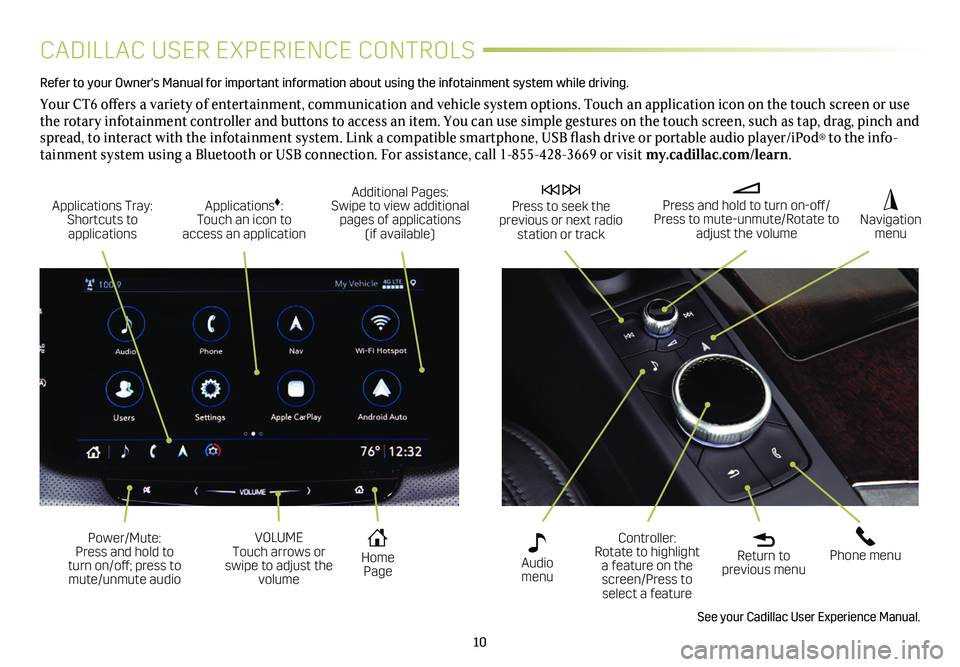
Your CT6 offers a variety of entertainment, communication and vehicle system options. Touch an application icon on the touch screen or use the rotary infotainment controller and buttons to access an item. You can use simple gestures on the touch screen, such as tap, drag, pinch and spread, to interact with the infotainment system. Link a compatible smartphone, USB flash drive or portable audio player/iPod® to the info-tainment system using a Bluetooth or USB connection. For assistance, call 1-855-428-3669 or visit my.cadillac.com/learn.
Applications Tray: Shortcuts to applications
Home Page
Additional Pages: Swipe to view additional pages of applications (if available)
Applications♦: Touch an icon to access an application
Press and hold to turn on-off/Press to mute-unmute/Rotate to adjust the volume
Press to seek the previous or next radio station or track
Return to previous menu
Controller: Rotate to highlight a feature on the screen/Press to select a feature
Phone menu
Navigation menu
Audio menu
See your Cadillac User Experience Manual.
Power/Mute: Press and hold to turn on/off; press to mute/unmute audio
VOLUME Touch arrows or swipe to adjust the volume
Page 11 of 20
11
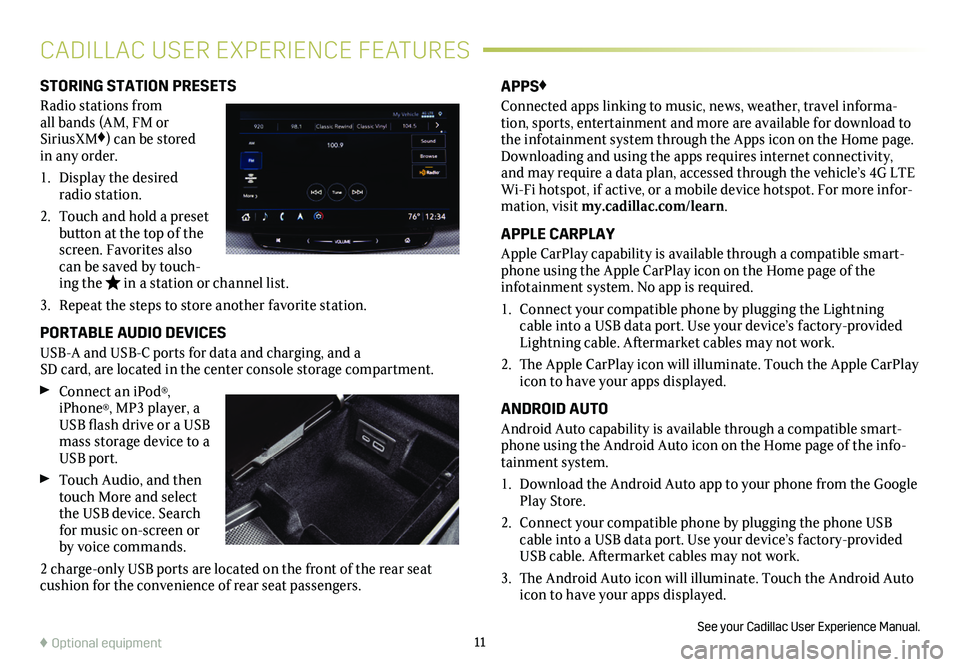
STORING STATION PRESETS
Radio stations from all bands (AM, FM or SiriusXM♦) can be stored in any order.
1. Display the desired radio station.
2. Touch and hold a preset button at the top of the screen. Favorites also can be saved by touch-ing the in a station or channel list.
3. Repeat the steps to store another favorite station.
PORTABLE AUDIO DEVICES
USB-A and USB-C ports for data and charging, and a SD card, are located in the center console storage
compartment.
Connect an iPod®, iPhone®, MP3 player, a USB flash drive or a USB mass storage device to a USB port.
Touch Audio, and then touch More and select the USB device. Search for music on-screen or by voice commands.
2 charge-only USB ports are located on the front of the rear seat cushion for the convenience of rear seat passengers.
APPS♦
Connected apps linking to music, news, weather, travel informa-tion, sports, entertainment and more are available for download to the infotainment system through the Apps icon on the Home page. Downloading and using the apps requires internet connectivity, and may require a data plan, accessed through the vehicle’s 4G LTE Wi-Fi hotspot, if active, or a mobile device hotspot. For more infor-mation, visit my.cadillac.com/learn.
APPLE CARPLAY
Apple CarPlay capability is available through a compatible smart-phone using the Apple CarPlay icon on the Home page of the
infotainment system. No app is required.
1. Connect your compatible phone by plugging the Lightning cable into a USB data port. Use your device’s factory-provided Lightning cable. Aftermarket cables may not work.
2. The Apple CarPlay icon will illuminate. Touch the Apple CarPlay icon to have your apps displayed.
ANDROID AUTO
Android Auto capability is available through a compatible smart-phone using the Android Auto icon on the Home page of the info-tainment system.
1. Download the Android Auto app to your phone from the Google Play Store.
2. Connect your compatible phone by plugging the phone USB cable into a USB data port. Use your device’s factory-provided USB cable. Aftermarket cables may not work.
3. The Android Auto icon will illuminate. Touch the Android Auto icon to have your apps displayed.
See your Cadillac User Experience Manual.♦ Optional equipment
CADILLAC USER EXPERIENCE FEATURES
Page 18 of 20
18
DRIVER ASSISTANCE SYSTEMS
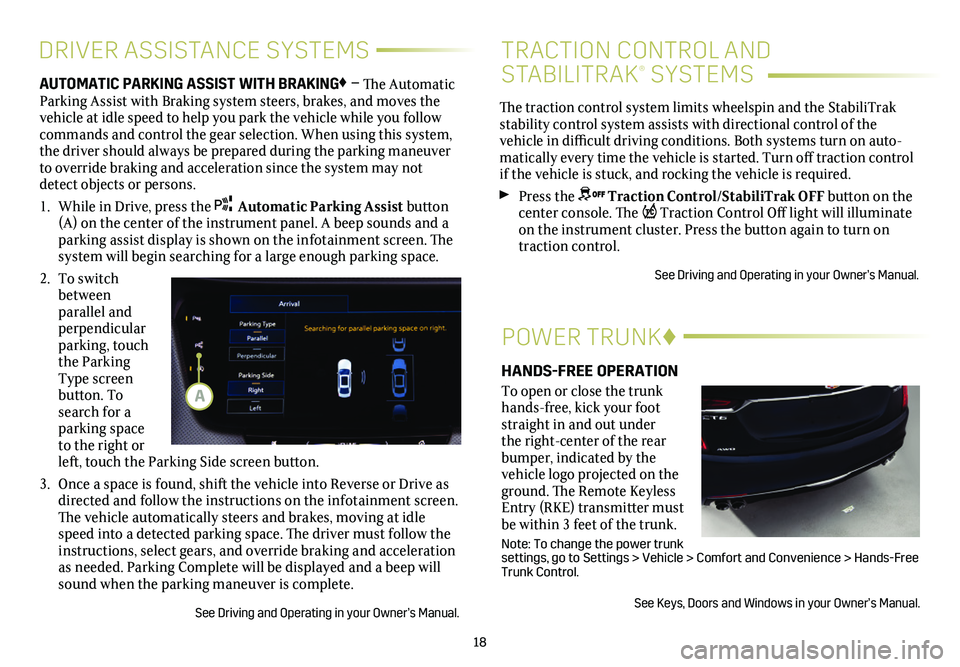
AUTOMATIC PARKING ASSIST WITH BRAKING♦ – The Automatic Parking Assist with Braking system steers, brakes, and moves the vehicle at idle speed to help you park the vehicle while you follow commands and control the gear selection. When using this system, the driver should always be prepared during the parking maneuver to override braking and acceleration since the system may not detect objects or persons.
1. While in Drive, press the Automatic Parking Assist button (A) on the center of the instrument panel. A beep sounds and a parking assist display is shown on the infotainment screen. The system will begin searching for a large enough parking space.
2. To switch between parallel and perpendicular parking, touch the Parking Type screen button. To search for a parking space to the right or left, touch the Parking Side screen button.
3. Once a space is found, shift the vehicle into Reverse or Drive as directed and follow the instructions on the infotainment screen. The vehicle automatically steers and brakes, moving at idle speed into a detected parking space. The driver must follow the instructions, select gears, and override braking and acceleration as needed. Parking Complete will be displayed and a beep will sound when the parking maneuver is complete.
See Driving and Operating in your Owner’s Manual.
POWER TRUNK♦
HANDS-FREE OPERATION
To open or close the trunk hands-free, kick your foot straight in and out under the right-center of the rear
bumper, indicated by the vehicle logo projected on the ground. The Remote Keyless Entry (RKE) transmitter must be within 3 feet of the trunk.
Note: To change the power trunk settings, go to Settings > Vehicle > Comfort and Convenience > Hands-Fre\
e Trunk Control.
See Keys, Doors and Windows in your Owner’s Manual.
The traction control system limits wheelspin and the StabiliTrak stability control system assists with directional control of the vehicle in difficult driving conditions. Both systems turn on auto-matically every time the vehicle is started. Turn off traction control if the vehicle is stuck, and rocking the vehicle is required.
Press the Traction Control/StabiliTrak OFF button on the center console. The Traction Control Off light will illuminate on the instrument cluster. Press the button again to turn on traction control.
See Driving and Operating in your Owner’s Manual.
TRACTION CONTROL AND
STABILITRAK® SYSTEMS
A
Page 19 of 20
19♦ Optional equipment
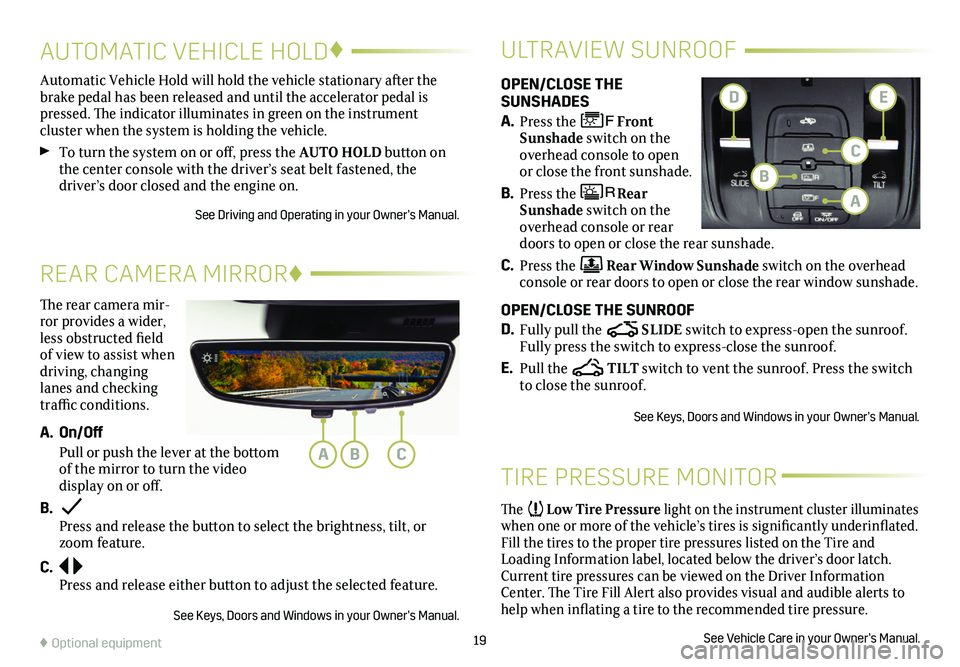
The rear camera mir-ror provides a wider, less obstructed field of view to assist when driving, changing lanes and checking traffic conditions.
A. On/Off
Pull or push the lever at the bottom of the mirror to turn the video display on or off.
B. Press and release the button to select the brightness, tilt, or zoom feature.
C. Press and release either button to adjust the selected feature.
See Keys, Doors and Windows in your Owner’s Manual.
REAR CAMERA MIRROR♦
OPEN/CLOSE THE SUNSHADES
A. Press the Front Sunshade switch on the overhead console to open or close the front sunshade.
B. Press the Rear Sunshade switch on the overhead console or rear doors to open or close the rear sunshade.
C. Press the Rear Window Sunshade switch on the overhead console or rear doors to open or close the rear window sunshade.
OPEN/CLOSE THE SUNROOF
D. Fully pull the SLIDE switch to express-open the sunroof. Fully press the switch to express-close the sunroof.
E. Pull the TILT switch to vent the sunroof. Press the switch to close the sunroof.
See Keys, Doors and Windows in your Owner’s Manual.
ULTRAVIEW SUNROOF
Automatic Vehicle Hold will hold the vehicle stationary after the brake pedal has been released and until the accelerator pedal is pressed. The indicator illuminates in green on the instrument
cluster when the system is holding the vehicle.
To turn the system on or off, press the AUTO HOLD button on the center console with the driver’s seat belt fastened, the
driver’s door closed and the engine on.
See Driving and Operating in your Owner’s Manual.
AUTOMATIC VEHICLE HOLD♦
TIRE PRESSURE MONITOR
The Low Tire Pressure light on the instrument cluster illuminates when one or more of the vehicle’s tires is significantly
underinflated. Fill the tires to the proper tire pressures listed on the Tire and Loading Information label, located below the driver’s door latch. Current tire pressures can be viewed on the Driver Information Center. The Tire Fill Alert also provides visual and audible alerts to help when inflating a tire to the recommended tire pressure.
See Vehicle Care in your Owner’s Manual.
ABC
C
A
B
DE