oil reset CADILLAC CTS 2006 1.G Owners Manual
[x] Cancel search | Manufacturer: CADILLAC, Model Year: 2006, Model line: CTS, Model: CADILLAC CTS 2006 1.GPages: 442, PDF Size: 2.57 MB
Page 184 of 442
TUNE/SEL (Select) Knob:Turn this knob, located in
the lower right corner of the audio system, to scroll
through the menu items displayed. Press this knob to
select the menu item.
Status of Vehicle Systems
You can view the status of several vehicle systems
using the DIC.
Vehicle Information Menu
To access this menu, press the up or down arrow on
the INFO switch located to the right of the display.
The following items are available when the ignition is in
ON. These items will not be available when the
ignition is in ACCESSORY. The tire pressure menu
items are only available if your vehicle has the
Tire Pressure Monitor (TPM) system:
OUTSIDE TEMP
MI TRIP A (KM TRIP A)*
MI TRIP B (KM TRIP B)*
MILES RANGE (KM RANGE)
MPG AVG (L/100 KM AVG)*
MPG INST (L/100 KM INST)
GAL FUEL USED (L FUEL USED)*
AVG MPH (AVG KM/H)*
TIMER*
BATTERY VOLTS
ENGINE OIL LIFE*
TRANS FLUID LIFE* (Automatic Transmission Only)
PSI LF TIRE (KPA LF TIRE)
PSI RF TIRE (KPA RF TIRE)
PSI RR TIRE (KPA RR TIRE)
PSI LR TIRE (KPA LR TIRE)
BLANK LINE
*These items can be reset. Each one must be reset
individually. For a detailed description of the menu items
and how to reset them, see “Vehicle Information
Menu Item Descriptions” later in this section.
You can view any of these items at any time, but only
one item can be displayed at a time.
Vehicle Information Menu Item
Descriptions
The following paragraphs contain a more detailed
description of each menu item:
OUTSIDE TEMP:If you select this item, the current
outside temperature is displayed at the top of the
screen. It will be in either degrees Fahrenheit (°F) or
degrees Celsius (°C) depending upon whether the
system is set for English or metric units. If you wish to
change the units, seeDIC Main Menu on page 3-57.
3-54
Page 186 of 442
To turn off the timer, press the CLR button again. When
the timer is off, the display will show the timer value
and TIMER OFF. The timing feature will stop.
To reset the timer, turn off the timer and then press and
hold the CLR button. The display will return to zero.
BATTERY VOLTS:If you select this item, the current
battery voltage is displayed. If the voltage is in the normal
range, the display will have OK after it. For example, the
display may read 13.2 BATTERY VOLTS OK.
If there is a problem with the battery charging system,
there are four possible DIC messages that may be
displayed. SeeDIC Warnings and Messages on
page 3-61for more information.
ENGINE OIL LIFE:If you select this item, the
percentage of remaining oil life is displayed. If you see
99% ENGINE OIL LIFE on the display, that means
that 99% of the current oil life remains.
When the oil life is depleted, the Change Engine Oil
message will appear on the display. See your dealer for
service. In addition to the engine oil life system
monitoring the oil life, additional maintenance is
recommended in the Maintenance Schedule in this
manual. SeeScheduled Maintenance on page 6-4and
Engine Oil on page 5-16for more information.When you reset the Change Engine Oil message by
clearing it from the display, you still must reset the
engine oil life system separately. For more information
on resetting the engine oil life system, see “How to
Reset the Engine Oil Life System and the Oil Life
Indicator” underEngine Oil Life System on page 5-20.
If you clear the Change Engine Oil message from
the display, it will not re-appear.
TRANS FLUID LIFE (Automatic Transmission):
If you select this item, the percentage of remaining
transmission �uid life is displayed. If you see
99% TRANS FLUID LIFE on the display, that means
that 99% of the current transmission �uid life remains.
When the transmission �uid life is depleted, the Change
Trans Fluid message will appear on the display. You
should change the transmission �uid as soon as
possible. Be sure to keep a written record of the mileage
and date of the �uid change so you will have it for
future reference. SeeScheduled Maintenance on
page 6-4andRecommended Fluids and Lubricants on
page 6-13for more information.
When you reset the Change Trans Fluid message by
clearing it from the display, you still must reset the
transmission �uid life monitor separately. For more
information on resetting the transmission �uid life
monitor, seeAutomatic Transmission Fluid on
page 5-23.
3-56
Page 193 of 442
Change Engine Oil
This message indicates that the life of the engine oil
has expired and it should be changed and that
your vehicle is due for service. See your GM dealer.
SeeEngine Oil on page 5-16andScheduled
Maintenance on page 6-4for more information.
When you reset the Change Engine Oil message by
clearing it from the display, you still must reset the
engine oil life system separately. For more information
on resetting the engine oil life system, seeEngine
Oil Life System on page 5-20. If you clear this message
from the display, it will not re-appear.
Change Trans (Transmission) Fluid
(Automatic Transmission)
This message indicates that the life of the transmission
�uid has expired and it should be changed. See
Scheduled Maintenance on page 6-4and
Recommended Fluids and Lubricants on page 6-13for
the proper �uid and change intervals.
When you reset the Change Trans Fluid message by
clearing it from the display, you still must reset the
transmission �uid life monitor separately. For more
information on resetting the transmission �uid life
monitor, seeAutomatic Transmission Fluid on
page 5-23.
Check Brake Fluid
This message will display if the ignition is in ON to
inform the driver that the brake �uid level is low.
Have the brake system serviced by your GM dealer as
soon as possible. SeeBrake System Warning Light
on page 3-38andBrakes on page 5-38for more
information.
Check Coolant Level
Notice:If your engine catches �re because you
keep driving with no coolant, your vehicle can
be badly damaged. The costly repairs would not be
covered by your warranty. SeeOverheated Engine
Protection Operating Mode on page 5-30for
information on driving to a safe place in an
emergency.
This message will appear when there is a low level of
engine coolant. Have the cooling system serviced
by your GM dealer as soon as possible. SeeEngine
Coolant on page 5-26for more information.
Check Gas Cap
When this message appears on the display, the gas cap
has not been fully tightened. You should recheck the
gas cap to ensure that it is on and tightened properly.
See “If the Light Is On Steady” underMalfunction
Indicator Lamp on page 3-41for more information.
3-63
Page 226 of 442
Using the Single CD Player
Insert a CD partway into the slot, label side up. The
player will pull it in. If the ignition and the radio are on the
CD will begin playing. A CD may be loaded with the radio
off but it will not start playing until the radio is on.
If the ignition or radio is turned off with a CD in the
player, it will stay in the player. When the ignition
or radio is turned on, the CD will start to play where it
stopped, if it was the last selected audio source.
When the CD is inserted, CD will appear on the display.
As each new track starts to play, the track number
will appear on the display.
The CD player can play the smaller 3 inch (8 cm) single
CDs with an adapter ring. Full-size CDs and the
smaller CDs are loaded in the same manner.
If playing a CD-R, the sound quality may be reduced due
to CD-R quality, the method of recording, the quality of
the music that has been recorded, and the way the CD-R
has been handled. There may be an increase in skipping,
difficulty in �nding tracks, and/or difficulty in loading and
ejecting. If these problems occur, check the bottom
surface of the CD. If the surface of the CD is damaged,
such as cracked, broken, or scratched, the CD will not
play properly. If the surface of the CD is soiled, seeCare
of Your CDs on page 3-103for more information.If there is no apparent damage, try a known good CD.
Do not add any label to a CD, it could get caught in the
CD player. If a CD is recorded on a personal computer
and a description label is needed, try labeling the top of
the recorded CD with a marking pen instead.
Notice:If you add any label to a CD, insert more
than one CD into the slot at a time, or attempt
to play scratched or damaged CDs, you could
damage the CD player. When using the CD player,
use only CDs in good condition without any
label, load one CD at a time, and keep the CD player
and the loading slot free of foreign materials,
liquids, and debris.
If an error appears on the display, see “CD Messages”
later in this section.
When a CD is inserted the CD functions will appear on
the display above the �rm keys, in place of the preset
stations (if programmed).
F1 PREV (Previous):Press this �rm key to go to the
previous track. Press and hold this �rm key to
reverse quickly within a track. Release the �rm key to
play the passage. The elapsed time of the track
will appear on the display.
F2 NEXT:Press this �rm key to go to the next track.
Press and hold this �rm key to advance quickly within a
track. Release the �rm key to play the passage. The
elapsed time of the track will appear on the display.
3-96
Page 294 of 442

Engine Oil Life System
When to Change Engine Oil
Your vehicle has a computer system that lets you know
when to change the engine oil and �lter. This is based
on engine revolutions and engine temperature, and not
on mileage. Based on driving conditions, the mileage
at which an oil change will be indicated can vary
considerably. For the oil life system to work properly,
you must reset the system every time the oil is changed.
When the system has calculated that oil life has been
diminished, it will indicate that an oil change is necessary.
A change engine oil message in the Driver Information
Center (DIC) will come on. Change your oil as soon
as possible within the next 600 miles (1 000 km). It is
possible that, if you are driving under the best conditions,
the oil life system may not indicate that an oil change
is necessary for over a year. However, your engine oil
and �lter must be changed at least once a year and
at this time the system must be reset. Your dealer has
GM-trained service people who will perform this work
using genuine GM parts and reset the system. It is also
important to check your oil regularly and keep it at the
proper level.
If the system is ever reset accidentally, you must
change your oil at 3,000 miles (5 000 km) since your
last oil change. Remember to reset the oil life system
whenever the oil is changed.
How to Reset the Engine Oil Life
System and the Oil Life Indicator
The Engine Oil Life System calculates when to change
your engine oil and �lter based on vehicle use. Anytime
your oil is changed, reset the system so it can calculate
when the next oil change is required. If a situation occurs
where you change your oil prior to a change engine oil
message in the DIC being turned on, reset the system.
After the oil has been changed, the change engine
oil message and the oil life indicator must be reset.
To reset the message and indicator, use one of
the following procedures:
Base Audio System
Press the CLR button located to the right of the DIC
display to acknowledge the change engine oil message.
This will clear the message from the display and reset it.
To reset the oil life indicator, use the following steps:
1. Press the up or down arrow on the INFO button
located to the right of the DIC display to access
the DIC menu.
2. Once XXX% ENGINE OIL LIFE menu item is
highlighted, press and hold the CLR button.
The percentage will return to 100, and the oil life
indicator will be reset. Repeat the steps if the
percentage does not return to 100.
3. Turn the key to OFF.
5-20
Page 295 of 442

If the change engine oil message comes back on when
you start your vehicle, the engine oil life system has
not reset. Repeat the procedure.
Navigation System
If you have the navigation system, see “Vehicle
Customization” in the Navigation System Manual for
how to reset the oil life indicator.
What to Do with Used Oil
Used engine oil contains certain elements that may be
unhealthy for your skin and could even cause cancer.
Do not let used oil stay on your skin for very long. Clean
your skin and nails with soap and water, or a good
hand cleaner. Wash or properly dispose of clothing or
rags containing used engine oil. See the manufacturer’s
warnings about the use and disposal of oil products.
Used oil can be a threat to the environment. If you
change your own oil, be sure to drain all the oil from the
�lter before disposal. Never dispose of oil by putting it in
the trash, pouring it on the ground, into sewers, or into
streams or bodies of water. Instead, recycle it by taking
it to a place that collects used oil. If you have a problem
properly disposing of your used oil, ask your dealer,
a service station or a local recycling center for help.
Engine Air Cleaner/Filter
The engine air cleaner/�lter is in the engine
compartment on the driver’s side of the vehicle, near
the front. SeeEngine Compartment Overview on
page 5-12for more information on location.CTS shown, CTS-V similar
5-21
Page 394 of 442
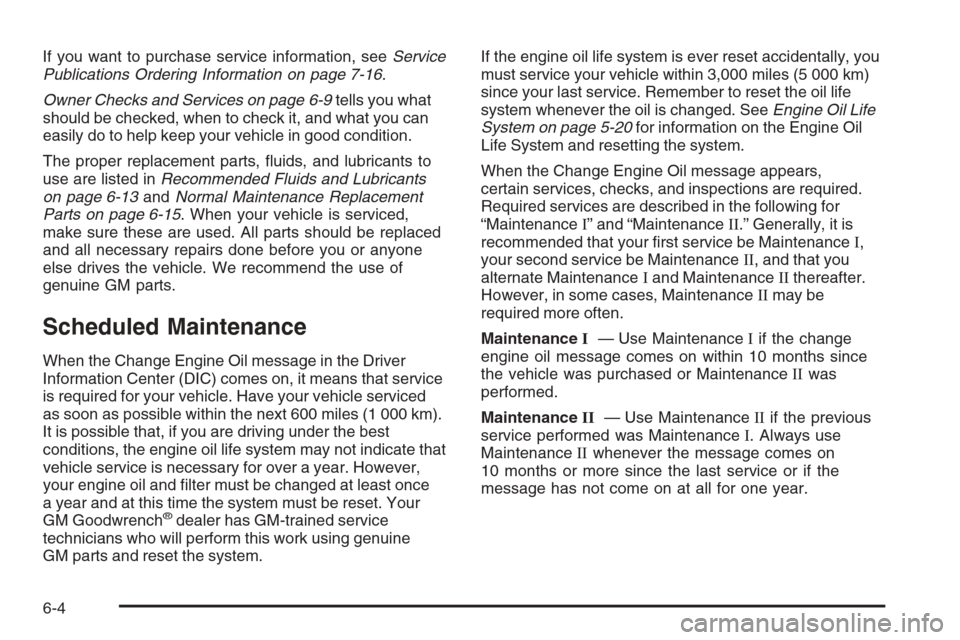
If you want to purchase service information, seeService
Publications Ordering Information on page 7-16.
Owner Checks and Services on page 6-9tells you what
should be checked, when to check it, and what you can
easily do to help keep your vehicle in good condition.
The proper replacement parts, �uids, and lubricants to
use are listed inRecommended Fluids and Lubricants
on page 6-13andNormal Maintenance Replacement
Parts on page 6-15. When your vehicle is serviced,
make sure these are used. All parts should be replaced
and all necessary repairs done before you or anyone
else drives the vehicle. We recommend the use of
genuine GM parts.
Scheduled Maintenance
When the Change Engine Oil message in the Driver
Information Center (DIC) comes on, it means that service
is required for your vehicle. Have your vehicle serviced
as soon as possible within the next 600 miles (1 000 km).
It is possible that, if you are driving under the best
conditions, the engine oil life system may not indicate that
vehicle service is necessary for over a year. However,
your engine oil and �lter must be changed at least once
a year and at this time the system must be reset. Your
GM Goodwrench
®dealer has GM-trained service
technicians who will perform this work using genuine
GM parts and reset the system.If the engine oil life system is ever reset accidentally, you
must service your vehicle within 3,000 miles (5 000 km)
since your last service. Remember to reset the oil life
system whenever the oil is changed. SeeEngine Oil Life
System on page 5-20for information on the Engine Oil
Life System and resetting the system.
When the Change Engine Oil message appears,
certain services, checks, and inspections are required.
Required services are described in the following for
“MaintenanceI” and “MaintenanceII.” Generally, it is
recommended that your �rst service be MaintenanceI,
your second service be MaintenanceII, and that you
alternate MaintenanceIand MaintenanceIIthereafter.
However, in some cases, MaintenanceIImay be
required more often.
MaintenanceI— Use MaintenanceIif the change
engine oil message comes on within 10 months since
the vehicle was purchased or MaintenanceIIwas
performed.
MaintenanceII— Use MaintenanceIIif the previous
service performed was MaintenanceI. Always use
MaintenanceIIwhenever the message comes on
10 months or more since the last service or if the
message has not come on at all for one year.
6-4
Page 395 of 442
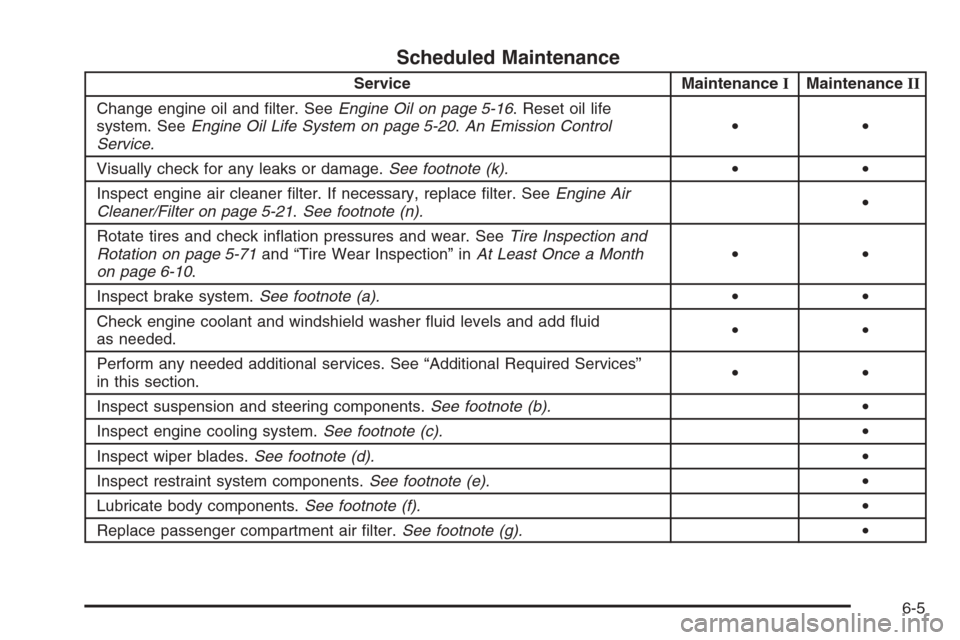
Scheduled Maintenance
Service MaintenanceIMaintenanceII
Change engine oil and �lter. SeeEngine Oil on page 5-16. Reset oil life
system. SeeEngine Oil Life System on page 5-20.An Emission Control
Service.••
Visually check for any leaks or damage.See footnote (k).••
Inspect engine air cleaner �lter. If necessary, replace �lter. SeeEngine Air
Cleaner/Filter on page 5-21.See footnote (n).•
Rotate tires and check in�ation pressures and wear. SeeTire Inspection and
Rotation on page 5-71and “Tire Wear Inspection” inAt Least Once a Month
on page 6-10.••
Inspect brake system.See footnote (a).••
Check engine coolant and windshield washer �uid levels and add �uid
as needed.••
Perform any needed additional services. See “Additional Required Services”
in this section.••
Inspect suspension and steering components.See footnote (b).•
Inspect engine cooling system.See footnote (c).•
Inspect wiper blades.See footnote (d).•
Inspect restraint system components.See footnote (e).•
Lubricate body components.See footnote (f).•
Replace passenger compartment air �lter.See footnote (g).•
6-5