warning CADILLAC CTS 2012 2.G Owners Manual
[x] Cancel search | Manufacturer: CADILLAC, Model Year: 2012, Model line: CTS, Model: CADILLAC CTS 2012 2.GPages: 496, PDF Size: 6.36 MB
Page 341 of 496

Black plate (29,1)Cadillac CTS/CTS-V Owner Manual (Include Mex) - 2012
Vehicle Care 10-29
Battery
The battery is in the trunk, behind
the trim panel, on the passenger
side of the vehicle. Refer to the
replacement number shown on the
original battery label when a new
battery is needed.
{WARNING
Battery posts, terminals, and
related accessories contain lead
and lead compounds, chemicals
known to the State of California to
cause cancer and reproductive
harm. Wash hands after handling.After a power loss, such as
disconnecting the battery or
removing the maxi fuses in the
power distribution fuse block, the
following steps must be performed
to calibrate the electronic throttle
control. If this is not done, the
engine will not run properly.
1. Turn the ignition on but do not
start the engine.
2. Leave the ignition on for at least three minutes so that the
electronic throttle control will
cycle and re-learn its home
position.
3. Turn the ignition off.
4. Start and run the engine for at least 30 seconds.
Vehicle Storage
{WARNING
Batteries have acid that can burn
you and gas that can explode.
You can be badly hurt if you are
not careful. See Jump Starting on
page 10‑104 for tips on working
around a battery without
getting hurt.
Infrequent Usage: Remove the
black, negative (−) cable from the
battery to keep the battery from
running down.
Extended Storage: Remove the
black, negative (−) cable from the
battery or use a battery trickle
charger.
Page 342 of 496

Black plate (30,1)Cadillac CTS/CTS-V Owner Manual (Include Mex) - 2012
10-30 Vehicle Care
All-Wheel Drive
If your vehicle is equipped with
all-wheel-drive, this is an additional
system that needs lubrication.
Transfer Case
When to Check Lubricant
It is not necessary to regularly
check the transfer case fluid unless
you suspect there is a leak or you
hear an unusual noise. A fluid loss
could indicate a problem. Have it
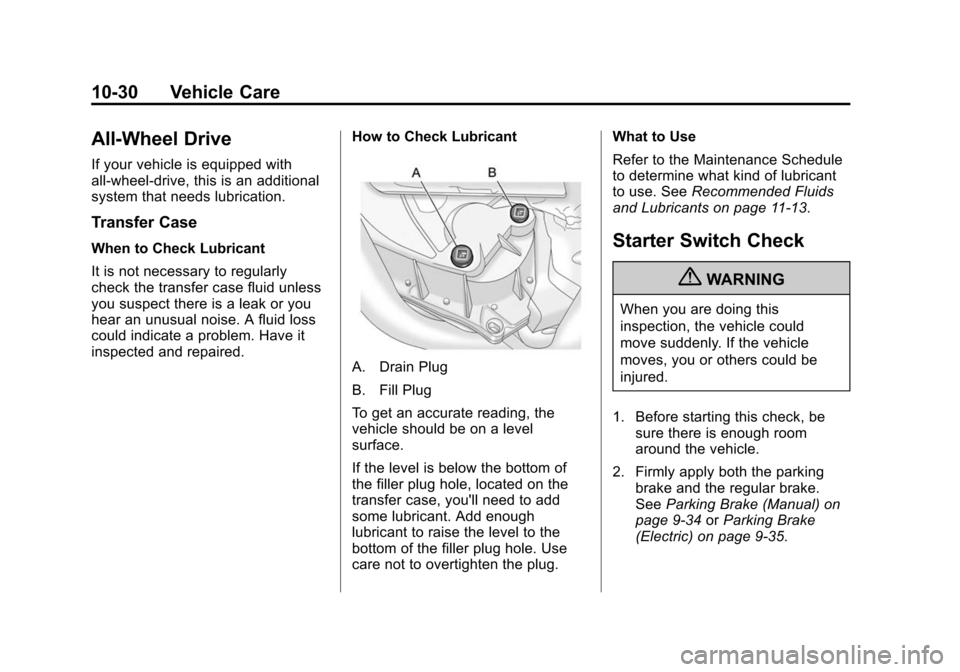
inspected and repaired.How to Check Lubricant
A. Drain Plug
B. Fill Plug
To get an accurate reading, the
vehicle should be on a level
surface.
If the level is below the bottom of
the filler plug hole, located on the
transfer case, you'll need to add
some lubricant. Add enough
lubricant to raise the level to the
bottom of the filler plug hole. Use
care not to overtighten the plug.What to Use
Refer to the Maintenance Schedule
to determine what kind of lubricant
to use. See
Recommended Fluids
and Lubricants on page 11‑13.
Starter Switch Check
{WARNING
When you are doing this
inspection, the vehicle could
move suddenly. If the vehicle
moves, you or others could be
injured.
1. Before starting this check, be sure there is enough room
around the vehicle.
2. Firmly apply both the parking brake and the regular brake.
See Parking Brake (Manual) on
page 9‑34 orParking Brake
(Electric) on page 9‑35.
Page 343 of 496

Black plate (31,1)Cadillac CTS/CTS-V Owner Manual (Include Mex) - 2012
Vehicle Care 10-31
Do not use the accelerator
pedal, and be ready to turn off
the engine immediately if it
starts.
3. For automatic transmission vehicles, try to start the engine
in each gear. The vehicle
should start only in P (Park) or
N (Neutral). If the vehicle starts
in any other position, contact
your dealer for service.
For manual transmission
vehicles, put the shift lever in
Neutral, push the clutch pedal
down halfway, and try to start
the engine. The vehicle should
start only when the clutch pedal
is pushed down all the way to
the floor. If the vehicle starts
when the clutch pedal is not
pushed all the way down,
contact your dealer for service.Automatic Transmission
Shift Lock Control
Function Check
{WARNING
When you are doing this
inspection, the vehicle could
move suddenly. If the vehicle
moves, you or others could be
injured.
1. Before starting this check, be sure there is enough room
around the vehicle. It should be
parked on a level surface.
2. Firmly apply the parking brake. See Parking Brake (Manual) on
page 9‑34 orParking Brake
(Electric) on page 9‑35.
Be ready to apply the regular
brake immediately if the vehicle
begins to move.
3. With the engine off, turn the ignition on, but do not start the
engine. Without applying the regular brake, try to move the
shift lever out of P (Park) with
normal effort. If the shift lever
moves out of P (Park), contact
your dealer for service.Ignition Transmission
Lock Check
While parked, and with the parking
brake set, try to turn the ignition to
LOCK/OFF in each shift lever
position.
.The ignition should turn to
LOCK/OFF only when the shift
lever is in P (Park).
.With the key access ignition
system, the ignition key should
come out only in LOCK/OFF.
See
Ignition Positions (Key
Access) on page 9‑16 orIgnition
Positions (Keyless Access) on
page 9‑18.
Contact your dealer if service is
required.
Page 344 of 496

Black plate (32,1)Cadillac CTS/CTS-V Owner Manual (Include Mex) - 2012
10-32 Vehicle Care
Park Brake and P (Park)
Mechanism Check
{WARNING
When you are doing this check,
the vehicle could begin to move.
You or others could be injured
and property could be damaged.
Make sure there is room in front
of the vehicle in case it begins to
roll. Be ready to apply the regular
brake at once should the vehicle
begin to move.Park on a fairly steep hill, with the
vehicle facing downhill. Keeping
your foot on the regular brake, set
the parking brake.
.To check the parking brake's
holding ability: With the engine
running and the transmission in
N (Neutral), slowly remove foot
pressure from the regular brake
pedal. Do this until the vehicle is
held by the parking brake only.
.To check the P (Park)
mechanism's holding ability:
With the engine running, shift to
P (Park). Then release the
parking brake followed by the
regular brake.
Contact your dealer if service is
required.
Wiper Blade Replacement
Windshield wiper blades should be
inspected for wear or cracking. See
Maintenance Schedule on
page 11‑3.
It is a good idea to clean or replace
the wiper blade assembly on a
regular basis or when worn. For
proper windshield wiper blade
length and type, see Maintenance
Replacement Parts on page 11‑15.
To replace the wiper blade
assembly:
1. Turn the ignition to ON/RUN with the engine off.
2. Turn on the windshield wipers and turn them off again when
the wipers are in the out-wipe
position. The driver side blade
will be straight up and down on
the windshield.
3. Pull the windshield wiper assembly away from the
windshield.
Page 349 of 496

Black plate (37,1)Cadillac CTS/CTS-V Owner Manual (Include Mex) - 2012
Vehicle Care 10-37
Bulb Replacement
For the proper type of replacement
bulbs, seeReplacement Bulbs on
page 10‑39.
For any bulb‐changing procedure
not listed in this section, contact
your dealer.
Halogen Bulbs
{WARNING
Halogen bulbs have pressurized
gas inside and can burst if you
drop or scratch the bulb. You or
others could be injured. Be sure
to read and follow the instructions
on the bulb package.
High Intensity Discharge
(HID) Lighting
{WARNING
The low beam high intensity
discharge lighting system
operates at a very high voltage.
If you try to service any of the
system components, you could be
seriously injured. Have your
dealer or a qualified technician
service them.
After an HID headlamp bulb has
been replaced, the beam might be a
slightly different shade than it was
originally. This is normal.
Fog Lamps
To replace a front fog lamp bulb:
1. Pull out the push-pins located on the underside of the protection
shield to remove the shield.
2. Reach up behind the front bumper area from under the
vehicle to access the lamp
housing.
3. Remove the electrical connector from the bulb by lifting the two
plastic clips.
4. Remove the bulb socket from the lamp housing by turning the
bulb socket one-quarter turn
counterclockwise.
Page 375 of 496

Black plate (63,1)Cadillac CTS/CTS-V Owner Manual (Include Mex) - 2012
Vehicle Care 10-63
Wheels and Tires
Tires
Every new GM vehicle has
high-quality tires made by a
leading tire manufacturer. See
the warranty manual for
information regarding the tire
warranty and where to get
service. For additional
information refer to the tire
manufacturer.
{WARNING
.Poorly maintained and
improperly used tires are
dangerous.
.Overloading the tires can
cause overheating as a result
of too much flexing. There
could be a blowout and a
serious crash. SeeVehicle
Load Limits on page 9‑11.
(Continued)
WARNING (Continued)
.Underinflated tires pose the
same danger as overloaded
tires. The resulting crash
could cause serious injury.
Check all tires frequently to
maintain the recommended
pressure. Tire pressure
should be checked when the
tires are cold.
.Overinflated tires are more
likely to be cut, punctured,
or broken by a sudden
impact—such as when
hitting a pothole. Keep tires at
the recommended pressure.
.Worn or old tires can cause a
crash. If the tread is badly
worn, replace them.
.Replace any tires that have
been damaged by impacts
with potholes, curbs, etc.
(Continued)
WARNING (Continued)
.Improperly repaired tires can
cause a crash. Only the
dealer or an authorized tire
service center should repair,
replace, dismount, and mount
the tires.
.Do not spin the tires in
excess of 55 km/h (35 mph)
on slippery surfaces such as
snow, mud, ice, etc.
Excessive spinning may
cause the tires to explode.
SeeTire Pressure for
High-Speed Operation on
page 10‑72 for inflation pressure
adjustment for high-speed
driving.
Page 384 of 496

Black plate (72,1)Cadillac CTS/CTS-V Owner Manual (Include Mex) - 2012
10-72 Vehicle Care
Tire Pressure for
High-Speed Operation
{WARNING
Driving at high speeds, 160 km/h
(100 mph) or higher, puts an
additional strain on tires.
Sustained high-speed driving
causes excessive heat buildup
and can cause sudden tire failure.
You could have a crash and you
or others could be killed. Some
high-speed rated tires require
inflation pressure adjustment for
high-speed operation. When
speed limits and road conditions
are such that a vehicle can be
driven at high speeds, make sure
the tires are rated for high-speed
operation, in excellent condition,
and set to the correct cold tire
inflation pressure for the
vehicle load.Vehicles with 255/40ZR19 or
285/35ZR19 size tires require
inflation pressure adjustment when
driving the vehicle at speeds of
160 km/h (100 mph) or higher. Set
the cold inflation pressure to the
maximum inflation pressure shown
on the tire sidewall, or 300 kPa
(44 psi), whichever is lower. See the
example following. Return the tires
to the recommended cold tire
inflation pressure when high-speed
driving has ended. See
Vehicle
Load Limits on page 9‑11 andTire
Pressure on page 10‑70.
Example:
The maximum load and inflation
pressure is molded on the tire
sidewall, in small letters, near the
rim flange. It will read something
like this: Maximum load 690 kg
(1521 lbs) 300 kPa (44 psi) Max.
Press.
For this example, set the inflation
pressure for high‐speed driving at
300 kPa (44 psi).
Tire Pressure Monitor
System
The Tire Pressure Monitor System
(TPMS) uses radio and sensor
technology to check tire pressure
levels. The TPMS sensors monitor
the air pressure in your tires and
transmit tire pressure readings to a
receiver located in the vehicle.
Each tire, including the spare
(if provided), should be checked
monthly when cold and inflated to
the inflation pressure recommended
by the vehicle manufacturer on the
vehicle placard or tire inflation
pressure label. (If your vehicle has
tires of a different size than the size
indicated on the vehicle placard or
tire inflation pressure label, you
should determine the proper tire
inflation pressure for those tires.)
As an added safety feature, your
vehicle has been equipped with a
tire pressure monitoring system
(TPMS) that illuminates a low tire
Page 386 of 496

Black plate (74,1)Cadillac CTS/CTS-V Owner Manual (Include Mex) - 2012
10-74 Vehicle Care
and transmits the tire pressure
readings to a receiver located in
the vehicle.
When a low tire pressure condition
is detected, the TPMS illuminates
the low tire pressure warning light
located on the instrument cluster.
If the warning light comes on, stop
as soon as possible and inflate the
tires to the recommended pressure
shown on the tire loading
information label. SeeVehicle
Load Limits on page 9‑11.
A message to check the pressure
in a specific tire displays in the
DIC display screen. The low tire
pressure warning light and the DIC
warning message come at each
ignition cycle until the tires are inflated to the correct inflation
pressure. Using the Driver
Information Center (DIC), tire
pressure levels can be viewed. For
additional information and details
about the DIC operation and
displays see
Driver Information
Center (DIC) on page 5‑27 andTire
Messages on page 5‑43.
The low tire pressure warning light
may come on in cool weather when
the vehicle is first started, and then
turn off as the vehicle is driven. This
could be an early indicator that the
air pressure is getting low and
needs to be inflated to the proper
pressure.
The Tire and Loading Information
label shows the size of the original
equipment tires and the correct
inflation pressure for the tires when
they are cold. See Vehicle Load
Limits on page 9‑11, for an example
of the Tire and Loading Information
label and its location. Also see Tire
Pressure on page 10‑70. The TPMS can warn about a l
ow tire pressure condition but it
does not replace normal tire
maintenance. See
Tire Inspection
on page 10‑76, Tire Rotation on
page 10‑77 andTires on
page 10‑63.
Notice: Tire sealant materials are
not all the same. A non-approved
tire sealant could damage the
TPMS sensors. TPMS sensor
damage caused by using an
incorrect tire sealant is not
covered by the vehicle warranty.
Always use only the
GM-approved tire sealant
available through your dealer or
included in the vehicle.
Factory-installed Tire Inflator Kits
use a GM approved liquid tire
sealant. Using non-approved tire
sealants could damage the TPMS
sensors. See Tire Sealant and
Compressor Kit on page 10‑86 for
information regarding the inflator kit
materials and instructions.
Page 387 of 496

Black plate (75,1)Cadillac CTS/CTS-V Owner Manual (Include Mex) - 2012
Vehicle Care 10-75
TPMS Malfunction Light and
Message
The TPMS will not function properly
if one or more of the TPMS sensors
are missing or inoperable. When the
system detects a malfunction, the
low tire warning light flashes for
about one minute and then stays on
for the remainder of the ignition
cycle. A DIC warning message also
displays. The malfunction light and
DIC warning message come on at
each ignition cycle until the problem
is corrected. Some of the conditions
that can cause these to come
on are:
.One of the road tires has been
replaced with the spare tire,
if the vehicle has one. The spare
tire does not have a TPMS
sensor. The malfunction light
and the DIC message should go
off after the road tire is replaced
and the sensor matching
process is performed
successfully. See“TPMS Sensor
Matching Process” later in this
section.
.The TPMS sensor matching
process was not done or
not completed successfully
after rotating the tires. The
malfunction light and the DIC
message should go off after
successfully completing the
sensor matching process. See
“TPMS Sensor Matching
Process” later in this section.
.One or more TPMS sensors
are missing or damaged. The
malfunction light and the DIC
message should go off when the
TPMS sensors are installed and
the sensor matching process is
performed successfully. See
your dealer for service.
.Replacement tires or wheels do
not match the original equipment
tires or wheels. Tires and wheels
other than those recommended
could prevent the TPMS from
functioning properly. See Buying
New Tires on page 10‑79.
.Operating electronic devices or
being near facilities using radio
wave frequencies similar to the
TPMS could cause the TPMS
sensors to malfunction.
If the TPMS is not functioning
properly, it cannot detect or signal a
low tire condition. See your dealer
for service if the TPMS malfunction
light and DIC message comes on
and stays on.
TPMS Sensor Matching
Process
Each TPMS sensor has a unique
identification code. The identification
code needs to be matched to a new
tire/wheel position after rotating the
vehicle’s tires or replacing one or
more of the TPMS sensors. Also,
the TPMS sensor matching process
should be performed after replacing
a spare tire with a road tire
containing the TPMS sensor. The
malfunction light and the DIC
message should go off at the next
ignition cycle. The sensors are
matched to the tire/wheel positions,
Page 390 of 496

Black plate (78,1)Cadillac CTS/CTS-V Owner Manual (Include Mex) - 2012
10-78 Vehicle Care
the tires have been rotated. See
Tire Pressure on page 10‑70
andVehicle Load Limits on
page 9‑11.
Reset the Tire Pressure Monitor
System. See Tire Pressure
Monitor Operation on
page 10‑73.
Check that all wheel nuts are
properly tightened. See “Wheel
Nut Torque” underCapacities
and Specifications on
page 12‑2.
{WARNING
Rust or dirt on a wheel, or on the
parts to which it is fastened, can
make wheel nuts become loose
after time. The wheel could come
off and cause an accident. When
changing a wheel, remove any
rust or dirt from places where the
wheel attaches to the vehicle. In
(Continued)
WARNING (Continued)
an emergency, a cloth or a paper
towel can be used; however, use
a scraper or wire brush later to
remove all rust or dirt.
Lightly coat the center of the
wheel hub with wheel bearing
grease after a wheel change or
tire rotation to prevent corrosion
or rust build-up. Do not get
grease on the flat wheel
mounting surface or on the
wheel nuts or bolts.
When It Is Time for New
Tires
Factors such as maintenance,
temperatures, driving speeds,
vehicle loading, and road conditions
affect the wear rate of the tires.
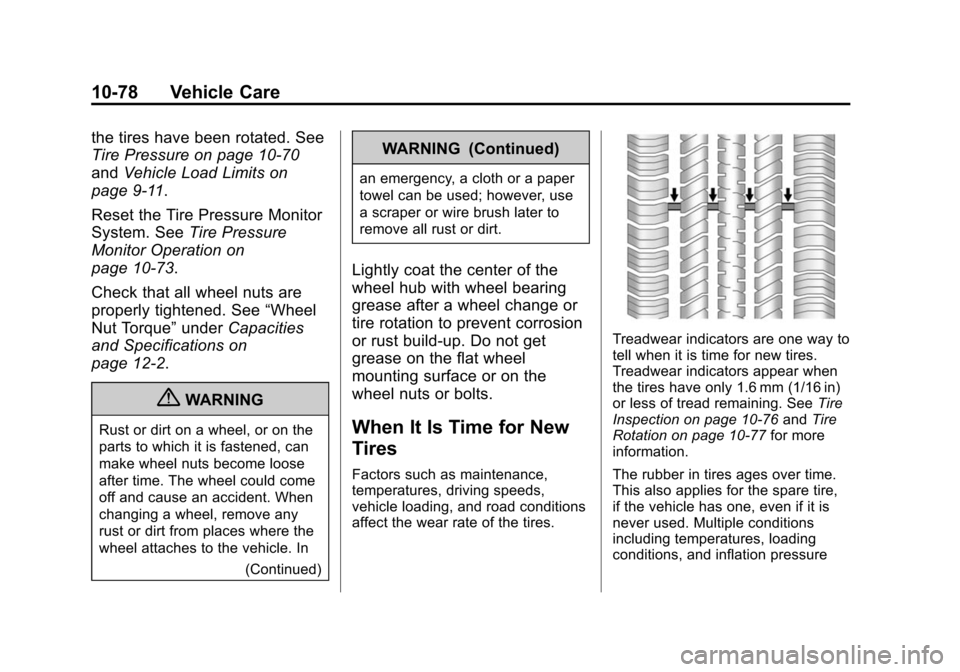
Treadwear indicators are one way to
tell when it is time for new tires.
Treadwear indicators appear when
the tires have only 1.6 mm (1/16 in)
or less of tread remaining. See Tire
Inspection on page 10‑76 andTire
Rotation on page 10‑77 for more
information.
The rubber in tires ages over time.
This also applies for the spare tire,
if the vehicle has one, even if it is
never used. Multiple conditions
including temperatures, loading
conditions, and inflation pressure