window CADILLAC CTS 2012 2.G Repair Manual
[x] Cancel search | Manufacturer: CADILLAC, Model Year: 2012, Model line: CTS, Model: CADILLAC CTS 2012 2.GPages: 496, PDF Size: 6.36 MB
Page 368 of 496
Black plate (56,1)Cadillac CTS/CTS-V Owner Manual (Include Mex) - 2012
10-56 Vehicle Care
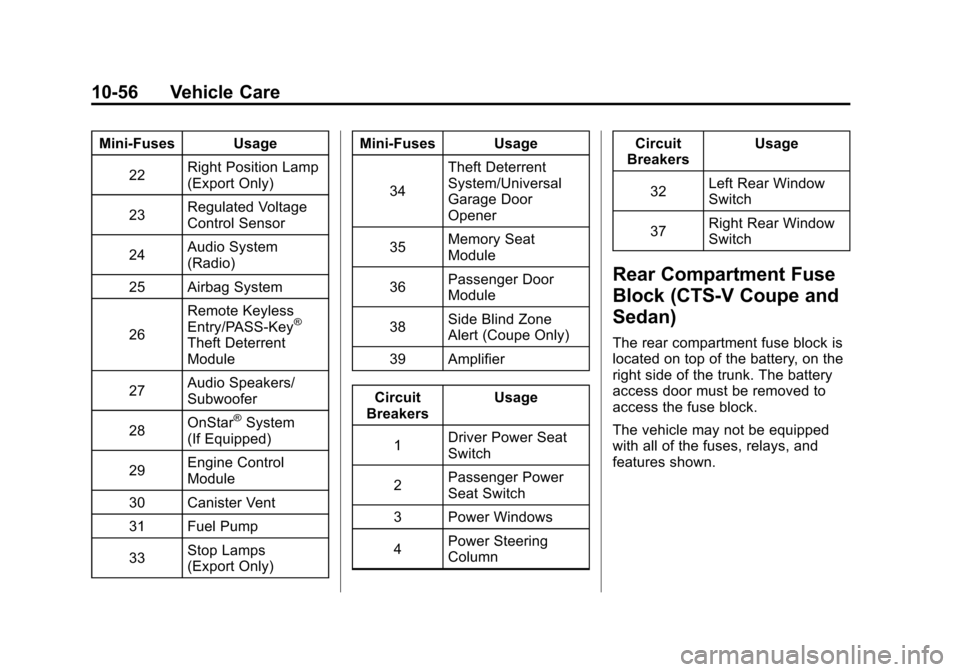
Mini‐Fuses Usage22 Right Position Lamp
(Export Only)
23 Regulated Voltage
Control Sensor
24 Audio System
(Radio)
25 Airbag System
26 Remote Keyless
Entry/PASS‐Key
®
Theft Deterrent
Module
27 Audio Speakers/
Subwoofer
28 OnStar
®System
(If Equipped)
29 Engine Control
Module
30 Canister Vent
31 Fuel Pump
33 Stop Lamps
(Export Only) Mini‐Fuses Usage
34 Theft Deterrent
System/Universal
Garage Door
Opener
35 Memory Seat
Module
36 Passenger Door
Module
38 Side Blind Zone
Alert (Coupe Only)
39 Amplifier
Circuit
Breakers Usage
1 Driver Power Seat
Switch
2 Passenger Power
Seat Switch
3 Power Windows
4 Power Steering
Column Circuit
Breakers Usage
32 Left Rear Window
Switch
37 Right Rear Window
Switch
Rear Compartment Fuse
Block (CTS-V Coupe and
Sedan)
The rear compartment fuse block is
located on top of the battery, on the
right side of the trunk. The battery
access door must be removed to
access the fuse block.
The vehicle may not be equipped
with all of the fuses, relays, and
features shown.
Page 370 of 496

Black plate (58,1)Cadillac CTS/CTS-V Owner Manual (Include Mex) - 2012
10-58 Vehicle Care
Mini‐Fuses Usage22 Right Position Lamp
(Export Only)
23 Regulated Voltage
Control Sensor
24 Audio System
(Radio)
25 Airbag System
26 Remote Keyless
Entry/PASS‐Key
®
Theft Deterrent
Module
27 Audio Speakers/
Subwoofer
28 OnStar
®System
(If Equipped)
29 Engine Control
Module
30 Canister Vent
31 Rear Differential
Cooling Pump
33 Stop Lamps
(Export Only) Mini‐Fuses Usage
34 Theft Deterrent
System/Universal
Garage Door
Opener
35 Memory Seat
Module
36 Passenger Door
Module
38 Side Blind Zone
Alert (Coupe Only)
39 Amplifier
Circuit
Breakers Usage
1 Driver Power Seat
Switch
2 Passenger Power
Seat Switch
3 Power Windows
4 Power Steering
Column Circuit
Breakers Usage
32 Left Rear Window
Switch
37 Right Rear Window
Switch
Rear Compartment Fuse
Block (CTS Wagon)
This fuse block is on the right side
of the vehicle, behind the trim panel
in the rear compartment.
The vehicle may not be equipped
with all of the fuses, relays, and
features shown.
Page 372 of 496

Black plate (60,1)Cadillac CTS/CTS-V Owner Manual (Include Mex) - 2012
10-60 Vehicle Care
Mini‐Fuses Usage23 Regulated Voltage
Control Sensor
24 Audio System
(Radio)
25 Airbag System
26 Remote Keyless
Entry/PASS‐Key
®
Theft Deterrent
Module
27 Audio Speakers/
Subwoofer
28 OnStar
®System
(If Equipped)
29 Engine Control
Module
30 Canister Vent
31 Fuel Pump
33 Stop Lamps
(Export Only) Mini‐Fuses Usage
34 Theft Deterrent
System/Universal
Garage Door
Opener
35 Memory Seat
Module
36 Passenger Door
Module
38 Rear Auxiliary
Power Outlet
39 Amplifier
Circuit
Breakers Usage
1 Driver Power Seat
Switch
2 Passenger Power
Seat Switch
3 Power Windows Circuit
Breakers Usage
4 Power Steering
Column
32 Left Rear Window
Switch
37 Right Rear Window
Switch
Rear Compartment Fuse
Block (CTS-V Wagon)
The rear compartment fuse block is
located on the passenger side of the
vehicle, behind the trim panel in the
rear compartment.
The vehicle may not be equipped
with all of the fuses and relays
shown.
Page 374 of 496

Black plate (62,1)Cadillac CTS/CTS-V Owner Manual (Include Mex) - 2012
10-62 Vehicle Care
Mini‐Fuses Usage22 Right Position Lamp
(Export Only)
23 Regulated Voltage
Control Sensor
24 Audio System
(Radio)
25 Airbag System
26 Remote Keyless
Entry/PASS‐Key
®
Theft Deterrent
Module
27 Audio Speakers/
Subwoofer
28 OnStar
®System
29 Engine Control
Module Mini‐Fuses Usage
30 Canister Vent
31 Rear Differential
Cooling Pump
33 Stop Lamps
(Export Only)
34 Theft Deterrent
System/Universal
Garage Door
Opener
35 Memory Seat
Module
36 Passenger Door
Module
38 Rear Auxiliary
Power Outlet
39 Amplifier Circuit
Breakers Usage
1 Driver Power Seat
Switch
2 Passenger Power
Seat Switch
3 Power Windows
4 Power Steering
Column
32 Left Rear Window
Switch
37 Right Rear Window
Switch
Page 380 of 496

Black plate (68,1)Cadillac CTS/CTS-V Owner Manual (Include Mex) - 2012
10-68 Vehicle Care
is certified to carry. The speed
rating is the maximum speed a
tire is certified to carry a load.
Tire Terminology and
Definitions
Air Pressure:The amount of
air inside the tire pressing
outward on each square inch
of the tire. Air pressure is
expressed in kPa (kilopascal)
or psi (pounds per square inch).
Accessory Weight
:The
combined weight of optional
accessories. Some examples
of optional accessories are
automatic transmission, power
steering, power brakes, power
windows, power seats, and air
conditioning.
Aspect Ratio
:The relationship
of a tire's height to its width. Belt
:A rubber coated layer of
cords that is located between
the plies and the tread. Cords
may be made from steel or other
reinforcing materials.
Bead
:The tire bead contains
steel wires wrapped by steel
cords that hold the tire onto
the rim.
Bias Ply Tire
:A pneumatic
tire in which the plies are laid
at alternate angles less than
90 degrees to the centerline of
the tread.
Cold Tire Pressure
:The
amount of air pressure in a tire,
measured in kPa (kilopascal)
or psi (pounds per square inch)
before a tire has built up heat
from driving. See Tire Pressure
on page 10‑70.
Curb Weight
:The weight of a
motor vehicle with standard and
optional equipment including the maximum capacity of fuel, oil,
and coolant, but without
passengers and cargo.
DOT Markings
:A code molded
into the sidewall of a tire
signifying that the tire is in
compliance with the U.S.
Department of Transportation
(DOT) Motor Vehicle Safety
Standards. The DOT code
includes the Tire Identification
Number (TIN), an alphanumeric
designator which can also
identify the tire manufacturer,
production plant, brand, and
date of production.
GVWR
:Gross Vehicle Weight
Rating. See Vehicle Load Limits
on page 9‑11.
GAWR FRT
:Gross Axle Weight
Rating for the front axle. See
Vehicle Load Limits on
page 9‑11.
Page 400 of 496
Black plate (88,1)Cadillac CTS/CTS-V Owner Manual (Include Mex) - 2012
10-88 Vehicle Care
When using the tire sealant and
compressor kit during cold
temperatures, warm the kit in aheated environment for five minutes.
This will help to inflate the tire
faster.
If a tire goes flat, avoid further tire
and wheel damage by driving slowly
to a level place. Turn on the hazard
warning flashers. See
Hazard
Warning Flashers on page 6‑5.
See If a Tire Goes Flat on
page 10‑84 for other important
safety warnings.
Do not remove any objects that
have penetrated the tire.
1. Remove the tire sealant and compressor kit from its storage
location. See Storing the Tire
Sealant and Compressor Kit
(Wagon) on page 10‑93 or
Storing the Tire Sealant and
Compressor Kit (Coupe) on
page 10‑94 orStoring the Tire
Sealant and Compressor Kit
(Sedan) on page 10‑94.
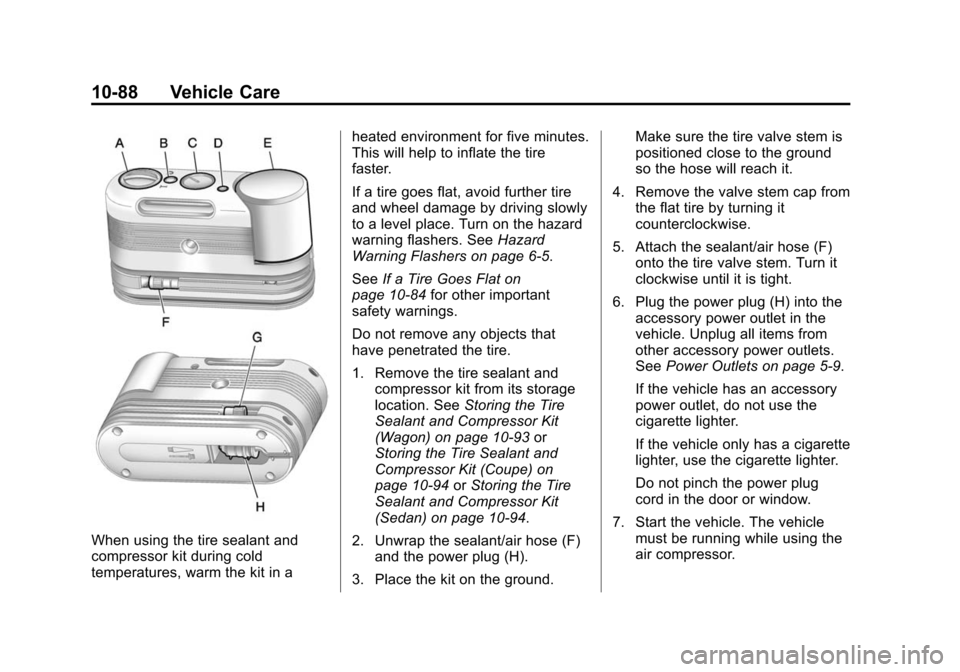
2. Unwrap the sealant/air hose (F) and the power plug (H).
3. Place the kit on the ground. Make sure the tire valve stem is
positioned close to the ground
so the hose will reach it.
4. Remove the valve stem cap from the flat tire by turning it
counterclockwise.
5. Attach the sealant/air hose (F) onto the tire valve stem. Turn it
clockwise until it is tight.
6. Plug the power plug (H) into the accessory power outlet in the
vehicle. Unplug all items from
other accessory power outlets.
See Power Outlets on page 5‑9.
If the vehicle has an accessory
power outlet, do not use the
cigarette lighter.
If the vehicle only has a cigarette
lighter, use the cigarette lighter.
Do not pinch the power plug
cord in the door or window.
7. Start the vehicle. The vehicle must be running while using the
air compressor.
Page 404 of 496

Black plate (92,1)Cadillac CTS/CTS-V Owner Manual (Include Mex) - 2012
10-92 Vehicle Care
4. Remove the tire valve stem capfrom the flat tire by turning it
counterclockwise.
5. Attach the air only hose (G) onto the tire valve stem by turning it
clockwise until it is tight.
6. Plug the power plug (H) into the accessory power outlet in the
vehicle. Unplug all items from
other accessory power outlets.
See Power Outlets on page 5‑9.
If the vehicle has an accessory
power outlet, do not use the
cigarette lighter.
If the vehicle only has a cigarette
lighter, use the cigarette lighter.
Do not pinch the power plug
cord in the door or window.
7. Start the vehicle. The vehicle must be running while using the
air compressor.
8. Turn the selector switch (A) clockwise to the Air Only
position. 9. Press the on/off button (B) to
turn the compressor on.
The compressor will inflate the
tire with air only.
10. Inflate the tire to the recommended inflation
pressure using the pressure
gauge (C). The recommended
inflation pressure can be found
on the Tire and Loading
Information label. See Tire
Pressure on page 10‑70.
The pressure gauge (C) may
read higher than the actual tire
pressure while the compressor
is on. Turn the compressor off
to get an accurate reading. The
compressor may be turned on/
off until the correct pressure is
reached.
If you inflate the tire higher
than the recommended
pressure you can adjust the
excess pressure by pressing
the pressure deflation
button (D) until the proper
pressure reading is reached. This option is only functional
when using the air only
hose (G).
11. Press the on/off button (B) to turn the tire sealant and
compressor kit off.
Be careful while handling the
tire sealant and compressor
kit as it could be warm after
usage.
12. Unplug the power plug (H) from the accessory power outlet in
the vehicle.
13. Disconnect the air only hose (G) from the tire valve
stem, by turning it
counterclockwise, and replace
the tire valve stem cap.
14. Replace the air only hose (G) and the power plug (H) and
cord back in its original
location.
15. Place the equipment in the original storage location in the
vehicle.
Page 426 of 496
Black plate (114,1)Cadillac CTS/CTS-V Owner Manual (Include Mex) - 2012
10-114 Vehicle Care
interior, maintain adequate
ventilation by opening the doors
and windows.
To prevent damage, do not clean
the interior using the following
cleaners or techniques:
.Never use a razor or any other
sharp object to remove a soil
from any interior surface.
.Never use a brush with stiff
bristles.
.Never rub any surface
aggressively or with excessive
pressure.
.Do not use laundry detergents or
dishwashing soaps with
degreasers. For liquid cleaners,
use approximately 20 drops per
3.78L (1 gal) of water.
A concentrated soap solution will
leave a residue that creates
streaks and attracts dirt. Do not
use solutions that contain strong
or caustic soap.
.Do not heavily saturate the
upholstery when cleaning.
.Do not use solvents or cleaners
containing solvents.
Interior Glass
To clean, use a terry cloth fabric
dampened with water. Wipe droplets
left behind with a clean dry cloth.
Commercial glass cleaners may be
used, if necessary, after cleaning
the interior glass with plain water.
Notice:To prevent scratching,
never use abrasive cleaners on
automotive glass. Abrasive
cleaners or aggressive cleaning
may damage the rear window
defogger.
Fabric/Carpet
Start by vacuuming the surface
using a soft brush attachment. If a
rotating brush attachment is being
used during vacuuming, only use it on the floor carpet. Before cleaning,
gently remove as much of the soil
as possible using one of the
following techniques:
.Gently blot liquids with a paper
towel. Continue blotting until no
more soil can be removed.
.For solid soils, remove as much
as possible prior to vacuuming.
To clean:
1. Saturate a clean lint-free colorfast cloth with water or
club soda. Microfiber cloth is
recommended to prevent lint
transfer to the fabric or carpet.
2. Remove excess moisture by gently wringing until water does
not drip from the cleaning cloth.
3. Start on the outside edge of the soil and gently rub toward the
center. Rotate the cleaning cloth
to a clean area frequently to
prevent forcing the soil in to the
fabric.
Page 435 of 496
Black plate (7,1)Cadillac CTS/CTS-V Owner Manual (Include Mex) - 2012
Service and Maintenance 11-7
Footnotes—Maintenance
Schedule Additional Required
Services —Normal
a) Vehicles with different size front
and rear tires do not have tire
rotation. See Tire Rotation on
page 10‑77.
b) Or every two years, whichever
comes first. More frequent
replacement may be needed if the
vehicle is driven in areas with heavy
traffic, areas with poor air quality, or
areas with high dust levels.
Replacement may also be needed if
there is a reduction in air flow,
excessive window fogging, or odors,
c) Check all fuel and vapor lines
and hoses for proper hook‐up,
routing, and condition. Check that
the purge valve, if the vehicle has
one, works properly. Replace as
needed. d)
Or every four years, whichever
comes first.
e) Do not directly power wash the
transfer case output seals. High
pressure water can overcome the
seals and contaminate the transfer
case fluid. Contaminated fluid will
decrease the life of the transfer
case and should be replaced.
f) Or every five years, whichever
comes first. See Cooling System on
page 10‑18.
g) Or every 10 years, whichever
comes first. Inspect for fraying,
excessive cracking, or damage;
replace, if needed.
h) Inspect for fraying, excessive
cracking, or damage; replace,
if needed.
Page 437 of 496
Black plate (9,1)Cadillac CTS/CTS-V Owner Manual (Include Mex) - 2012
Service and Maintenance 11-9
Footnotes—Maintenance
Schedule Additional Required
Services —Severe
a) Vehicles with different size front
and rear tires do not have tire
rotation. See Tire Rotation on
page 10‑77.
b) Or every two years, whichever
comes first. More frequent
replacement may be needed if the
vehicle is driven in areas with heavy
traffic, areas with poor air quality, or
areas with high dust levels.
Replacement may also be needed if
there is a reduction in air flow,
excessive window fogging, or odors,
c) Check all fuel and vapor lines
and hoses for proper hook‐up,
routing, and condition. Check that
the purge valve, if the vehicle has
one, works properly. Replace as
needed. d)
Or every four years, whichever
comes first.
e) Do not directly power wash the
transfer case output seals. High
pressure water can overcome the
seals and contaminate the transfer
case fluid. Contaminated fluid will
decrease the life of the transfer
case and should be replaced.
f) Or every five years, whichever
comes first. See Cooling System on
page 10‑18.
g) Or every 10 years, whichever
comes first. Inspect for fraying,
excessive cracking, or damage;
replace, if needed.
h) Inspect for fraying, excessive
cracking, or damage; replace,
if needed.Special Application
Services
.Vehicles with manual
transmissions: Every two years
drain, flush, and fill clutch
hydraulic system.
.Severe Commercial Use
Vehicles Only: Lubricate chassis
components every 5 000 km/
3,000 mi.
.Have underbody flushing service
performed once a year.