audio CADILLAC CTS 2013 2.G Infotainment Manual
[x] Cancel search | Manufacturer: CADILLAC, Model Year: 2013, Model line: CTS, Model: CADILLAC CTS 2013 2.GPages: 70, PDF Size: 0.65 MB
Page 17 of 70
Black plate (17,1)Cadillac CTS/CTS-V Navigation System - 2013 - crc - 8/21/12
Infotainment System 17
2. Press the left arrow to go to thestart of the current track, if more
than five seconds have played
or to the previous track,
if five seconds or less have
played.
3. If either arrow is pressed more than once, the player continues
moving backward or forward
through the CD. The sound
mutes while seeking.
TUNE/TONE knob: Turn to go to
the next or previous track.
Track List Screen: Press the
center button on the main screen to
go to the Track List Screen. Press
the screen button to select a
different song to play from the disc.
Playing a DVD
There are two ways to play a DVD:
.Once a DVD is inserted, the
system automatically starts play
of the DVD.
.Press AUDIO, then press the
DVD screen button. VOL/
O(Volume/Power):
1. Press to turn the system on and off.
2. Turn to increase or decrease the volume of the audio system.
DVD Menu Options
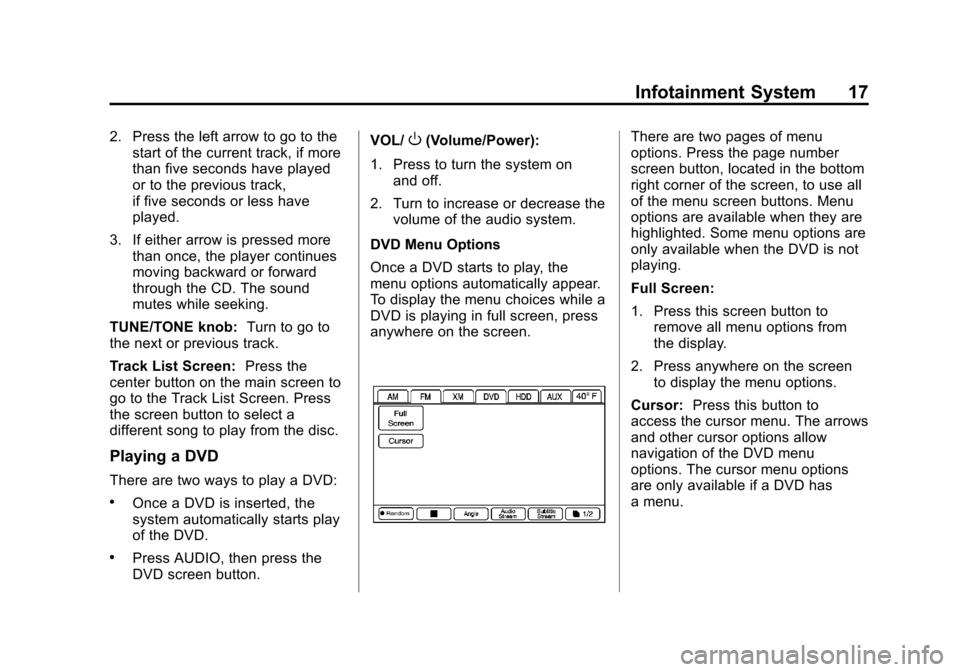
Once a DVD starts to play, the
menu options automatically appear.
To display the menu choices while a
DVD is playing in full screen, press
anywhere on the screen.There are two pages of menu
options. Press the page number
screen button, located in the bottom
right corner of the screen, to use all
of the menu screen buttons. Menu
options are available when they are
highlighted. Some menu options are
only available when the DVD is not
playing.
Full Screen:
1. Press this screen button to remove all menu options from
the display.
2. Press anywhere on the screen to display the menu options.
Cursor: Press this button to
access the cursor menu. The arrows
and other cursor options allow
navigation of the DVD menu
options. The cursor menu options
are only available if a DVD has
a menu.
Page 18 of 70
Black plate (18,1)Cadillac CTS/CTS-V Navigation System - 2013 - crc - 8/21/12
18 Infotainment System
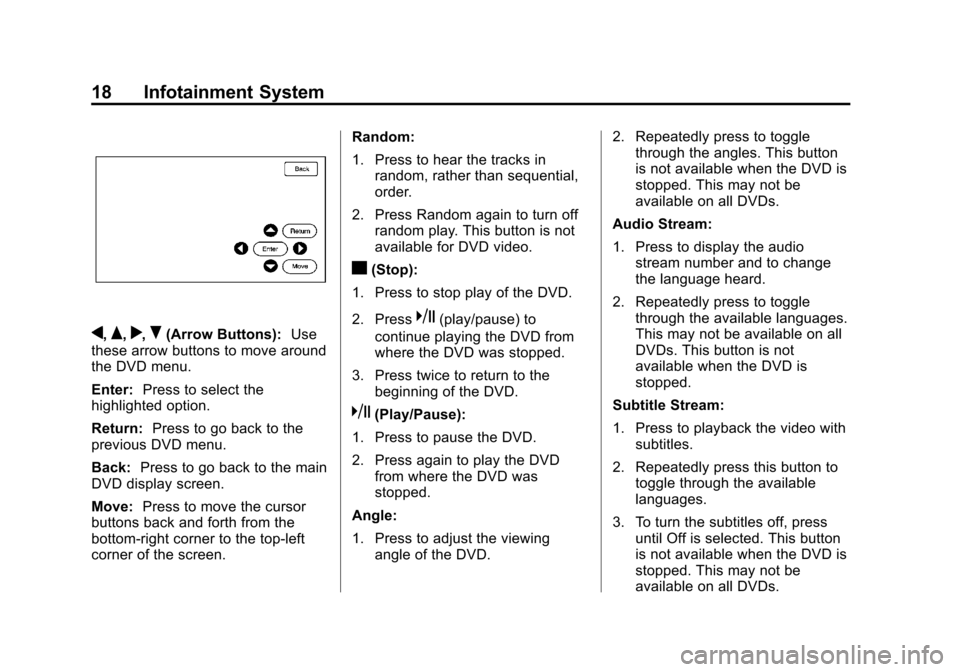
q,Q,r,R(Arrow Buttons):Use
these arrow buttons to move around
the DVD menu.
Enter: Press to select the
highlighted option.
Return: Press to go back to the
previous DVD menu.
Back: Press to go back to the main
DVD display screen.
Move: Press to move the cursor
buttons back and forth from the
bottom-right corner to the top-left
corner of the screen. Random:
1. Press to hear the tracks in
random, rather than sequential,
order.
2. Press Random again to turn off random play. This button is not
available for DVD video.
c(Stop):
1. Press to stop play of the DVD.
2. Press
k(play/pause) to
continue playing the DVD from
where the DVD was stopped.
3. Press twice to return to the beginning of the DVD.
k(Play/Pause):
1. Press to pause the DVD.
2. Press again to play the DVD from where the DVD was
stopped.
Angle:
1. Press to adjust the viewing angle of the DVD. 2. Repeatedly press to toggle
through the angles. This button
is not available when the DVD is
stopped. This may not be
available on all DVDs.
Audio Stream:
1. Press to display the audio stream number and to change
the language heard.
2. Repeatedly press to toggle through the available languages.
This may not be available on all
DVDs. This button is not
available when the DVD is
stopped.
Subtitle Stream:
1. Press to playback the video with subtitles.
2. Repeatedly press this button to toggle through the available
languages.
3. To turn the subtitles off, press until Off is selected. This button
is not available when the DVD is
stopped. This may not be
available on all DVDs.
Page 19 of 70
Black plate (19,1)Cadillac CTS/CTS-V Navigation System - 2013 - crc - 8/21/12
Infotainment System 19
Top Menu:Press to display the
first menu of the DVD. This button is
not available on all DVDs.
Menu: Press to display the DVD
menu of the current area of the DVD
that is playing. This button is not
available for DVD audio.
Keypad: Press to display the title/
chapter, the group/track, or the
menu number screen; type in the
appropriate number on the keypad.
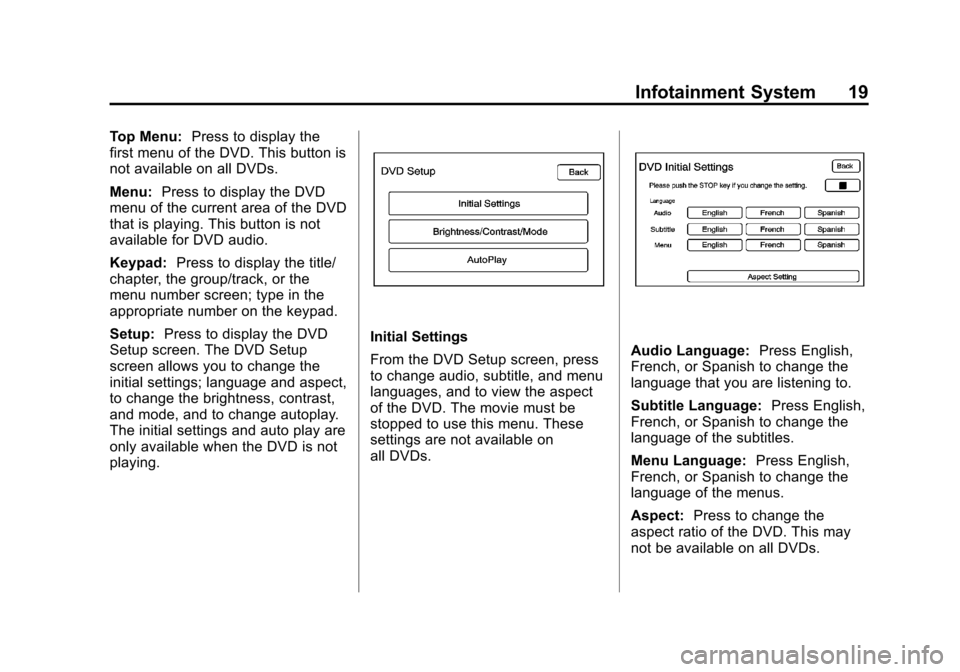
Setup: Press to display the DVD
Setup screen. The DVD Setup
screen allows you to change the
initial settings; language and aspect,
to change the brightness, contrast,
and mode, and to change autoplay.
The initial settings and auto play are
only available when the DVD is not
playing.
Initial Settings
From the DVD Setup screen, press
to change audio, subtitle, and menu
languages, and to view the aspect
of the DVD. The movie must be
stopped to use this menu. These
settings are not available on
all DVDs.Audio Language: Press English,
French, or Spanish to change the
language that you are listening to.
Subtitle Language: Press English,
French, or Spanish to change the
language of the subtitles.
Menu Language: Press English,
French, or Spanish to change the
language of the menus.
Aspect: Press to change the
aspect ratio of the DVD. This may
not be available on all DVDs.
Page 21 of 70
Black plate (21,1)Cadillac CTS/CTS-V Navigation System - 2013 - crc - 8/21/12
Infotainment System 21
If the CD/DVD is not playing
correctly, for any other reason, try a
known good disc.
If any error occurs repeatedly or if
an error cannot be corrected,
contact your dealer.
MP3
Using an MP3 CD and DVD
MP3 Format
There are guidelines that must be
met, when creating an MP3 disc.
If the guidelines are not met when
recording a CD-R(W), the CD may
not play. The guidelines are:
.Sampling rate: 8 kHz, 16 kHz,
22.05 kHz, 24 kHz, 32 kHz,
44.1 kHz, and 48 kHz.
.Bit rates supported: 8, 16, 24,
32, 40, 48, 56, 64, 80, 96, 112,
128, 144, 160, 192, 224, 256,
and 320 kbps.
.ID3 tag information is displayed
by the radio if it is available. The
radio will display a filename,
song name, artist name, album
name, and directory name.
.Maximum number of folders is
255 with a maximum hierarchy
of eight folders.
.Create a folder structure that
makes it easy to find songs
while driving. Each folder or
album should contain 18 songs
or less.
.It is recommended that there is a
maximum of 1024 files on a disc.
.The files can be recorded on a
CD-R or CD-RW with a
maximum capacity of 700 MB.
Root Directory
The root directory is treated as a
folder. If the root directory has
compressed audio files, the
directory displays as DISC. All files
contained directly under the root
directory are accessed prior to any root directory folders. However,
playlists can always be accessed
before root folders or files.
Empty Directory or Folder
If a root directory or a folder exists
somewhere in the file structure that
contains only folders/subfolders and
no compressed files directly
beneath them, the player advances
to the next folder in the file structure
that contains compressed audio
files and the empty folder will not be
displayed or numbered.
No Folder
When the CD contains only
compressed files, the files are
located under the root folder. The
next and previous folder functions
have no function on a CD that was
recorded without folders or playlists.
When displaying the name of the
folder the radio displays Disc.
When the CD contains only playlists
and compressed audio files, but no
folders, all files are located under
the root folder. The left and right
Page 22 of 70
Black plate (22,1)Cadillac CTS/CTS-V Navigation System - 2013 - crc - 8/21/12
22 Infotainment System
arrow buttons search playlists (Px)
first and then goes to the root folder.
When the radio displays the name
of the folder the radio
displays DISC.
Order of Play
Tracks are played in the following
order:
.Play begins from the first track in
the first playlist and continues
sequentially through all tracks in
each playlist. When the last
track of the last playlist has been
played, play continues from the
first track of the first playlist.
.If the CD does not contain any
playlists, then play begins from
the first track under the root
directory. When all tracks from
the root directory have been
played, play continues from files
according to their numerical
listing. After playing the last
track from the last folder, play
begins again at the first track of
the first folder or root directory.When play enters a new folder, the
display automatically shows the new
folder name. The new track name
displays.
File System and Naming
The song name that displays is the
song name contained in the file.
If the song name is not present in
the file, then the radio displays the
file name with the extension (such
as .mp3) as the track name.
Preprogrammed Playlists
Preprogrammed playlists which
were created by WinAmp™,
MusicMatch™, or Real Jukebox™
software can be accessed, however,
there is not editing capability. These
playlists are treated as special
folders containing compressed
audio song files.
Playing an MP3
With the ignition on, insert a MP3
CD partway into the slot, label side
up. The player pulls it in and the
MP3 should begin playing. While
playing a MP3, the navigation system is available. If a MP3 is
inserted with the system off and the
ignition on, it starts to play.
When a MP3 CD is inserted, the
MP3 tab activates.
If the ignition or radio is turned off
with a MP3 CD in the player, it stays
in the player. When the ignition or
radio is turned on, the MP3 CD
starts playing where it stopped, if it
was the last selected audio source.
As each new track starts to play, the
track number displays.
If an error displays, see
“CD/DVD
Messages” later in this section.
If viewing a map screen, press the
MP3 screen button. The display
splits between the audio screen and
the map screen. If no split screen is
wanted or if not on a map screen,
press the AUDIO control button,
then press AUDIO until MP3 is
selected or press the MP3 screen
button.
Page 24 of 70
Black plate (24,1)Cadillac CTS/CTS-V Navigation System - 2013 - crc - 8/21/12
24 Infotainment System
song has been selected from
this category, the song name will
appear in the center button on
the main screen.
.Folder: Press to view the
folders that have been stored on
the Disc. Select a folder name to
view all songs in this folder,
select a song. It may take a few
minutes for the system to show
a list. Once a song has been
selected from this category, the
folder name appears in the
center button on the main
screen to show that music is
being played from a specific
folder.
.Artist : Press to view the artists
that have been stored on the
Disc. Select an artist name to
view all songs on that list, select
a song. It may take a few
minutes for the system to show
the list. Once a song has been
selected from this category, the
artist name appears in the
center button on the main screen to show that music is
being played from a specific
artist.
.Album
: Press to view the
albums that have been stored on
the Disc. Select an album name
to view all songs on that list,
select a song. It may take a few
minutes for the system to show
the list. Once a song has been
selected from this category, the
album name appears in the
center button on the main
screen to show that music is
being played from a specific
album.
.Genre : Press to view the
genres that have been stored on
the Disc. Select a genre name to
view all songs on that list, select
a song. Once a song has been
selected from this category, the
genre name appears in the
center button on the main
screen to show that music is
being played from a specific
genre. Audiobooks are also available
through the Genre menu screen.
Hard Drive Device (HDD)
With a hard drive device you are
able to record songs from your CD
player or a mass media storage
device connected by a USB
connector. The hard drive has at the
most 9 GB memory capacity for
storage of media files.
The types of formats supported by
the HDD are:
.MP3
.MP3-PRO (with Spectral Band
Replication)
.WMA
.AAC
.OGG Vorbis
.Audible.com
Recording from a CD
To record all tracks:
1. Load a CD.
Page 25 of 70
Black plate (25,1)Cadillac CTS/CTS-V Navigation System - 2013 - crc - 8/21/12
Infotainment System 25
To record an audio book from a
CD or a USB, you must register
with www.audible.com to receive
an ID number. The ID number
must be entered into the system.
See Audio Book later in this
section for information on
www.audible.com. See“Radio”
under Configure Menu on
page 51 for information on
entering your ID number.
2. Press REC.
3. A confirmation window displays. Press Yes to record all tracks;
press No to cancel the
operation.
A progress bar displays if Yes
was selected.
To record selected tracks:
1. Load a CD.
2. Press the Track List screen button, located in the middle of
the screen.
3. Highlight the songs from the Music Navigator screen using
the TUNE knob. To record an audio book from a
CD or a USB, you must register
with www.audible.com to receive
an ID number. The ID number
must be entered into the system.
See Audio Book later in this
section for information on
www.audible.com. See
“Radio”
under Configure Menu on
page 51 for information on
entering your ID number.
4. Press REC.
5. A confirmation window displays. Press Yes to record this track;
press No to cancel the
operation.
A progress bar displays if Yes
was selected.
While recording a CD to the HDD,
if the system is turned off, the
recording process stops. When the
system is turned back on, the
recording process will not continue.Recording from a USB Device
To record all tracks:
1. Connect a USB device. To record an audio book from a
CD or a USB, you must register
with www.audible.com to receive
an ID number. The ID number
must be entered into the system.
See Audio Book later in this
section for information on
www.audible.com. See “Radio”
under Configure Menu on
page 51 for information on
entering your ID number.
2. Press REC.
3. A confirmation window displays. Press Yes to record all tracks;
press No to cancel the
operation.
A progress bar displays if Yes
was selected.
Page 26 of 70
Black plate (26,1)Cadillac CTS/CTS-V Navigation System - 2013 - crc - 8/21/12
26 Infotainment System
To record selected tracks:
1. Connect a USB device.
2. Press the USB screen button,located in the middle of the
screen.
3. Select the media from the Music Navigator screen.
To record an audio book from a
CD or a USB, you must register
with www.audible.com to receive
an ID number. The ID number
must be entered into the system.
See Audio Book later in this
section for information on
www.audible.com. See “Radio”
under Configure Menu on
page 51 for information on
entering your ID number.
4. Press REC.
5. A confirmation window displays. Press Yes to record this track;
press No to cancel the
operation.
A progress bar displays if Yes
was selected. While recording a USB device to the
HDD, if the system is turned off, the
recording process stops. When the
system is turned back on, the
recording process will not continue.
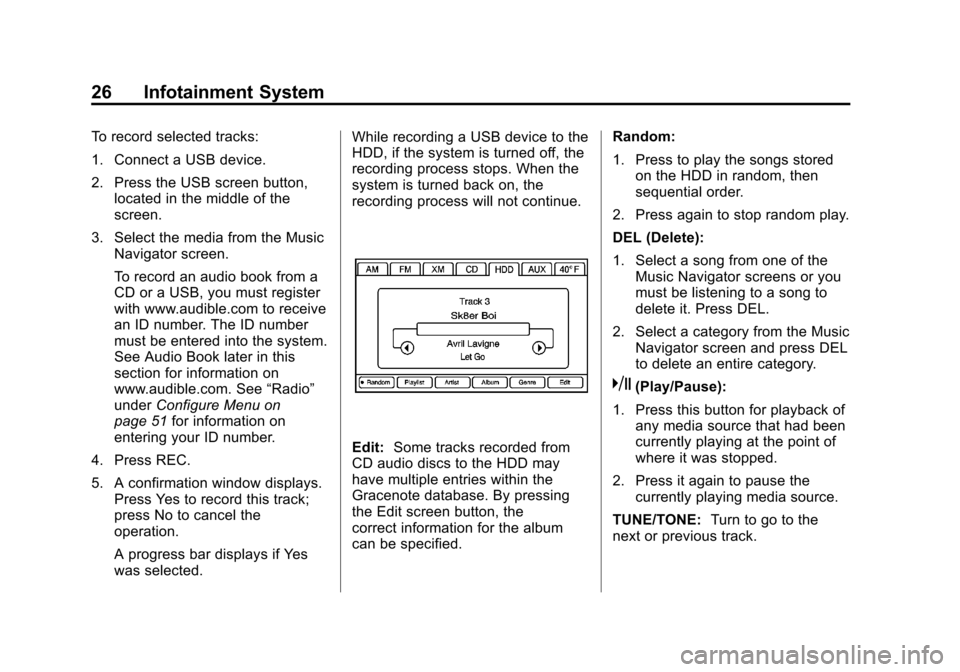
Edit:
Some tracks recorded from
CD audio discs to the HDD may
have multiple entries within the
Gracenote database. By pressing
the Edit screen button, the
correct information for the album
can be specified. Random:
1. Press to play the songs stored
on the HDD in random, then
sequential order.
2. Press again to stop random play.
DEL (Delete):
1. Select a song from one of the Music Navigator screens or you
must be listening to a song to
delete it. Press DEL.
2. Select a category from the Music Navigator screen and press DEL
to delete an entire category.
k(Play/Pause):
1. Press this button for playback of any media source that had been
currently playing at the point of
where it was stopped.
2. Press it again to pause the currently playing media source.
TUNE/TONE: Turn to go to the
next or previous track.
Page 27 of 70
Black plate (27,1)Cadillac CTS/CTS-V Navigation System - 2013 - crc - 8/21/12
Infotainment System 27
uSEEK /tSEEK:
1. Press the right arrow to go to the next track.
2. Press the left arrow to go to the start of the current track, if more
than five seconds have played
or to the previous track,
if five seconds or less have
played.
3. If either arrow is pressed more than once, the player continues
moving backward or forward
through the HDD. The sound
mutes while seeking.
q r(Category):
1. Select the left or right arrow to go to the previous or next
Album/Playlist/Artist/Genre/
Audiobook on the HDD.
2. Press the center button on the main screen to display Music
Navigator.
Music Navigator Screen
Selecting any of the following
screen buttons, when in HDD,
displays the Music Navigator screen
for each of the following categories.
All Songs:
1. Press to view all songs storedon HDD.
2. Select a song name from that list. It may take a few minutes for
the system to show the list.
Once a song has been selected
from this category, the song
name will appear in the center
button on the main screen.
Playlists:
1. Press to view the playlists that have been stored on the HDD.
2. Select a playlist name to view all songs that have been stored in
this list, select a song. Once a
song has been selected from
this category, the "Playlist”
appears in the center button on the main screen to show that
music is being played in
this mode.
Under the playlist category, there is
a submenu button called, More
Like This.
1. Press this button to see a playlist of songs similar to the
current song is generated by
music recognition technology
and related data that are
provided by Gracenote.
2. Select a song to listen to after the list is created.
3. Press the Refresh screen button to generate the new list.
Once a song has been selected
from this category, the “AutoPlay”
appears in the center button on the
main screen to show music is being
played in this mode.
Artists:
1. Press to view the artists that have been stored on the HDD.
Page 28 of 70
Black plate (28,1)Cadillac CTS/CTS-V Navigation System - 2013 - crc - 8/21/12
28 Infotainment System
2. Select an artist name to view allsongs in this list, select a song
to listen to.
Once a song has been selected
from this category, the “Artist”
appears in the center button on the
main screen to show that music is
being played in this mode.
Albums:
1. Press to view the albums that
have been stored on the HDD.
2. Select an album name to view all songs in this list, select a
song to listen to.
Once a song has been selected
from this category, the “Album”
appears in the center button on the
main screen to show that music is
being played in this mode.
Genres:
1. Press to view the genres that
have been stored on the HDD. 2. Select a genre name to view all
songs or audio books in this list,
select a song or book to
listen to.
Once a song or book has been
selected from this category, the
“Genre“ appears in the center button
on the main screen to show that
playback is in this mode.
Audio books are only available
through the Genre menu.
1. Press to view the genres that have been stored on the HDD.
Select an audio book name
(book title) to view all sections
in it.
2. Select a section to listen to. If the “Last position” screen
button is pressed, the audio
book starts playback from the
position it was stopped the last
time played.
Compressed Audio
The HDD will play an MP3/WMA
disc that contains compressed CD
audio from all formats that are supported. By default the radio
shows the CD label on the left side
of the screen but plays all supported
file formats in the order in which
they were recorded to the CD.
Background Recording
A CD can be copied and then
listened to or a CD can be recording
while listening to another source
such as AM, FM, HDD, or AUX. The
quality of the listening experience
should be the same whether
recording in the background or not,
and the speed of the recording
process does not take any longer
than normal.
Timeshift cannot be activated during
the background recording function.
Duplicate Content
When record is executed the
system checks to see if the CD has
already been recorded to the hard
drive. If the entire contents of the
CD still exists on the hard drive the
system will not record the content.
If the system determines that none