AUX CADILLAC CTS 2013 2.G Owners Manual
[x] Cancel search | Manufacturer: CADILLAC, Model Year: 2013, Model line: CTS, Model: CADILLAC CTS 2013 2.GPages: 478, PDF Size: 7.7 MB
Page 23 of 478
Black plate (17,1)Cadillac CTS/CTS-V Owner Manual - 2013 - crc2 - 8/22/12
In Brief 1-17
coast, and in digital-quality sound.
A fee is required to receive the
SiriusXM service.
Refer to:
.www.siriusxm.com or call
1-866-635-2349 (U.S.).
.www.xmradio.ca or call
1-877-209-0079 (Canada).
See Satellite Radio on page 7‑11.
Portable Audio Devices
Some vehicles have a 3.5 mm
(1/8 in) auxiliary input and a USB
port in the center console bin.
External devices such as iPods
®,
laptop computers, MP3 players, CD
changers, and USB drives may be
connected, depending on the audio
system.
See Auxiliary Devices on page 7‑34.
Bluetooth®
The Bluetooth®system allows users
with a Bluetooth-enabled mobile
phone to make and receive
hands-free calls using the vehicle
audio system and controls.
The Bluetooth-enabled mobile
phone must be paired with the
in-vehicle Bluetooth system before it
can be used in the vehicle. Not all
phones will support all functions.
See Bluetooth on page 7‑36.
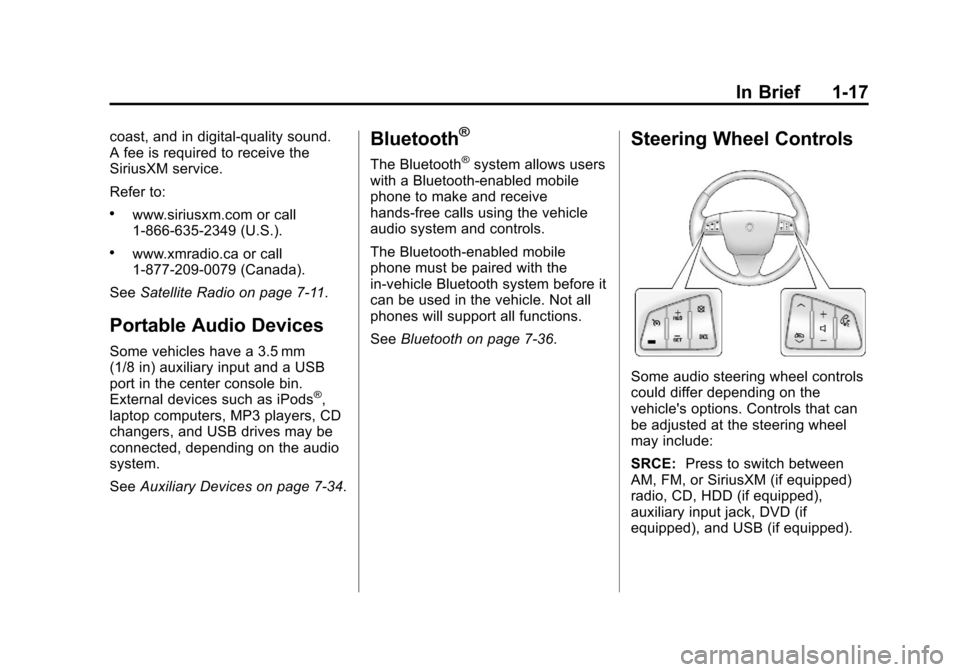
Steering Wheel Controls
Some audio steering wheel controls
could differ depending on the
vehicle's options. Controls that can
be adjusted at the steering wheel
may include:
SRCE: Press to switch between
AM, FM, or SiriusXM (if equipped)
radio, CD, HDD (if equipped),
auxiliary input jack, DVD (if
equipped), and USB (if equipped).
Page 125 of 478

Black plate (3,1)Cadillac CTS/CTS-V Owner Manual - 2013 - crc2 - 8/22/12
Instruments and Controls 5-3
Steering Wheel Controls
Some audio steering wheel controls
could differ depending on the
vehicle's options. Controls that can
be adjusted at the steering wheel
may include:
SRCE (Source):Press to switch
between AM, FM, or SiriusXM™
(if equipped) radio, CD, DVD
(if equipped), HDD (if equipped),
auxiliary input jack, and USB
(if equipped).
yorc/z(Previous/Next):
Press to go to the previous or next
radio station stored as a favorite,
or the previous or next track of
a CD.
Press to interact with the Bluetooth
®
system. See Bluetooth on
page 7‑36 for more information.
+
e− (Volume): Press to increase
or to decrease the volume.
b/g(Mute/Speech Recognition/
Push to Talk): Press and release
to silence the vehicle speakers only.
The audio of the wireless and wired
headphones, if the vehicle has
these features, do not mute. Press
and release
b/gagain, to turn the
sound on.
.For vehicles with a navigation
system, press and hold
b/gfor
two seconds to initiate speech
recognition. See “Speech
Recognition” in the navigation
manual for more information.
.For vehicles without a navigation
system, press and hold
b/gfor
two seconds to interact with
OnStar
®or Bluetooth. See
OnStar Overview on page 14‑1
or Bluetooth on page 7‑36 for
more information about these
features.
.For vehicles with a navigation
system, OnStar, or Bluetooth,
press and hold
b/gfor
two seconds and say “hands
free” to interact with OnStar or
Bluetooth. See OnStar Overview
on page 14‑1 orBluetooth on
page 7‑36 for more information
about these features.
Page 154 of 478

Black plate (32,1)Cadillac CTS/CTS-V Owner Manual - 2013 - crc2 - 8/22/12
5-32 Instruments and Controls
BATTERY VOLTS LOW
This message displays when the
electrical system is charging less
than 10 volts or the battery has
been drained.
If this message appears
immediately after starting the
engine, it is possible that the
generator can still recharge the
battery. The battery should recharge
while driving, but may take a few
hours to do so. Consider using an
auxiliary charger to boost the
battery after returning home or
arriving at a final destination. Make
sure you follow the manufacturer's
instructions.
If this message appears while
driving or after starting the vehicle
and stays on, have it checked
immediately to determine the cause
of this problem.
To help the generator recharge the
battery quickly, reduce the load on
the electrical system by turning off
the accessories.The normal battery voltage range is
11.5 to 15.5 volts. Monitor battery
voltage on the DIC by pressing the
vehicle information button until
Battery Voltage is displayed.
SERVICE BATTERY
CHARGING SYSTEM
This message displays when there
is a problem with the generator and
battery charging systems. Driving
with this problem could drain the
battery. Turn off all unnecessary
accessories. Stop and turn off the
vehicle as soon as it is safe to do
so. Have the electrical system
checked by your dealer. Under
certain conditions, the charging
system light may also turn on in the
instrument cluster. See
Charging
System Light on page 5‑19.
Brake System Messages
PARK BRAKE RELEASED
For vehicles with the electric parking
brake, this message displays when
the parking brake has been released from the set position. See
the electric parking brake
information under
Parking Brake
(Electric) on page 9‑33 orParking
Brake (Manual) on page 9‑32.
PARK BRAKE SET
For vehicles with the electric parking
brake, this message displays when
the parking brake has been applied
to the set position. See the electric
parking brake information under
Parking Brake (Electric) on
page 9‑33 orParking Brake
(Manual) on page 9‑32.
PRESS BRAKE TO START
ENGINE (AUTOMATIC
TRANSMISSION ONLY)
If the vehicle has the keyless
access system, this message
displays if you try to start the engine
without having the brake pressed.
The brake needs to be pressed
when starting the engine. See
Ignition Positions (Keyless Access)
on page 9‑15 orIgnition Positions
(Key Access) on page 9‑17.
Page 189 of 478
Black plate (1,1)Cadillac CTS/CTS-V Owner Manual - 2013 - crc2 - 8/22/12
Infotainment System 7-1
Infotainment
System
Introduction
Infotainment . . . . . . . . . . . . . . . . . . . 7-1
Theft-Deterrent Feature . . . . . . . 7-2
Operation . . . . . . . . . . . . . . . . . . . . . 7-3
Radio
AM-FM Radio . . . . . . . . . . . . . . . . . 7-8
Satellite Radio . . . . . . . . . . . . . . . 7-11
Radio Reception . . . . . . . . . . . . . 7-15
Backglass Antenna . . . . . . . . . . 7-15
Multi-Band Antenna . . . . . . . . . . 7-16
Audio Players
CD Player . . . . . . . . . . . . . . . . . . . 7-16
CD/DVD Player . . . . . . . . . . . . . . 7-19
MP3 . . . . . . . . . . . . . . . . . . . . . . . . . 7-23
Hard Drive Device (HDD) . . . . 7-27
Auxiliary Devices . . . . . . . . . . . . 7-34
Phone
Bluetooth . . . . . . . . . . . . . . . . . . . . 7-36
Trademarks and License
Agreements
Trademarks and LicenseAgreements . . . . . . . . . . . . . . . . 7-44
Introduction
Infotainment
Read the following pages to
become familiar with the audio
system's features.
{WARNING
Taking your eyes off the road for
extended periods could cause a
crash resulting in injury or death
to you or others. Do not give
extended attention to infotainment
tasks while driving.
This system provides access to
many audio and non‐audio listings.
To minimize taking your eyes off the
road while driving, do the following
while the vehicle is parked:
.Become familiar with the
operation and controls of the
audio system.
Page 208 of 478
Black plate (20,1)Cadillac CTS/CTS-V Owner Manual - 2013 - crc2 - 8/22/12
7-20 Infotainment System
Care of the CD/DVD Player
Do not add a label to a disc; it could
get caught in the CD/DVD player.
If a label is needed, label the top of
the recorded disc with a
marking pen.
The use of disc lens cleaners for
discs is not advised, due to the risk
of contaminating the lens of the disc
optics with lubricants internal to the
CD/DVD player mechanism.
Notice:If a label is added to a
disc, or more than one disc is
inserted into the slot at a time,
or an attempt is made to play
scratched or damaged discs, the
CD/DVD player could be
damaged. While using the CD/
DVD player, use only discs in
good condition without any label,
load one dosc at a time, and keep
the CD/DVD player and the
loading slot free of foreign
materials, liquids, and debris.Control Buttons
The knobs and buttons used to
control the CD/DVD player are:
CD/AUX (CD/Auxiliary): Press to
switch between CD/DVD, auxiliary
input, and USB devices.
¨SEEK or©SEEK: Press to
select tracks.
TUNE/TONE: Turn and then press
to select tracks.
MENU/SELECT: Turn and then
press to select.
r/j(Play/Pause): Press to pause
and restart CD or DVD playback.
sREV (Fast Reverse): In CD or
MP3 playback mode, press and
hold to reverse playback quickly
within a track. Sound is heard at a
reduced volume. When released,
normal playback resumes and the
elapsed time of the track displays.
In DVD-Audio playback mode, press
once to change playback to a speed
of 2X. Each successive press changes playback to a speed of 4X,
10X, or 21X. Press
r/jto resume
normal playback.
\FWD (Fast Forward): In CD or
MP3 playback mode, press and
hold to advance playback quickly
within a track. Sound is heard at a
reduced volume. When released,
normal playback resumes and the
elapsed time of the track displays.
In DVD-Audio playback mode, press
once to change playback to a speed
of 2X. Each successive press
changes playback to a speed of 4X,
10X, or 21X. Press
r/jto resume
normal playback.
Z(Eject): Press to eject the disc.
Inserting a Disc
With the printed side facing up,
insert a disc into the audio CD/DVD
slot until it is drawn in. The disc
track number and a Shuffle tab
display and playback begins.
Page 222 of 478
Black plate (34,1)Cadillac CTS/CTS-V Owner Manual - 2013 - crc2 - 8/22/12
7-34 Infotainment System
the radio, the content from the
current station is always being
buffered to the HDD.
Press
r/j(play/pause) to pause
the radio. The radio display will
show the Time Shift buffer status
bar. The status bar shows the
amount of content stored in the
buffer and the current pause point.
To resume playback from the
current pause point, press
r/j
again. The radio will no longer be
playing “live”radio. Instead, time
shifted content is being played from
the buffer. When the radio is playing
time shifted content from the buffer,
a buffer status bar shows below the
station number on the left side of
the screen.
Press and hold
sREV or\FWD
to rewind or fast forward through the
time shift buffer. Hold
\FWD until
the end of the currently recorded
buffer to resume “live”radio
playback. With “live”radio playing, the radio display will no longer show
the buffer bar below the station
number.
On AM/FM, press
sREV or\
FWD multiple times to rewind or fast
forward. Each press will rewind or
fast forward 30 seconds of content.
On XM, press
sREV or\FWD
multiple times to jump to the
previous or next song or
commercial.
When the radio station is changed,
the buffer is cleared and
automatically restarted for the
current station. You cannot rewind
the content from a previously tuned
station.
Time shifting of AM/FM or XM is not
available while recording or while
other sources of playback are
selected. Pausing AM/FM or XM™
(if equipped) with the Vehicle
Turned Off
If AM/FM or XM is paused before
the vehicle is turned off, the radio
will continue to buffer the current
radio station for up to one hour.
If the vehicle is turned back on
within one hour, the radio will
automatically resume playback from
the pause point.
Auxiliary Devices
The 3.5 mm (1/8 in) auxiliary input
jack and the USB port (if equipped)
in the center console bin, allow
portable devices to connect to the
vehicle. This is not an audio output;
do not plug headphones into the
auxiliary input jack.
Set up auxiliary devices while the
vehicle is stopped. See
Defensive
Driving on page 9‑3 for more
information on driver distraction.
Page 223 of 478
Black plate (35,1)Cadillac CTS/CTS-V Owner Manual - 2013 - crc2 - 8/22/12
Infotainment System 7-35
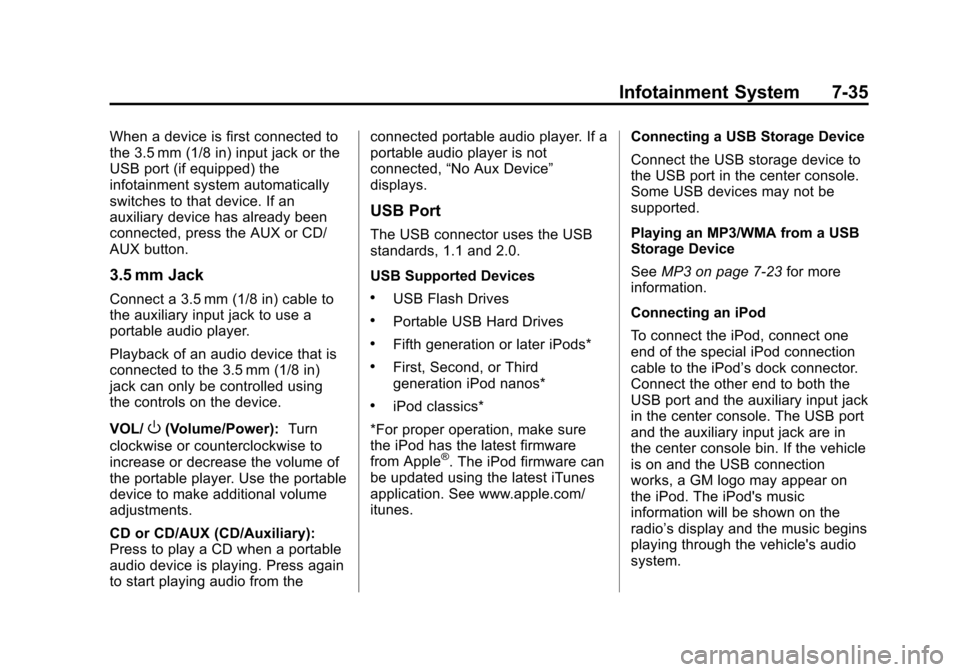
When a device is first connected to
the 3.5 mm (1/8 in) input jack or the
USB port (if equipped) the
infotainment system automatically
switches to that device. If an
auxiliary device has already been
connected, press the AUX or CD/
AUX button.
3.5 mm Jack
Connect a 3.5 mm (1/8 in) cable to
the auxiliary input jack to use a
portable audio player.
Playback of an audio device that is
connected to the 3.5 mm (1/8 in)
jack can only be controlled using
the controls on the device.
VOL/
O(Volume/Power):Turn
clockwise or counterclockwise to
increase or decrease the volume of
the portable player. Use the portable
device to make additional volume
adjustments.
CD or CD/AUX (CD/Auxiliary):
Press to play a CD when a portable
audio device is playing. Press again
to start playing audio from the connected portable audio player. If a
portable audio player is not
connected,
“No Aux Device”
displays.
USB Port
The USB connector uses the USB
standards, 1.1 and 2.0.
USB Supported Devices
.USB Flash Drives
.Portable USB Hard Drives
.Fifth generation or later iPods*
.First, Second, or Third
generation iPod nanos*
.iPod classics*
*For proper operation, make sure
the iPod has the latest firmware
from Apple
®. The iPod firmware can
be updated using the latest iTunes
application. See www.apple.com/
itunes. Connecting a USB Storage Device
Connect the USB storage device to
the USB port in the center console.
Some USB devices may not be
supported.
Playing an MP3/WMA from a USB
Storage Device
See
MP3 on page 7‑23 for more
information.
Connecting an iPod
To connect the iPod, connect one
end of the special iPod connection
cable to the iPod’s dock connector.
Connect the other end to both the
USB port and the auxiliary input jack
in the center console. The USB port
and the auxiliary input jack are in
the center console bin. If the vehicle
is on and the USB connection
works, a GM logo may appear on
the iPod. The iPod's music
information will be shown on the
radio’s display and the music begins
playing through the vehicle's audio
system.
Page 337 of 478
Black plate (37,1)Cadillac CTS/CTS-V Owner Manual - 2013 - crc2 - 8/22/12
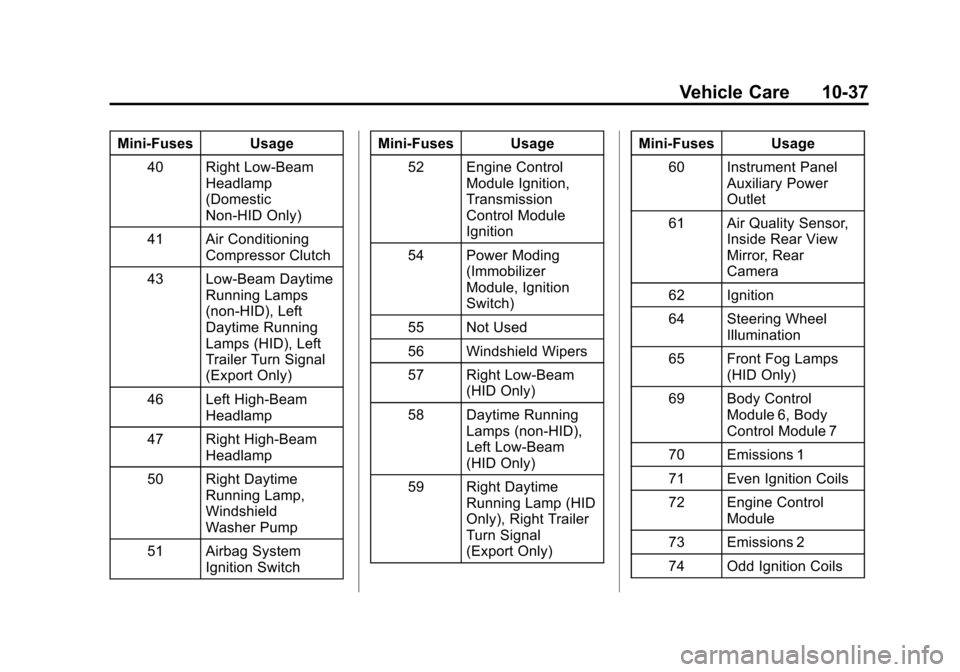
Vehicle Care 10-37
Mini-Fuses Usage40 Right Low-Beam Headlamp
(Domestic
Non-HID Only)
41 Air Conditioning Compressor Clutch
43 Low-Beam Daytime Running Lamps
(non-HID), Left
Daytime Running
Lamps (HID), Left
Trailer Turn Signal
(Export Only)
46 Left High-Beam Headlamp
47 Right High-Beam Headlamp
50 Right Daytime Running Lamp,
Windshield
Washer Pump
51 Airbag System Ignition Switch Mini-Fuses Usage
52 Engine Control Module Ignition,
Transmission
Control Module
Ignition
54 Power Moding (Immobilizer
Module, Ignition
Switch)
55 Not Used
56 Windshield Wipers
57 Right Low-Beam (HID Only)
58 Daytime Running Lamps (non-HID),
Left Low-Beam
(HID Only)
59 Right Daytime Running Lamp (HID
Only), Right Trailer
Turn Signal
(Export Only) Mini-Fuses Usage
60 Instrument Panel Auxiliary Power
Outlet
61 Air Quality Sensor, Inside Rear View
Mirror, Rear
Camera
62 Ignition
64 Steering Wheel Illumination
65 Front Fog Lamps (HID Only)
69 Body Control Module 6, Body
Control Module 7
70 Emissions 1
71 Even Ignition Coils
72 Engine Control Module
73 Emissions 2
74 Odd Ignition Coils
Page 338 of 478

Black plate (38,1)Cadillac CTS/CTS-V Owner Manual - 2013 - crc2 - 8/22/12
10-38 Vehicle Care
Mini-Fuses Usage75 Transmission Output Speed
Sensor, Brake
Vacuum Relay
76 Spare
77 Spare
78 Spare
79 Spare
80 Spare
81 Spare
J-Case Fuses Usage
6 Cooling Fan 2
7 Cooling Fan 1
8 Starter
9 Brake Vacuum Pump
10 Antilock Brake System Motor J-Case
Fuses Usage
13 Not Used
14 Electric Parking Brake
15 Not Used
16 Not Used
17 Blower Motor
18 Rear Window Defogger
37 Not Used
Relays Usage 1 Cooling Fan 2
2 Cooling Fan 1
3 Starter
4 Rear Window Defogger
5 Instrument Panel Auxiliary Power
Outlet Relays Usage
12 Horn
20 Headlamp Washer (HID Only)
21 Cooling Fan (Series/ Parallel)
32 Air Conditioning Compressor Clutch
39 Windshield Washer Pump
42 Right Daytime Running Lamp,
Trailer Turn Signal
44 Low-Beam (non-HID), Left
Daytime Running
Lamps (HID), Left
Trailer Turn Signal
(Export Only)
45 Front Fog Lamps (HID Only)
48 High-Beam Headlamps
Page 341 of 478
Black plate (41,1)Cadillac CTS/CTS-V Owner Manual - 2013 - crc2 - 8/22/12
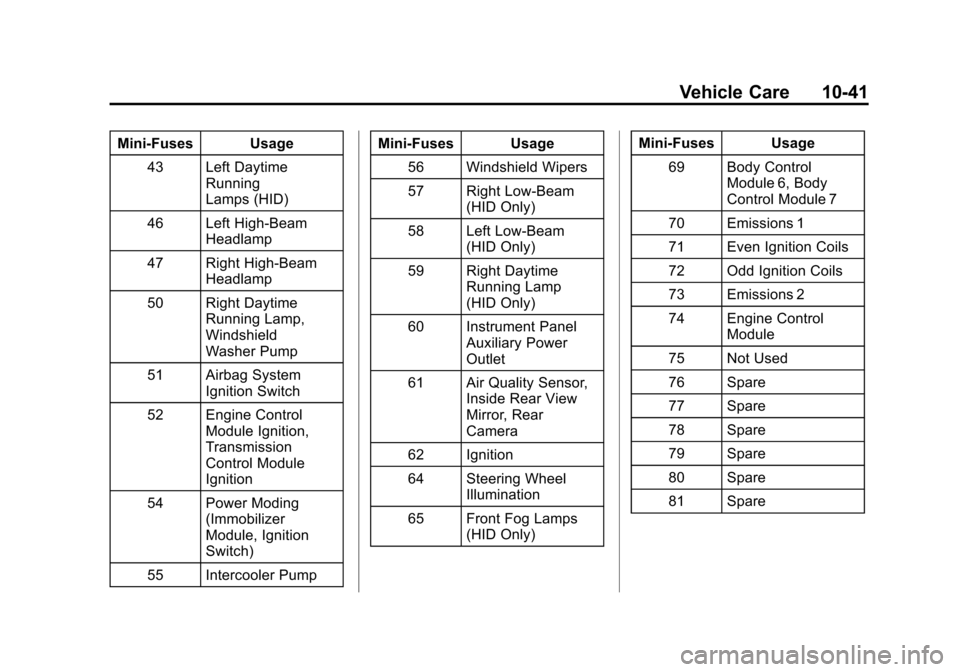
Vehicle Care 10-41
Mini‐Fuses Usage43 Left Daytime Running
Lamps (HID)
46 Left High‐Beam Headlamp
47 Right High‐Beam Headlamp
50 Right Daytime Running Lamp,
Windshield
Washer Pump
51 Airbag System Ignition Switch
52 Engine Control Module Ignition,
Transmission
Control Module
Ignition
54 Power Moding (Immobilizer
Module, Ignition
Switch)
55 Intercooler Pump Mini‐Fuses Usage
56 Windshield Wipers
57 Right Low‐Beam (HID Only)
58 Left Low‐Beam (HID Only)
59 Right Daytime Running Lamp
(HID Only)
60 Instrument Panel Auxiliary Power
Outlet
61 Air Quality Sensor, Inside Rear View
Mirror, Rear
Camera
62 Ignition
64 Steering Wheel Illumination
65 Front Fog Lamps (HID Only) Mini‐Fuses Usage
69 Body Control Module 6, Body
Control Module 7
70 Emissions 1
71 Even Ignition Coils
72 Odd Ignition Coils
73 Emissions 2
74 Engine Control Module
75 Not Used
76 Spare
77 Spare
78 Spare
79 Spare
80 Spare
81 Spare