display CADILLAC CTS 2016 3.G User Guide
[x] Cancel search | Manufacturer: CADILLAC, Model Year: 2016, Model line: CTS, Model: CADILLAC CTS 2016 3.GPages: 354, PDF Size: 3.56 MB
Page 55 of 354
Cadillac CTS/CTS-V Owner Manual (GMNA-Localizing-MidEast-9369309) -
2016 - crc - 7/30/15
54 Seats and Restraints
Front Seats
Power Seat Adjustment
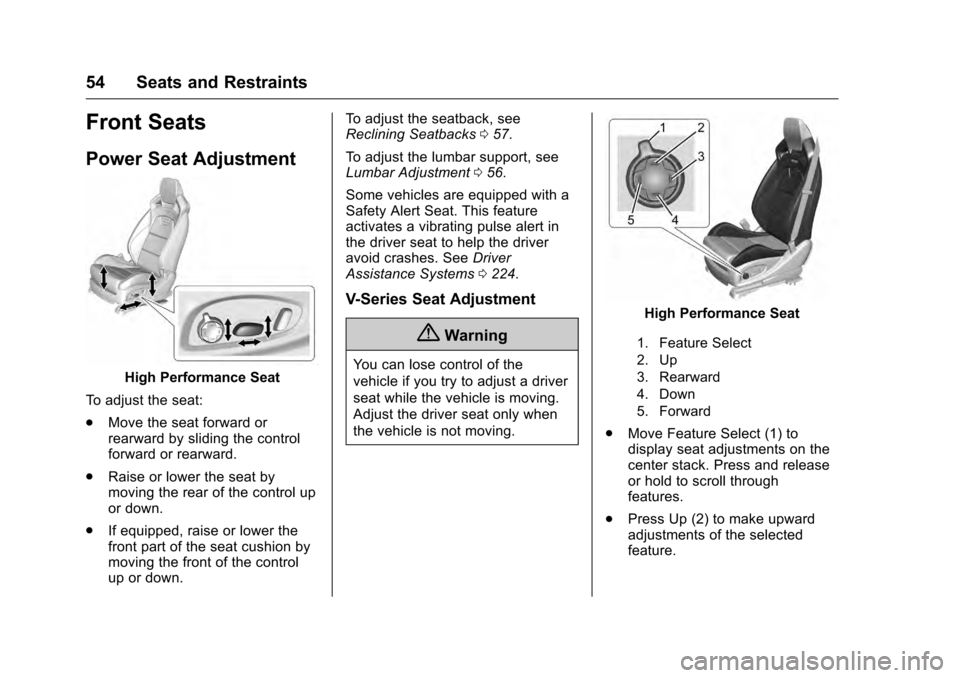
High Performance Seat
To adjust the seat:
. Move the seat forward or
rearward by sliding the control
forward or rearward.
. Raise or lower the seat by
moving the rear of the control up
or down.
. If equipped, raise or lower the
front part of the seat cushion by
moving the front of the control
up or down. To adjust the seatback, see
Reclining Seatbacks
057.
To adjust the lumbar support, see
Lumbar Adjustment 056.
Some vehicles are equipped with a
Safety Alert Seat. This feature
activates a vibrating pulse alert in
the driver seat to help the driver
avoid crashes. See Driver
Assistance Systems 0224.
V-Series Seat Adjustment
{Warning
You can lose control of the
vehicle if you try to adjust a driver
seat while the vehicle is moving.
Adjust the driver seat only when
the vehicle is not moving.
High Performance Seat
1. Feature Select
2. Up
3. Rearward
4. Down
5. Forward
.
Move Feature Select (1) to
display seat adjustments on the
center stack. Press and release
or hold to scroll through
features.
. Press Up (2) to make upward
adjustments of the selected
feature.
Page 60 of 354
Cadillac CTS/CTS-V Owner Manual (GMNA-Localizing-MidEast-9369309) -
2016 - crc - 7/30/15
Seats and Restraints 59
Manually Recalling Memory
Positions
Press and hold 1, 2, or
Bto
manually recall the previously
stored memory positions. Releasing
1, 2, or
Bbefore the stored
positions are reached stops the
recall.
Automatically Recalling Memory
Positions
If programmed in the vehicle
personalization Menu, the Auto
(Automatic) Memory Recall feature
automatically recalls the current
driver ’s previously stored 1 or 2
position when the ignition is
changed from off to ON/RUN/
START or ACC/ACCESSORY.
The transmission must be in
P (Park).
See Vehicle Personalization 0147.
To stop recall movement, press one
of the memory, driver seat, outside
mirror, or power tilt and telescoping
steering column controls. RKE transmitters are not labeled
with a number. If your memory seat
position is stored to 1 or 2 but this
position is not automatically
recalling, then store your positions
to the other button or switch RKE
transmitters with the other driver.
If the vehicle’s driver has changed,
in some vehicles the Driver ID may
be displayed for the first few ignition
cycles.
Easy Exit Recall
If programmed on in the vehicle
personalization menu, the Easy Exit
feature recalls the previously stored
B(Exit) positions when leaving the
vehicle. See “Storing Memory
Positions” listed previously. See
also Vehicle Personalization 0147.
Easy Exit Recall automatically
activates when one of the following
occurs:
. The vehicle is turned off and the
driver door is opened within a
short time.
. The vehicle is turned off with the
driver door open. Obstructions
If something has blocked the driver
seat and/or the power tilt and
telescoping steering column while
recalling a memory position, the
recall may stop. Remove the
obstruction. Then do one of the
following:
.
If automatically or manually
recalling the stored memory
position, press and hold the
appropriate manual control for
two seconds. Try recalling again
by pressing the appropriate
memory button, then try recalling
again by opening the driver door
and pressingKon the RKE
transmitter..
. If recalling the exit position,
press and hold the appropriate
manual control for the exit
feature not recalling for
two seconds. Then try recalling
the exit position again.
If the memory position is still not
recalling, see your dealer for
service.
Page 64 of 354

Cadillac CTS/CTS-V Owner Manual (GMNA-Localizing-MidEast-9369309) -
2016 - crc - 7/30/15
Seats and Restraints 63
{Warning
A safety belt that is improperly
routed, not properly attached,
or twisted will not provide the
protection needed in a crash. The
person wearing the belt could be
seriously injured. After raising the
rear seatback, always check to be
sure that the safety belts are
properly routed and attached, and
are not twisted.
To raise a seatback: 1. Lift the seatback up. Make sure the center safety belt and latch
do not get trapped behind the
seat. Push the seatback
rearward to secure it in place.
A red tab near the seatback
lever retracts when the
seatback is in place.
2. Push and pull the top of the seatback to be sure it is in
position.
3. Lock the seatback using the vehicle key in the cylinder. 4. Reconnect the center safety
belt mini-latch to the
mini-buckle. Do not let the belt
twist.
5. Pull on the center safety belt to make sure the mini-latch is
secure.
6. Repeat the steps to raise the other seatback, if necessary.
When the seat is not in use, it
should be kept in the upright, locked
position.
Heated Rear Seats
{Warning
If you cannot feel temperature
change or pain to the skin, the
seat heater may cause burns.
See the Warning under Heated
and Ventilated Front Seats 060.
If equipped, the buttons are on the
rear of the center console.
With the ignition in ON/RUN/START,
press
MorLto heat the left or right
outboard seat cushion and
seatback. An indicator on the
climate control display appears
when this feature is on.
Press the button once for the
highest setting. With each press of
the button, the heated seat changes
to the next lower setting, and then
the off setting. Three lights indicate
the highest setting, and one light
indicates the lowest. If the heated
Page 70 of 354
Cadillac CTS/CTS-V Owner Manual (GMNA-Localizing-MidEast-9369309) -
2016 - crc - 7/30/15
Seats and Restraints 69
safety belts when the forward
vehicle speed exceeds the
threshold for activation.
The system also activates during
emergency braking and/or sudden
driving maneuvers and releases
when driving conditions return to
normal.
The system turns off whenever
Competitive Driving Mode is
activated, and will turn back on
when Competitive Driving Mode is
deactivated. SeeCompetitive
Driving Mode (V-Series Only) 0211.
The system will not activate if the
Traction Control/Electronic Stability
Control system is not functioning
properly. See Traction Control/
Electronic Stability Control 0206.
If there is a problem with the
Automatic Safety Belt Tightening
System, a message displays on the
Driver Information Center (DIC). See
Safety Belt Messages 0145. Other
safety belt functions are not affected
by the Automatic Safety Belt
Tightening System.Safety Belt Pretensioners
This vehicle has safety belt
pretensioners for front outboard
occupants. Although the safety belt
pretensioners cannot be seen, they
are part of the safety belt assembly.
They can help tighten the safety
belts during the early stages of a
moderate to severe frontal, near
frontal, or rear crash if the threshold
conditions for pretensioner
activation are met. Safety belt
pretensioners can also help tighten
the safety belts in a side crash or a
rollover event.
Pretensioners work only once. If the
pretensioners activate in a crash,
the pretensioners and probably
other parts of the vehicle's safety
belt system will need to be replaced.
See Replacing Safety Belt System
Parts after a Crash 070.
Rear Safety Belt Comfort
Guides
Rear safety belt comfort guides may
provide added safety belt comfort
for older children who have
outgrown booster seats and for some adults. When installed on a
shoulder belt, the comfort guide
positions the belt away from the
neck and head.
Comfort guides may be available
through your dealer for the rear
outboard seating positions.
If available, instructions are included
with the guide.
Safety Belt Use During
Pregnancy
Safety belts work for everyone,
including pregnant women. Like all
occupants, they are more likely to
be seriously injured if they do not
wear safety belts.
Page 104 of 354

Cadillac CTS/CTS-V Owner Manual (GMNA-Localizing-MidEast-9369309) -
2016 - crc - 7/30/15
Instruments and Controls 103
Instruments and
Controls
Controls
Steering Wheel Adjustment . . . 104
Steering Wheel Controls . . . . . . 105
Heated Steering Wheel . . . . . . . 105
Horn . . . . . . . . . . . . . . . . . . . . . . . . . . 105
Windshield Wiper/Washer . . . . 105
Clock . . . . . . . . . . . . . . . . . . . . . . . . . 107
Power Outlets . . . . . . . . . . . . . . . . 107
Wireless Charging . . . . . . . . . . . . 109
Warning Lights, Gauges, and
Indicators
Warning Lights, Gauges, andIndicators . . . . . . . . . . . . . . . . . . . . 111
Instrument Cluster . . . . . . . . . . . . 112
Speedometer . . . . . . . . . . . . . . . . . 116
Odometer . . . . . . . . . . . . . . . . . . . . . 116
Trip Odometer . . . . . . . . . . . . . . . . 116
Tachometer . . . . . . . . . . . . . . . . . . . 116
Fuel Gauge . . . . . . . . . . . . . . . . . . . 117
Engine Coolant Temperature Gauge . . . . . . . . . . . . . . . . . . . . . . 117
Safety Belt Reminders . . . . . . . . 118
Airbag Readiness Light . . . . . . . 119
Passenger Airbag Status Indicator . . . . . . . . . . . . . . . . . . . . . 119 Charging System Light . . . . . . . 120
Malfunction Indicator Lamp
(Check Engine Light) . . . . . . . . 121
Brake System Warning Light . . . . . . . . . . . . . . . . . . . . . . . . 122
Parking Brake Light . . . . . . . . . . 123
Service Electric Parking Brake Light . . . . . . . . . . . . . . . . . . . . . . . . 123
Antilock Brake System (ABS) Warning Light . . . . . . . . . . . . . . . 124
Lane Keep Assist (LKA) Light . . . . . . . . . . . . . . . . . . . . . . . . 124
Vehicle Ahead Indicator . . . . . . 124
Traction Off Light . . . . . . . . . . . . . 125
StabiliTrak
®OFF Light . . . . . . . . 125
Traction Control System (TCS)/ StabiliTrak
®Light . . . . . . . . . . . 125
Engine Coolant Temperature Warning Light . . . . . . . . . . . . . . . 126
Tire Pressure Light . . . . . . . . . . . 126
Engine Oil Pressure Light . . . . 127
Low Fuel Warning Light . . . . . . 127
Security Light . . . . . . . . . . . . . . . . . 127
High-Beam On Light . . . . . . . . . . 128
Adaptive Forward Lighting (AFL) Light . . . . . . . . . . . . . . . . . . 128
Lamps On Reminder . . . . . . . . . 128
Cruise Control Light . . . . . . . . . . 128
Door Ajar Light . . . . . . . . . . . . . . . 129
Information Displays
Driver Information Center (DIC) . . . . . . . . . . . . . . . . 129
Head-Up Display (HUD) . . . . . . 132
Vehicle Messages
Vehicle Messages . . . . . . . . . . . . 135
Battery Voltage and Charging Messages . . . . . . . . . . . . . . . . . . . 135
Brake System Messages . . . . . 136
Cruise Control Messages . . . . . 136
Door Ajar Messages . . . . . . . . . . 137
Engine Cooling System Messages . . . . . . . . . . . . . . . . . . . 137
Engine Oil Messages . . . . . . . . . 138
Engine Power Messages . . . . . 138
Fuel System Messages . . . . . . . 138
Key and Lock Messages . . . . . 139
Lamp Messages . . . . . . . . . . . . . . 139
Object Detection System Messages . . . . . . . . . . . . . . . . . . . 140
Ride Control System Messages . . . . . . . . . . . . . . . . . . . 142
Airbag System Messages . . . . 144
Safety Belt Messages . . . . . . . . 145
Security Messages . . . . . . . . . . . 145
Service Vehicle Messages . . . . 145
Starting the Vehicle Messages . . . . . . . . . . . . . . . . . . . 145
Tire Messages . . . . . . . . . . . . . . . . 146
Transmission Messages . . . . . . 146
Page 106 of 354

Cadillac CTS/CTS-V Owner Manual (GMNA-Localizing-MidEast-9369309) -
2016 - crc - 7/30/15
Instruments and Controls 105
Steering Wheel Controls
The infotainment system can be
operated by using the steering
wheel controls. See "Steering
Wheel Controls" in the infotainment
manual.
Heated Steering Wheel
((Heated Steering Wheel, If
Equipped) : Press to turn the
heated steering wheel on or off.
A light next to the button displays
when the feature is turned on.
The steering wheel takes about
three minutes to be fully heated.
Horn
Pressaon the steering wheel pad
to sound the horn.
Windshield Wiper/Washer
With the ignition in ACC/
ACCESSORY or ON/RUN/START,
move the windshield wiper lever to
select the wiper speed.
HI : Use for fast wipes.
LO : Use for slow wipes.
INT (Intermittent Wipes/Rainsense
Wipe Sensitivity Control) : If
Rainsense™ is turned off, move the
lever up to INT for intermittent
wipes, then turn the
xINT band
up for more frequent wipes or down
for less frequent wipes. If Rainsense
is turned on, see Rainsense™ later
in this section.
If the windshield wipers are in use
for a while when driving, the exterior
lamps come on automatically if the
exterior lamp control is in AUTO.
See “Wiper-Activated Headlamps”
later in this section.
OFF : Use to turn the wipers off.
1X (Mist) : For a single wipe, briefly
move the wiper lever down. For
several wipes, hold the wiper
lever down.
Clear snow and ice from the wiper
blades and windshield before using
them. If frozen to the windshield,
carefully loosen or thaw them.
Damaged blades should be
replaced. See Wiper Blade
Replacement 0277.
Page 108 of 354
Cadillac CTS/CTS-V Owner Manual (GMNA-Localizing-MidEast-9369309) -
2016 - crc - 7/30/15
Instruments and Controls 107
{Warning
In freezing weather, do not use
the washer until the windshield is
warmed. Otherwise the washer
fluid can form ice on the
windshield, blocking your vision.
Wiper-Activated Headlamps
This feature activates the
headlamps and parking lamps after
the windshield wipers have been in
use for a while. The transition time
for the lamps coming on varies
based on the wiper speed. For this
feature to work, the exterior lamp
control must be in AUTO.
The wiper-activated headlamps
immediately turn off when the
ignition is turned to LOCK/OFF,
or the windshield wiper control is
turned off.
Clock
The infotainment system controls
are used to access the time and
date settings through the menusystem. See
“Overview”in the
infotainment manual for information
about how to use the menu system.
Setting the Time
To set the time:
1. Press the SETTINGS screen button and press Time
and Date.
2. Press Set Time and press + or −to increase or decrease
hours, minutes, and AM or PM.
Press 12Hr or 24Hr for 12 or
24 hour clock.
3. Press
}to go back to the
previous menu.
If auto timing is set, the time
displayed on the clock may not
update immediately when driving
into a new time zone.
To set the date: 1. Press the SETTINGS screen button and press Time
and Date.
2. Press Set Date and press + or −to increase or decrease
month, day, or year. 3. Press
}to go back to the
previous menu.
To set the clock display: 1. Press the SETTINGS screen button and press Time
and Date.
2. Press Clock Display and press OFF or ON to turn the clock
display off or on.
3. Press
}to go back to the
previous menu.
Power Outlets
Power Outlets 12 Volt Direct
Current
Accessory power outlets can be
used to plug in electrical equipment,
such as a cell phone or MP3 player.
The vehicle has three 12-volt
accessory power outlets on the
center console:
. Inside the center console
storage in front of the armrest
cover.
. Inside the storage area under
the armrest cover.
Page 111 of 354

Cadillac CTS/CTS-V Owner Manual (GMNA-Localizing-MidEast-9369309) -
2016 - crc - 7/30/15
110 Instruments and Controls
The operating temperature is−20 °C
(−4 °F) to 60 °C (140 °F) for the
charging system and 0 °C (32 °F) to
35 °C (95 °F) for the phone.
{Warning
Remove all metal objects from the
charging pad before charging
your mobile device. Metal objects,
such as coins, keys, rings,
or paper clips, between the phone
and charging pad will become
very hot. On the rare occasion
that the charging system does not
detect a metal object, and the
object gets wedged between the
phone and charger, remove the
phone and allow the metallic
object to cool before removing it
from the charging pad, to prevent
burns.
To charge a mobile device:
1. Open the climate control system panel. 2. Remove all objects from the
charging pad. The system may
not charge if there are any
objects on the charging pad.
3. Place the mobile device face up on the
@symbol on the
charging pad.
4. The
~will display on theV
on the infotainment screen.
This indicates that the mobile
device is properly positioned
and charging. If a phone is
placed on the charging pad
and
~does not display,
remove the phone from the
pad, and wait three seconds
before placing/aligning the
phone on the pad again.
Keep the storage door closed while
driving.
Page 115 of 354
Cadillac CTS/CTS-V Owner Manual (GMNA-Localizing-MidEast-9369309) -
2016 - crc - 7/30/15
114 Instruments and Controls
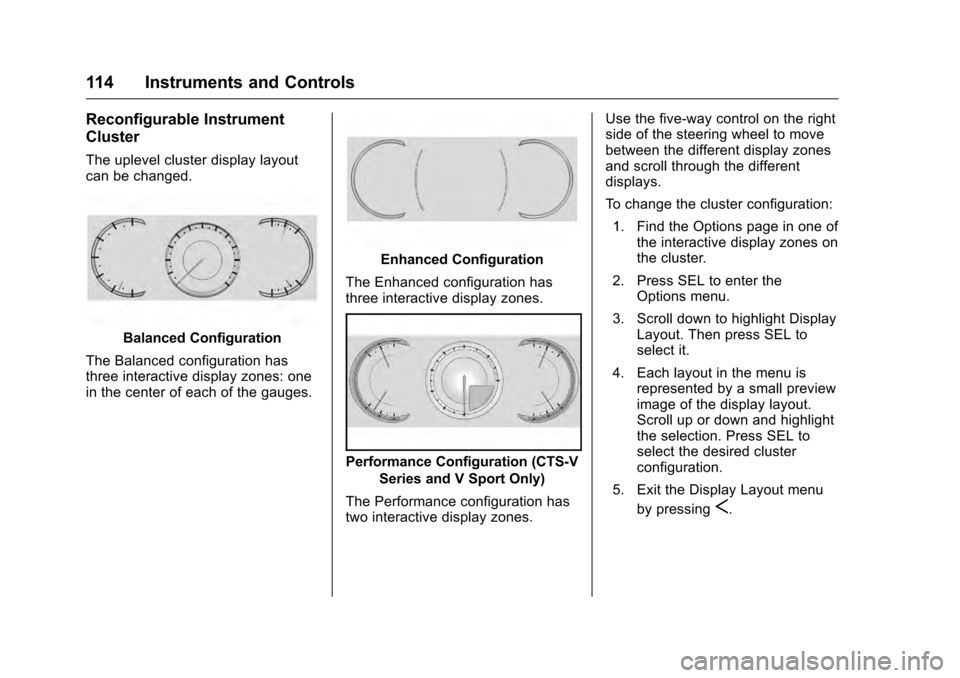
Reconfigurable Instrument
Cluster
The uplevel cluster display layout
can be changed.
Balanced Configuration
The Balanced configuration has
three interactive display zones: one
in the center of each of the gauges.
Enhanced Configuration
The Enhanced configuration has
three interactive display zones.
Performance Configuration (CTS-V Series and V Sport Only)
The Performance configuration has
two interactive display zones. Use the five-way control on the right
side of the steering wheel to move
between the different display zones
and scroll through the different
displays.
To change the cluster configuration:
1. Find the Options page in one of the interactive display zones on
the cluster.
2. Press SEL to enter the Options menu.
3. Scroll down to highlight Display Layout. Then press SEL to
select it.
4. Each layout in the menu is represented by a small preview
image of the display layout.
Scroll up or down and highlight
the selection. Press SEL to
select the desired cluster
configuration.
5. Exit the Display Layout menu by pressing
S.
Page 116 of 354

Cadillac CTS/CTS-V Owner Manual (GMNA-Localizing-MidEast-9369309) -
2016 - crc - 7/30/15
Instruments and Controls 115
Cluster Application Displays
The cluster can display information
regarding Navigation, Audio, and
Phone. On the base cluster, a
speedometer can also be displayed
in the center zone.
Navigation
If there is no active route, a
compass will be displayed. If there
is an active route, press SEL to end
route guidance (if equipped) or turn
the voice prompts (if equipped) on
or off.
Audio
While the Audio application page is
displayed, press SEL to enter the
Audio menu. In the Audio menu,
search for music, select from
favorites, or change the audio
source.
Phone
While the Phone application page is
displayed, press SEL to enter the
Phone menu. In the Phone menu,
if there is no active phone call, view
recent calls, select from favorites,or scroll through contacts. If there is
an active call, mute the phone or
switch to handset operation.
Cluster Options Menu
To enter the cluster Options menu:
1. Use the five-way control on the right side of the steering wheel
to find the Options page in one
of the interactive display zones
on the cluster.
2. Press SEL on the center of the five-way control to enter the
Options menu.
Units : Press SEL while Units is
highlighted to enter the Unit menu.
Choose English, Imperial, or metric
units by pressing SEL while the
desired item is highlighted.
A checkmark will be displayed next
to the selected item.
Info Pages : Press SEL while Info
Pages is highlighted to select the
items to be displayed in the DIC info
displays. See Driver Information
Center (DIC) 0129. Fav Button Options :
Press SEL
while Fav Button Options is
highlighted to select between FAV
Primary and SEEK Primary. This
selection allows for configuration of
theCandBsteering wheel
controls. When FAV Primary is
selected, pressing
CandBwill go
to the next or previous favorite and
pressing and holding
CandBwill
seek. When SEEK Primary is
selected, pressing
CandBwill
seek and pressing and holding
C
andBwill go to the next or
previous favorite.
Display Layout : Press SEL while
Display Layout is highlighted to
change the configuration of the
uplevel cluster. See “Reconfigurable
Instrument Cluster” earlier in this
section.
Tire Loading : Press SEL while Tire
Loading is highlighted to change the
tire loading setting. Choose Light
(for comfort pressure up to three
people), Eco (for Eco pressure up to