light CADILLAC CTS 2019 Owner's Manual
[x] Cancel search | Manufacturer: CADILLAC, Model Year: 2019, Model line: CTS, Model: CADILLAC CTS 2019Pages: 401, PDF Size: 6.85 MB
Page 245 of 401

Cadillac CTS/CTS-V Owner Manual (GMNA-Localizing-U.S./Canada/Mexico-
12460273) - 2019 - CRC - 5/16/18
244 DRIVING AND OPERATING
V2V-equipped vehicle ahead has
warning flashers active and is moving
slowly or has stopped. Under these
disabled vehicle conditions, V2V may
display the DIC message HAZARD
LIGHTS AHEAD and the estimated
distance to the vehicle.
A chime or two seat pulses may also
occur.
TRAFFIC INFORMATION OFF
This message displays when the V2V
Disabled Vehicle Ahead feature has
been turned off.
To enable or disable this feature, see
“Traffic and Roadside Information”
under Vehicle Personalization 0145. V2V Slippery Road Ahead
When the vehicle is traveling above
32 km/h (20 mph), V2V may detect
when a V2V-equipped vehicle ahead
has a StabiliTrak/ESC, Traction
Control, or Antilock Brake System
(ABS) event. This could indicate that
the road ahead is slippery or has low
traction. Under these conditions, V2V
may display a DIC message.
TRAFFIC INFORMATION OFF
This message displays when the V2V
Slippery Road Ahead feature has been
turned off.
To enable or disable this feature, see
“Traffic and Roadside Information
”
under Vehicle Personalization 0145.Fuel
Top Tier Fuel
GM recommends the use of TOP TIER
Detergent Gasoline to keep the engine
clean, reduce engine deposits, and
maintain optimal vehicle performance.
Look for the TOP TIER Logo or see
www.toptiergas.com for a list of TOP
TIER Detergent Gasoline marketers
and applicable countries.
Page 256 of 401

Cadillac CTS/CTS-V Owner Manual (GMNA-Localizing-U.S./Canada/Mexico-
12460273) - 2019 - CRC - 5/16/18
DRIVING AND OPERATING 255
Safety Chains
Always attach chains between the
vehicle and the trailer, and attach the
chains to the holes on the trailer hitch
platform. Instructions about safety
chains may be provided by the hitch
manufacturer or by the trailer
manufacturer.
Cross the safety chains under the
tongue of the trailer to help prevent
the tongue from contacting the road if
it becomes separated from the hitch.
Always leave just enough slack so the
combination can turn. Never allow
safety chains to drag on the ground.
Trailer Brakes
State or local regulations may require
trailers to have their own braking
system if the loaded weight of the
trailer exceeds certain minimums that
can vary from state to state. Read and
follow the instructions for the trailer
brakes so they are installed, adjusted,
and maintained properly. Never
attempt to tap into your vehicle's
hydraulic brake system. If you do,both the vehicle anti-lock brakes and
the trailer brakes may not function,
which could result in a crash.
Trailer Lamps
Always check all trailer lamps are
working at the beginning of each trip,
and periodically on longer trips.
Turn Signals When Towing a
Trailer
When properly connected, the trailer
turn signals will illuminate to indicate
the vehicle is turning, changing lanes,
or stopping. When towing a trailer,
the arrows on the instrument cluster
will illuminate even if the trailer is not
properly connected or the bulbs are
burned out.
Towing Equipment
(V6 Twin Turbo)
{Warning
Never tow a trailer with your
vehicle. It was not designed or
intended to tow a trailer.
Conversions and
Add-Ons
Add-On Electrical
Equipment
{Warning
The Data Link Connector (DLC) is
used for vehicle service and
Emission Inspection/Maintenance
testing. See
Malfunction Indicator
Lamp (Check Engine Light) 0129.
A device connected to the DLC —
such as an aftermarket fleet or
driver-behavior tracking device —
may interfere with vehicle systems.
This could affect vehicle operation
and cause a crash. Such devices
may also access information stored
in the vehicle’s systems.
Page 258 of 401

Cadillac CTS/CTS-V Owner Manual (GMNA-Localizing-U.S./Canada/Mexico-
12460273) - 2019 - CRC - 5/16/18
VEHICLE CARE 257
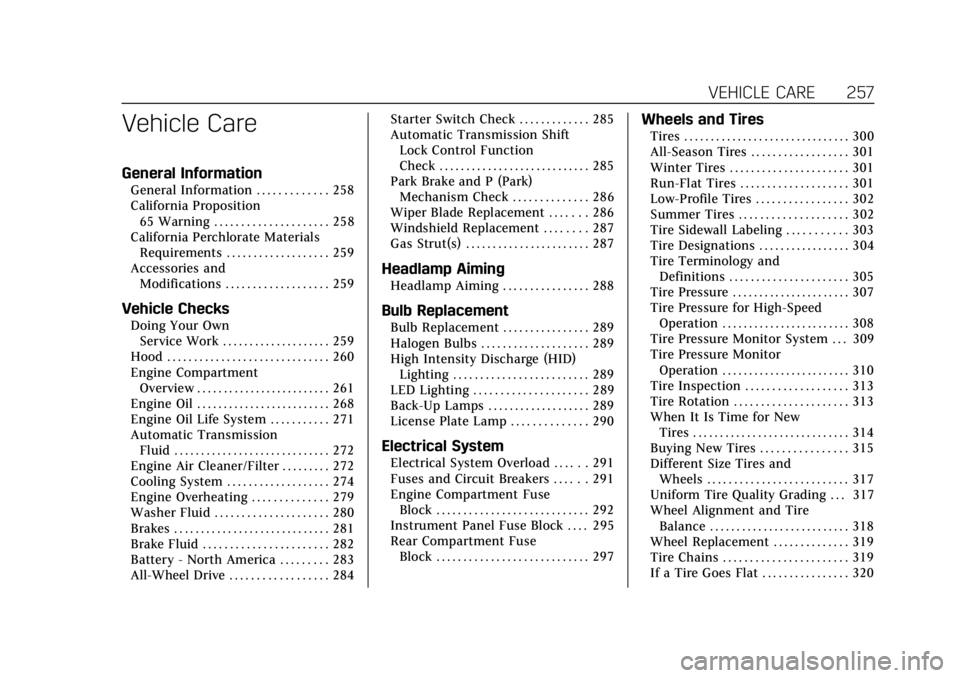
Vehicle Care
General Information
General Information . . . . . . . . . . . . . 258
California Proposition65 Warning . . . . . . . . . . . . . . . . . . . . . 258
California Perchlorate Materials Requirements . . . . . . . . . . . . . . . . . . . 259
Accessories and Modifications . . . . . . . . . . . . . . . . . . . 259
Vehicle Checks
Doing Your OwnService Work . . . . . . . . . . . . . . . . . . . . 259
Hood . . . . . . . . . . . . . . . . . . . . . . . . . . . . . . 260
Engine Compartment Overview . . . . . . . . . . . . . . . . . . . . . . . . . 261
Engine Oil . . . . . . . . . . . . . . . . . . . . . . . . . 268
Engine Oil Life System . . . . . . . . . . . 271
Automatic Transmission Fluid . . . . . . . . . . . . . . . . . . . . . . . . . . . . . 272
Engine Air Cleaner/Filter . . . . . . . . . 272
Cooling System . . . . . . . . . . . . . . . . . . . 274
Engine Overheating . . . . . . . . . . . . . . 279
Washer Fluid . . . . . . . . . . . . . . . . . . . . . 280
Brakes . . . . . . . . . . . . . . . . . . . . . . . . . . . . . 281
Brake Fluid . . . . . . . . . . . . . . . . . . . . . . . 282
Battery - North America . . . . . . . . . 283
All-Wheel Drive . . . . . . . . . . . . . . . . . . 284 Starter Switch Check . . . . . . . . . . . . . 285
Automatic Transmission Shift
Lock Control Function
Check . . . . . . . . . . . . . . . . . . . . . . . . . . . . 285
Park Brake and P (Park)
Mechanism Check . . . . . . . . . . . . . . 286
Wiper Blade Replacement . . . . . . . 286
Windshield Replacement . . . . . . . . 287
Gas Strut(s) . . . . . . . . . . . . . . . . . . . . . . . 287
Headlamp Aiming
Headlamp Aiming . . . . . . . . . . . . . . . . 288
Bulb Replacement
Bulb Replacement . . . . . . . . . . . . . . . . 289
Halogen Bulbs . . . . . . . . . . . . . . . . . . . . 289
High Intensity Discharge (HID) Lighting . . . . . . . . . . . . . . . . . . . . . . . . . 289
LED Lighting . . . . . . . . . . . . . . . . . . . . . 289
Back-Up Lamps . . . . . . . . . . . . . . . . . . . 289
License Plate Lamp . . . . . . . . . . . . . . 290
Electrical System
Electrical System Overload . . . . . . 291
Fuses and Circuit Breakers . . . . . . 291
Engine Compartment Fuse Block . . . . . . . . . . . . . . . . . . . . . . . . . . . . 292
Instrument Panel Fuse Block . . . . 295
Rear Compartment Fuse Block . . . . . . . . . . . . . . . . . . . . . . . . . . . . 297
Wheels and Tires
Tires . . . . . . . . . . . . . . . . . . . . . . . . . . . . . . . 300
All-Season Tires . . . . . . . . . . . . . . . . . . 301
Winter Tires . . . . . . . . . . . . . . . . . . . . . . 301
Run-Flat Tires . . . . . . . . . . . . . . . . . . . . 301
Low-Profile Tires . . . . . . . . . . . . . . . . . 302
Summer Tires . . . . . . . . . . . . . . . . . . . . 302
Tire Sidewall Labeling . . . . . . . . . . . 303
Tire Designations . . . . . . . . . . . . . . . . . 304
Tire Terminology andDefinitions . . . . . . . . . . . . . . . . . . . . . . 305
Tire Pressure . . . . . . . . . . . . . . . . . . . . . . 307
Tire Pressure for High-Speed Operation . . . . . . . . . . . . . . . . . . . . . . . . 308
Tire Pressure Monitor System . . . 309
Tire Pressure Monitor Operation . . . . . . . . . . . . . . . . . . . . . . . . 310
Tire Inspection . . . . . . . . . . . . . . . . . . . 313
Tire Rotation . . . . . . . . . . . . . . . . . . . . . 313
When It Is Time for New Tires . . . . . . . . . . . . . . . . . . . . . . . . . . . . . 314
Buying New Tires . . . . . . . . . . . . . . . . 315
Different Size Tires and Wheels . . . . . . . . . . . . . . . . . . . . . . . . . . 317
Uniform Tire Quality Grading . . . 317
Wheel Alignment and Tire Balance . . . . . . . . . . . . . . . . . . . . . . . . . . 318
Wheel Replacement . . . . . . . . . . . . . . 319
Tire Chains . . . . . . . . . . . . . . . . . . . . . . . 319
If a Tire Goes Flat . . . . . . . . . . . . . . . . 320
Page 274 of 401

Cadillac CTS/CTS-V Owner Manual (GMNA-Localizing-U.S./Canada/Mexico-
12460273) - 2019 - CRC - 5/16/18
VEHICLE CARE 273
How to Inspect the Engine Air
Cleaner/Filter
Do not start the engine or have the
engine running with the engine air
cleaner/filter housing open. Before
removing the engine air cleaner/filter,
make sure that the engine air cleaner/
filter housing and nearby components
are free of dirt and debris. Remove the
engine air cleaner/filter. Lightly tap
and shake the engine air cleaner/filter
(away from the vehicle), to release
loose dust and dirt. Inspect the engine
air cleaner/filter for damage, and
replace if damaged. Do not clean the
engine air cleaner/filter or
components with water or
compressed air.To inspect or replace the air cleaner/
filter:
2.0L L4 Engine (LTG) Shown, 3.6L
V6 Engine (LGX) Similar
1. Remove the four screws on top of the air cleaner/filter cover.
2. Lift the air/cleaner/filter cover away from the air cleaner/filter
housing.
3. Pull out the air cleaner/filter.
4. Inspect or replace the air cleaner/filter.
5. Reverse Steps 1–3 to reinstall the air cleaner/filter cover.
3.6L V6 Engine (LF3)
1. Lower Air Duct Clamp
2. Lower Electrical Connector
3. Upper Air Duct Clamp
4. Upper Electrical Connector
5. Screws
1. Disconnect the lower and upperoutlet ducts by loosening the
lower (1) and upper (3) air duct
clamps.
2. Disconnect the lower (2) and upper (4) electrical connectors
and wiring attachments to air
cleaner/filter cover.
Page 282 of 401

Cadillac CTS/CTS-V Owner Manual (GMNA-Localizing-U.S./Canada/Mexico-
12460273) - 2019 - CRC - 5/16/18
VEHICLE CARE 281
Adding Washer Fluid
Open the cap with the washer symbol
on it. Add washer fluid until the tank
is full. SeeEngine Compartment
Overview 0261 for reservoir location.
Caution
.
Do not use washer fluid that
contains any type of water
repellent coating. This can
cause the wiper blades to
chatter or skip.
. Do not use engine coolant
(antifreeze) in the windshield
washer. It can damage the
windshield washer system
and paint.
(Continued)
Caution (Continued)
.Do not mix water with
ready-to-use washer fluid.
Water can cause the solution
to freeze and damage the
washer fluid tank and other
parts of the washer system.
. When using concentrated
washer fluid, follow the
manufacturer instructions for
adding water.
. Fill the washer fluid tank only
three-quarters full when it is
very cold. This allows for
fluid expansion if freezing
occurs, which could damage
the tank if it is
completely full.
Brakes
Disc brake pads have built-in wear
indicators that make a high-pitched
warning sound when the brake pads
are worn and new pads are needed.
The sound can come and go or be heard all the time when the vehicle is
moving, except when applying the
brake pedal firmly.
{Warning
The brake wear warning sound
means that soon the brakes will not
work well. That could lead to a
crash. When the brake wear
warning sound is heard, have the
vehicle serviced.
Caution
Continuing to drive with worn-out
brake pads could result in costly
brake repair.
Some driving conditions or climates
can cause a brake squeal when the
brakes are first applied or lightly
applied. This does not mean
something is wrong with the brakes.
Page 284 of 401

Cadillac CTS/CTS-V Owner Manual (GMNA-Localizing-U.S./Canada/Mexico-
12460273) - 2019 - CRC - 5/16/18
VEHICLE CARE 283
new brake linings are installed. Add or
remove fluid, as necessary, only when
work is done on the brake hydraulic
system.
{Warning
If too much brake fluid is added, it
can spill on the engine and burn,
if the engine is hot enough. You or
others could be burned, and the
vehicle could be damaged. Add
brake fluid only when work is done
on the brake hydraulic system.
When the brake fluid falls to a low
level, the brake warning light comes
on. See Brake System Warning Light
0 131.
Brake fluid absorbs water over time
which degrades the effectiveness of
the brake fluid. Replace brake fluid at
the specified intervals to prevent
increased stopping distance. See
Maintenance Schedule 0345. What to Add
Use only GM approved DOT 3 brake
fluid from a clean, sealed container.
See
Recommended Fluids and
Lubricants 0354.{Warning
The wrong or contaminated brake
fluid could result in damage to the
brake system. This could result in
the loss of braking leading to a
possible injury. Always use the
proper GM approved brake fluid.
Caution
If brake fluid is spilled on the
vehicle's painted surfaces, the paint
finish can be damaged. Immediately
wash off any painted surface.
Battery - North America
The original equipment battery is
maintenance free. Do not remove the
cap and do not add fluid. The battery is in the trunk, behind the
trim panel, on the driver side of the
vehicle. Refer to the replacement
number shown on the original battery
label when a new battery is needed.
{Warning
WARNING:
Battery posts,
terminals, and related accessories
contain lead and lead compounds,
chemicals known to the State of
California to cause cancer and birth
defects or other reproductive harm.
Batteries also contain other
chemicals known to the State of
California to cause cancer. WASH
HANDS AFTER HANDLING. For
more information go to
www.P65Warnings.ca.gov/
passenger-vehicle.
See California Proposition 65 Warning
0 258 and the back cover.
After a power loss, such as
disconnecting the battery or removing
the maxi fuses in the power
distribution fuse block, the following
Page 290 of 401

Cadillac CTS/CTS-V Owner Manual (GMNA-Localizing-U.S./Canada/Mexico-
12460273) - 2019 - CRC - 5/16/18
VEHICLE CARE 289
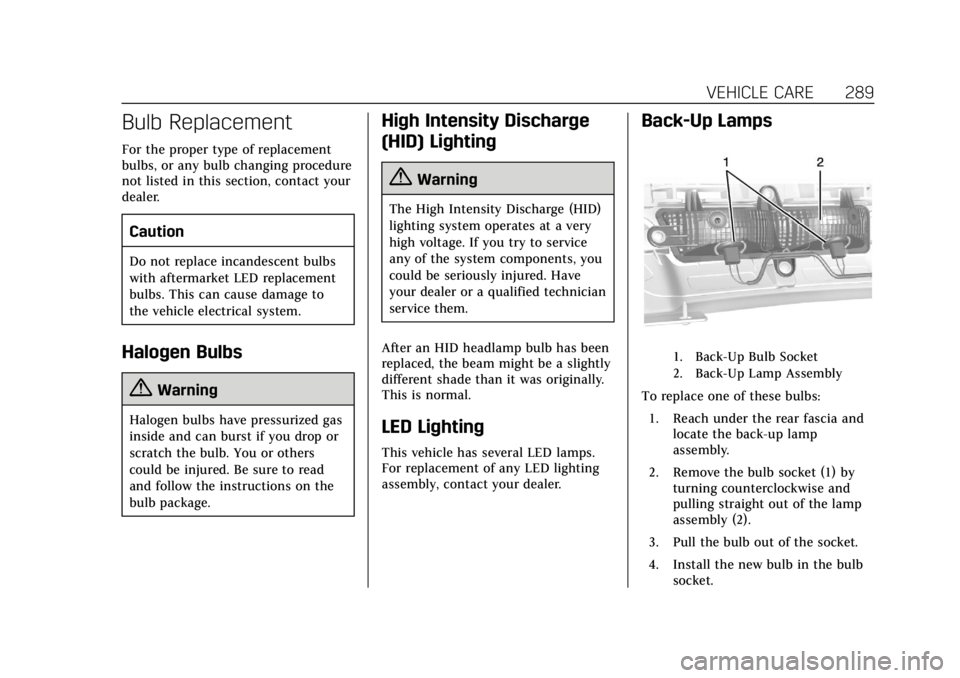
Bulb Replacement
For the proper type of replacement
bulbs, or any bulb changing procedure
not listed in this section, contact your
dealer.
Caution
Do not replace incandescent bulbs
with aftermarket LED replacement
bulbs. This can cause damage to
the vehicle electrical system.
Halogen Bulbs
{Warning
Halogen bulbs have pressurized gas
inside and can burst if you drop or
scratch the bulb. You or others
could be injured. Be sure to read
and follow the instructions on the
bulb package.
High Intensity Discharge
(HID) Lighting
{Warning
The High Intensity Discharge (HID)
lighting system operates at a very
high voltage. If you try to service
any of the system components, you
could be seriously injured. Have
your dealer or a qualified technician
service them.
After an HID headlamp bulb has been
replaced, the beam might be a slightly
different shade than it was originally.
This is normal.
LED Lighting
This vehicle has several LED lamps.
For replacement of any LED lighting
assembly, contact your dealer.
Back-Up Lamps
1. Back-Up Bulb Socket
2. Back-Up Lamp Assembly
To replace one of these bulbs: 1. Reach under the rear fascia and locate the back-up lamp
assembly.
2. Remove the bulb socket (1) by turning counterclockwise and
pulling straight out of the lamp
assembly (2).
3. Pull the bulb out of the socket.
4. Install the new bulb in the bulb socket.
Page 295 of 401

Cadillac CTS/CTS-V Owner Manual (GMNA-Localizing-U.S./Canada/Mexico-
12460273) - 2019 - CRC - 5/16/18
294 VEHICLE CARE
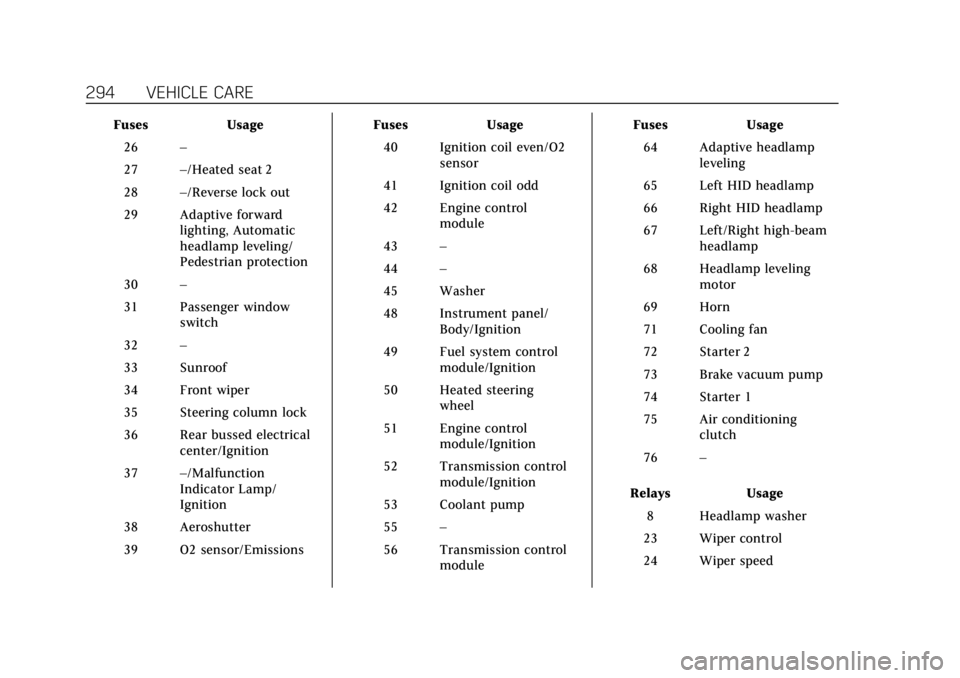
FusesUsage
26 –
27 –/Heated seat 2
28 –/Reverse lock out
29 Adaptive forward lighting, Automatic
headlamp leveling/
Pedestrian protection
30 –
31 Passenger window switch
32 –
33 Sunroof
34 Front wiper
35 Steering column lock
36 Rear bussed electrical center/Ignition
37 –/Malfunction
Indicator Lamp/
Ignition
38 Aeroshutter
39 O2 sensor/Emissions Fuses
Usage
40 Ignition coil even/O2 sensor
41 Ignition coil odd
42 Engine control module
43 –
44 –
45 Washer
48 Instrument panel/ Body/Ignition
49 Fuel system control module/Ignition
50 Heated steering wheel
51 Engine control module/Ignition
52 Transmission control module/Ignition
53 Coolant pump
55 –
56 Transmission control module Fuses
Usage
64 Adaptive headlamp leveling
65 Left HID headlamp
66 Right HID headlamp
67 Left/Right high-beam headlamp
68 Headlamp leveling motor
69 Horn
71 Cooling fan
72 Starter 2
73 Brake vacuum pump
74 Starter 1
75 Air conditioning clutch
76 –
Relays Usage
8 Headlamp washer
23 Wiper control
24 Wiper speed
Page 297 of 401

Cadillac CTS/CTS-V Owner Manual (GMNA-Localizing-U.S./Canada/Mexico-
12460273) - 2019 - CRC - 5/16/18
296 VEHICLE CARE
FusesUsage
2 Cupholder motor Fuses
Usage
3 Electric steering column lock Fuses
Usage
4 –
5 –
6 Tilt and telescopic steering column
8 Data link connector
9 Glovebox release
10 Shunt
11 Body control module 1
12 Body control module 5
13 Body control module 6
14 –
15 Body control module 7
16 Transmission control module
17 –
18 –
19 Auxiliary power outlet
20 Lighter
Page 302 of 401

Cadillac CTS/CTS-V Owner Manual (GMNA-Localizing-U.S./Canada/Mexico-
12460273) - 2019 - CRC - 5/16/18
VEHICLE CARE 301
All-Season Tires
This vehicle may come with all-season
tires. These tires are designed to
provide good overall performance on
most road surfaces and weather
conditions. Original equipment tires
designed to GM's specific tire
performance criteria have a TPC
specification code molded onto the
sidewall. Original equipment
all-season tires can be identified by
the last two characters of this TPC
code, which will be“MS.”
Consider installing winter tires on the
vehicle if frequent driving on snow or
ice-covered roads is expected.
All-season tires provide adequate
performance for most winter driving
conditions, but they may not offer the
same level of traction or performance
as winter tires on snow or ice-covered
roads. See Winter Tires 0301.
Winter Tires
This vehicle was not originally
equipped with winter tires. Winter
tires are designed for increased
traction on snow and ice-covered roads. Consider installing winter tires
on the vehicle if frequent driving on
ice or snow covered roads is expected.
See your dealer for details regarding
winter tire availability and proper tire
selection. Also, see
Buying New Tires
0 315.
With winter tires, there may be
decreased dry road traction, increased
road noise, and shorter tread life.
After changing to winter tires, be alert
for changes in vehicle handling and
braking.
If using winter tires:
. Use tires of the same brand and
tread type on all four wheel
positions.
. Use only radial ply tires of the
same size, load range, and speed
rating as the original equipment
tires.
Winter tires with the same speed
rating as the original equipment tires
may not be available for H, V, W, Y,
and ZR speed rated tires. If winter
tires with a lower speed rating are
chosen, never exceed the tire's
maximum speed capability.
Run-Flat Tires
This vehicle, when new, may have had
run-flat tires. There is no spare tire,
no tire changing equipment, and no
place to store a tire in the vehicle.
The vehicle also has a Tire Pressure
Monitor System (TPMS) that indicates
a loss of tire pressure in any of the
tires.
{Warning
If the low tire warning light displays
on the instrument cluster, the
handling capabilities will be
reduced during severe maneuvers.
Driving too fast could cause loss of
control and you or others could be
injured. Do not drive over 90 km/h
(55 mph) when the low tire warning
light is displayed. Drive cautiously
and check the tire pressures as
soon as possible.
Run-flat tires can be driven on with
no air pressure. There is no need to
stop on the side of the road to change
the tire. Continue driving; however, do