clock CADILLAC CTS V 2004 1.G User Guide
[x] Cancel search | Manufacturer: CADILLAC, Model Year: 2004, Model line: CTS V, Model: CADILLAC CTS V 2004 1.GPages: 454, PDF Size: 2.87 MB
Page 331 of 454

CAUTION: (Continued)
Your vehicle’s coolant warning system is set for
the proper coolant mixture. With plain water or
the wrong mixture, your engine could get too
hot but you would not get the overheat warning.
Your engine could catch �re and you or others
could be burned. Use a 50/50 mixture of clean,
drinkable water and DEX-COOL
®coolant.
Notice:In cold weather, water can freeze and crack
the engine, radiator, heater core and other parts.
Use the recommended coolant and the proper
coolant mixture.
{CAUTION:
You can be burned if you spill coolant on hot
engine parts. Coolant contains ethylene glycol
and it will burn if the engine parts are hot
enough. Do not spill coolant on a hot engine.If no coolant is visible in the surge tank, add coolant
as follows:
1. Park the vehicle on a level surface. You can
remove the coolant surge tank pressure cap
when the cooling system, including the coolant
surge tank pressure cap and upper radiator hose,
is no longer hot. Turn the pressure cap slowly
counterclockwise (left) about one-quarter turn
and then stop.
If you hear a hiss, wait for that to stop. A hiss
means there is still some pressure left.
5-37
Page 347 of 454

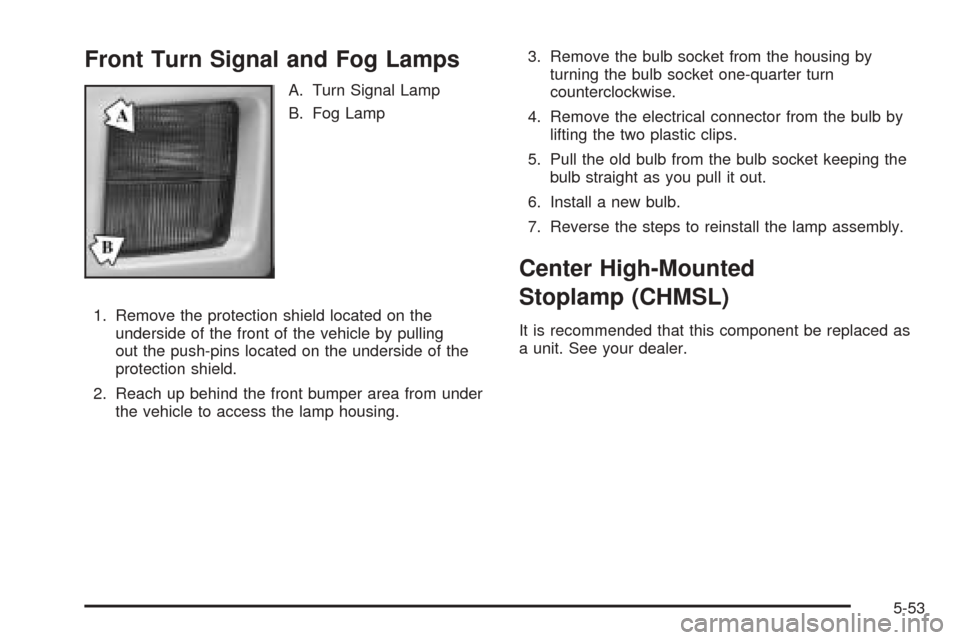
Front Turn Signal and Fog Lamps
A. Turn Signal Lamp
B. Fog Lamp
1. Remove the protection shield located on the
underside of the front of the vehicle by pulling
out the push-pins located on the underside of the
protection shield.
2. Reach up behind the front bumper area from under
the vehicle to access the lamp housing.3. Remove the bulb socket from the housing by
turning the bulb socket one-quarter turn
counterclockwise.
4. Remove the electrical connector from the bulb by
lifting the two plastic clips.
5. Pull the old bulb from the bulb socket keeping the
bulb straight as you pull it out.
6. Install a new bulb.
7. Reverse the steps to reinstall the lamp assembly.
Center High-Mounted
Stoplamp (CHMSL)
It is recommended that this component be replaced as
a unit. See your dealer.
5-53
Page 348 of 454

Taillamps, Turn Signal, Stoplamps
and Sidemarker Lamps
A. Tail and Stop Lamps
B. Turn Signal Lamp
C. Side-Marker Lamp
1. Open the trunk using the trunk button on the remote
keyless entry transmitter or the trunk release button
located on the lower part of the driver’s door.
2. Remove the compact spare tire cover by turning the
wing nut counterclockwise.3. Remove the four convenience net wing nuts.
4. Pull the carpet back away from the body of the
vehicle on the side with the burned out bulb.
5. Remove the two mounting screws from the
lamp assembly.
6. Pull out the lamp assembly to expose the
bulb sockets.
7. Turn the bulb socket one-quarter turn
counterclockwise and pull the bulb and socket out
of the lamp re�ector.
8. Pull the old bulb from the bulb socket keeping the
bulb straight as you pull it out.
9. Install a new bulb.
10. Reverse the steps to reinstall the lamp assembly.
5-54
Page 349 of 454

Back-Up and License Plate Lamps
A. Back-Up Lamps
B. License Plate Lamps
1. Open the trunk using the trunk button on the remote
keyless entry transmitter or the trunk release button
located on the lower part of the driver’s door.
2. Remove the cloth cover on the trunk lid by pulling
out the three push-pins located on the underside of
the trunk lid.3. Remove the eight mounting nuts from the underside
of the trunk lid by turning the nuts counterclockwise.
4. Pull the lamp assembly away from the vehicle
to expose the bulb sockets.
5. Turn the bulb socket one-quarter turn
counterclockwise and pull the bulb and socket out
of the lamp re�ector.
6. Pull the old bulb from the bulb socket keeping the
bulb straight as you pull it out.
7. Install a new bulb.
8. Reverse the steps to reinstall the lamp assembly.
5-55
Page 376 of 454

Removing the Spare Tire and Tools
The equipment you’ll need is in the trunk.
To gain access to the spare tire and jacking equipment,
do the following:
1. Turn the center nut on
the compact spare tire
cover counterclockwise
to remove it. Then
remove the cover.
2. Turn the nut holding the jack counterclockwise and
remove it. Then remove the jack and wheel wrench.
5-82
Page 378 of 454

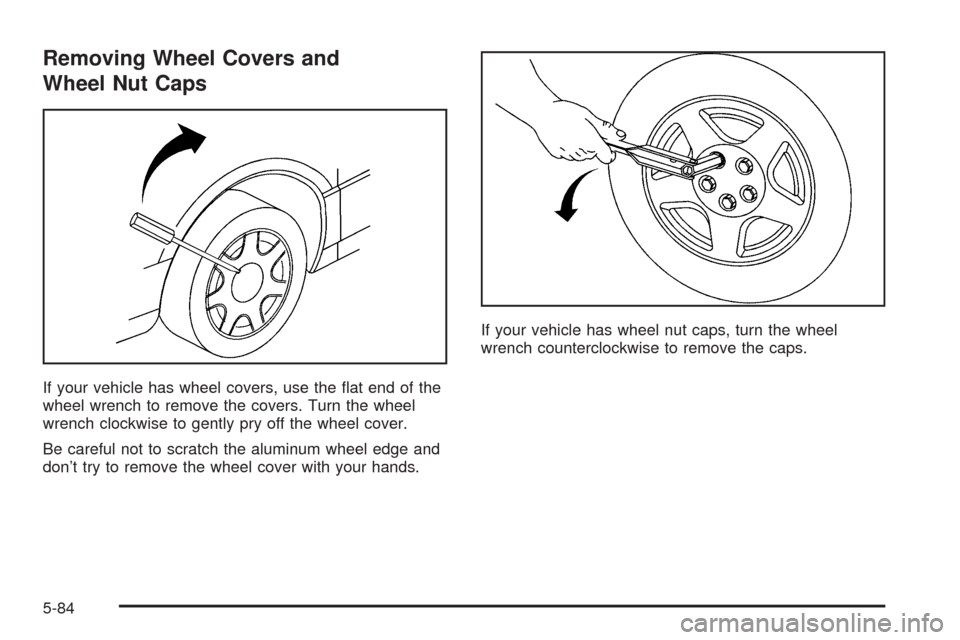
Removing Wheel Covers and
Wheel Nut Caps
If your vehicle has wheel covers, use the �at end of the
wheel wrench to remove the covers. Turn the wheel
wrench clockwise to gently pry off the wheel cover.
Be careful not to scratch the aluminum wheel edge and
don’t try to remove the wheel cover with your hands.If your vehicle has wheel nut caps, turn the wheel
wrench counterclockwise to remove the caps.
5-84
Page 379 of 454

Removing the Flat Tire and Installing
the Spare Tire
1. Place the wheel wrench (A) securely over the wheel
nut (B). Turn the wheel wrench counterclockwise to
loosen all the wheel nuts. Don’t remove them yet.2. Find the jacking location using the diagram above
and corresponding hoisting notches located in the
plastic molding. The notches in the plastic molding
are marked with a triangle shape to help you
�nd them.
The front location (A) is about 14 inches (35.6 cm)
from the rear edge of the front wheel well, and
the rear location (B) is about 7 inches (17.8 cm)
from the front edge of the rear wheel well.
5-85
Page 380 of 454

{CAUTION:
Getting under a vehicle when it is jacked up is
dangerous. If the vehicle slips off the jack you
could be badly injured or killed. Never get under
a vehicle when it is supported only by a jack.
{CAUTION:
Raising your vehicle with the jack improperly
positioned can damage the vehicle and even
make the vehicle fall. To help avoid personal
injury and vehicle damage, be sure to �t the
jack lift head into the proper location before
raising the vehicle.
3. Attach the wheel wrench to the jack.
4. Turn the wheel wrench counterclockwise to lower the
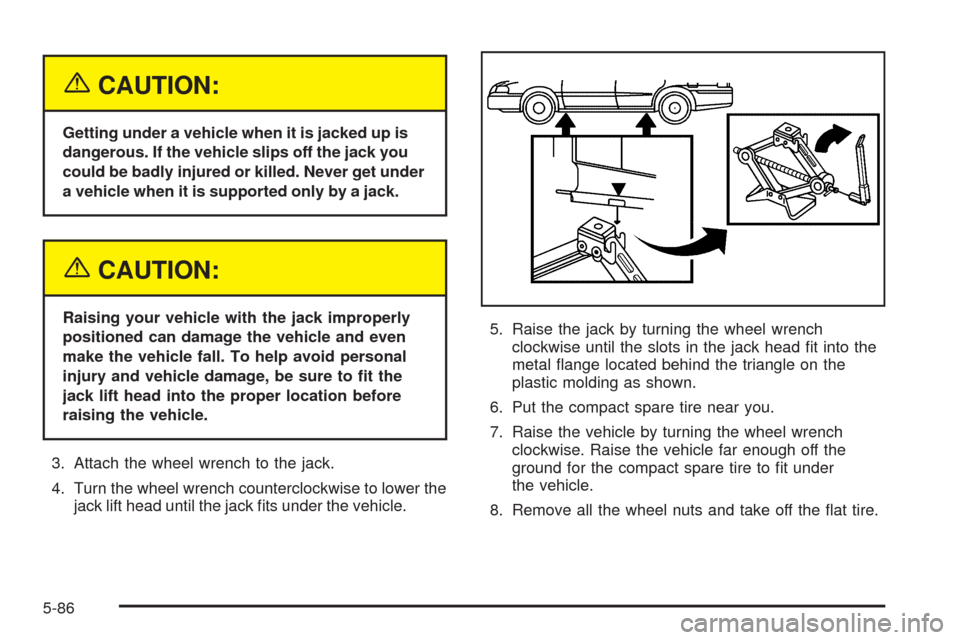
jack lift head until the jack �ts under the vehicle.5. Raise the jack by turning the wheel wrench
clockwise until the slots in the jack head �t into the
metal �ange located behind the triangle on the
plastic molding as shown.
6. Put the compact spare tire near you.
7. Raise the vehicle by turning the wheel wrench
clockwise. Raise the vehicle far enough off the
ground for the compact spare tire to �t under
the vehicle.
8. Remove all the wheel nuts and take off the �at tire.
5-86
Page 382 of 454

11. Put the wheel nuts
back on with the
rounded end of the
nuts toward the wheel.
Tighten each wheel
nut by turning it
clockwise with your
hand until the wheel is
held against the hub.
12. Lower the vehicle by turning the wheel wrench
counterclockwise. Lower the jack completely.
5-88