lock CADILLAC CTS V 2004 1.G Manual Online
[x] Cancel search | Manufacturer: CADILLAC, Model Year: 2004, Model line: CTS V, Model: CADILLAC CTS V 2004 1.GPages: 454, PDF Size: 2.87 MB
Page 348 of 454

Taillamps, Turn Signal, Stoplamps
and Sidemarker Lamps
A. Tail and Stop Lamps
B. Turn Signal Lamp
C. Side-Marker Lamp
1. Open the trunk using the trunk button on the remote
keyless entry transmitter or the trunk release button
located on the lower part of the driver’s door.
2. Remove the compact spare tire cover by turning the
wing nut counterclockwise.3. Remove the four convenience net wing nuts.
4. Pull the carpet back away from the body of the
vehicle on the side with the burned out bulb.
5. Remove the two mounting screws from the
lamp assembly.
6. Pull out the lamp assembly to expose the
bulb sockets.
7. Turn the bulb socket one-quarter turn
counterclockwise and pull the bulb and socket out
of the lamp re�ector.
8. Pull the old bulb from the bulb socket keeping the
bulb straight as you pull it out.
9. Install a new bulb.
10. Reverse the steps to reinstall the lamp assembly.
5-54
Page 349 of 454

Back-Up and License Plate Lamps
A. Back-Up Lamps
B. License Plate Lamps
1. Open the trunk using the trunk button on the remote
keyless entry transmitter or the trunk release button
located on the lower part of the driver’s door.
2. Remove the cloth cover on the trunk lid by pulling
out the three push-pins located on the underside of
the trunk lid.3. Remove the eight mounting nuts from the underside
of the trunk lid by turning the nuts counterclockwise.
4. Pull the lamp assembly away from the vehicle
to expose the bulb sockets.
5. Turn the bulb socket one-quarter turn
counterclockwise and pull the bulb and socket out
of the lamp re�ector.
6. Pull the old bulb from the bulb socket keeping the
bulb straight as you pull it out.
7. Install a new bulb.
8. Reverse the steps to reinstall the lamp assembly.
5-55
Page 351 of 454

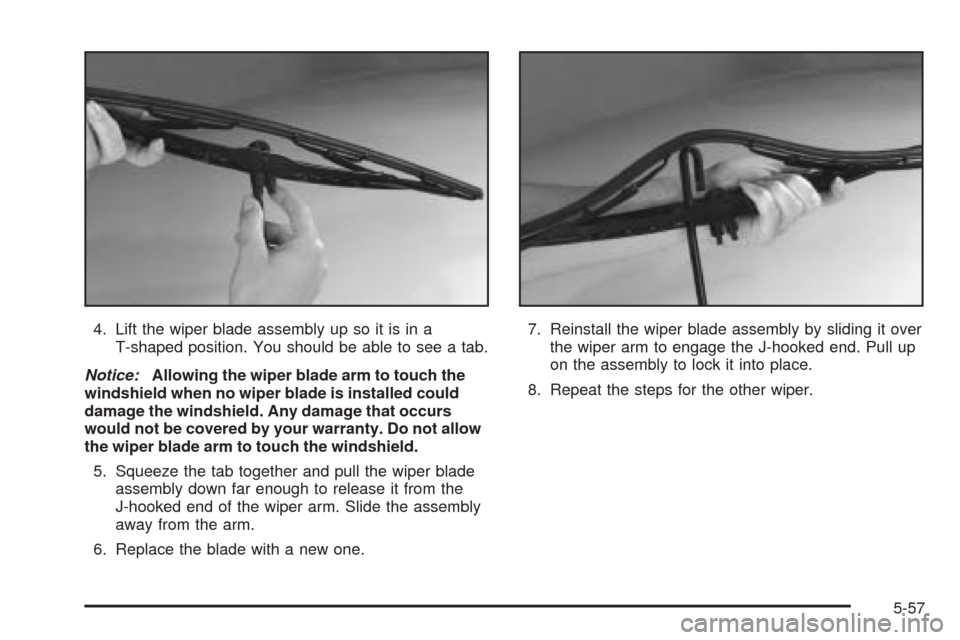
4. Lift the wiper blade assembly up so it is in a
T-shaped position. You should be able to see a tab.
Notice:Allowing the wiper blade arm to touch the
windshield when no wiper blade is installed could
damage the windshield. Any damage that occurs
would not be covered by your warranty. Do not allow
the wiper blade arm to touch the windshield.
5. Squeeze the tab together and pull the wiper blade
assembly down far enough to release it from the
J-hooked end of the wiper arm. Slide the assembly
away from the arm.
6. Replace the blade with a new one.7. Reinstall the wiper blade assembly by sliding it over
the wiper arm to engage the J-hooked end. Pull up
on the assembly to lock it into place.
8. Repeat the steps for the other wiper.
5-57
Page 375 of 454

Changing a Flat Tire
If a tire goes �at, avoid further tire and wheel damage
by driving slowly to a level place. Turn on your
hazard warning �ashers.
{CAUTION:
Changing a tire can be dangerous. The vehicle
can slip off the jack and roll over or fall on you
or other people. You and they could be badly
injured or even killed. Find a level place to
change your tire. To help prevent the vehicle
from moving:
1. Set the parking brake �rmly.
2. Put an automatic transmission shift lever in
PARK (P), or shift a manual transmission to
FIRST (1) or REVERSE (R).
3. Turn off the engine and do not restart while
the vehicle is raised.
4. Do not allow passengers to remain in
the vehicle.
CAUTION: (Continued)
CAUTION: (Continued)
Put the wheel blocks at the front and rear of
the tire farthest away from the one being
changed. That would be the tire on the other
side, at the opposite end of the vehicle.
The following steps will tell you how to use the jack and
change a tire.
5-81
Page 376 of 454

Removing the Spare Tire and Tools
The equipment you’ll need is in the trunk.
To gain access to the spare tire and jacking equipment,
do the following:
1. Turn the center nut on
the compact spare tire
cover counterclockwise
to remove it. Then
remove the cover.
2. Turn the nut holding the jack counterclockwise and
remove it. Then remove the jack and wheel wrench.
5-82
Page 378 of 454

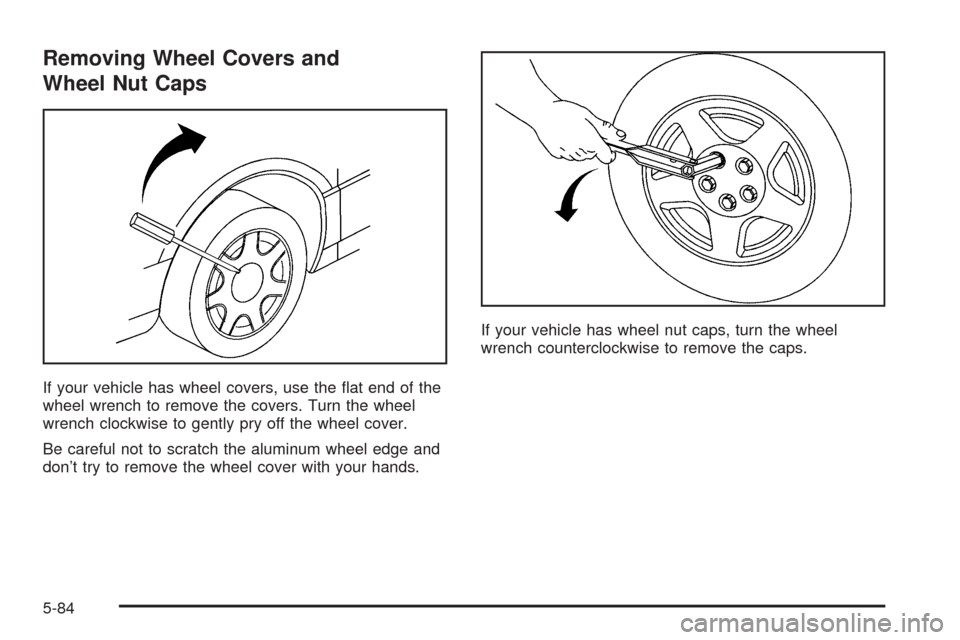
Removing Wheel Covers and
Wheel Nut Caps
If your vehicle has wheel covers, use the �at end of the
wheel wrench to remove the covers. Turn the wheel
wrench clockwise to gently pry off the wheel cover.
Be careful not to scratch the aluminum wheel edge and
don’t try to remove the wheel cover with your hands.If your vehicle has wheel nut caps, turn the wheel
wrench counterclockwise to remove the caps.
5-84
Page 379 of 454

Removing the Flat Tire and Installing
the Spare Tire
1. Place the wheel wrench (A) securely over the wheel
nut (B). Turn the wheel wrench counterclockwise to
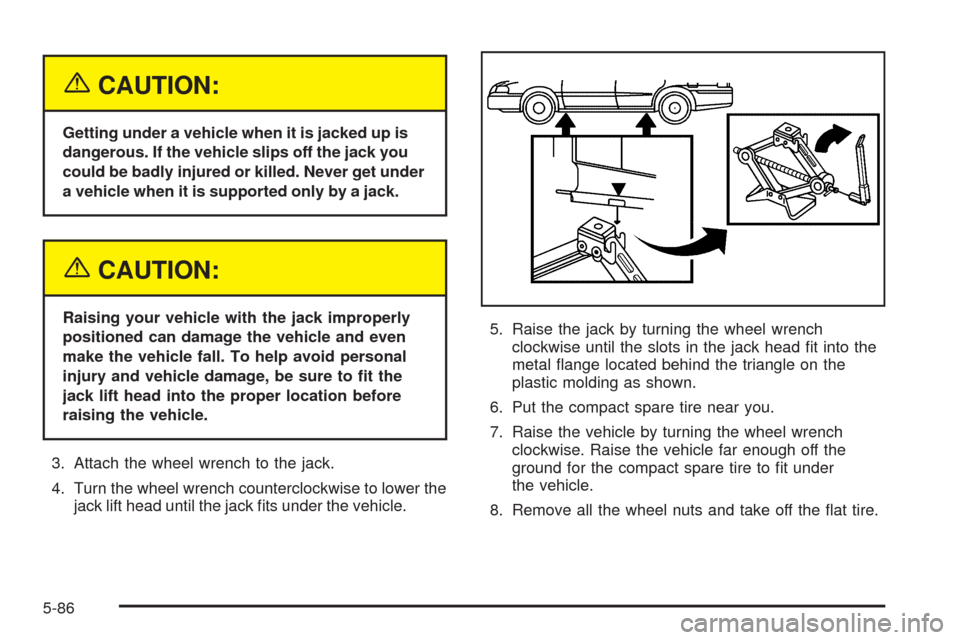
loosen all the wheel nuts. Don’t remove them yet.2. Find the jacking location using the diagram above
and corresponding hoisting notches located in the
plastic molding. The notches in the plastic molding
are marked with a triangle shape to help you
�nd them.
The front location (A) is about 14 inches (35.6 cm)
from the rear edge of the front wheel well, and
the rear location (B) is about 7 inches (17.8 cm)
from the front edge of the rear wheel well.
5-85
Page 380 of 454

{CAUTION:
Getting under a vehicle when it is jacked up is
dangerous. If the vehicle slips off the jack you
could be badly injured or killed. Never get under
a vehicle when it is supported only by a jack.
{CAUTION:
Raising your vehicle with the jack improperly
positioned can damage the vehicle and even
make the vehicle fall. To help avoid personal
injury and vehicle damage, be sure to �t the
jack lift head into the proper location before
raising the vehicle.
3. Attach the wheel wrench to the jack.
4. Turn the wheel wrench counterclockwise to lower the
jack lift head until the jack �ts under the vehicle.5. Raise the jack by turning the wheel wrench
clockwise until the slots in the jack head �t into the
metal �ange located behind the triangle on the
plastic molding as shown.
6. Put the compact spare tire near you.
7. Raise the vehicle by turning the wheel wrench
clockwise. Raise the vehicle far enough off the
ground for the compact spare tire to �t under
the vehicle.
8. Remove all the wheel nuts and take off the �at tire.
5-86
Page 382 of 454

11. Put the wheel nuts
back on with the
rounded end of the
nuts toward the wheel.
Tighten each wheel
nut by turning it
clockwise with your
hand until the wheel is
held against the hub.
12. Lower the vehicle by turning the wheel wrench
counterclockwise. Lower the jack completely.
5-88
Page 394 of 454

Electrical System
Add-On Electrical Equipment
Notice:Don’t add anything electrical to your
vehicle unless you check with your dealer �rst.
Some electrical equipment can damage your vehicle
and the damage wouldn’t be covered by your
warranty. Some add-on electrical equipment can
keep other components from working as they should.
Your vehicle has an air bag system. Before attempting to
add anything electrical to your vehicle, seeServicing
Your Airbag-Equipped Vehicle on page 1-58.
Windshield Wiper Fuses
The windshield wiper motor is protected by an internal
circuit breaker. If the wiper motor overheats due to
heavy snow, the wipers will stop until the motor cools
and will then restart.
Power Windows and Other
Power Options
Circuit breakers protect the power windows and power
seats. When the current load is too heavy, the circuit
breaker opens and closes, protecting the circuit until the
problem is �xed or goes away.
Fuses and Circuit Breakers
The wiring circuits in your vehicle are protected from
short circuits by a combination of fuses and circuit
breakers. This greatly reduces the chance of �res
caused by electrical problems.
Look at the silver-colored band inside the fuse. If the
band is broken or melted, replace the fuse. Be sure you
replace a bad fuse with a new one of the identical
size and rating. If a fuse blows, see your dealer
for service immediately.
If you ever have a problem on the road and don’t have
a spare fuse, you can “borrow” one that has the
same amperage. Pick some feature of your vehicle that
you can get along without – like the radio or cigarette
lighter – and use its fuse, if it is the correct amperage.
Replace it as soon as you can.
The fuses are located in three fuse blocks, one located
in the engine compartment on the passenger’s side
and the other two under the rear seat.
5-100