change time CADILLAC CTS V 2004 1.G Owners Manual
[x] Cancel search | Manufacturer: CADILLAC, Model Year: 2004, Model line: CTS V, Model: CADILLAC CTS V 2004 1.GPages: 454, PDF Size: 2.87 MB
Page 2 of 454

GENERAL MOTORS, GM, the GM Emblem, CADILLAC,
the CADILLAC Crest & Wreath, and the name CTS are
registered trademarks of General Motors Corporation.
This manual includes the latest information at the time it
was printed. We reserve the right to make changes
after that time without notice. For vehicles �rst sold in
Canada, substitute the name “General Motors of Canada
Limited” for Cadillac Motor Car Division whenever it
appears in this manual.
Keep this manual in your vehicle, so it will be there if
you ever need it while you are on the road. If you
sell the vehicle, please leave this manual in the vehicle.
Litho in U.S.A.
Part No. 25758901 C First Edition©
Copyright General Motors Corporation 03/12/04
All Rights Reserved
Canadian Owners
A French language copy of this manual can be obtained
from your dealer or from:
Helm, Incorporated
P.O. Box 07130
Detroit, MI 48207
How to Use This Manual
Many people read the owner manual from beginning to
end when they �rst receive their new vehicle. If this
is done, it can help you learn about the features
and controls for the vehicle. Pictures and words work
together in the owner manual to explain things.
Index
A good place to quickly locate information about the
vehicle is the Index in the back of the manual. It is an
alphabetical list of what is in the manual and the
page number where it can be found.
ii
Page 9 of 454

Power Lumbar
Your vehicle may have this feature. The driver’s and
passenger’s seatback lumbar support can be adjusted
by moving a control located on the outboard side of
the seat cushions.
To increase or decrease support, hold the control
forward or rearward. Keep in mind that as your seating
position changes, as it may during long trips, so
should the position of your lumbar support. Adjust the
seat as needed.
Heated Seats
If your vehicle is equipped
with heated front seats, the
buttons are located on
the climate control panel.There is one button for the driver and one for the front
passenger. Each button has three settings, LO, HI and
off. The active setting appears on the climate control
panel display. The LO setting warms the seatback and
cushion until the seat approximates normal body
temperature. The HI setting has a slightly higher
temperature.
To turn on the heated seats, press the button once.
The seat will heat to the HI setting. Press the button
again to switch to the LO setting. Pressing the button a
third time turns the system off.
The heated seats can only be used when the ignition is
turned on. When the vehicle is turned off, the heated
seats automatically turn off. If you wish to have the
heated seats on once the vehicle is restarted, press the
button again.
1-3
Page 38 of 454

Infants and Young Children
Everyone in a vehicle needs protection! This includes
infants and all other children. Neither the distance
traveled nor the age and size of the traveler changes
the need, for everyone, to use safety restraints. In fact,
the law in every state in the United States and in
every Canadian province says children up to some age
must be restrained while in a vehicle.
Every time infants and young children ride in vehicles,
they should have the protection provided by appropriate
restraints. Young children should not use the vehicle’s
adult safety belts alone, unless there is no other choice.
Instead, they need to use a child restraint.
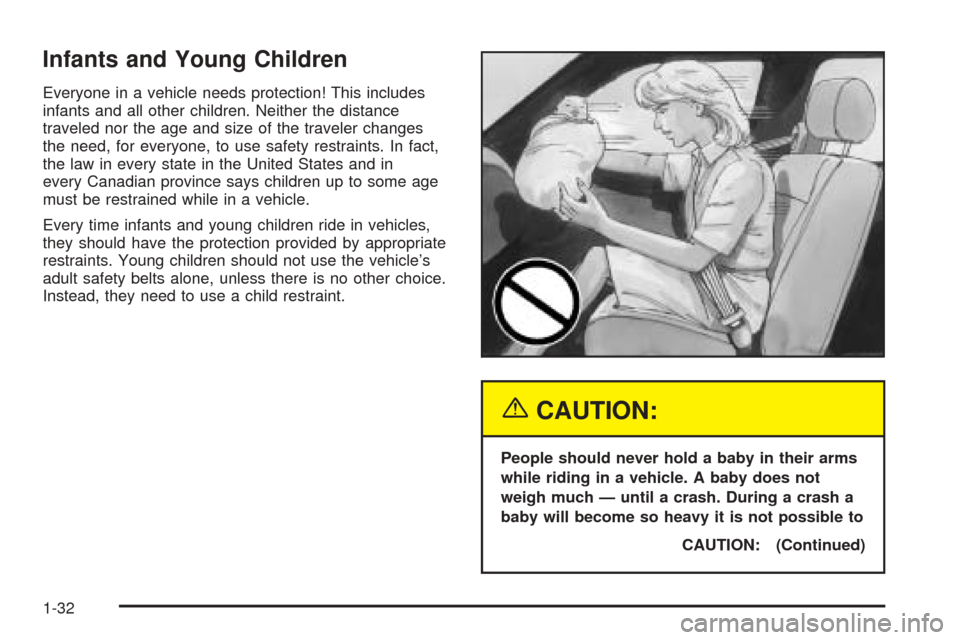
{CAUTION:
People should never hold a baby in their arms
while riding in a vehicle. A baby does not
weigh much — until a crash. During a crash a
baby will become so heavy it is not possible to
CAUTION: (Continued)
1-32
Page 72 of 454

W(Unlock):Press this symbol on the remote keyless
entry transmitter to unlock the driver’s door. This
also disarms the theft-deterrent system. Press the
button again to unlock the rest of the doors.
You can program your vehicle so that the exterior lamps
will �ash when you unlock the doors with the remote
keyless entry transmitter. SeeDIC Vehicle
Personalization on page 3-88for more information on
programming this feature.
If your vehicle is programmed for remote con�rmation,
the doors must be closed for this feature to work. If
a door is open, remote con�rmation will be canceled.
L(Panic Alarm):The remote keyless entry transmitter
comes equipped with an instant panic alarm. Press
the horn symbol when the ignition is turned off. The horn
will sound and the exterior lamps will �ash for up to
30 seconds. To stop the instant panic alarm, press the
symbol again or turn the ignition to ON.
V(Trunk):Press this button to open the trunk.
The remote keyless entry transmitter can be used to
recall the memory settings for up to two drivers.
For more information, seeDIC Vehicle Personalization
on page 3-88andMemory Seat and Mirrors on
page 2-53.
Matching Transmitter(s) to
Your Vehicle
Each remote keyless entry transmitter is coded to
prevent another transmitter from unlocking your vehicle.
If a transmitter is lost or stolen, a replacement can
be purchased through your dealer. Remember to bring
any remaining transmitters with you when you go to
your dealer. When the dealer matches the replacement
transmitter to your vehicle, any remaining transmitters
must also be matched. Once your dealer has coded the
new transmitter, the lost transmitter will not unlock
your vehicle. Each vehicle can have a maximum of four
transmitters matched to it.
Battery Replacement
Under normal use, the battery in your remote keyless
entry transmitter should last about four years.
You can tell the battery is weak if the transmitter won’t
work at the normal range in any location. If you have
to get close to your vehicle before the transmitter works,
it’s probably time to change the battery.
Notice:When replacing the battery, use care not
to touch any of the circuitry. Static from your
body transferred to these surfaces may damage
the transmitter.
2-6
Page 131 of 454

Replace burned-out bulbs to help avoid possible
accidents. Check the fuse and for burned-out bulbs if
the arrow fails to work when signaling a turn. SeeFuses
and Circuit Breakers on page 5-100.
Turn Signal On Chime
If the turn signal is left on for about 1 mile (1.6 km), a
warning chime will sound and the Turn Signal On
message will appear on the Driver Information
Center (DIC) display. See “Turn Signal On Message”
underDIC Warnings and Messages on page 3-70.
Headlamp High/Low-Beam Changer
Push forward on the turn signal/multifunction lever to
change the headlamps from low to high beam. Pull the
lever back and then release it to change from high
to low beam.
This light on the
instrument panel cluster
will be on, indicating
high-beam usage.
Flash-To-Pass Feature
This feature allows you to use the high-beam headlamps
to signal the driver in front of you that you want to pass.
Pull and hold the turn signal/multifunction lever toward
you to use this feature. When you do, the following
will occur:
If the headlamps are either off, in low-beam or in
Daytime Running Lamps (DRL) mode, the
high-beam headlamps will turn on. They’ll stay on
as long as you hold the lever there. Release
the lever to turn them off.
If the headlamps are in high-beam mode, they will
switch to low beam. To return to high-beam, push
the lever away from you.
3-11
Page 144 of 454

Exterior Lamps
Headlamps
SeeTurn Signal/Multifunction Lever on page 3-10for
more information on the headlamps.
Daytime Running Lamps
Daytime Running Lamps (DRL) can make it easier for
others to see the front of your vehicle during the
day. DRL can be helpful in many different driving
conditions, but they can be especially helpful in the short
periods after dawn and before sunset. Fully functional
daytime running lamps are required on all vehicles
�rst sold in Canada.
The DRL system will make the turn signal lamps come
on when the following conditions are met:
It is still daylight and the ignition is in ON or START,
the exterior lamp control is in OFF or AUTO with the
headlamps off, and
an automatic transmission is not in PARK (P) or the
parking brake is not set on a manual transmission.When DRL are on, only your front turn signal lamps will
be on. No other exterior lamps will be on when the
DRL are being used. Your instrument panel won’t be lit
up either.
When the exterior lamp control is in AUTO and it’s dark
enough outside, the DRL will turn off and the low-beam
headlamps will turn on. When it’s bright enough
outside, the low-beam headlamps will go off, and the
DRL will turn back on. If you start your vehicle in a dark
garage, the automatic headlamp system will come on
immediately. Once you leave the garage, it will take
about one minute for the automatic headlamp system to
change to DRL if it is light outside. During that delay,
your instrument panel cluster may not be as bright
as usual. Make sure your instrument panel brightness
lever is in the full bright position. See “Instrument Panel
Brightness” underInterior Lamps on page 3-26.
3-24
Page 149 of 454

Climate Controls
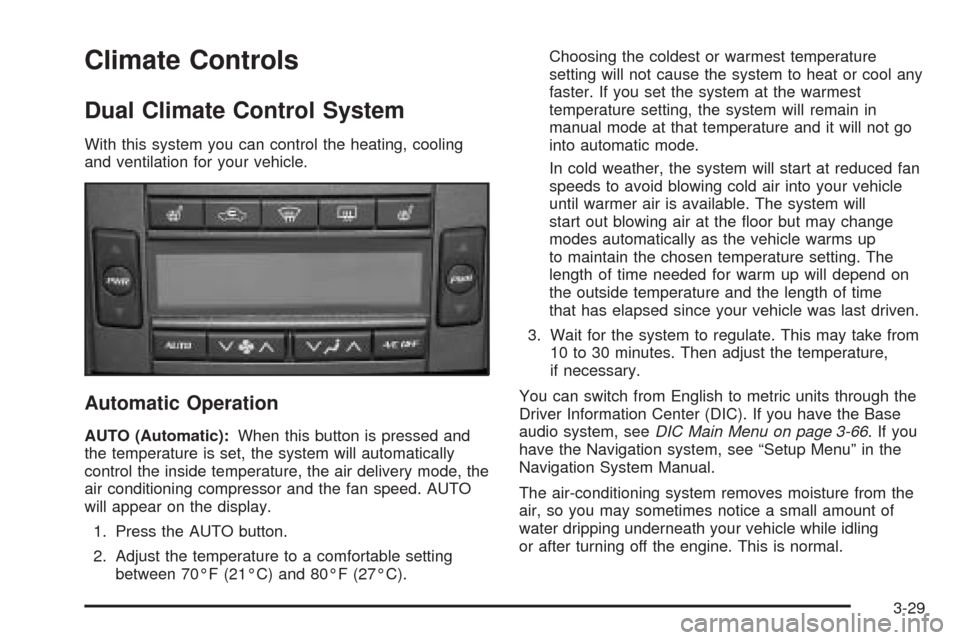
Dual Climate Control System
With this system you can control the heating, cooling
and ventilation for your vehicle.
Automatic Operation
AUTO (Automatic):When this button is pressed and
the temperature is set, the system will automatically
control the inside temperature, the air delivery mode, the
air conditioning compressor and the fan speed. AUTO
will appear on the display.
1. Press the AUTO button.
2. Adjust the temperature to a comfortable setting
between 70°F (21°C) and 80°F (27°C).Choosing the coldest or warmest temperature
setting will not cause the system to heat or cool any
faster. If you set the system at the warmest
temperature setting, the system will remain in
manual mode at that temperature and it will not go
into automatic mode.
In cold weather, the system will start at reduced fan
speeds to avoid blowing cold air into your vehicle
until warmer air is available. The system will
start out blowing air at the �oor but may change
modes automatically as the vehicle warms up
to maintain the chosen temperature setting. The
length of time needed for warm up will depend on
the outside temperature and the length of time
that has elapsed since your vehicle was last driven.
3. Wait for the system to regulate. This may take from
10 to 30 minutes. Then adjust the temperature,
if necessary.
You can switch from English to metric units through the
Driver Information Center (DIC). If you have the Base
audio system, seeDIC Main Menu on page 3-66.Ifyou
have the Navigation system, see “Setup Menu” in the
Navigation System Manual.
The air-conditioning system removes moisture from the
air, so you may sometimes notice a small amount of
water dripping underneath your vehicle while idling
or after turning off the engine. This is normal.
3-29
Page 183 of 454

Instantaneous Fuel Economy
Fuel Used*
Average Vehicle Speed*
Timer*
Battery Voltage
Engine Oil Life*
Transmission Fluid Life* (Automatic Transmission
Only)
Blank Display
* These items can be reset. Each one must be reset
individually. For a detailed description of the menu items
and how to reset them, see “Vehicle Information
Menu Item Descriptions” following.
You can view any of these submenu items at any time
by selecting them using the TUNE/SEL knob. The
currently selected item is displayed at the top of the
screen. Only one item can be displayed at a time.
Vehicle Information Menu
Item Descriptions
The following paragraphs contain a more detailed
description of each menu item:
BLANK LINE/Blank Display:If you select this item,
nothing is displayed at the top of the screen.
OUTSIDE TEMP/Outside Air Temperature:If you
select this item, the current outside temperature
is displayed at the top of the screen. It will be in either
degrees Fahrenheit or degrees Celsius depending
upon whether the system is set for English or metric
units. If you wish to change the units on the Base audio
system, seeDIC Main Menu on page 3-66.Ifyou
have the optional Navigation System and wish to change
the units, see “Setup Menu” in the Index of the CTS
Entertainment and Navigation System owner’s manual.
MI TRIP A and B/Trip Odometer A and B:For
information on the trip odometers, see “Trip Odometers”
underSpeedometer and Odometer on page 3-40.
MPG AVG/Average Fuel Economy:If you select this
item, the approximate average miles per gallon (mpg) or
liters per 100 kilometers (L/100 km) is displayed.
This number is calculated based on the number of
mpg (L/100 km) recorded since the last time this menu
item was reset.
3-63
Page 185 of 454

To reset the Average Vehicle Speed using the Navigation
system, press and hold the multifunction button that
corresponds to the Reset prompt in the upper right of the
display. The display will return to zero.
TIMER/Timer:If you select this item, a timing feature is
displayed. The timer functions like a stopwatch in that
you can record the time it takes to travel from one point
to another.
To use the timer, you must �rst turn it on. To turn on the
timer using the Base audio system, press the CLR button
located to the right of the screen once. To turn on the
timer using the Navigation system, press the
multifunction button next to the On/Off menu item in the
upper right of the display. The display for both systems
will read 00:00:00 TIMER ON and begin counting.
Press the button(s) again to turn the timer off. When the
timer is off, the display will show the timer value and
TIMER OFF. The timing feature will stop.
To reset the timer using the Base audio system, turn off
the timer and then press and hold the CLR button. The
display will return to zero.
To reset the timer using the Navigation system press and
hold the multifunction button next to the Reset prompt in
the upper right of the display. The display will return
to zero.BATTERY VOLTS/Battery Voltage:If you select this
item, the current battery voltage is displayed. If the
voltage is in the normal range, the display will have OK
after it. For example, the display may read 13.2 Battery
Volts OK.
If there is a problem with the battery charging system,
there are four possible DIC messages that may be
displayed. SeeDIC Warnings and Messages on
page 3-70for more information.
ENGINE OIL LIFE/Engine Oil Life:If you select this
item, the percentage of remaining oil life is displayed.
If you see 99% Oil Life on the display, that means
that 99% of the current oil life remains.
When the oil life is depleted, the Change Engine Oil
message will appear on the display. SeeEngine Oil on
page 5-18andScheduled Maintenance on page 6-4
for more information.
When you reset the Change Engine Oil message by
clearing it from the display, you still must reset the
engine oil life monitor separately. For more information
on resetting the engine oil life monitor, seeEngine
Oil on page 5-18.
3-65
Page 210 of 454

Personalization Features
The following choices are available for programming
using both the Base audio and Navigation systems
unless otherwise indicated.
Personalization Name
This feature allows you to type in a name that will
appear on the DIC display whenever the corresponding
remote keyless entry transmitter is used or one of
the buttons on the driver’s door armrest (1 or 2)
is pressed.
If a customized name is not programmed, the system
will show Driver 1 or Driver 2 to correspond with
the numbers on the back of the remote keyless
entry transmitters.
To program a name, use one of the following procedures:
To customize the name using the Base audio system,
do the following:
1. Enter the Personalization menu following the
instructions listed previously.
2. Select the PERSONALIZATION NAME menu item
by pressing the TUNE/SEL knob once.
You will see a cursor on the screen.3. Turn the TUNE/SEL knob until you reach the �rst
letter you want; the letter will be highlighted. There
is a complete alphabet with both upper and
lower case letters and the numbers zero through
nine. Also included are spaces and other non-letter
characters such as the ampersand (&).
4. Press the TUNE/SEL knob once to select the letter.
The letter will then appear on the display.
If you make a mistake, press the Back key. This will
exit the menu. You can then go back into the
menu and edit the name. You can also press the
TUNE/SEL knob repeatedly to cycle through all the
characters until you reach the character you
wish to change.
5. Repeat Steps 2 and 3 until the name you want is
complete. You can program up to 16 characters.
6. Press the BACK button located to the lower right of
the display to exit and set your choice or let the
screen time out and return to the main screen.
To customize the name using the Navigation system,
do the following:
1. Enter the Personalization menu following the
instructions listed previously.
2. Turn the TUNE/SEL knob until Personalization
Name is highlighted. Press the knob once to
access the Edit Name screen.
3-90