clutch CADILLAC CTS V 2005 1.G Owners Manual
[x] Cancel search | Manufacturer: CADILLAC, Model Year: 2005, Model line: CTS V, Model: CADILLAC CTS V 2005 1.GPages: 432, PDF Size: 2.52 MB
Page 96 of 432
3. Insert a narrow, pointed object into the hole in the
steering column cover and press the spring.
4. Then, turn the ignition switch to OFF and remove
the key.
Retained Accessory Power (RAP)
The following accessories on your vehicle may be used
for up to 10 minutes after the ignition key is turned
from ON to OFF:
Radio
Power Windows
Audio Steering Wheel Controls (if programmed)
Sunroof
Power to these accessories stops after 10 minutes
or if a door is opened. If you want power for another
10 minutes, close all the doors and turn the
ignition key to ON and then back to OFF.
Starting the Engine
Automatic Transmission
Move your shift lever to PARK (P) or NEUTRAL (N).
Your engine will not start in any other position — that is
a safety feature. To restart when you are already
moving, use NEUTRAL (N) only.
Notice:Do not try to shift to PARK (P) if your
vehicle is moving. If you do, you could damage the
transmission. Shift to PARK (P) only when your
vehicle is stopped.
Manual Transmission
The shift lever should be in NEUTRAL and the parking
brake engaged. Hold the clutch pedal to the �oor
and start the engine. Your vehicle will not start if the
clutch pedal is not all the way down — that is a safety
feature.
1. With your foot off the accelerator pedal, turn your
ignition key to START. Then, let go of the key; the
engine will start automatically. The idle speed
will go down as your engine gets warm.
2-24
Page 103 of 432
Manual Transmission Operation
If your vehicle has a manual transmission, the shift lever
is located on the center console between the front
seats. The following explains how to operate the manual
transmission.
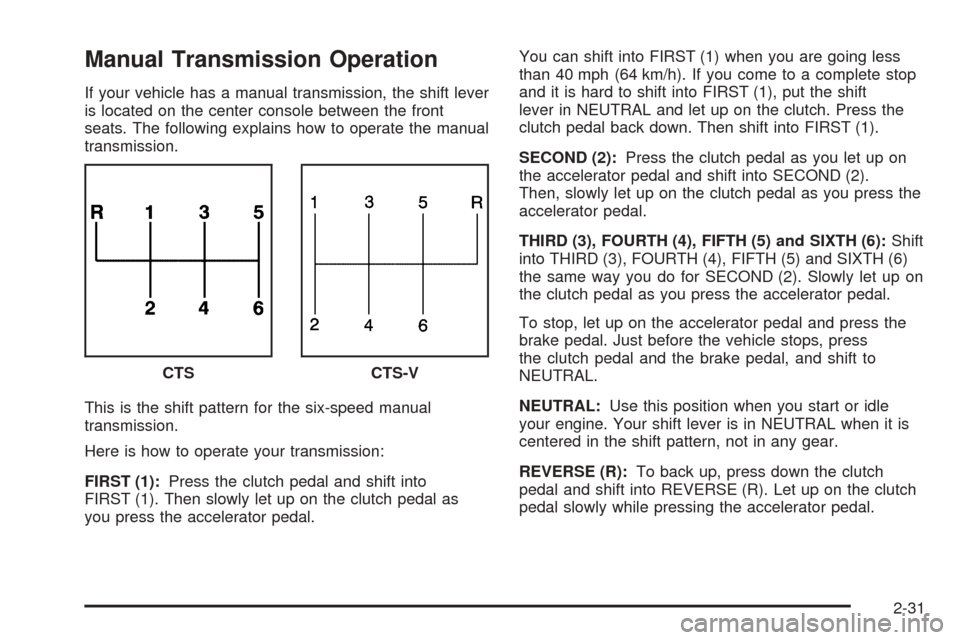
This is the shift pattern for the six-speed manual
transmission.
Here is how to operate your transmission:
FIRST (1):Press the clutch pedal and shift into
FIRST (1). Then slowly let up on the clutch pedal as
you press the accelerator pedal.You can shift into FIRST (1) when you are going less
than 40 mph (64 km/h). If you come to a complete stop
and it is hard to shift into FIRST (1), put the shift
lever in NEUTRAL and let up on the clutch. Press the
clutch pedal back down. Then shift into FIRST (1).
SECOND (2):Press the clutch pedal as you let up on
the accelerator pedal and shift into SECOND (2).
Then, slowly let up on the clutch pedal as you press the
accelerator pedal.
THIRD (3), FOURTH (4), FIFTH (5) and SIXTH (6):Shift
into THIRD (3), FOURTH (4), FIFTH (5) and SIXTH (6)
the same way you do for SECOND (2). Slowly let up on
the clutch pedal as you press the accelerator pedal.
To stop, let up on the accelerator pedal and press the
brake pedal. Just before the vehicle stops, press
the clutch pedal and the brake pedal, and shift to
NEUTRAL.
NEUTRAL:Use this position when you start or idle
your engine. Your shift lever is in NEUTRAL when it is
centered in the shift pattern, not in any gear.
REVERSE (R):To back up, press down the clutch
pedal and shift into REVERSE (R). Let up on the clutch
pedal slowly while pressing the accelerator pedal. CTS
CTS-V
2-31
Page 104 of 432

Your six-speed manual transmission has a feature that
allows you to safely shift into REVERSE (R) while
the vehicle is rolling at less than 3 mph (5 km/h). You
will be locked out if you try to shift into REVERSE (R)
while your vehicle is moving faster than 3 mph (5 km/h).
If you have turned your ignition off and wish to park
your vehicle in REVERSE (R), you will have to
overcome the lockout mechanism by moving the shift
lever quickly to the right, and immediately forward
into gear using more force than a normal shift.
Shift Speeds (Manual Transmission)
{CAUTION:
If you skip a gear when you downshift, you
could lose control of your vehicle. You could
injure yourself or others. Do not shift down
more than one gear at a time when you
downshift.
Notice:If you skip more than one gear when you
downshift, or if you race the engine when you
release the clutch pedal while downshifting, you
could damage the engine, clutch, driveshaft or the
transmission. Do not skip gears or race the
engine when downshifting.If the vehicle speed drops below 20 mph (32 km/h),
or if the engine is not running smoothly, you should
downshift to the next lower gear. You may have
to downshift two or more gears to keep the engine
running smoothly or for good performance.
Skip Shift (CTS-V)
1r4:This may appear in the message center in the
speedometer during light throttle, low speed maneuvers
(15 to 19 mph (24 to 31 km/h)). When this message
appears, you can only shift from FIRST (1) to
FOURTH (4) instead of FIRST (1) to SECOND (2).
During the shift from FIRST (1) to FOURTH (4), pull the
shift lever straight back using light force on the shift
lever. You must complete the shift into FOURTH (4) to
turn off this feature. This helps you get the best
possible fuel economy.
Notice:Forcing the shift lever into any gear except
FOURTH (4) when the skip shift light comes on
may damage the transmission. Shift only from
FIRST (1) to FOURTH (4) when the light comes on.
This light comes on when:
The engine coolant temperature is higher than
169°F (76°C),
you are going 15 to 19 mph (24 to 31 km/h) and
you are 21 percent throttle or less.
2-32
Page 141 of 432

Reducing Speed While Using Cruise
Control
There are two ways to reduce your speed while using
cruise control:
Press in the button at the end of the lever until you
reach the lower speed you want, then release it.
To slow down in very small amounts, brie�y press
the set button. Each time you do this, you’ll go
about 1 mph (1.6 km/h) slower.
Passing Another Vehicle While Using
Cruise Control
Use the accelerator pedal to increase your speed.
When you take your foot off the pedal, your vehicle will
slow down to the cruise control speed you set earlier.
Using Cruise Control on Hills
How well your cruise control will work on hills depends
upon your speed, load and the steepness of the
hills. When going up steep hills, you may have to step
on the accelerator pedal to maintain your speed.
When going downhill, you may have to brake or shift to
a lower gear to keep your speed down. Applying the
brake or shifting into a lower gear will take you out
of cruise control. If you need to apply the brake or shift
to a lower gear due to the grade of the downhill
slope, you may not want to attempt to use your cruise
control feature.
Ending Cruise Control
To end a cruise control session, step lightly on the
brake pedal. If your vehicle has a manual transmission,
lightly tapping the clutch will end a cruise control
session also.
Stepping on the brake or clutch pedal will end the
current cruise control session only. Move the cruise
control switch to off to turn off the system completely.
Erasing Speed Memory
When you turn off the cruise control or the ignition, your
cruise control set speed memory is erased.
3-15
Page 145 of 432

Using Cruise Control on Hills
How well your cruise control will work on hills depends
upon your speed, load and the steepness of the
hills. When going up steep hills, you may have to step
on the accelerator pedal to maintain your speed.
When going downhill, you may have to brake or shift to
a lower gear to keep your speed down. Applying the
brake or shifting into a lower gear will take you out
of cruise control. If you need to apply the brake or shift
to a lower gear due to the grade of the downhill
slope, you may not want to attempt to use your cruise
control feature.
Ending Cruise Control
To end a cruise control session, step lightly on the
brake pedal, or press the cruise control on/off button on
the steering wheel.
Stepping on the brake or clutch pedal will end the
current cruise control session only. You must press the
cruise control on/off button on the steering wheel to
turn off the system completely.
Erasing Speed Memory
When you turn off the cruise control or the ignition, your
cruise control set speed memory is erased.
Headlamps
The exterior lamp control is located in the middle of the
turn signal/multifunction lever. SeeTurn
Signal/Multifunction Lever on page 3-8.
O(Exterior Lamp Control):Turn the control with this
symbol on it to operate the exterior lamps.
CTS
The exterior lamp control for the CTS has the following
four positions:
O(On/Off):Turn the control to this position to turn off
all lamps except the Daytime Running Lamps (DRL).
AUTO (Automatic):Turn the control to this position to
put the headlamps in automatic mode. AUTO mode
will turn the exterior lamps on and off depending upon
how much light is available outside of the vehicle.
3-19
Page 281 of 432
Service............................................................5-3
Doing Your Own Service Work.........................5-4
Adding Equipment to the Outside
of Your Vehicle...........................................5-5
Fuel................................................................5-5
Gasoline Octane............................................5-5
Gasoline Speci�cations....................................5-5
California Fuel...............................................5-6
Additives.......................................................5-6
Fuels in Foreign Countries...............................5-7
Filling the Tank..............................................5-8
Filling a Portable Fuel Container.....................5-10
Checking Things Under the Hood....................5-10
Hood Release..............................................5-11
Engine Compartment Overview.......................5-12
Engine Oil...................................................5-16
Engine Oil Life System..................................5-19
Engine Air Cleaner/Filter................................5-21
Automatic Transmission Fluid.........................5-22
Manual Transmission Fluid.............................5-24
Hydraulic Clutch...........................................5-25
Engine Coolant.............................................5-25
Coolant Surge Tank Pressure Cap..................5-28
Engine Overheating.......................................5-28Overheated Engine Protection
Operating Mode........................................5-30
Cooling System............................................5-31
Power Steering Fluid.....................................5-36
Windshield Washer Fluid................................5-37
Brakes........................................................5-38
Battery........................................................5-41
Jump Starting...............................................5-42
Rear Axle.......................................................5-48
Bulb Replacement..........................................5-49
High Intensity Discharge (HID) Lighting............5-49
Halogen Bulbs..............................................5-49
Front Turn Signal and Fog Lamps...................5-50
Taillamps, Turn Signal, Stoplamps and
Sidemarker Lamps.....................................5-50
Back-Up and License Plate Lamps..................5-51
Replacement Bulbs.......................................5-52
Windshield Wiper Blade Replacement..............5-52
Tires..............................................................5-54
Tire Sidewall Labelling...................................5-56
Tire Terminology and De�nitions.....................5-58
Run-Flat Tires (CTS-V)..................................5-61
In�ation - Tire Pressure.................................5-62
Section 5 Service and Appearance Care
5-1
Page 293 of 432
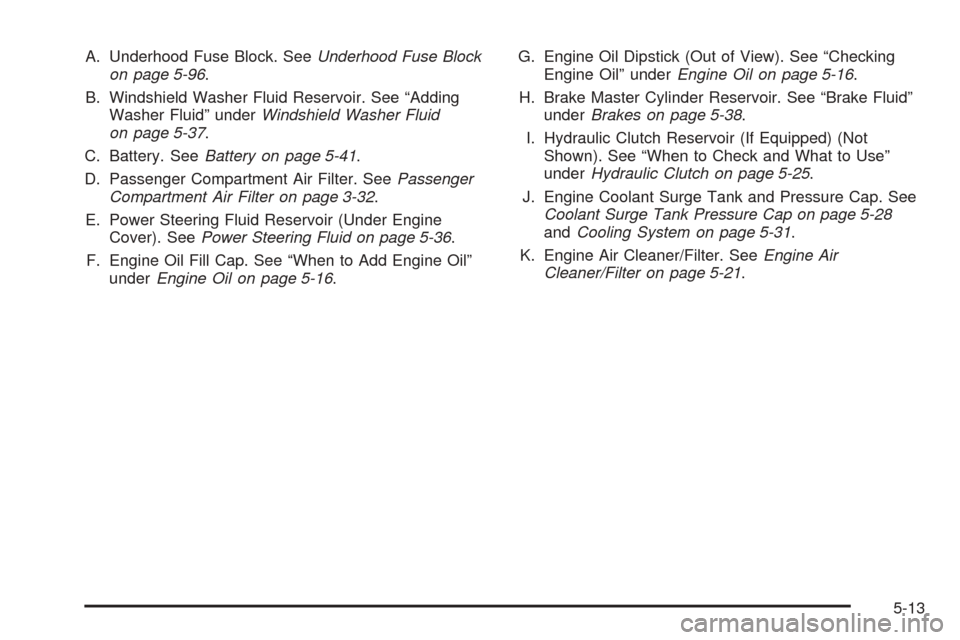
A. Underhood Fuse Block. SeeUnderhood Fuse Block
on page 5-96.
B. Windshield Washer Fluid Reservoir. See “Adding
Washer Fluid” underWindshield Washer Fluid
on page 5-37.
C. Battery. SeeBattery on page 5-41.
D. Passenger Compartment Air Filter. SeePassenger
Compartment Air Filter on page 3-32.
E. Power Steering Fluid Reservoir (Under Engine
Cover). SeePower Steering Fluid on page 5-36.
F. Engine Oil Fill Cap. See “When to Add Engine Oil”
underEngine Oil on page 5-16.G. Engine Oil Dipstick (Out of View). See “Checking
Engine Oil” underEngine Oil on page 5-16.
H. Brake Master Cylinder Reservoir. See “Brake Fluid”
underBrakes on page 5-38.
I. Hydraulic Clutch Reservoir (If Equipped) (Not
Shown). See “When to Check and What to Use”
underHydraulic Clutch on page 5-25.
J. Engine Coolant Surge Tank and Pressure Cap. See
Coolant Surge Tank Pressure Cap on page 5-28
andCooling System on page 5-31.
K. Engine Air Cleaner/Filter. SeeEngine Air
Cleaner/Filter on page 5-21.
5-13
Page 295 of 432
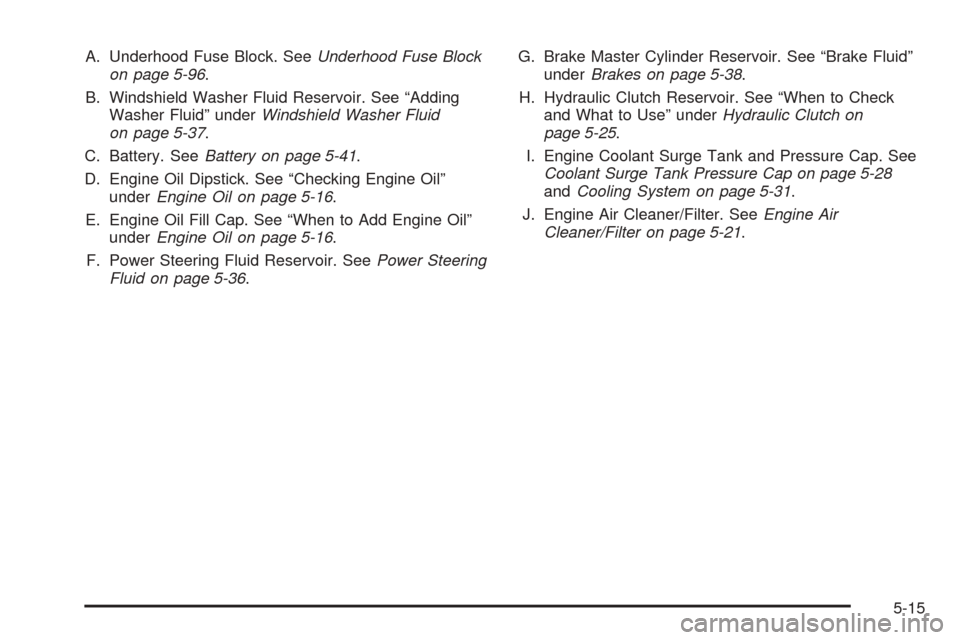
A. Underhood Fuse Block. SeeUnderhood Fuse Block
on page 5-96.
B. Windshield Washer Fluid Reservoir. See “Adding
Washer Fluid” underWindshield Washer Fluid
on page 5-37.
C. Battery. SeeBattery on page 5-41.
D. Engine Oil Dipstick. See “Checking Engine Oil”
underEngine Oil on page 5-16.
E. Engine Oil Fill Cap. See “When to Add Engine Oil”
underEngine Oil on page 5-16.
F. Power Steering Fluid Reservoir. SeePower Steering
Fluid on page 5-36.G. Brake Master Cylinder Reservoir. See “Brake Fluid”
underBrakes on page 5-38.
H. Hydraulic Clutch Reservoir. See “When to Check
and What to Use” underHydraulic Clutch on
page 5-25.
I. Engine Coolant Surge Tank and Pressure Cap. See
Coolant Surge Tank Pressure Cap on page 5-28
andCooling System on page 5-31.
J. Engine Air Cleaner/Filter. SeeEngine Air
Cleaner/Filter on page 5-21.
5-15
Page 305 of 432

Hydraulic Clutch
It is not necessary to regularly check clutch �uid
unless you suspect there is a leak in the system.
Adding �uid will not correct a leak.
A �uid loss in this system could indicate a problem.
Have the system inspected and repaired.
When to Check and What to Use
The hydraulic clutch �uid
reservoir cap has this
symbol on it. SeeEngine
Compartment Overview
on page 5-12for reservoir
location.
Refer to the Maintenance Schedule to determine how
often you should check the �uid level in your clutch
master cylinder reservoir and for the proper �uid to use.
SeeOwner Checks and Services on page 6-9and
Recommended Fluids and Lubricants on page 6-12.
How to Check and Add Fluid
Make sure the �uid level is at the MIN line on the side
of the reservoir. If it is not, remove the cap and add
the proper �uid until the level reaches the MIN line.
Engine Coolant
The cooling system in your vehicle is �lled with
DEX-COOL®engine coolant. This coolant is designed
to remain in your vehicle for �ve years or 150,000 miles
(240 000 km), whichever occurs �rst, if you add only
DEX-COOL
®extended life coolant.
The following explains your cooling system and how
to add coolant when it is low. If you have a problem
with engine overheating, seeEngine Overheating
on page 5-28.
5-25
Page 378 of 432

Relays Usage
MAIN RELAY
MICROPowertrain/ECM
STARTER
RELAY MINIStarter Solenoid
CMP CLU
RELAY MICROCompressor Clutch
IGN-1 RELAY
MICROIgnition Switch (ON)
Wiring
HarnessesUsage
BODY W/H Wiring Harness Connection
I/P W/H Wiring Harness Connection
ENG W/H Engine Wiring Harness Connection
FORWARD
LAMPForward Lamp Wiring Harness
Connection
J Cases Usage
R REARRRPDB (Passenger’s Side Rear
Power Distribution Box)
R REARRRPDB (Passenger’s Side Rear
Power Distribution Box)
L REARLRPDB (Driver’s Side Rear Power
Distribution Box)
L REARLRPDB (Driver’s Side Rear Power
Distribution Box)
HI FAN High Cooling Fan Motor
LO FAN Low Cooling Fan Motor
BLOWER PWM Fan Motor Assembly
STARTER Starter Solenoid
ABS Anti-Lock Brake System
5-98