clock CADILLAC CTS V 2007 1.G User Guide
[x] Cancel search | Manufacturer: CADILLAC, Model Year: 2007, Model line: CTS V, Model: CADILLAC CTS V 2007 1.GPages: 518, PDF Size: 2.77 MB
Page 338 of 518

{CAUTION:
Fuel can spray out on you if you open the
fuel cap too quickly. If you spill fuel and
then something ignites it, you could be
badly burned. This spray can happen if
your tank is nearly full, and is more likely
in hot weather. Open the fuel cap slowly
and wait for any hiss noise to stop. Then
unscrew the cap all the way.
Be careful not to spill fuel. Do not top off or over�ll
the tank and wait a few seconds after you have
�nished pumping before removing the nozzle.
Clean fuel from painted surfaces as soon
as possible. SeeWashing Your Vehicle on
page 439.
When replacing the fuel cap, turn it clockwise until
it clicks. Make sure the cap is fully installed.
The diagnostic system can determine if the fuel
cap has been left off or improperly installed.
This would allow fuel to evaporate into the
atmosphere. SeeMalfunction Indicator Lamp on
page 209.The Check Gas Cap message in the Driver
Information Center (DIC) will be displayed if the
fuel cap is not properly installed. SeeDIC
Warnings and Messages on page 232for more
information.
{CAUTION:
If a �re starts while you are refueling, do
not remove the nozzle. Shut off the �ow of
fuel by shutting off the pump or by
notifying the station attendant. Leave the
area immediately.
Notice:If you need a new fuel cap, be sure to
get the right type. Your dealer/retailer can
get one for you. If you get the wrong type, it
may not �t properly. This may cause your
malfunction indicator lamp to light and may
damage your fuel tank and emissions system.
SeeMalfunction Indicator Lamp on page 209.
338
Page 366 of 518

{CAUTION:
Adding only plain water to your cooling
system can be dangerous. Plain water, or
some other liquid such as alcohol, can boil
before the proper coolant mixture will. Your
vehicle’s coolant warning system is set for
the proper coolant mixture. With plain
water or the wrong mixture, your engine
could get too hot but you would not get the
overheat warning. Your engine could catch
�re and you or others could be burned. Use
a 50/50 mixture of clean, drinkable water
and DEX-COOL
®coolant.
Notice:In cold weather, water can freeze and
crack the engine, radiator, heater core and
other parts. Use the recommended coolant and
the proper coolant mixture.
{CAUTION:
You can be burned if you spill coolant on
hot engine parts. Coolant contains
ethylene glycol and it will burn if the
engine parts are hot enough. Do not spill
coolant on a hot engine.
If no coolant is visible in the surge tank, add
coolant as follows:
1. Remove the coolant surge tank pressure cap
when the cooling system, including the
coolant surge tank pressure cap and upper
radiator hose, is no longer hot. Turn the
pressure cap slowly counterclockwise about
one-quarter turn and then stop.
If you hear a hiss, wait for that to stop. A hiss
means there is still some pressure left.
366
Page 385 of 518

7. Locate the vertical headlamp aiming screws,
which are under the hood near each headlamp
assembly.
The adjustment screw can be turned with
a 6 mm hex socket.8. Turn the vertical aiming screw until the
headlamp beam is aimed to the horizontal tape
line. If you turn it clockwise, it will raise the
beam and if you turn it counterclockwise, it will
lower the beam.
The top edge of the cut-off should be
positioned at the bottom edge of the horizontal
tape line.
9. Make sure that the light from the headlamp is
positioned at the bottom edge of the horizontal
tape line. The lamp on the left (A) shows the
correct headlamp aim. The lamp on the
right (B) shows the incorrect headlamp aim.
10. Repeat Steps 7 through 9 for the opposite
headlamp.
Passenger’s Side Shown
385
Page 387 of 518

Front Turn Signal and Fog Lamps
A. Turn Signal Lamp
B. Fog Lamp
To replace a turn signal or fog lamp bulb, do the
following:
1. Remove the protection shield located on the
underside of the front of the vehicle by pulling
out the push-pins located on the underside
of the protection shield.
2. Reach up behind the front bumper area from
under the vehicle to access the lamp housing.3. Remove the bulb socket from the housing by
turning the bulb socket one-quarter turn
counterclockwise.
4. Remove the electrical connector from the bulb
by lifting the two plastic clips.
5. Pull the old bulb from the bulb socket keeping
the bulb straight as you pull it out.
6. Install a new bulb.
7. Reverse the steps to reinstall the lamp
assembly.
387
Page 388 of 518

Taillamps, Turn Signal, Stoplamps
and Sidemarker Lamps
A. Taillamps and
Stoplamps
B. Turn Signal Lamp
C. Sidemarker Lamp
1. Open the trunk. SeeTrunk on page 104for
more information.
2. Remove the compact spare tire cover by
turning the wing nut counterclockwise.3. Remove the four convenience net wing nuts.
4. Pull the carpet back away from the body
of the vehicle on the side with the burned
out bulb.
5. Remove the two mounting screws from the
lamp assembly.
6. Pull out the lamp assembly to expose the bulb
sockets.
7. Turn the bulb socket one-quarter turn
counterclockwise and pull the bulb socket out
of the lamp re�ector.
8. Pull the old bulb from the bulb socket keeping
the bulb straight as you pull it out.
9. Install a new bulb.
10. Reverse the steps to reinstall the lamp
assembly.
388
Page 389 of 518

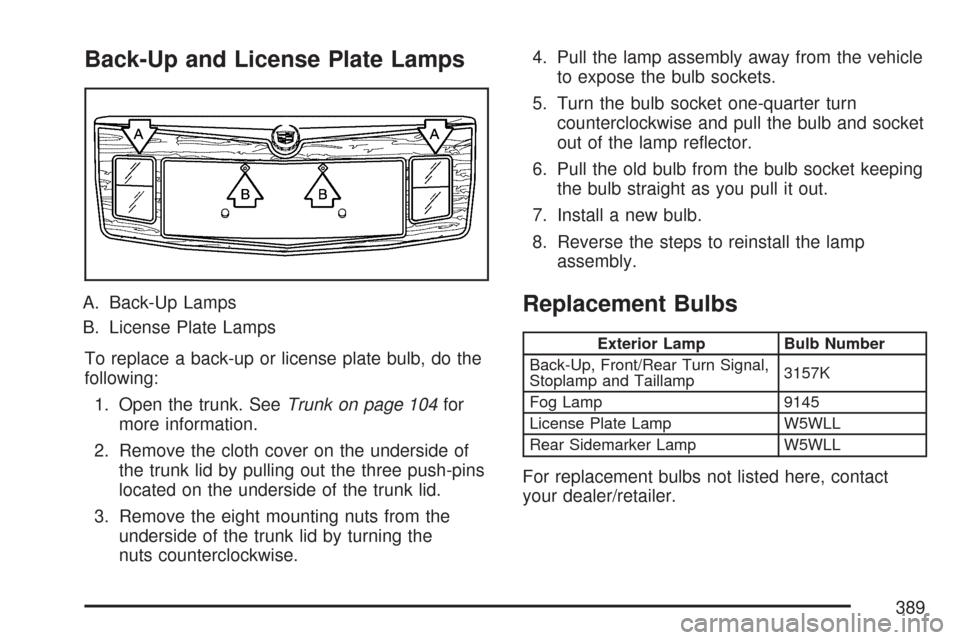
Back-Up and License Plate Lamps
A. Back-Up Lamps
B. License Plate Lamps
To replace a back-up or license plate bulb, do the
following:
1. Open the trunk. SeeTrunk on page 104for
more information.
2. Remove the cloth cover on the underside of
the trunk lid by pulling out the three push-pins
located on the underside of the trunk lid.
3. Remove the eight mounting nuts from the
underside of the trunk lid by turning the
nuts counterclockwise.4. Pull the lamp assembly away from the vehicle
to expose the bulb sockets.
5. Turn the bulb socket one-quarter turn
counterclockwise and pull the bulb and socket
out of the lamp re�ector.
6. Pull the old bulb from the bulb socket keeping
the bulb straight as you pull it out.
7. Install a new bulb.
8. Reverse the steps to reinstall the lamp
assembly.Replacement Bulbs
Exterior Lamp Bulb Number
Back-Up, Front/Rear Turn Signal,
Stoplamp and Taillamp3157K
Fog Lamp 9145
License Plate Lamp W5WLL
Rear Sidemarker Lamp W5WLL
For replacement bulbs not listed here, contact
your dealer/retailer.
389
Page 425 of 518

Removing the Spare Tire and Tools
(CTS Only)
The equipment you will need is in the trunk.
To gain access to the spare tire and jacking
equipment, do the following:
1. Turn the wing nut on
the compact spare
tire cover
counterclockwise to
remove it. Then
remove the cover.
2. Turn the nut holding the jack counterclockwise
and remove it. Then remove the jack and
wheel wrench.
3. Remove the compact spare tire. SeeCompact
Spare Tire (CTS Only) on page 434for more
information about the compact spare tire.
425
Page 429 of 518

Notice:If you position the jack under the
rocker molding and attempt to raise the
vehicle, you could break the molding and/or
cause other damage to your vehicle. Always
position the jack so that when the jack head is
raised, it will �t �rmly in the notch located
inboard from the rocker molding.
4. Turn the wheel wrench counterclockwise to
lower the jack lift head until the jack �ts
under the vehicle.
5. Raise the jack by turning the wheel wrench
clockwise until the slots in the jack head �t
into the metal �ange located behind the
triangle on the plastic molding as shown.
6. Put the compact spare tire near you.
429
Page 430 of 518

7. Raise the vehicle by turning the wheel wrench
clockwise. Raise the vehicle far enough off
the ground for the compact spare tire to
�t under the vehicle.8. Remove all the
wheel nuts and take
off the �at tire.
{CAUTION:
Rust or dirt on the wheel, or on the parts
to which it is fastened, can make the
wheel nuts become loose after time.
The wheel could come off and cause an
accident. When you change a wheel,
remove any rust or dirt from the places
where the wheel attaches to the vehicle.
CAUTION: (Continued)
430
Page 431 of 518

CAUTION: (Continued)
In an emergency, you can use a cloth or a
paper towel to do this; but be sure to use
a scraper or wire brush later, if needed, to
get all the rust or dirt off.
{CAUTION:
Never use oil or grease on studs or nuts.
If you do, the nuts might come loose.
Your wheel could fall off, causing a
serious accident.9. Remove any rust or
dirt from the wheel
bolts, mounting
surfaces, and spare
wheel.
10. Install the spare tire.
11. Put the wheel nuts back on with the rounded
end of the nuts toward the wheel.
12. Tighten each wheel nut by turning it clockwise
with your hand until the wheel is held against
the hub.
431