ECU CADILLAC DEVILLE 2003 8.G Owner's Guide
[x] Cancel search | Manufacturer: CADILLAC, Model Year: 2003, Model line: DEVILLE, Model: CADILLAC DEVILLE 2003 8.GPages: 423, PDF Size: 2.91 MB
Page 177 of 423

The light goes on when you turn your key to ON or
START. It goes off once you start your engine. That's a
check to be sure the light works. If it doesn't come
on, be sure to have it ®xed so it will be there to warn
you if something goes wrong.
When the light comes on and stays on, it means that oil
isn't ¯owing through your engine properly. You could
be low on oil and you might have some other system
problem.
Security Light
For information regarding
this light, see
Theft-Deterrent Systems
on page 2-19.
Fog Lamp Light
This light will come on
when the fog lamps are in
use. It will go out when the
fog lamps are turned off.
For more information about the fog lamps, see ªFog
Lampsº under
Exterior Lamps on page 3-15.
Lights On Reminder
This light comes on whenever the parking lamps are on
so that you know that your exterior lamps are on.
United StatesCanada (Analog Only)
3-54
Page 208 of 423

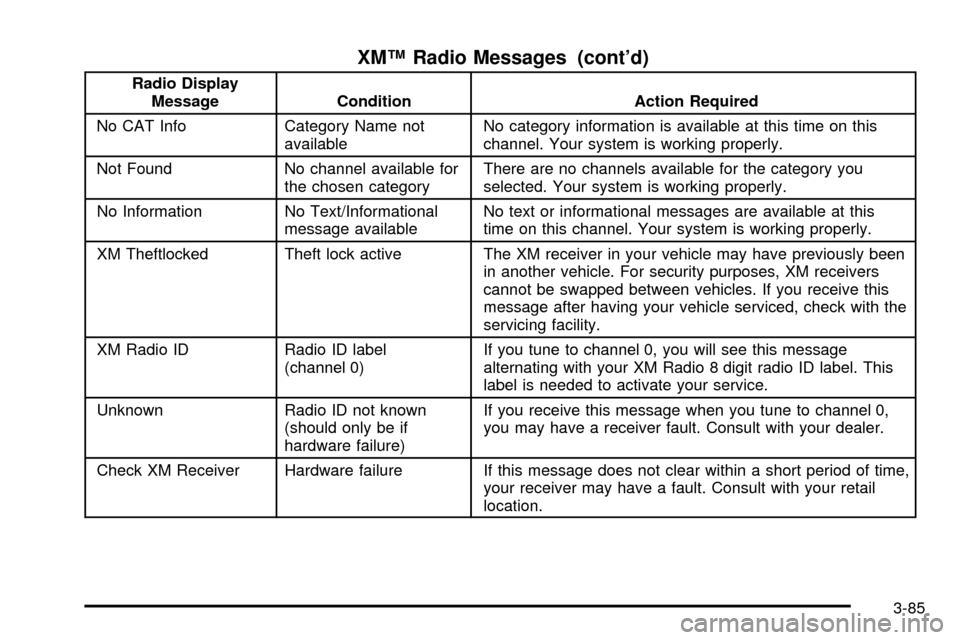
XMŸ Radio Messages (cont'd)
Radio Display
Message Condition Action Required
No CAT Info Category Name not
availableNo category information is available at this time on this
channel. Your system is working properly.
Not Found No channel available for
the chosen categoryThere are no channels available for the category you
selected. Your system is working properly.
No Information No Text/Informational
message availableNo text or informational messages are available at this
time on this channel. Your system is working properly.
XM Theftlocked Theft lock active The XM receiver in your vehicle may have previously been
in another vehicle. For security purposes, XM receivers
cannot be swapped between vehicles. If you receive this
message after having your vehicle serviced, check with the
servicing facility.
XM Radio ID Radio ID label
(channel 0)If you tune to channel 0, you will see this message
alternating with your XM Radio 8 digit radio ID label. This
label is needed to activate your service.
Unknown Radio ID not known
(should only be if
hardware failure)If you receive this message when you tune to channel 0,
you may have a receiver fault. Consult with your dealer.
Check XM Receiver Hardware failure If this message does not clear within a short period of time,
your receiver may have a fault. Consult with your retail
location.
3-85
Page 217 of 423

MSG (Message):If the current station has a message,
MSG will appear on the display. Press the MSG
button, to see the message. If the whole message does
not appear on the display, parts of the message will
appear every three seconds until the message is
completed. To see the parts of the message faster than
every three seconds, press the MSG button repeatedly.
A new group of words will appear on the display
with each press. Once the complete message has been
displayed, MSG will disappear from the display until
another new MSG is received.
For XMŸ (USA only, if equipped), press this button while
in XM mode to retrieve various pieces of information
related to the current song or channel. By pressing and
releasing the MSG button, you may retrieve four different
categories of information: Artist Name/Feature, Song/
Program Title, Channel Category that may be broadcast
on that channel.
Each of the four information types may have multiple
pages of text. To reach a category, press and release the
MSG button consecutively until the desired type is
displayed. If there are multiple pages of text for the
information selected type, the radio will automatically
display all the pages for that type at a rate of
approximately one page every three seconds before
timing out and returning to the default display. You may
override this feature by pressing the MSG button to
review all of the pages at your own pace.Finding a PTY Station (RDS and XMŸ)
To select and ®nd a desired PTY perform the following:
1. Press PTY. PTY will be displayed on the screen.
2. Select a category by pressing-LEVEL +.
3. Once the desired category is displayed, press
TUNE/SEEK to select the category and take
you to the category's ®rst station.
4. If you want to go to another station within that
category, press TUNE/SEEK once to display
the category, then press TUNE/SEEK again to go
to another station.
5. If PTY times out and is no longer on the display, go
back to Step 1.
SCAN:You can also scan through the channels within
a category by performing the following:
1. Press PTY. PTY will be displayed on the screen.
2. Select a category by pressing-LEVEL +.
3. Once the desired category is displayed, press
SCAN, and the radio will begin scanning within
your chosen category.
4. Press SCAN again to stop at a particular section.
3-94
Page 219 of 423

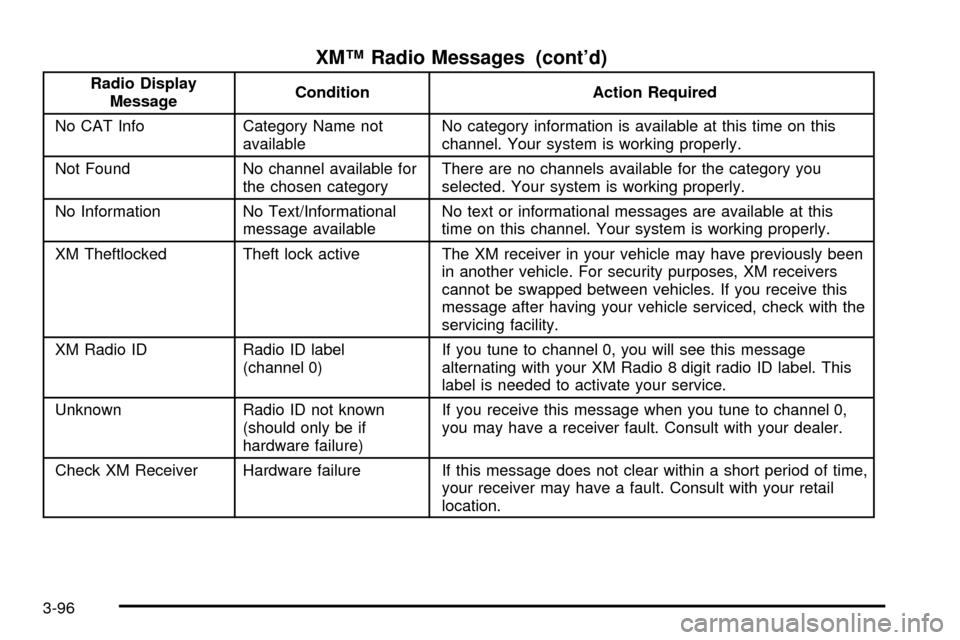
XMŸ Radio Messages (cont'd)
Radio Display
MessageCondition Action Required
No CAT Info Category Name not
availableNo category information is available at this time on this
channel. Your system is working properly.
Not Found No channel available for
the chosen categoryThere are no channels available for the category you
selected. Your system is working properly.
No Information No Text/Informational
message availableNo text or informational messages are available at this
time on this channel. Your system is working properly.
XM Theftlocked Theft lock active The XM receiver in your vehicle may have previously been
in another vehicle. For security purposes, XM receivers
cannot be swapped between vehicles. If you receive this
message after having your vehicle serviced, check with the
servicing facility.
XM Radio ID Radio ID label
(channel 0)If you tune to channel 0, you will see this message
alternating with your XM Radio 8 digit radio ID label. This
label is needed to activate your service.
Unknown Radio ID not known
(should only be if
hardware failure)If you receive this message when you tune to channel 0,
you may have a receiver fault. Consult with your dealer.
Check XM Receiver Hardware failure If this message does not clear within a short period of time,
your receiver may have a fault. Consult with your retail
location.
3-96
Page 256 of 423

Winter Driving
Here are some tips for winter driving:
·Have your vehicle in good shape for winter.
·You may want to put winter emergency supplies in
your trunk.Include an ice scraper, a small brush or broom, a
supply of windshield washer ¯uid, a rag, some winter
outer clothing, a small shovel, a ¯ashlight, a red
cloth and a couple of re¯ective warning triangles. And, if
you will be driving under severe conditions, include a
small bag of sand, a piece of old carpet or a couple of
burlap bags to help provide traction. Be sure you
properly secure these items in your vehicle.
4-25
Page 265 of 423

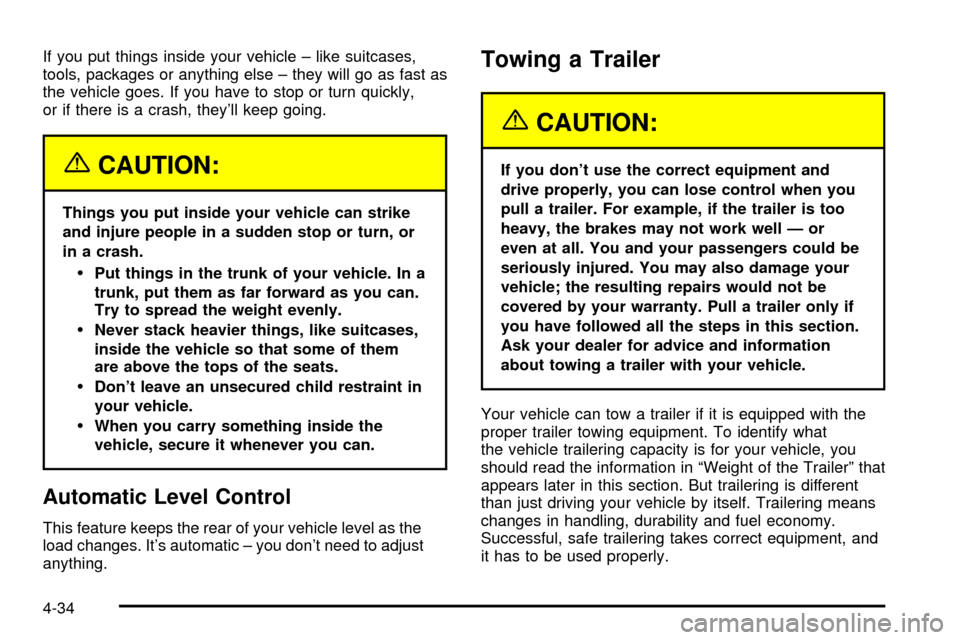
If you put things inside your vehicle ± like suitcases,
tools, packages or anything else ± they will go as fast as
the vehicle goes. If you have to stop or turn quickly,
or if there is a crash, they'll keep going.
{CAUTION:
Things you put inside your vehicle can strike
and injure people in a sudden stop or turn, or
in a crash.
·Put things in the trunk of your vehicle. In a
trunk, put them as far forward as you can.
Try to spread the weight evenly.
·Never stack heavier things, like suitcases,
inside the vehicle so that some of them
are above the tops of the seats.
·Don't leave an unsecured child restraint in
your vehicle.
·When you carry something inside the
vehicle, secure it whenever you can.
Automatic Level Control
This feature keeps the rear of your vehicle level as the
load changes. It's automatic ± you don't need to adjust
anything.
Towing a Trailer
{CAUTION:
If you don't use the correct equipment and
drive properly, you can lose control when you
pull a trailer. For example, if the trailer is too
heavy, the brakes may not work well Ð or
even at all. You and your passengers could be
seriously injured. You may also damage your
vehicle; the resulting repairs would not be
covered by your warranty. Pull a trailer only if
you have followed all the steps in this section.
Ask your dealer for advice and information
about towing a trailer with your vehicle.
Your vehicle can tow a trailer if it is equipped with the
proper trailer towing equipment. To identify what
the vehicle trailering capacity is for your vehicle, you
should read the information in ªWeight of the Trailerº that
appears later in this section. But trailering is different
than just driving your vehicle by itself. Trailering means
changes in handling, durability and fuel economy.
Successful, safe trailering takes correct equipment, and
it has to be used properly.
4-34
Page 269 of 423

Trailer Brakes
Because you have anti-lock brakes, don't try to tap into
your vehicle's hydraulic brake system. If you do,
both brake systems won't work well, or at all. If you tow
more than 1,000 lbs. (450 kg), use trailer brakes.
Be sure to follow the instructions that come with the
trailer or from the brake manufacturer.
Be sure to read and follow the instructions for the trailer
brakes so you'll be able to maintain them properly.
Driving with a Trailer
Towing a trailer requires a certain amount of experience.
Before setting out for the open road, you'll want to get
to know your rig. Acquaint yourself with the feel of
handling and braking with the added weight of the trailer.
And always keep in mind that the vehicle you are
driving is now a good deal longer and not nearly as
responsive as your vehicle is by itself.
Before you start, check the trailer hitch and platform
(and attachments), safety chains, electrical connector,
lamps, tires and mirror adjustment. If the trailer has
electric brakes, start your vehicle and trailer moving and
then apply the trailer brake controller by hand to be
sure the brakes are working. This lets you check your
electrical connection at the same time.
During your trip, check occasionally to be sure that the
load is secure, and that the lamps and any trailer
brakes are still working.
Following Distance
Stay at least twice as far behind the vehicle ahead as
you would when driving your vehicle without a trailer.
This can help you avoid situations that require
heavy braking and sudden turns.
Passing
You'll need more passing distance up ahead when
you're towing a trailer. And, because you're a good deal
longer, you'll need to go much farther beyond the
passed vehicle before you can return to your lane.
Backing Up
Hold the bottom of the steering wheel with one hand.
Then, to move the trailer to the left, just move that hand
to the left. To move the trailer to the right, move your
hand to the right. Always back up slowly and, if possible,
have someone guide you.
Making Turns
Notice:Making very sharp turns while trailering
could cause the trailer to come in contact with the
vehicle. Your vehicle could be damaged. Avoid
making very sharp turns while trailering.
When you're turning with a trailer, make wider turns than
normal. Do this so your trailer won't strike soft shoulders,
curbs, road signs, trees or other objects. Avoid jerky or
sudden maneuvers. Signal well in advance.
4-38
Page 313 of 423

To be sure the vent hose (A) is properly attached, the
vent hose connectors (B) must be securely reattached to
the vent outlets (C) on each side of the battery, and
the vent assembly grommet (D) must be secured to the
¯oor pan (E).
Vehicle Storage
If you're not going to drive you vehicle for 25 days or
more, remove the black, negative (-) cable from
the battery. This will help keep your battery from
running down.
{CAUTION:
Batteries have acid that can burn you and gas
that can explode. You can be badly hurt if you
aren't careful. See ªJump Startingº next for
tips on working around a battery without
getting hurt.
Contact your dealer to learn how to prepare your
vehicle for longer storage periods.
Also, for your audio system, see
Theft-Deterrent
Feature on page 3-104.
5-42
Page 342 of 423

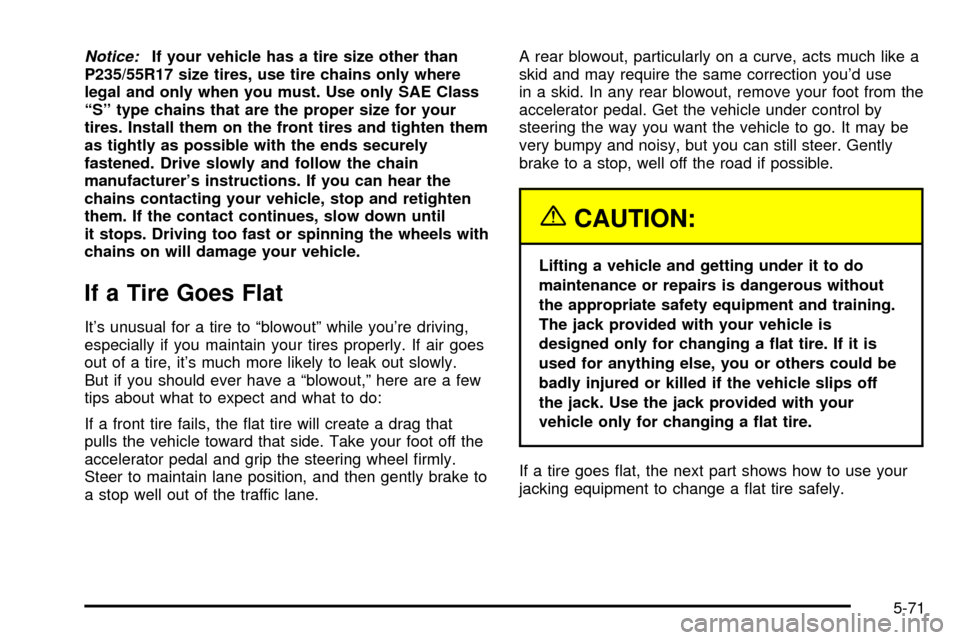
Notice:If your vehicle has a tire size other than
P235/55R17 size tires, use tire chains only where
legal and only when you must. Use only SAE Class
ªSº type chains that are the proper size for your
tires. Install them on the front tires and tighten them
as tightly as possible with the ends securely
fastened. Drive slowly and follow the chain
manufacturer's instructions. If you can hear the
chains contacting your vehicle, stop and retighten
them. If the contact continues, slow down until
it stops. Driving too fast or spinning the wheels with
chains on will damage your vehicle.
If a Tire Goes Flat
It's unusual for a tire to ªblowoutº while you're driving,
especially if you maintain your tires properly. If air goes
out of a tire, it's much more likely to leak out slowly.
But if you should ever have a ªblowout,º here are a few
tips about what to expect and what to do:
If a front tire fails, the ¯at tire will create a drag that
pulls the vehicle toward that side. Take your foot off the
accelerator pedal and grip the steering wheel ®rmly.
Steer to maintain lane position, and then gently brake to
a stop well out of the traffic lane.A rear blowout, particularly on a curve, acts much like a
skid and may require the same correction you'd use
in a skid. In any rear blowout, remove your foot from the
accelerator pedal. Get the vehicle under control by
steering the way you want the vehicle to go. It may be
very bumpy and noisy, but you can still steer. Gently
brake to a stop, well off the road if possible.
{CAUTION:
Lifting a vehicle and getting under it to do
maintenance or repairs is dangerous without
the appropriate safety equipment and training.
The jack provided with your vehicle is
designed only for changing a ¯at tire. If it is
used for anything else, you or others could be
badly injured or killed if the vehicle slips off
the jack. Use the jack provided with your
vehicle only for changing a ¯at tire.
If a tire goes ¯at, the next part shows how to use your
jacking equipment to change a ¯at tire safely.
5-71
Page 368 of 423

{CAUTION:
A safety belt that isn't properly routed through
the seat cushion or is twisted won't provide
the protection needed in a crash. If the safety
CAUTION: (Continued)
CAUTION: (Continued)
belt hasn't been routed through the seat
cushion at all, it won't be there to work for the
next passenger. The person sitting in that
position could be badly injured. After
reinstalling the seat cushion, always check to
be sure that the safety belts are properly
routed and are not twisted.
1. Buckle the center passenger position safety belt,
then route the safety belts through the proper slots
in the seat cushion. Don't let the safety belts get
twisted.
2. Slide the rear of the cushion up and under the
seatback so the rear-locating guides hook into
the wire loops on the back frame.
3. With the seat cushion lowered, push rearward and
then press down on the seat cushion until the
spring locks on both ends engage.
4. Check to make sure the safety belts are properly
routed and that no portion of any safety belt is
trapped under the seat. Also make sure the seat
cushion is secured.
5-97