flat tire CADILLAC DEVILLE 2003 8.G Owners Manual
[x] Cancel search | Manufacturer: CADILLAC, Model Year: 2003, Model line: DEVILLE, Model: CADILLAC DEVILLE 2003 8.GPages: 423, PDF Size: 2.91 MB
Page 185 of 423

The correct tire in¯ation pressure should be set to those
shown on the Tire Loading-Information Label, located on
the rear edge of the driver's door. For more information
regarding proper tire in¯ation, see
In¯ation -- Tire
Pressure on page 5-61. If a tire is low, you should stop as
soon as possible and inspect your tire(s) for damage. If a
tire is ¯at, see
If a Tire Goes Flat on page 5-71.
Once the TPM system detects the low or high tire
pressure condition, the message CHECK TIRE
PRESSURE will be displayed whenever you start the
engine. To remove or clear the CHECK TIRE
PRESSURE message, you will need to set the tire(s) to
the proper tire pressure. See
In¯ation -- Tire Pressure on
page 5-61.
{CAUTION:
When the CHECK TIRE PRESSURE message is
displayed on the Driver Information Center and
the tire pressure is low, your vehicle's
handling capabilities will be reduced during
CAUTION: (Continued)
CAUTION: (Continued)
severe maneuvers. If you drive too fast, you
could lose control of your vehicle. You or
others could be injured. Don't drive over 55
mph (90 km/h) when the tire pressure is low.
Drive cautiously and correct the tire pressure
as soon as you can.
CHECK WASHER FLUID ± 25:This message means
that your vehicle is low on windshield washer ¯uid.
See
Windshield Washer Fluid on page 5-37.
DRIVER DOOR AJAR ± 140:This message will
display anytime the key is in ON, the transaxle is not in
PARK (P) and the driver's door is open or ajar. A
chime will sound when the vehicle's speed is greater
than 3 mph (4.8 km/h).
DRIVE NO. X (1 OR 2):This message will be displayed
with the key in ON and while entering FEATURE
PROGRAMMING, but only if the vehicle is equipped
with memory seats. The message will show which driver
is activating the personalization feature. It will only
stay on for ®ve seconds. This message can be
customized for you by your dealer.
3-62
Page 273 of 423

Uniform Tire Quality Grading..........................5-67
Wheel Alignment and Tire Balance..................5-68
Wheel Replacement......................................5-69
Tire Chains..................................................5-70
If a Tire Goes Flat........................................5-71
Changing a Flat Tire.....................................5-72
Compact Spare Tire......................................5-83
Appearance Care............................................5-84
Cleaning the Inside of Your Vehicle.................5-84
Care of Safety Belts......................................5-87
Weatherstrips...............................................5-87
Cleaning the Outside of Your Vehicle..............5-88
Sheet Metal Damage.....................................5-90
Finish Damage.............................................5-90
Underbody Maintenance................................5-90Chemical Paint Spotting.................................5-90
Vehicle Care/Appearance Materials..................5-91
Vehicle Identi®cation......................................5-92
Vehicle Identi®cation Number (VIN).................5-92
Service Parts Identi®cation Label.....................5-93
Electrical System............................................5-93
Add-On Electrical Equipment..........................5-93
Headlamp Wiring..........................................5-93
Windshield Wiper Fuses................................5-93
Power Windows and Other Power Options.......5-93
Fuses and Circuit Breakers............................5-94
Removing the Rear Seat Cushion...................5-96
Capacities and Speci®cations........................5-101
Normal Maintenance Replacement Parts.........5-103
Section 5 Service and Appearance Care
5-2
Page 333 of 423

How to Check
Use a good quality pocket-type gage to check tire
pressure. You can't tell if your tires are properly in¯ated
simply by looking at them. Radial tires may look
properly in¯ated even when they're underin¯ated.
Be sure to put the valve caps back on the valve stems.
They help prevent leaks by keeping out dirt and moisture.
Tire Pressure Monitor System
The Tire Pressure Monitor (TPM) system uses radio
and sensor technology to check tire pressure levels.
Sensors, mounted on each road wheel, transmit
tire pressure readings to a receiver located in the trunk.
Tire pressure status and tire pressure warnings are
shown on the Driver Information Center (DIC) display.
See
Driver Information Center (DIC) on page 3-57,
for details regarding DIC controls and displays.
The system operates on a radio frequency subject to
Federal Communications Commission (FCC) Rules and
with Industry and Science Canada.
This device complies with Part 15 of the FCC Rules.
Operation is subject to the following two conditions: (1)
this device may not cause harmful interference, and (2)
this device must accept any interference received,
including interference that may cause undesired
operation.This device complies with RSS-210 of Industry and
Science Canada. Operation is subject to the following
two conditions: (1) this device may not cause
interference, and (2) this device must accept any
interference received, including interference that may
cause undesired operation of the device.
Changes or modi®cations to this system by anyone
other than an authorized service facility could void
authorization to use this equipment.
If the TPM system detects low tire pressure, below
25 psi (172 kPa), or high tire pressure, above 38 psi
(262 kPa), a message, CHECK TIRE PRESSURE, will
appear on the Driver Information Center (DIC)
display. By pressing the INFO button, the DIC screen
will show which tire(s) has the low or high pressure
condition. See
In¯ation Ð Tire Pressure on page 5-61for information regarding correct tire in¯ation. If a
tire is low, you should stop as soon as possible and
check all your tires for damage. If a tire is ¯at, see
If a
Tire Goes Flat on page 5-71.
Notice:Do not use a tire sealant if your vehicle is
equipped with Tire Pressure Monitors. The liquid
sealant can damage the tire pressure monitor
sensors.
5-62
Page 336 of 423

{CAUTION:
Rust or dirt on a wheel, or on the parts to
which it is fastened, can make wheel nuts
become loose after a time. The wheel could
come off and cause an accident. When you
change a wheel, remove any rust or dirt from
places where the wheel attaches to the vehicle.
In an emergency, you can use a cloth or a
paper towel to do this; but be sure to use a
scraper or wire brush later, if you need to, to
get all the rust or dirt off. See ªChanging a Flat
Tireº in the Index.
When It Is Time for New Tires
One way to tell when it's
time for new tires is to
check the treadwear
indicators, which will
appear when your tires
have only 1/16 inch
(1.6 mm) or less of tread
remaining.
You need a new tire if any of the following statements
are true:
·You can see the indicators at three or more places
around the tire.
·You can see cord or fabric showing through the
tire's rubber.
·The tread or sidewall is cracked, cut or snagged
deep enough to show cord or fabric.
·The tire has a bump, bulge or split.
·The tire has a puncture, cut or other damage that
can't be repaired well because of the size or
location of the damage.
5-65
Page 340 of 423

Wheel Replacement
Replace any wheel that is bent, cracked or badly rusted
or corroded. If wheel nuts keep coming loose, the
wheel, wheel bolts and wheel nuts should be replaced.
If the wheel leaks air, replace it (except some
aluminum wheels, which can sometimes be repaired).
See your dealer if any of these conditions exist.
Your dealer will know the kind of wheel you need.
Each new wheel should have the same load-carrying
capacity, diameter, width, offset and be mounted
the same way as the one it replaces.
If you need to replace any of your wheels, wheel bolts
or wheel nuts, replace them only with new GM
original equipment parts. This way, you will be sure to
have the right wheel, wheel bolts and wheel nuts
for your vehicle.{CAUTION:
Using the wrong replacement wheels, wheel
bolts or wheel nuts on your vehicle can be
dangerous. It could affect the braking and
handling of your vehicle, make your tires lose
air and make you lose control. You could have
a collision in which you or others could be
injured. Always use the correct wheel, wheel
bolts and wheel nuts for replacement.
Notice:The wrong wheel can also cause problems
with bearing life, brake cooling, speedometer or
odometer calibration, headlamp aim, bumper height,
vehicle ground clearance and tire or tire chain
clearance to the body and chassis.
See
Changing a Flat Tire on page 5-72for more
information.
5-69
Page 342 of 423

Notice:If your vehicle has a tire size other than
P235/55R17 size tires, use tire chains only where
legal and only when you must. Use only SAE Class
ªSº type chains that are the proper size for your
tires. Install them on the front tires and tighten them
as tightly as possible with the ends securely
fastened. Drive slowly and follow the chain
manufacturer's instructions. If you can hear the
chains contacting your vehicle, stop and retighten
them. If the contact continues, slow down until
it stops. Driving too fast or spinning the wheels with
chains on will damage your vehicle.
If a Tire Goes Flat
It's unusual for a tire to ªblowoutº while you're driving,
especially if you maintain your tires properly. If air goes
out of a tire, it's much more likely to leak out slowly.
But if you should ever have a ªblowout,º here are a few
tips about what to expect and what to do:
If a front tire fails, the ¯at tire will create a drag that
pulls the vehicle toward that side. Take your foot off the
accelerator pedal and grip the steering wheel ®rmly.
Steer to maintain lane position, and then gently brake to
a stop well out of the traffic lane.A rear blowout, particularly on a curve, acts much like a
skid and may require the same correction you'd use
in a skid. In any rear blowout, remove your foot from the
accelerator pedal. Get the vehicle under control by
steering the way you want the vehicle to go. It may be
very bumpy and noisy, but you can still steer. Gently
brake to a stop, well off the road if possible.
{CAUTION:
Lifting a vehicle and getting under it to do
maintenance or repairs is dangerous without
the appropriate safety equipment and training.
The jack provided with your vehicle is
designed only for changing a ¯at tire. If it is
used for anything else, you or others could be
badly injured or killed if the vehicle slips off
the jack. Use the jack provided with your
vehicle only for changing a ¯at tire.
If a tire goes ¯at, the next part shows how to use your
jacking equipment to change a ¯at tire safely.
5-71
Page 343 of 423

Changing a Flat Tire
If a tire goes ¯at, avoid further tire and wheel damage
by driving slowly to a level place. Turn on your
hazard warning ¯ashers.
{CAUTION:
Changing a tire can cause an injury. The
vehicle can slip off the jack and roll over you
or other people. You and they could be badly
injured. Find a level place to change your tire.
To help prevent the vehicle from moving:
1. Put the shift lever in PARK (P).
2. Set the parking brake ®rmly.
3. Turn off the engine.
To be even more certain the vehicle won't
move, you can put blocks at the front and rear
of the tire farthest away from the one being
changed. That would be the tire on the other
side of the vehicle, at the opposite end.The following steps will tell you how to use the jack and
change a tire.
5-72
Page 346 of 423

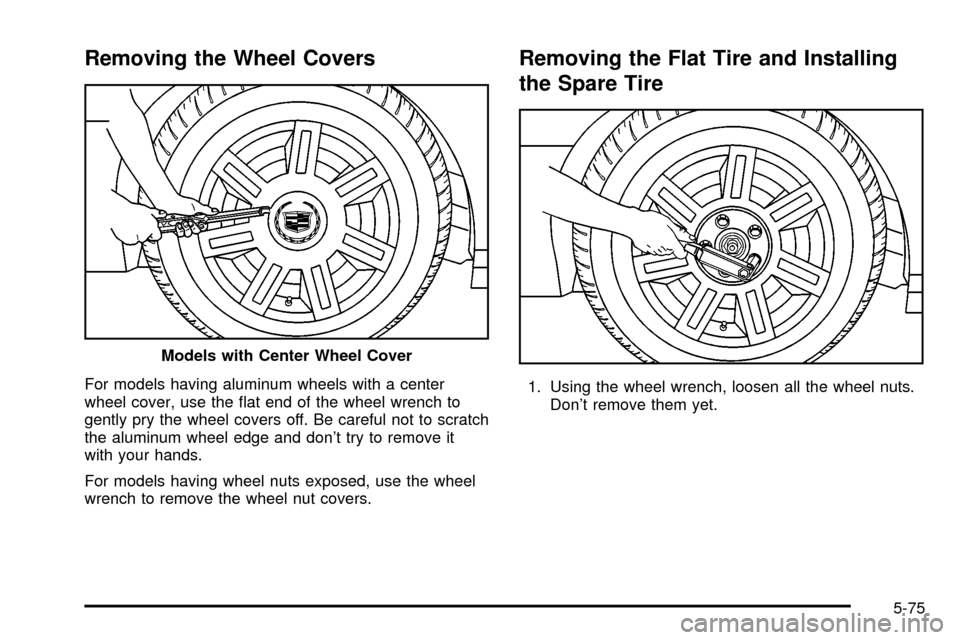
Removing the Wheel Covers
For models having aluminum wheels with a center
wheel cover, use the ¯at end of the wheel wrench to
gently pry the wheel covers off. Be careful not to scratch
the aluminum wheel edge and don't try to remove it
with your hands.
For models having wheel nuts exposed, use the wheel
wrench to remove the wheel nut covers.
Removing the Flat Tire and Installing
the Spare Tire
1. Using the wheel wrench, loosen all the wheel nuts.
Don't remove them yet. Models with Center Wheel Cover
5-75
Page 352 of 423

Notice:Improperly tightened wheel nuts can lead
to brake pulsation and rotor damage. To avoid
expensive brake repairs, evenly tighten the wheel
nuts in the proper sequence and to the proper
torque speci®cation. See ªCapacities and
Speci®cationsº in the index for the wheel nut torque
speci®cation.
Don't try to put a wheel cover on your compact spare
tire. It won't ®t. Store the wheel cover and lug nut caps in
the trunk until you have the ¯at tire repaired or
replaced.
Notice:Wheel covers won't ®t on your compact
spare. If you try to put a wheel cover on your
compact spare, you could damage the cover or
the spare.
Storing the Flat Tire and Tools
{CAUTION:
Storing a jack, a tire, or other equipment in the
passenger compartment of the vehicle could
cause injury. In a sudden stop or collision,
loose equipment could strike someone. Store
all these in the proper place.
After you've put the compact spare tire on your vehicle,
you'll need to store the ¯at tire in your trunk.
Store the ¯at tire as far forward in the trunk as possible.
Store the jack and wheel wrench in their compartment
in the trunk. For storage, the jack must be raised
until the screw end is ¯ush with the edge of the jack.
5-81
Page 400 of 423

Emergency Road Service is performed on site for the
following situations:
·Towing Service
·Battery Jump Starting
·Lock Out Assistance
·Fuel Delivery
·Flat Tire Change (Covers change only)
·Trip Interruption ± If your trip is interrupted due to a
warranty failure, incidental expenses may be
reimbursed during the 48 months/50,000 miles
(80 000 km) warranty period. Items covered
are hotel, meals and rental car.
Roadside Service Availability
Wherever you drive in the United States or Canada, an
advisor is available to assist you over the phone. A
dealer technician, if available, can travel to your location
within a 30 mile (50 km) radius of a participating
Cadillac dealership. If beyond this radius, we will
arrange to have your car towed to the nearest Cadillac
dealership.
Reaching Roadside Service
Dial the toll-free Roadside Service number:
1-800-882-1112. An experienced Roadside Service
Advisor will assist you and request the following
information:
·A description of the problem
·Name, home address, home telephone number
·Location of your Cadillac and number you are
calling from
·The model year, Vehicle Identi®cation Number
(VIN), mileage and date of delivery
Roadside Service for the Hearing or
Speech Impaired
Roadside Service is prepared to assist owners who have
hearing difficulties or are speech impaired. Cadillac has
installed special telecommunication devices called Text
Telephone (TTY) in the Roadside Service Center.
Any customer who has access to a (TTY) or a
conventional teletypewriter can communicate with
Cadillac by dialing from the United States or Canada
1-888-889-2438 ± daily, 24 hours.
7-7