set clock CADILLAC DEVILLE 2004 8.G Owners Manual
[x] Cancel search | Manufacturer: CADILLAC, Model Year: 2004, Model line: DEVILLE, Model: CADILLAC DEVILLE 2004 8.GPages: 460, PDF Size: 2.88 MB
Page 78 of 460

Programmable Automatic Door
Locks
Your vehicle is programmed so that, when the doors are
closed, the ignition is on and the shift lever is moved
out of PARK (P), all the doors will lock. The doors
will unlock every time you stop the vehicle and move
the shift lever into PARK (P).
If someone needs to get out while your vehicle is not in
PARK (P), have the person use the manual lever or
power door lock switch. When the door is closed again,
it will not lock automatically. Use the manual lever or
power door lock switch to lock the door.
With the vehicle in PARK (P) and the ignition in ON, the
door locks can be programmed through prompts
displayed on the Driver Information Center (DIC). These
prompts allow the driver to choose various lock and
unlock settings. For programming information, seeDIC
Vehicle Personalization on page 3-74.
Rear Door Security Locks
Your vehicle is equipped with rear door security locks
that prevent passengers from opening the rear doors on
your vehicle from the inside.
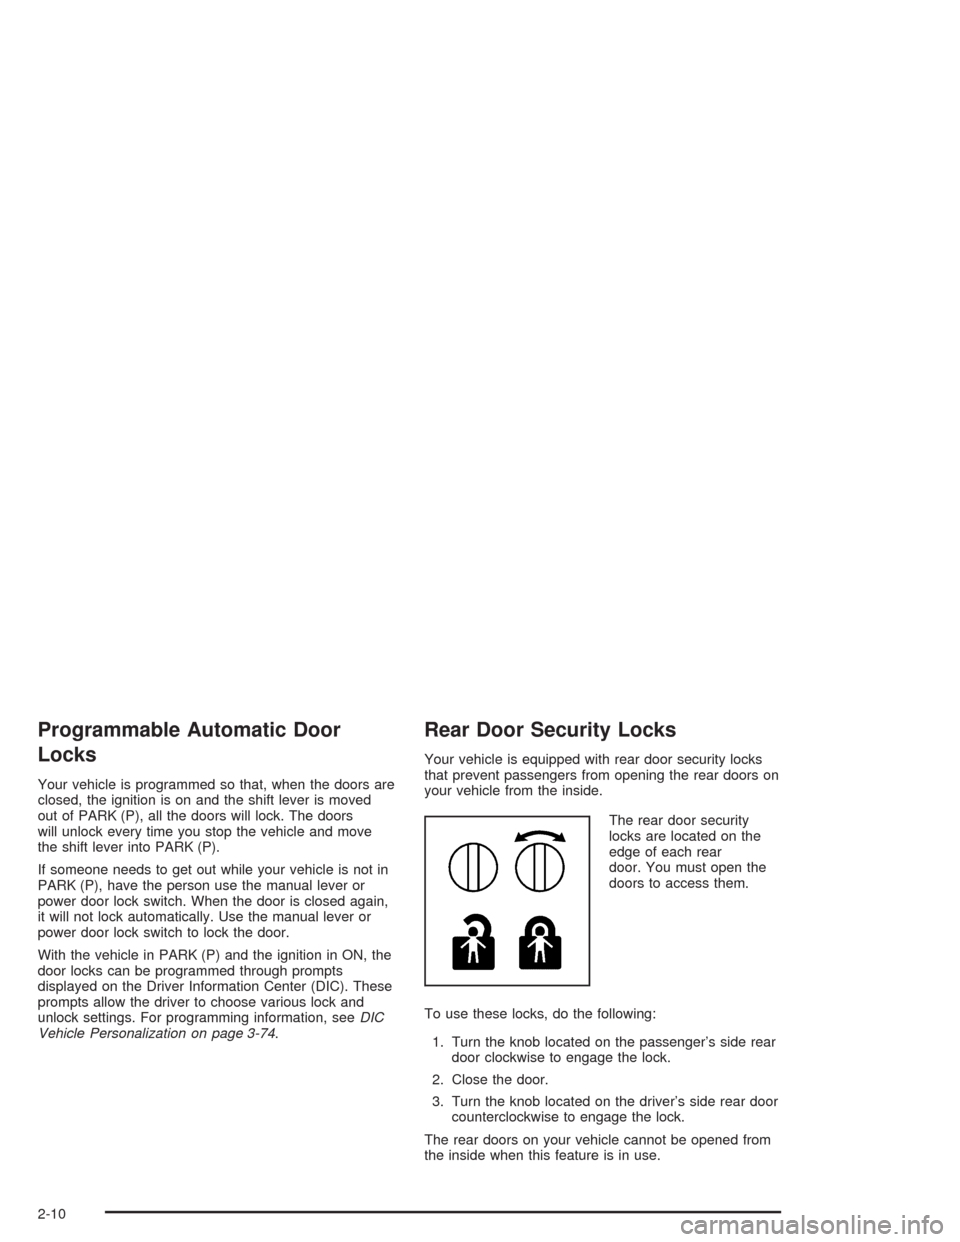
The rear door security
locks are located on the
edge of each rear
door. You must open the
doors to access them.
To use these locks, do the following:
1. Turn the knob located on the passenger’s side rear
door clockwise to engage the lock.
2. Close the door.
3. Turn the knob located on the driver’s side rear door
counterclockwise to engage the lock.
The rear doors on your vehicle cannot be opened from
the inside when this feature is in use.
2-10
Page 79 of 460

When you want to open a rear door while the security
lock is on, do the following:
1. Unlock the door using the remote keyless entry
transmitter, the front door power lock switch or
by lifting the rear door manual lock.
2. Then open the door from the outside.
To cancel the rear door security lock, do the following:
1. Unlock the door and open it from the outside.
2. Turn the knob on the passenger’s side of the rear
door counterclockwise all the way back to the
original position.
3. Turn the knob on the driver’s side of the rear door
clockwise all the way back to the original position.
The rear door locks will now work normally.Lockout Protection
Leaving your key in any ignition position with any door
open will disable the power door lock switches as
well as the lock button on the remote keyless entry
transmitter. If you close the doors, you can lock them
using the remote keyless entry transmitter. It is
always recommended that you remove the ignition key
when locking your vehicle.
The anti-lockout feature can be overridden by holding
the power door lock switch for three seconds or longer.
Leaving Your Vehicle
If you are leaving your vehicle, open the door, set the
locks from the inside, get out and close the door.
2-11
Page 118 of 460

Reprogramming a Single HomeLink®
Button
To program a device to HomeLink®using a HomeLink®
button previously trained, follow these steps:
1. Press and hold the desired HomeLink
®button. Do
not release the button.
2. The indicator light will begin to �ash after
20 seconds. While still holding the HomeLink
®
button, proceed with Step 2 under “Programming
HomeLink®.”
Resetting Defaults
To reset HomeLink®to default settings do the following:
1. Hold down the two outside buttons for about
20 seconds until the indicator light begins to �ash.
2. Continue to hold both buttons until the HomeLink
®
indicator light turns off.
3. Release both buttons.
For questions or comments, contact HomeLink
®at
1-800-355-3515, or on the internet at
www.homelink.com.
Storage Areas
Glove Box
The glove box is located in front of the passenger’s seat
on the instrument panel. To lock the glove box door,
insert the master key into the lock cylinder and
turn it clockwise. Turn the key counterclockwise to
unlock the door.
Instrument Panel Storage Area
This storage compartment is located in the center of the
instrument panel below the radio. Pull the door out to
reveal the accessory power outlet and storage
compartment. To clean the storage compartment, lift out
while pulling on the sides.
2-50
Page 162 of 460

Manual Operation
yMODEz:Pressing the MODE switch and changing
the mode cancels automatic operation and places the
system in manual mode. Press AUTO to return to
automatic operation.
To change the current mode, select one of the following:
F(Vent):This mode directs air to the instrument
panel outlets.
*(Bi-Level):This mode directs approximately half of
the air to the instrument panel outlets, and then
directs most of the remaining air to the �oor outlets.
Some air may be directed toward the windshield.
In automatic operation, cooler air is directed to the upper
outlets and warmer air to the �oor outlets.
7(Floor):This mode directs most of the air to the
�oor outlets with some air directed to the outboard
outlets (for the side windows) a little air directed to the
windshield.
The MODE switch can also be used to select the
�oor/defog mode. Information on defogging and
defrosting can be found later in this section.
y9z(Fan):Press this switch to increase or
decrease the fan speed. Pressing this switch cancels
automatic operation and places the system in manual
mode. Press AUTO to return to automatic operation.
If the air�ow seems low when the fan speed is at
the highest setting, the passenger compartment air �lter
may need to be replaced. For more information, see
Passenger Compartment Air Filter on page 3-40
andScheduled Maintenance on page 6-4.
?(Recirculation):This mode keeps outside air from
coming in the vehicle. It can be used to prevent outside
air and odors from entering your vehicle or to help heat or
cool the air inside your vehicle more quickly. Press this
button to turn the recirculation mode on or off. When the
button is pressed, an indicator light will come on. The
air-conditioning compressor also comes on.
Driver’s Temperature Knob:Press this knob to turn
the entire climate control system on or off. Turn this knob
clockwise or counterclockwise to manually increase or
decrease the temperature inside your vehicle.
3-34
Page 191 of 460

«INFOª(Information):Pressing this button up or
down will display the MILES RANGE (Analog Cluster),
MPG AVG, MPG INST, GAL FUEL USED, AVG
MPH, TIMER, BATTERY VOLTS, LF-RF-LR-RR TIRE
(If Equipped), RPM TACHOMETER (Digital Cluster),
ENGINE OIL LIFE, TRANS FLUID LIFE, PHONE
(If Equipped), FEATURE PROGRAMMING and Blank
Display.
INFO RESET:Pressing this button will reset the MPG
AVG, GAL FUEL USED, AVG MPH, TIMER, ENGINE
OIL LIFE and TRANS FLUID LIFE. For more information
about the trip odometer, seeTrip Odometer on
page 3-47.
MPG AVG (Average Miles Per Gallon):This
message shows the approximate fuel economy you
have averaged since the last time you reset the
value. To reset the MPG AVG (Average Fuel
Economy), press the INFO button to display the
MPG AVG then press and hold the INFO RESET
button until 0.0 MPG AVG is displayed.
GAL (Gallons) FUEL USED:This message shows
how much fuel has been used since the last reset.
To learn how much fuel is used from a new
starting point, press the RESET button while the
GAL FUEL USED is displayed in the DIC.
AVG MPH (Average Miles per Hour):This
message shows the average speed you have
traveled at since the last time you reset the value.
To reset the value, press the INFO button to
display AVG MPH then press and hold the INFO
RESET button until 0.0 AVG MPH is displayed.
TIMER:This feature is like a stopwatch, in that you
can clock the time it takes to get from one point to
another.
To operate, press the INFO button to display
TIMER. Each of the �elds for the hours, minutes
and seconds are two numeric digits.
Once TIMER 00:00:00 is displayed, press the
ON/OFF button to start the timing feature. Press the
ON/OFF button again to stop it. If you will be starting
and stopping your vehicle, during a trip for instance,
the TIMER feature will automatically start timing
where it left off when you last stopped. To reset it,
press and hold the INFO RESET button until the
display reads TIMER 00:00:00. Press the INFO
button to exit from the TIMER display.
3-63
Page 235 of 460

¦SEEK¥:Your tape must have at least three
seconds of silence between each selection for the SEEK
arrows to work. Press the up or the down arrow to
seek to the next or to the previous selection on the tape.
SCAN:Press this button to listen to each selection
for a few seconds. The tape will go to a selection, play
for a few seconds, then go on to the next selection.
Press this button again to stop scanning.
SOURCE:Press this button to lay a cassette tape or
CD when listening to the radio. The audio source
must be loaded to play. Available loaded sources are
shown on the display. If a source is being used, it will be
underlined on the display. If none of the audio sources
are loaded, NO SOURCE LOADED will appear on
the display.
BAND:Press this button to listen to the radio when
playing a cassette tape or CD. The inactive tape or CD
will remain safely inside the radio for future listening.
SIDE:Press this button to play the other side of
the tape.
Z(Eject):Press this button, located to the right of
the cassette tape slot, to stop a tape when it is playing
or to eject a tape when it is not playing. Eject may
be activated with the radio and the ignition off.
Cassette Tape Messages
If an error occurs while trying to play a cassette tape, it
could be one of the following has occurred:
The cassette tape is tight and the cassette player
cannot turn the hubs of the tape. Hold the cassette
tape with the open end down and try turning
the right hub counterclockwise with a pencil. Flip
the tape over and repeat. If the hubs do not
turn easily, your cassette tape may be damaged
and should not be used in the player. Try a
new tape to be sure your player is working properly.
The cassette tape is broken. (Check to see if
your tape is broken. Try a new tape.)
CLEAN TAPE:If this message appears on the display,
the cassette tape player needs to be cleaned. It will
still play tapes, but you should clean it as soon as
possible to prevent damage to the tapes and player.
SeeCare of Your Cassette Tape Player on page 3-116.
If any error occurs repeatedly or if an error cannot be
corrected, contact your dealer.
3-107