ECU CADILLAC DTS PROFESSIONAL 2007 1.G Workshop Manual
[x] Cancel search | Manufacturer: CADILLAC, Model Year: 2007, Model line: DTS PROFESSIONAL, Model: CADILLAC DTS PROFESSIONAL 2007 1.GPages: 518, PDF Size: 2.77 MB
Page 339 of 518

If you put things inside your vehicle, like suitcases,
tools, packages, or anything else, they will go as
fast as the vehicle goes. If you have to stop or turn
quickly, or if there is a crash, they will keep going.
{CAUTION:
Things you put inside your vehicle can
strike and injure people in a sudden stop
or turn, or in a crash.
Put things in the trunk of your vehicle.
In a trunk, put them as far forward as
you can. Try to spread the weight
evenly.
Never stack heavier things, like
suitcases, inside the vehicle so that
some of them are above the tops of
the seats.
Do not leave an unsecured child
restraint in your vehicle.
When you carry something inside the
vehicle, secure it whenever you can.
Automatic Level Control
This feature keeps the rear of your vehicle level
as the load changes. It is automatic, you do
not need to adjust anything.
This type of level control is fully automatic and will
provide a better leveled riding position as well
as better handling under a variety of passenger
and loading conditions. An air compressor
connected to the rear shocks will raise or lower
the rear of the vehicle to maintain proper vehicle
height. The system is activated when the
ignition key is turned to RUN and will automatically
adjust vehicle height thereafter. The system
may exhaust (lower vehicle height) for up to
ten minutes after the ignition key has been turned
to OFF. You may hear the air compressor
operating when the height is being adjusted.
339
Page 344 of 518
Maximum trailer weight is calculated assuming
only the driver is in the tow vehicle and it has all
the required trailering equipment. The weight
of additional optional equipment, passengers and
cargo in the tow vehicle must be subtracted
from the maximum trailer weight.
You can ask your dealer/retailer for our trailering
information or advice, or you can write us at
our Customer Assistance Offices. SeeCustomer
Assistance Offices on page 486for more
information.
Weight of the Trailer Tongue
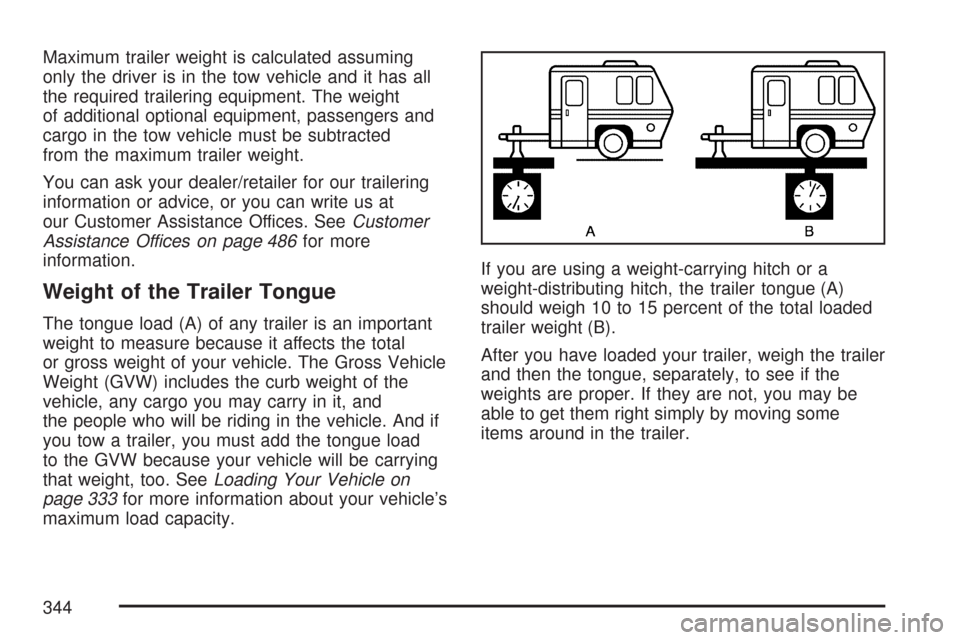
The tongue load (A) of any trailer is an important
weight to measure because it affects the total
or gross weight of your vehicle. The Gross Vehicle
Weight (GVW) includes the curb weight of the
vehicle, any cargo you may carry in it, and
the people who will be riding in the vehicle. And if
you tow a trailer, you must add the tongue load
to the GVW because your vehicle will be carrying
that weight, too. SeeLoading Your Vehicle on
page 333for more information about your vehicle’s
maximum load capacity.If you are using a weight-carrying hitch or a
weight-distributing hitch, the trailer tongue (A)
should weigh 10 to 15 percent of the total loaded
trailer weight (B).
After you have loaded your trailer, weigh the trailer
and then the tongue, separately, to see if the
weights are proper. If they are not, you may be
able to get them right simply by moving some
items around in the trailer.
344
Page 346 of 518

Driving with a Trailer
Towing a trailer requires a certain amount of
experience. Before setting out for the open road,
you will want to get to know your rig. Acquaint
yourself with the feel of handling and braking with
the added weight of the trailer. And always
keep in mind that the vehicle you are driving is
now a good deal longer and not nearly as
responsive as your vehicle is by itself.
Before you start, check the trailer hitch and
platform, parts and attachments, safety chains,
electrical connector, lamps, tires and mirror
adjustment. If the trailer has electric brakes, start
your vehicle and trailer moving and then apply
the trailer brake controller by hand to be sure the
brakes are working. This lets you check your
electrical connection at the same time.
During your trip, check occasionally to be sure
that the load is secure, and that the lamps and any
trailer brakes are still working.
Following Distance
Stay at least twice as far behind the vehicle ahead
as you would when driving your vehicle without
a trailer. This can help you avoid situations
that require heavy braking and sudden turns.
Passing
You will need more passing distance up ahead
when you are towing a trailer. And, because
the vehicle is a good deal longer, you will need to
go much farther beyond the passed vehicle
before you can return to your lane.
Backing Up
Hold the bottom of the steering wheel with
one hand. Then, to move the trailer to the left, just
move that hand to the left. To move the trailer
to the right, move your hand to the right. Always
back up slowly and, if possible, have someone
guide you.
346
Page 377 of 518
Adding Coolant
If you need more coolant, add the proper
DEX-COOL®coolant mixture at the coolant surge
tank, but only when the engine is cool.
{CAUTION:
You can be burned if you spill coolant on
hot engine parts. Coolant contains
ethylene glycol, and it will burn if the
engine parts are hot enough. Do not spill
coolant on a hot engine.
When replacing the pressure cap, make sure to
turn the cap until it clicks.
Coolant Surge Tank Pressure Cap
Notice:If the pressure cap is not tightly
installed, coolant loss and possible engine
damage may occur. Be sure the cap is properly
and tightly secured.
SeeEngine Compartment Overview on page 364
for more information on location.
Engine Overheating
You will �nd an ENGINE OVERHEATED IDLE
ENGINE message or an ENGINE OVERHEATED
STOP ENGINE message displayed in the
Driver Information Center (DIC). SeeDIC
Warnings and Messages on page 246for more
information. You will also hear a chime.
There is also an engine temperature warning light
and/or gage on the instrument panel cluster.
SeeEngine Coolant Temperature Warning Light
on page 233andEngine Coolant Temperature
Gage on page 233.
377
Page 391 of 518

To be sure the vent hose (A) is properly attached,
the vent hose connectors (B) must be securely
reattached to the vent outlets (C) on each side of
the battery, and the vent assembly grommet (D)
must be secured to the �oor pan (E).
Vehicle Storage
If you are not going to drive your vehicle for
25 days or more, remove the black, negative (−)
cable from the battery. This will help keep
your battery from running down.
{CAUTION:
Batteries have acid that can burn you and
gas that can explode. You can be badly
hurt if you are not careful. SeeJump
Starting on page 392for tips on working
around a battery without getting hurt.
391
Page 438 of 518
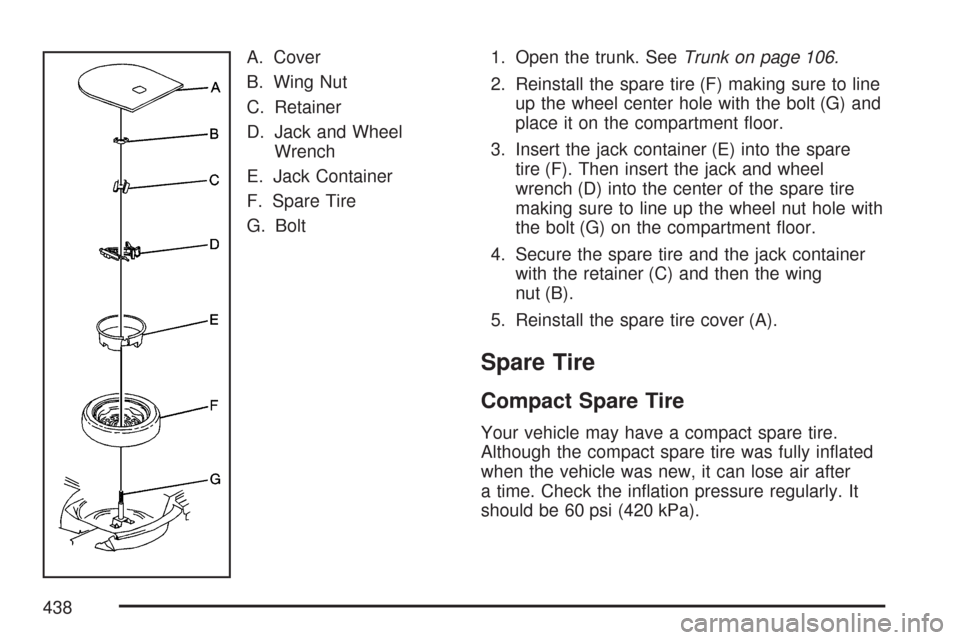
A. Cover
B. Wing Nut
C. Retainer
D. Jack and Wheel
Wrench
E. Jack Container
F. Spare Tire
G. Bolt1. Open the trunk. SeeTrunk on page 106.
2. Reinstall the spare tire (F) making sure to line
up the wheel center hole with the bolt (G) and
place it on the compartment �oor.
3. Insert the jack container (E) into the spare
tire (F). Then insert the jack and wheel
wrench (D) into the center of the spare tire
making sure to line up the wheel nut hole with
the bolt (G) on the compartment �oor.
4. Secure the spare tire and the jack container
with the retainer (C) and then the wing
nut (B).
5. Reinstall the spare tire cover (A).
Spare Tire
Compact Spare Tire
Your vehicle may have a compact spare tire.
Although the compact spare tire was fully in�ated
when the vehicle was new, it can lose air after
a time. Check the in�ation pressure regularly. It
should be 60 psi (420 kPa).
438
Page 456 of 518
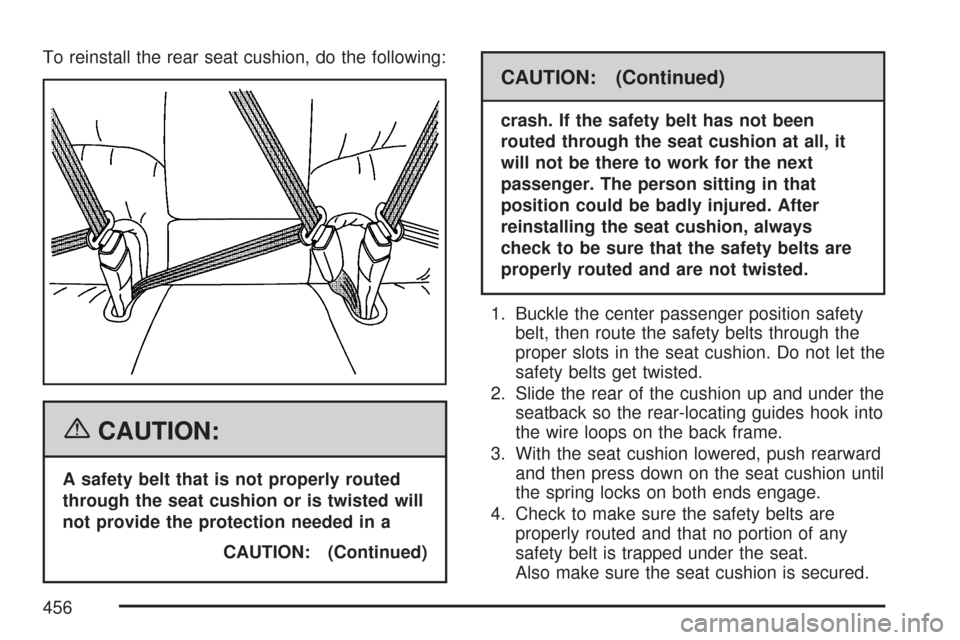
To reinstall the rear seat cushion, do the following:
{CAUTION:
A safety belt that is not properly routed
through the seat cushion or is twisted will
not provide the protection needed in a
CAUTION: (Continued)
CAUTION: (Continued)
crash. If the safety belt has not been
routed through the seat cushion at all, it
will not be there to work for the next
passenger. The person sitting in that
position could be badly injured. After
reinstalling the seat cushion, always
check to be sure that the safety belts are
properly routed and are not twisted.
1. Buckle the center passenger position safety
belt, then route the safety belts through the
proper slots in the seat cushion. Do not let the
safety belts get twisted.
2. Slide the rear of the cushion up and under the
seatback so the rear-locating guides hook into
the wire loops on the back frame.
3. With the seat cushion lowered, push rearward
and then press down on the seat cushion until
the spring locks on both ends engage.
4. Check to make sure the safety belts are
properly routed and that no portion of any
safety belt is trapped under the seat.
Also make sure the seat cushion is secured.
456
Page 472 of 518
At Each Fuel Fill
It is important to perform these underhood checks
at each fuel �ll.
Engine Oil Level Check
Check the engine oil level and add the proper oil if
necessary. SeeEngine Oil on page 365for
further details.
Notice:It is important to check the engine oil
regularly and keep it at the proper level.
Failure to keep the engine oil at the proper
level can cause damage to the engine not
covered by your warranty.
Engine Coolant Level Check
Check the engine coolant level and add
DEX-COOL®coolant mixture if necessary. See
Engine Coolant on page 374for further details.
Windshield Washer Fluid Level Check
Check the windshield washer �uid level in
the windshield washer �uid reservoir and add the
proper �uid if necessary.
At Least Once a Month
Tire In�ation Check
Inspect your vehicle’s tires and make sure they
are in�ated to the correct pressures. Do not forget
to check the spare tire. SeeIn�ation - Tire
Pressure on page 411. Check to make sure the
spare tire is stored securely. SeeChanging a Flat
Tire on page 428.
Tire Wear Inspection
Tire rotation may be required for high mileage
highway drivers prior to the Engine Oil Life System
service noti�cation. Check the tires for wear
and, if necessary, rotate the tires. SeeTire
Inspection and Rotation on page 418.
472
Page 489 of 518
Lock Out Assistance:To ensure security,
the driver must present the vehicle registration
and personal ID before lock-out service is
provided. Lock-out service will be covered at
no charge if you are unable to gain entry
into your vehicle. If your vehicle will not start,
Roadside Service will arrange to have
your vehicle towed to the nearest authorized
dealership. In the United States, replacement
keys made at the customer’s expense will
be delivered within 10 miles.
Fuel Delivery:Delivery of enough fuel for the
customer to get to the nearest service station
(approximately $5 in the United States and
10 litres in Canada).
Flat Tire Change (Covers change only):
Installation of your spare tire, in good
condition, will be covered at no charge. The
customer is responsible for the repair or
replacement of the tire if not covered by a
warrantable failure.
Trip Interruption:If your trip is interrupted due
to a warranty failure, incidental expenses may
be reimbursed during the 48 months/
50,000 miles (80 000 km) warranty period.
Items covered are hotel, meals, and rental car.
Additional Services for Canadian
Customers
Trip Routing Service:Upon request, Cadillac
Roadside Service will send you detailed,
computer-personalized maps, highlighting your
choice of either the most direct route or the
most scenic route to your destination,
anywhere in North America, along with any
helpful travel information we may have
pertaining to your trip. To request this service,
please call us toll-free at 1-800-268-6800.
We will make every attempt to send your
personalized trip routing as quickly as
possible, but it is best to allow three weeks
before your planned departure date. Trip
routing requests will be limited to
six per calendar year.
Alternative Service:There may be times when
Roadside Service cannot provide timely
assistance. Your advisor may authorize you to
secure local emergency road service, and you
will be reimbursed up to $100 upon submission
of the original receipt to Cadillac Roadside
Service
®.
489
Page 490 of 518

Cadillac Technician Roadside Service
(U.S. only)
Cadillac’s exceptional Roadside Service is more
than an auto club or towing service. It provides
every Cadillac owner in the United States with the
advantage of contacting a Cadillac advisor and,
where available, a Cadillac trained dealer
technician who can provide on-site service.
A dealer technician will travel to your location within
a 30 mile (50 km) radius of a participating Cadillac
dealership/retailer. If beyond this radius, we will
arrange to have your car towed to the nearest
Cadillac dealership. Each technician travels with a
specially equipped service vehicle complete with
the necessary Cadillac parts and tools required to
handle most roadside repairs.
Calling for Assistance
For prompt and efficient assistance when calling,
please provide the following to the Roadside
Service Representative:
A description of the problem
Name, home address, home telephone
number
Location of your Cadillac and number you are
calling from
The model year, Vehicle Identi�cation Number
(VIN), odometer reading, and date of delivery
While we hope you never have the occasion to use
our service, it is added security while traveling
for you and your family. Remember, we are only a
phone call away. In the United States or Canada,
customers call Roadside Service:1-800-882-1112.
Any customer who has access to a (TTY) or a
conventional teletypewriter can communicate with
Cadillac by dialing from the United States or
Canada1-888-889-2438— daily, 24 hours.
Cadillac and General Motors of Canada Limited
reserve the right to limit services or reimbursement
to an owner or driver when, in their sole
discretion, the claims become excessive in
frequency or type of occurrence.
Roadside Service is not part of or included in the
coverage provided by the New Vehicle Limited
Warranty. Cadillac General Motors of Canada
Limited reserve the right to make any changes or
discontinue the Roadside Service program at
any time without noti�cation.
490