warning CADILLAC ELR 2014 Owner's Manual
[x] Cancel search | Manufacturer: CADILLAC, Model Year: 2014, Model line: ELR, Model: CADILLAC ELR 2014Pages: 408, PDF Size: 4.47 MB
Page 321 of 408

Black plate (61,1)Cadillac ELR Owner Manual (GMNA-Localizing-U.S./Canada-6081525) -
2014 - Second Edition - 1/22/14
Vehicle Care 10-61
Warning (Continued)
replace them, be sure to get new
GM original equipment
wheel nuts.
{Caution
Improperly tightened wheel nuts
can lead to brake pulsation and
rotor damage. To avoid expensive
brake repairs, evenly tighten the
wheel nuts in the proper
sequence and to the proper
torque specification.
Used Replacement Wheels
{Warning
Replacing a wheel with a used
one is dangerous. How it has
been used or how far it has been
driven may be unknown. It could (Continued)
Warning (Continued)
fail suddenly and cause a crash.
When replacing wheels, use a
new GM original equipment
wheel.
Tire Chains
{Warning
Do not use tire chains. There is
not enough clearance. Tire chains
used on a vehicle without the
proper amount of clearance can
cause damage to the brakes,
suspension, or other vehicle
parts. The area damaged by the
tire chains could cause loss of
control and a crash.
Use another type of traction
device only if its manufacturer
recommends it for the vehicle's
tire size combination and road(Continued)
Warning (Continued)
conditions. Follow that
manufacturer's instructions. To
avoid vehicle damage, drive slow
and readjust or remove the
traction device if it contacts the
vehicle. Do not spin the wheels.
If traction devices are used, install
them on the front tires.
If a Tire Goes Flat
This vehicle has a tire sealant and
compressor kit. SeeTire Sealant
and Compressor Kit on page 10-63.
There is no spare tire, no tire
changing equipment, and no place
to store a tire.
To properly lift this vehicle, see
Lifting the Vehicle on page 10-3.
Page 322 of 408

Black plate (62,1)Cadillac ELR Owner Manual (GMNA-Localizing-U.S./Canada-6081525) -
2014 - Second Edition - 1/22/14
10-62 Vehicle Care
It is unusual for a tire to blowout
while driving, especially if the tires
are maintained properly. SeeTires
on page 10-42. If air goes out of a
tire, it is much more likely to leak
out slowly. But if there ever is a
blowout, here are a few tips about
what to expect and what to do:
If a front tire fails, the flat tire will
create a drag that pulls the vehicle
toward that side. Take your foot off
the accelerator pedal and grip the
steering wheel firmly. Steer to
maintain lane position, and then
gently brake to a stop, well off the
road, if possible.
A rear blowout, particularly on a
curve, acts much like a skid and
may require the same correction as
used in a skid. Stop pressing the
accelerator pedal and steer to
straighten the vehicle. It may be
very bumpy and noisy. Gently brake
to a stop, well off the road,
if possible.{Warning
Driving on a flat tire will cause
permanent damage to the tire.
Re-inflating a tire after it has been
driven on while severely
underinflated or flat may cause a
blowout and a serious crash.
Never attempt to re-inflate a tire
that has been driven on while
severely underinflated or flat.
Have your dealer or an authorized
tire service center repair or
replace the flat tire as soon as
possible.
If a tire goes flat, avoid further tire
and wheel damage by driving slowly
to a level place and stopping, well
off the road, if possible.
1. Turn on the hazard warning flashers. See Hazard Warning
Flashers on page 6-5.
2. Set the parking brake firmly. 3. Put the shift lever in P (Park).
See Shifting Into Park on
page 9-19.
4. Turn off the engine.
5. Inspect the flat tire.
If the tire has been separated from
the wheel, has damaged sidewalls,
or has a puncture larger than
6 mm (0.25 in), the tire is too
severely damaged for the tire
sealant and compressor kit to be
effective. See Roadside Service on
page 13-5.
If the tire has a puncture less than
6 mm (0.25 in) in the tread area of
the tire, see Tire Sealant and
Compressor Kit on page 10-63.
Page 323 of 408

Black plate (63,1)Cadillac ELR Owner Manual (GMNA-Localizing-U.S./Canada-6081525) -
2014 - Second Edition - 1/22/14
Vehicle Care 10-63
Tire Sealant and
Compressor Kit
{Warning
Running the engine in Extended
Range Mode in an enclosed area
with poor ventilation is dangerous.
Engine exhaust may enter the
vehicle. Engine exhaust contains
carbon monoxide (CO) which
cannot be seen or smelled. It can
cause unconsciousness and even
death. Never run the engine in
Extended Range Mode in an
enclosed area that has no fresh
air ventilation. For more
information, seeEngine Exhaust
on page 9-27.
{Warning
Overinflating a tire could cause
the tire to rupture and you or
others could be injured. Be sure
to read and follow the tire sealant
and compressor kit instructions
and inflate the tire to its
recommended pressure. Do not
exceed the recommended
pressure.
{Warning
Storing the tire sealant and
compressor kit or other
equipment in the passenger
compartment of the vehicle could
cause injury. In a sudden stop or
collision, loose equipment could
strike someone. Store the tire
sealant and compressor kit in its
original location. If this vehicle has a tire sealant and
compressor kit, there may not be a
spare tire, tire changing equipment,
and on some vehicles there may not
be a place to store a tire.
The tire sealant and compressor
can be used to temporarily seal
punctures up to 6 mm (0.25 in) in
the tread area of the tire. It can also
be used to inflate an
underinflated tire.
If the tire has been separated from
the wheel, has damaged sidewalls,
or has a large puncture, the tire is
too severely damaged for the tire
sealant and compressor kit to be
effective. See
Roadside Service on
page 13-5.
Read and follow all of the tire
sealant and compressor kit
instructions.
Page 325 of 408

Black plate (65,1)Cadillac ELR Owner Manual (GMNA-Localizing-U.S./Canada-6081525) -
2014 - Second Edition - 1/22/14
Vehicle Care 10-65
When using the tire sealant and
compressor kit during cold
temperatures, warm the kit in aheated environment for five minutes.
This will help to inflate the tire
faster.
If a tire goes flat, avoid further tire
and wheel damage by driving slowly
to a level place. Turn on the hazard
warning flashers. See
Hazard
Warning Flashers on page 6-5.
See If a Tire Goes Flat on
page 10-61 for other important
safety warnings.
Do not remove any objects that
have penetrated the tire.
1. Remove the tire sealant and compressor kit from its storage
location. See Storing the Tire
Sealant and Compressor Kit on
page 10-70.
2. Unwrap the sealant/air hose (6) and the power plug (8).
3. Place the kit on the ground. Make sure the tire valve stem is
positioned close to the ground
so the hose will reach it. 4. Remove the valve stem cap from
the flat tire by turning it
counterclockwise.
5. Attach the sealant/air hose (6) onto the tire valve stem. Turn it
clockwise until it is tight.
6. Plug the power plug (8) into the accessory power outlet in the
vehicle. Unplug all items from
other accessory power outlets.
See Power Outlets on page 5-6.
If the vehicle has an accessory
power outlet, do not use the
cigarette lighter.
If the vehicle only has a cigarette
lighter, use the cigarette lighter.
Do not pinch the power plug
cord in the door or window.
7. Start the vehicle. The vehicle must be running while using the
air compressor.
8. Press and turn the selector switch (1) counterclockwise to
the Sealant + Air position.
Page 328 of 408

Black plate (68,1)Cadillac ELR Owner Manual (GMNA-Localizing-U.S./Canada-6081525) -
2014 - Second Edition - 1/22/14
10-68 Vehicle Care
If a tire goes flat, avoid further tire
and wheel damage by driving slowly
to a level place. Turn on the hazard
warning flashers. SeeHazard
Warning Flashers on page 6-5.
See If a Tire Goes Flat on
page 10-61 for other important
safety warnings.
1. Remove the tire sealant and compressor kit from its storage
location. See Storing the Tire
Sealant and Compressor Kit on
page 10-70.
2. Unwrap the air only hose (7) and the power plug (8).
3. Place the kit on the ground. Make sure the tire valve stem is
positioned close to the ground
so the hose will reach it.
4. Remove the tire valve stem cap from the flat tire by turning it
counterclockwise.
5. Attach the air only hose (7) onto the tire valve stem by turning it
clockwise until it is tight. 6. Plug the power plug (8) into the
accessory power outlet in the
vehicle. Unplug all items from
other accessory power outlets.
See Power Outlets on page 5-6.
If the vehicle has an accessory
power outlet, do not use the
cigarette lighter.
If the vehicle only has a cigarette
lighter, use the cigarette lighter.
Do not pinch the power plug
cord in the door or window.
7. Start the vehicle. The vehicle must be running while using the
air compressor.
8. Press and turn the selector switch (1) clockwise to the Air
Only position.
9. Press the on/off button (2) to turn the compressor on.
The compressor will inflate the
tire with air only.
Page 330 of 408

Black plate (70,1)Cadillac ELR Owner Manual (GMNA-Localizing-U.S./Canada-6081525) -
2014 - Second Edition - 1/22/14
10-70 Vehicle Care
4. Replace with a new canisterwhich is available from your
dealer.
5. Push the new canister into place.
Storing the Tire Sealant
and Compressor Kit
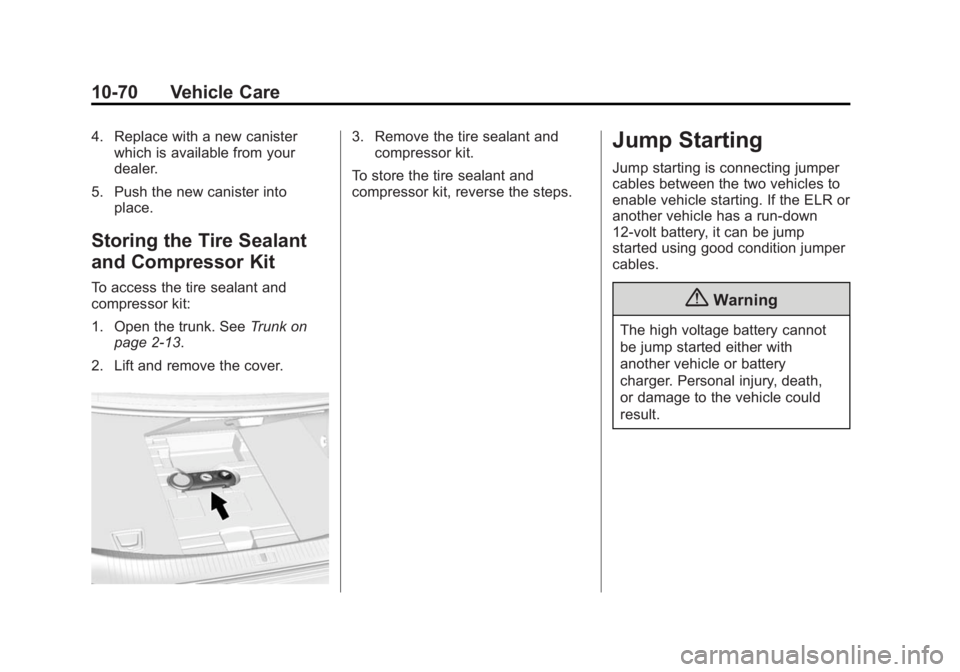
To access the tire sealant and
compressor kit:
1. Open the trunk. See Trunk on
page 2-13.
2. Lift and remove the cover.
3. Remove the tire sealant and compressor kit.
To store the tire sealant and
compressor kit, reverse the steps.Jump Starting
Jump starting is connecting jumper
cables between the two vehicles to
enable vehicle starting. If the ELR or
another vehicle has a run-down
12-volt battery, it can be jump
started using good condition jumper
cables.
{Warning
The high voltage battery cannot
be jump started either with
another vehicle or battery
charger. Personal injury, death,
or damage to the vehicle could
result.
Page 331 of 408

Black plate (71,1)Cadillac ELR Owner Manual (GMNA-Localizing-U.S./Canada-6081525) -
2014 - Second Edition - 1/22/14
Vehicle Care 10-71
{Warning
Batteries are dangerous and can
cause injury. Batteries contain
acid and can explode or ignite.
They contain electricity that can
burn. Follow the exact steps
provided or injuries could occur.
Using an open flame near a
battery can cause battery gas to
explode; you or others could be
hurt. Battery acid can cause
blindness.
Be sure the battery in the other
vehicle has enough water. Add
water if the level is low. A low
water level could cause explosive
gas to be present.
Battery fluid contains acid that
can burn. If battery fluid gets in
eyes or on skin; flush with water
and get medical help immediately.
{Warning
Electric fans can start up even
when the engine is not running
and can cause injury. Keep
hands, clothing, and tools away
from any underhood electric fans.
{Caution
Ignoring these steps could result
in costly damage to the vehicle
that would not be covered by the
vehicle warranty. Trying to start
the vehicle by pushing or pulling it
will not work, and it could damage
the vehicle.
Jump Starting the ELR
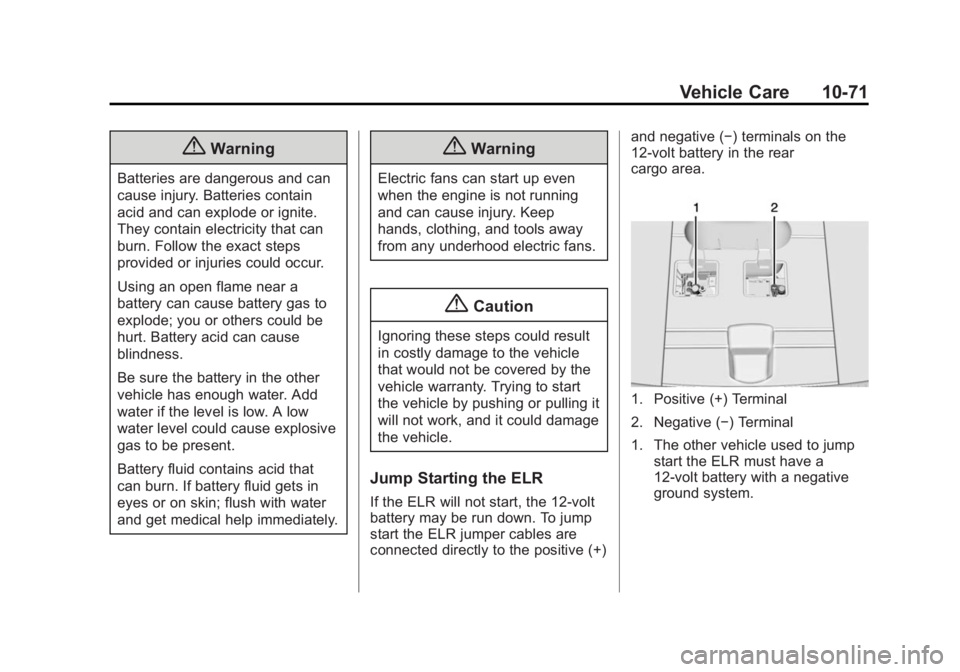
If the ELR will not start, the 12-volt
battery may be run down. To jump
start the ELR jumper cables are
connected directly to the positive (+)and negative (−) terminals on the
12-volt battery in the rear
cargo area.
1. Positive (+) Terminal
2. Negative (−) Terminal
1. The other vehicle used to jump
start the ELR must have a
12-volt battery with a negative
ground system.
Page 348 of 408

Black plate (88,1)Cadillac ELR Owner Manual (GMNA-Localizing-U.S./Canada-6081525) -
2014 - Second Edition - 1/22/14
10-88 Vehicle Care
Caution (Continued)
these solvents can permanently
change the appearance and feel
of leather or soft trim and are not
recommended.
Do not use cleaners that increase
gloss, especially on the instrument
panel. Reflected glare can decrease
visibility through the windshield
under certain conditions.
{Caution
Use of air fresheners may cause
permanent damage to plastics
and painted surfaces. If an air
freshener comes in contact with
any plastic or painted surface in
the vehicle, blot immediately and
clean with a soft cloth dampened
with a mild soap solution.
Damage caused by air fresheners
would not be covered by the
vehicle warranty.
Cargo Cover and
Convenience Net
Wash with warm water and mild
detergent. Do not use chlorine
bleach. Rinse with cold water, and
then dry completely.
Care of Safety Belts
Keep belts clean and dry.
{Warning
Do not bleach or dye safety belts.
It may severely weaken them. In
a crash, they might not be able to
provide adequate protection.
Clean safety belts only with mild
soap and lukewarm water.
Floor Mats
{Warning
If a floor mat is the wrong size or
is not properly installed, it can
interfere with the pedals.
Interference with the pedals can
cause unintended acceleration
and/or increased stopping
distance which can cause a crash
and injury. Make sure the floor
mat does not interfere with the
pedals.
Use the following guidelines for
proper floor mat usage:
.The original equipment floor
mats were designed for your
vehicle. If the floor mats need
replacing, it is recommended
that GM certified floor mats be
purchased. Non-GM floor mats
may not fit properly and may
interfere with the pedals. Always
check that the floor mats do not
interfere with the pedals.
Page 352 of 408

Black plate (2,1)Cadillac ELR Owner Manual (GMNA-Localizing-U.S./Canada-6081525) -
2014 - Second Edition - 1/22/14
11-2 Service and Maintenance
Because of the way people use
vehicles, maintenance needs vary.
There may need to be more
frequent checks and services. The
Additional Required Services -
Normal are for vehicles that:
.Carry passengers and cargo
within recommended limits on
the Tire and Loading Information
label. SeeVehicle Load Limits
on page 9-12.
.Are driven on reasonable road
surfaces within legal driving
limits.
.Use the recommended fuel. See
Fuel on page 9-66.
Refer to the information in the
Maintenance Schedule Additional
Required Services - Normal chart.
The Additional Required Services -
Severe are for vehicles that are:
.Mainly driven in heavy city traffic
in hot weather.
.Mainly driven in hilly or
mountainous terrain.
.Frequently towing a trailer.
.Used for high speed or
competitive driving.
.Used for taxi, police, or delivery
service.
Refer to the information in the
Maintenance Schedule Additional
Required Services - Severe chart.
{Warning
Performing maintenance work can
be dangerous and can cause
serious injury. Perform
maintenance work only if the
required information, proper tools,
and equipment are available.
If they are not, see your dealer to
have a trained technician do the
work. See Doing Your Own
Service Work on page 10-5.
Maintenance
Schedule
Owner Checks and Services
At Each Fuel Stop
.Check the engine oil level. See
Engine Oil on page 10-9.
Once a Month
.Check the tire inflation
pressures. See Tire Pressure on
page 10-48.
.Inspect the tires for wear. See
Tire Inspection on page 10-54.
.Check the windshield washer
fluid level. See Washer Fluid on
page 10-19.
.Engine, power electronics, and
high voltage battery pack
coolant level checks. See
Cooling System (Engine) on
page 10-14 orCooling System
(High Voltage Battery) on
page 10-15 orCooling System
(Power Electronics and Charger
Modules) on page 10-16.
Page 397 of 408

Black plate (1,1)Cadillac ELR Owner Manual (GMNA-Localizing-U.S./Canada-6081525) -
2014 - Second Edition - 1/22/14
INDEX i-1
A
Accessories andModifications . . . . . . . . . . . . . . . . . 10-2
Accessory Power . . . . . . . . . . . . . . 9-19
Active Emergency Braking System . . . . . . . . 1-17, 9-53
Adaptive Cruise Control . . . . . . . 9-39
Add-On Electrical
Equipment . . . . . . . . . . . . . . . . . . . 9-71
Additional Information OnStar
®. . . . . . . . . . . . . . . . . . . . . . 14-5
Adjustments Lumbar, Front Seats . . . . . . . . . . . 3-4
Thigh Support . . . . . . . . . . . . . . . . . 3-5
Air Cleaner/Filter, Engine . . . . . 10-13
Air Filter, Passenger Compartment . . . . . . . . . . . . . . . . . 8-8
Air Vents . . . . . . . . . . . . . . . . . . . . . . . 8-7
Airbag System Check . . . . . . . . . . . . . . . . . . . . . . . . 3-31
How Does an Airbag
Restrain? . . . . . . . . . . . . . . . . . . . 3-23
Passenger Sensing System . . . . . . . . . . . . . . . . . . . . . . 3-25
What Makes an Airbag
Inflate? . . . . . . . . . . . . . . . . . . . . . . 3-23 Airbag System (cont'd)
What Will You See after an
Airbag Inflates? . . . . . . . . . . . . . 3-24
When Should an Airbag
Inflate? . . . . . . . . . . . . . . . . . . . . . . 3-22
Where Are the Airbags? . . . . . . 3-21
Airbags Adding Equipment to theVehicle . . . . . . . . . . . . . . . . . . . . . . 3-30
Passenger Status Indicator . . . 5-16
Readiness Light . . . . . . . . . . . . . . 5-16
Servicing Airbag-Equipped Vehicles . . . . . . . . . . . . . . . . . . . . . 3-30
System Check . . . . . . . . . . . . . . . . 3-19
Alarm Vehicle Security . . . . . . . . . . . . . . 2-15
Alert Side Blind Zone (SBZA) . . . . . . 9-54
Antilock Brake System (ABS) . . . . . . . . . . . . . . . . 9-29
Warning Light . . . . . . . . . . . . . . . . . 5-21
Appearance Care Exterior . . . . . . . . . . . . . . . . . . . . . 10-80
Interior . . . . . . . . . . . . . . . . . . . . . . 10-85
Assistance Systems for Driving . . . . . . . . . . . . . . . . . . . . . . . 9-50 Assistance Systems for
Parking and Backing . . . . . . . . . 9-47
Automatic Door Locks . . . . . . . . . . . . . . . . . . . 2-13
Headlamp System . . . . . . . . . . . . . 6-4
B
Battery . . . . . . . . . . . . . . . . . . . . . . . 10-23Exterior Lighting Battery
Saver . . . . . . . . . . . . . . . . . . . . . . . . 6-8
Gauge . . . . . . . . . . . . . . . . . . . . . . . . 5-12
High Voltage . . . . . . . . . . . . . . . . . . 5-12
Jump Starting . . . . . . . . . . . . . . . 10-70
Power Protection . . . . . . . . . . . . . . 6-8
Battery and Charging Messages. . . . . . . . . . . . . . . . . . . . 5-41
Blade Replacement, Wiper . . . 10-25
Brake Parking, Electric . . . . . . . . . . . . . . 9-30
System Warning Light . . . . . . . . 5-20
Brakes . . . . . . . . . . . . . . . . . . . . . . . . 10-20 Antilock . . . . . . . . . . . . . . . . . . . . . . . 9-29
Fluid . . . . . . . . . . . . . . . . . . . . . . . . 10-21
Regenerative Braking . . . . . . . . . 9-32
System Messages . . . . . . . . . . . . 5-41
Braking . . . . . . . . . . . . . . . . . . . . . . . . . 9-6