CADILLAC ELR 2014 Owner's Guide
Manufacturer: CADILLAC, Model Year: 2014, Model line: ELR, Model: CADILLAC ELR 2014Pages: 408, PDF Size: 4.47 MB
Page 31 of 408

Black plate (25,1)Cadillac ELR Owner Manual (GMNA-Localizing-U.S./Canada-6081525) -
2014 - Second Edition - 1/22/14
In Brief 1-25
Tire Pressure Monitor
This vehicle may have a Tire
Pressure Monitor System (TPMS).
The low tire pressure warning light
alerts to a significant loss in
pressure of one of the vehicle's
tires. If the warning light comes on,
stop as soon as possible and inflate
the tires to the recommended
pressure shown on the Tire and
Loading Information label. See
Vehicle Load Limits on page 9-12.
The warning light will remain on until
the tire pressure is corrected.
The low tire pressure warning light
may come on in cool weather when
the vehicle is first started, and then
turn off as the vehicle is driven. This
may be an early indicator that thetire pressures are getting low and
the tires need to be inflated to the
proper pressure.
The TPMS does not replace normal
monthly tire maintenance. Maintain
the correct tire pressures.
See
Tire Pressure Monitor System
on page 10-49.
Engine Oil Life System
The engine oil life system calculates
engine oil life based on vehicle use
and displays the CHANGE ENGINE
OIL SOON message when it is time
to change the engine oil and filter.
The oil life system should be reset
to 100% only following an oil
change.
Resetting the Oil Life System
1. Display RESET OIL LIFE on the DIC menu. See Driver
Information Center (DIC) on
page 5-38. 2. Press and hold SEL for several
seconds while the Oil Life
display is active to reset the Oil
Life system.
See Engine Oil Life System on
page 10-12.
Driving for Better Energy
Efficiency
Use the following tips to help
maximize energy efficiency and
range.
In colder temperatures, while these
efficiency tips will help, the electric
vehicle driving range may be lower
due to higher energy usage.
Driving Style
Efficiency Gauge (Instrument
Cluster)
The leaf indicator or green ring
indicator should be kept green and
in the center of the gauge.
Page 32 of 408

Black plate (26,1)Cadillac ELR Owner Manual (GMNA-Localizing-U.S./Canada-6081525) -
2014 - Second Edition - 1/22/14
1-26 In Brief
Inefficient acceleration is indicated
when the ring turns yellow or the
leaf turns yellow and travels above
the center of the gauge.
Aggressive braking is indicated
when the ring turns yellow or the
leaf turns yellow and travels below
the center of the gauge.
Acceleration/Braking/Coasting
Avoid unnecessary rapid
accelerations and decelerations.
Electric range is maximized at
80 km/h (50 mph) and below. Higher
speeds use more energy and can
significantly reduce electric range.
Use cruise control when
appropriate.
Plan ahead for decelerations and
coast whenever possible. For
example, do not rush to traffic
signals.
Do not shift to N (Neutral) to coast.
The vehicle recovers energy while
coasting and braking in D (Drive)
or L (Low).Drive Mode and PRNDL Selection
Use Tour Mode when possible.
Sport Mode provides more
responsive acceleration than Tour
Mode, but can reduce efficiency.
Use Mountain Mode prior to
climbing long, steep grades in
mountainous areas. Be sure to
engage Mountain Mode before
starting to climb. Mountain Mode
reduces electric range and power,
but may be needed to maintain
speeds above 96 km/h (60 mph)
when climbing grades of 5% or
greater.
Use Hold Mode on a trip where all
or most of the electric charge will be
depleted. Use Hold Mode mainly
during highway or high-speed
driving to maximize both electric
vehicle miles and fuel efficiency.
Use L (Low) in heavy stop-and-go
traffic or when traveling downhill.
L (Low) requires less brake pedal
application and provides a
controlled, efficient way to slow the
vehicle down.
Climate Setting
Using the heat and air conditioning
systems decreases the energy
available for electric driving.
Optimal energy efficiency is
achieved with the heat, air
conditioning, and fan turned off.
Less energy is used at low fan
speeds. When using the fan:
.MIN is the most energy efficient
climate setting as long as
0is
not selected.
.ECO is for moderate air
conditioning and heater
operation and is the next most
energy efficient setting as long
as
0is not selected.
.MAX mode provides the most
comfort but is the least energy
efficient.
Page 33 of 408

Black plate (27,1)Cadillac ELR Owner Manual (GMNA-Localizing-U.S./Canada-6081525) -
2014 - Second Edition - 1/22/14
In Brief 1-27
Use the auto heated seat feature
instead of climate settings. Heating
the seat uses less energy than
heating the vehicle interior.
Use remote start to heat or cool the
interior when the vehicle is plugged
in to maximize the electric range by
utilizing electricity from the electrical
outlet. Engine Assisted Heating
while plugged in can be
personalized. SeeRemote Start on
page 2-8.
In hot weather, avoid parking in
direct sunlight or use sunshades
inside the vehicle.
Turn off the front and rear window
defog/defrost when they are no
longer needed.
Avoid driving with the windows open
at highway speeds.
See Vehicle Personalization on
page 5-51.Vehicle Charging/Maintenance
Charging
Keep the vehicle plugged in, even
when fully charged, to keep the
battery temperature ready for the
next drive. This is important when
outside temperatures are extremely
hot or cold.
Maintenance
Always keep the tires properly
inflated and the vehicle properly
aligned.
The weight of excess cargo in the
vehicle affects efficiency and range.
Avoid carrying more than is needed.
If fuel is not regularly used, consider
keeping the fuel tank only one-third
full. Excess fuel weight impacts
efficiency and range.
For fuel recommendations, see Fuel
on page 9-66. Avoid unnecessary use of electrical
accessories. Power used for
functions other than propelling the
vehicle will reduce electric vehicle
range.
Using a rooftop carrier will reduce
efficiency due to additional weight
and drag.
Roadside Service
U.S.: 1-888-811-1926
Canada: 1-800-882-1112
TTY Users (U.S. Only):
1-888-889-2438
New vehicles are automatically
enrolled in the Roadside Service
program.
See
Roadside Service on
page 13-5.
Page 34 of 408

Black plate (28,1)Cadillac ELR Owner Manual (GMNA-Localizing-U.S./Canada-6081525) -
2014 - Second Edition - 1/22/14
1-28 In Brief
OnStar®
If equipped, this vehicle has a
comprehensive, in-vehicle system
that can connect to a live Advisor
for Emergency, Security, Navigation,
Connection, and Diagnostic
Services. SeeOnStar Overview on
page 14-1.
Page 35 of 408

Black plate (1,1)Cadillac ELR Owner Manual (GMNA-Localizing-U.S./Canada-6081525) -
2014 - Second Edition - 1/22/14
Keys, Doors, and Windows 2-1
Keys, Doors, and
Windows
Keys and Locks
Keys . . . . . . . . . . . . . . . . . . . . . . . . . . 2-1
Remote Keyless Entry (RKE)System . . . . . . . . . . . . . . . . . . . . . . 2-2
Remote Keyless Entry (RKE) System Operation . . . . . . . . . . . 2-2
Remote Start . . . . . . . . . . . . . . . . . . 2-8
Door Locks . . . . . . . . . . . . . . . . . . 2-10
Power Door Locks . . . . . . . . . . . 2-11
Delayed Locking . . . . . . . . . . . . . 2-12
Automatic Door Locks . . . . . . . 2-13
Lockout Protection . . . . . . . . . . . 2-13
Doors
Trunk . . . . . . . . . . . . . . . . . . . . . . . . 2-13
Vehicle Security
Vehicle Security . . . . . . . . . . . . . . 2-15
Vehicle Alarm System . . . . . . . 2-15
Immobilizer . . . . . . . . . . . . . . . . . . 2-16
Immobilizer Operation . . . . . . . 2-16
Exterior Mirrors
Convex Mirrors . . . . . . . . . . . . . . 2-17
Power Mirrors . . . . . . . . . . . . . . . . 2-17
Folding Mirrors . . . . . . . . . . . . . . . 2-18
Heated Mirrors . . . . . . . . . . . . . . . 2-18
Reverse Tilt Mirrors . . . . . . . . . . 2-18
Interior Mirrors
Interior Rearview Mirrors . . . . . 2-18
Automatic Dimming Rearview Mirror . . . . . . . . . . . . . . . . . . . . . . . 2-18
Windows
Windows . . . . . . . . . . . . . . . . . . . . . 2-19
Power Windows . . . . . . . . . . . . . 2-19
Sun Visors . . . . . . . . . . . . . . . . . . . 2-21
Keys and Locks
Keys
{Warning
Leaving children in a vehicle with
a Remote Keyless Entry (RKE)
transmitter is dangerous and
children or others could be
seriously injured or killed. They
could operate the power windows
or other controls or make the
vehicle move. The windows will
function with the RKE transmitter
in the vehicle, and children or
others could be caught in the path
of a closing window. Do not leave
children in a vehicle with an RKE
transmitter.
The key that is part of the RKE
transmitter can be used for the
trunk.
Page 36 of 408

Black plate (2,1)Cadillac ELR Owner Manual (GMNA-Localizing-U.S./Canada-6081525) -
2014 - Second Edition - 1/22/14
2-2 Keys, Doors, and Windows
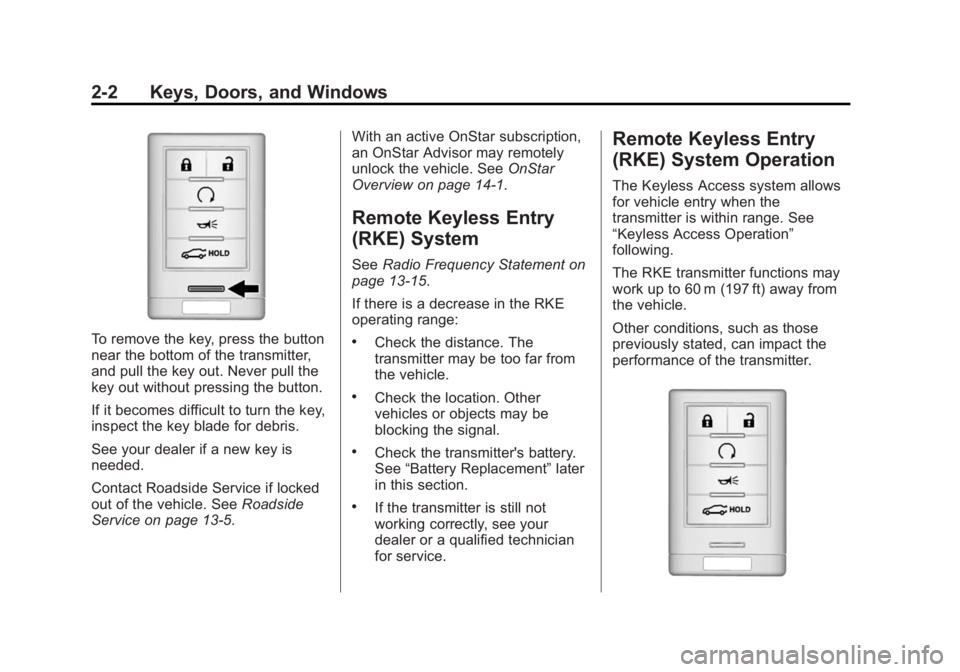
To remove the key, press the button
near the bottom of the transmitter,
and pull the key out. Never pull the
key out without pressing the button.
If it becomes difficult to turn the key,
inspect the key blade for debris.
See your dealer if a new key is
needed.
Contact Roadside Service if locked
out of the vehicle. SeeRoadside
Service on page 13-5. With an active OnStar subscription,
an OnStar Advisor may remotely
unlock the vehicle. See
OnStar
Overview on page 14-1.
Remote Keyless Entry
(RKE) System
See Radio Frequency Statement on
page 13-15.
If there is a decrease in the RKE
operating range:
.Check the distance. The
transmitter may be too far from
the vehicle.
.Check the location. Other
vehicles or objects may be
blocking the signal.
.Check the transmitter's battery.
See “Battery Replacement” later
in this section.
.If the transmitter is still not
working correctly, see your
dealer or a qualified technician
for service.
Remote Keyless Entry
(RKE) System Operation
The Keyless Access system allows
for vehicle entry when the
transmitter is within range. See
“Keyless Access Operation”
following.
The RKE transmitter functions may
work up to 60 m (197 ft) away from
the vehicle.
Other conditions, such as those
previously stated, can impact the
performance of the transmitter.
Page 37 of 408

Black plate (3,1)Cadillac ELR Owner Manual (GMNA-Localizing-U.S./Canada-6081525) -
2014 - Second Edition - 1/22/14
Keys, Doors, and Windows 2-3
K(Unlock):Press once to unlock
the driver door. Press a second time
within five seconds to unlock all
doors.
The hazard warning lamps will flash
twice each time the button is
pressed and the anti-theft alarm
system will be disarmed. See
Vehicle Alarm System on
page 2-15.
On vehicles with remote operating
windows, pressing and holding
K
will open all of the vehicle's
windows. See Power Windows on
page 2-19. This feature can be
disabled by a dealer technician.
Q(Lock): Press to lock all doors.
The hazard warning lamps will flash
once and the anti-theft alarm system
will be armed. See Vehicle Alarm
System on page 2-15.
If the driver door is open when
Qis
pressed, all doors lock and then the
driver door will unlock if the
Unlocked Door Anti-Lockout feature
is enabled through vehicle personalization. See
“Unlocked
Door Anti-Lockout” underVehicle
Personalization on page 5-51. This
may vary based on vehicle
personalization.
L(Vehicle Locator/Panic
Alarm): Press and release to
initiate vehicle locator. The exterior
lamps flash and the horn chirps
three times. Press and hold for
three seconds to sound the panic
alarm. The horn sounds and the
turn signals flash for 30 seconds.
Press again to cancel the panic
alarm.
/(Remote Vehicle Start): Press
and release
Qand then immediately
press and hold
/for at least
four seconds to start the vehicle
from outside using the RKE
transmitter. See Remote Start on
page 2-8.
i(Remote Trunk Release):
Press and hold to release the trunk.
Keyless Access Operation
To lock and unlock the doors and
access the trunk, the RKE
transmitter must be within 1 m (3 ft)
of the door or trunk.
Keyless Access can be
programmed to unlock all doors on
the first touch pad press from the
driver door. See Vehicle
Personalization on page 5-51.
Keyless Unlocking from the
Driver Door
When the RKE transmitter is within
1 m (3 ft) of the driver door handle,
pressing the touch pad button on
the driver door handle will unlock
and open the driver door. See Door
Locks on page 2-10.
To customize whether the doors
automatically unlock all doors, see
“Remote Locking, Unlocking,
Starting” underVehicle
Personalization on page 5-51.
Page 38 of 408

Black plate (4,1)Cadillac ELR Owner Manual (GMNA-Localizing-U.S./Canada-6081525) -
2014 - Second Edition - 1/22/14
2-4 Keys, Doors, and Windows
Keyless Unlocking from
Passenger Door
Press the door touch pad to unlock
all doors and open the passenger
door if the RKE transmitter is within
1 m (3 ft).
Passive Locking
This feature will lock the vehicle
several seconds after all doors are
closed, if the vehicle is off and at
least one RKE transmitter has been
removed from the interior or none
remain in the interior.
To customize whether the doors
automatically lock when exiting the
vehicle, see“Passive Door Lock”
under Vehicle Personalization on
page 5-51.
Temporarily Disable Passive
Locking Feature
Temporarily disable the passive
locking by pressing and holding
K
on the interior door switch with a
door open for at least four seconds,
or until three chimes are heard. Passive locking will then remain
disabled until
Qon the interior door
is pressed, or until the vehicle is
turned on.
To customize the doors to
automatically lock when exiting the
vehicle, see “Remote Lock, Unlock,
Start” under Vehicle Personalization
on page 5-51.
Keyless Trunk Opening
Press the touch pad to open if the
RKE transmitter is within 1 m (3 ft)
and the doors are locked. If the
doors are unlocked, the transmitter
is not required to open the trunk.
Programming Transmitters to
the Vehicle
Only RKE transmitters programmed
to this vehicle will work. If a
transmitter is lost or stolen, a
replacement can be purchased and
programmed through your dealer. The vehicle can be reprogrammed
so that lost or stolen transmitters no
longer work. Each vehicle can have
up to eight transmitters programmed
to it.
Programming with a Recognized
Transmitter
A new transmitter can be
programmed to the vehicle when
there is one recognized transmitter.
1. The vehicle must be off and both
the recognized and new
transmitters must be with you.
2. Remove the key base from the recognized RKE transmitter.
3. Place the recognized transmitter in the cupholder.
Page 39 of 408

Black plate (5,1)Cadillac ELR Owner Manual (GMNA-Localizing-U.S./Canada-6081525) -
2014 - Second Edition - 1/22/14
Keys, Doors, and Windows 2-5
4. Insert the vehicle key into thekey cylinder above the license
plate.
5. Open the trunk.
6. Turn the key counterclockwise five times within 10 seconds.
7. The DIC displays READY FOR REMOTE KEY 3 or 4, up to 8.8. Remove the rubber liner toaccess the pocket. Place the
new transmitter on the indent in
the center console storage bin.
9. Press the POWER
Obutton.
10. The DIC displays READY FOR REMOTE KEY 4 or 5, up to 8.
11. Press
QorKon each newly
programmed transmitter to
complete the process. 12. To program additional
transmitters, repeat
Steps 8–11.
Return the key base back into
the RKE transmitter.
13. Press and hold the POWER
O
button for at least 12 seconds
to exit programming.
Programming without a
Recognized Transmitter
If there are no currently recognized
transmitters available, follow this
procedure to program up to eight
transmitters. This feature is not
available in Canada. This procedure
will take approximately 30 minutes
to complete. The vehicle must be off
and all transmitters to be
programmed must be present.
Page 40 of 408

Black plate (6,1)Cadillac ELR Owner Manual (GMNA-Localizing-U.S./Canada-6081525) -
2014 - Second Edition - 1/22/14
2-6 Keys, Doors, and Windows
1. Remove the key from thetransmitter and insert the vehicle
key into the key cylinder above
the license plate.
2. Open the trunk.
3. Turn the key counterclockwise five times within 10 seconds.
The DIC message displays
REMOTE LEARN PENDING
PLEASE WAIT.
4. Return the key base back into the RKE transmitter. 5. Wait for 10 minutes until the DIC
displays PRESS ENGINE
START BUTTON LEARN, then
press the POWER
Obutton.
The DIC reads REMOTE
LEARN PENDING,
PLEASE WAIT.
6. Repeat Step 5 two additional times. After the third time all
previously known transmitters
will no longer work with the
vehicle. Remaining transmitters
can be relearned during the next
steps. The DIC display should
now show READY FOR
REMOTE #1.
7. First remove the rubber liner toaccess the pocket. Place the
new transmitter on the indent in
the center console storage bin.
8. Press the POWER
Obutton.
When the transmitter is learned,
the DIC display will show that it
is ready to program the new
transmitter.
9. Remove the transmitter from the transmitter pocket and press
Q
orKon the transmitter.
10. To program additional transmitters, repeat Steps 7–9.