manual transmission CADILLAC ELR 2014 Owner's Manual
[x] Cancel search | Manufacturer: CADILLAC, Model Year: 2014, Model line: ELR, Model: CADILLAC ELR 2014Pages: 408, PDF Size: 4.47 MB
Page 168 of 408

Black plate (60,1)Cadillac ELR Owner Manual (GMNA-Localizing-U.S./Canada-6081525) -
2014 - Second Edition - 1/22/14
5-60 Instruments and Controls
To program a garage door opener,
park outside directly in line with and
facing the garage door opener
receiver. Clear all people and
objects near the garage door.
Make sure the hand-held transmitter
has a new battery for quick and
accurate transmission of the
radio-frequency signal.
Programming the Universal
Remote System
For questions or help programming
the Universal Remote system, call
1-800-355-3515 or see
www.homelink.com.
Programming involves
time-sensitive actions, and may time
out causing the procedure to be
repeated.
To program up to three devices:
1. Hold the end of the hand-heldtransmitter about 3 to 8 cm (1 to
3 in) away from the Universal
Remote system buttons with the
indicator light in view. The hand-held transmitter was
supplied by the manufacturer of
the garage door opener receiver.
2. At the same time, press and hold both the hand-held
transmitter button and one of the
three Universal Remote system
buttons to be used to operate
the garage door. Do not release
either button until the indicator
light changes from a slow to a
rapid flash. Then release both
buttons.
Some garage door openers may
require substitution of Step 2
with the procedure under in
“Radio Signals for Canada and
Some Gate Operators” later in
this section.
3. Press and hold the newly programmed Universal Remote
system button for five seconds
while watching the indicator light
and garage door activation.
.If the indicator light stays on
continuously or the garage
door moves when the button is pressed, then
programming is complete.
There is no need to
complete Steps 4–6.
.If the indicator light does
not come on or the garage
door does not move, a
second button press may
be required. For a second
time, press and hold the
newly programmed button
for five seconds. If the light
stays on or the garage door
moves, programming is
complete.
.If the indicator light blinks
rapidly for two seconds,
then changes to a solid light
and the garage door does
not move, continue with
programming Steps 4–6.
Page 169 of 408

Black plate (61,1)Cadillac ELR Owner Manual (GMNA-Localizing-U.S./Canada-6081525) -
2014 - Second Edition - 1/22/14
Instruments and Controls 5-61
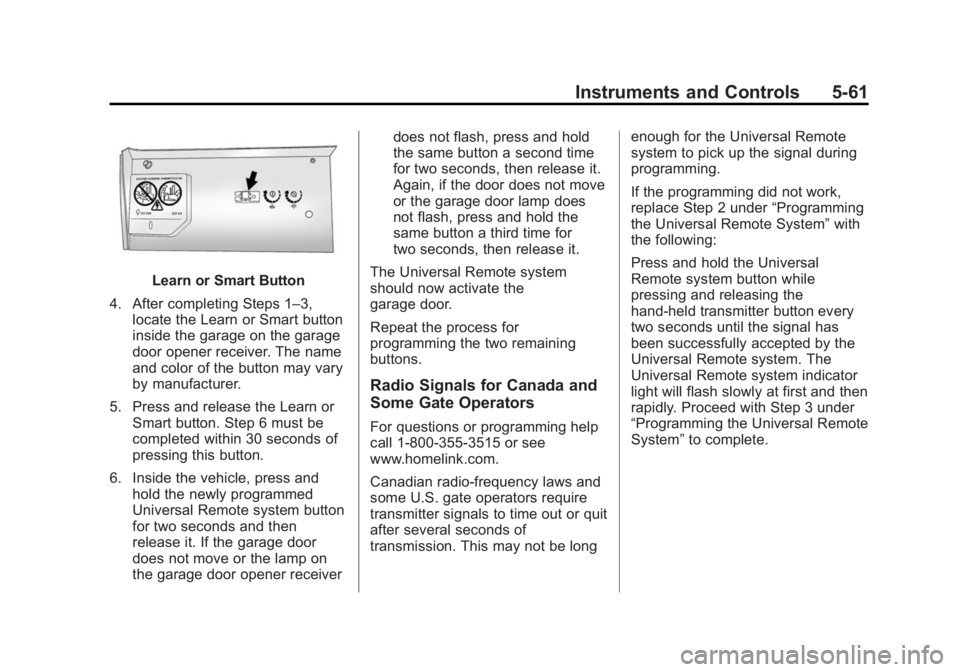
Learn or Smart Button
4. After completing Steps 1–3, locate the Learn or Smart button
inside the garage on the garage
door opener receiver. The name
and color of the button may vary
by manufacturer.
5. Press and release the Learn or Smart button. Step 6 must be
completed within 30 seconds of
pressing this button.
6. Inside the vehicle, press and hold the newly programmed
Universal Remote system button
for two seconds and then
release it. If the garage door
does not move or the lamp on
the garage door opener receiver does not flash, press and hold
the same button a second time
for two seconds, then release it.
Again, if the door does not move
or the garage door lamp does
not flash, press and hold the
same button a third time for
two seconds, then release it.
The Universal Remote system
should now activate the
garage door.
Repeat the process for
programming the two remaining
buttons.
Radio Signals for Canada and
Some Gate Operators
For questions or programming help
call 1-800-355-3515 or see
www.homelink.com.
Canadian radio-frequency laws and
some U.S. gate operators require
transmitter signals to time out or quit
after several seconds of
transmission. This may not be long enough for the Universal Remote
system to pick up the signal during
programming.
If the programming did not work,
replace Step 2 under
“Programming
the Universal Remote System” with
the following:
Press and hold the Universal
Remote system button while
pressing and releasing the
hand-held transmitter button every
two seconds until the signal has
been successfully accepted by the
Universal Remote system. The
Universal Remote system indicator
light will flash slowly at first and then
rapidly. Proceed with Step 3 under
“Programming the Universal Remote
System” to complete.
Page 291 of 408

Black plate (31,1)Cadillac ELR Owner Manual (GMNA-Localizing-U.S./Canada-6081525) -
2014 - Second Edition - 1/22/14
Vehicle Care 10-31
Mini
Fuses Amps Usage
14 –Not Used
15 15A Traction Power Inverter
Module and
Transmission
Control Module
–Battery
17 5A Engine Control Module–
Battery
22 10A Left High-Beam
Headlamp
24 –Empty
25 –Empty
26 –Not Used
31 5A Adaptive Cruise Control/
Auto
Headlamp Mini
Fuses Amps Usage
32 5A Vehicle Integration
Control Module
33 10A Run/Crank for Heated
Steering
Wheel
34 10A Vehicle Integration
Control Module
–Battery
35 –Not Used
36 10A Power Electronics
Coolant Pump
37 5A Cabin Heater Control Module Mini
Fuses Amps Usage
38 10A Rechargeable Energy
Storage
System (High
Voltage
Battery)
Coolant Pump
39 10A Rechargeable Energy
Storage
System (High
Voltage
Battery)
Control Module
40 10A Front Windshield
Washer
41 10A Right High-Beam
Headlamp
46 –Empty
47 –Empty
49 –Empty
Page 292 of 408

Black plate (32,1)Cadillac ELR Owner Manual (GMNA-Localizing-U.S./Canada-6081525) -
2014 - Second Edition - 1/22/14
10-32 Vehicle Care
Mini
Fuses Amps Usage
50 10A Run/Crank –
Rear Vision
Camera,
Accessory
Power Module
51 7.5A Run/Crank for ABS, Aero
Shutter, VITM
52 5A Engine Control Module/
Transmission
Control Module
–Run/Crank
53 7.5A Traction Power Inverter
Module–Run/
Crank Mini
Fuses Amps Usage
54 7.5A Run/Crank –
Fuel System
Control
Module, Air
Conditioning
Control
Module, On
Board Charger,
Instrument
Cluster,
Automatic
Occupant
Sensing,
Mirrors
J-Case Fuses Amps Usage
16 20A AIR Solenoid (PZEV Only)
18 30A Rear Defogger
Lower Grid J-Case
Fuses Amps Usage
19 30A Power Window–
Front
20 –Empty
21 30A Antilock Brake
System
Electronic
Control Unit
23 –Empty
27 40A AIR Pump (PZEV Only)
28 –Empty
29 30A Front Wipers
30 60A Antilock Brake
System Motor
42 30A Cooling Fan –Right
43 30A Front Wipers
44 40A Charger
Page 332 of 408

Black plate (72,1)Cadillac ELR Owner Manual (GMNA-Localizing-U.S./Canada-6081525) -
2014 - Second Edition - 1/22/14
10-72 Vehicle Care
{Caution
If the other vehicle does not have
a 12-volt system with a negative
ground, both vehicles can be
damaged. Only use a vehicle that
has a 12-volt system with a
negative ground for jump starting.
2. Park both vehicles close enough so that the jumper cables can
reach both vehicles' positive (+)
and negative (−) terminals. The
vehicles must not touch each
other. It could cause an
unwanted ground connection
that could damage both vehicles'
electrical systems.
Put both vehicles in P (Park) for
an automatic transmission or
electric drive unit. For a manual
transmission, place the vehicle
in Neutral and set the parking
brake.
{Caution
If any accessories are left on or
plugged in during the jump
starting procedure, they could be
damaged. The repairs would not
be covered by the vehicle
warranty. Whenever possible, turn
off or unplug all accessories on
either vehicle when jump starting.
3. Turn off the ignition on the other vehicle. Turn off the radio, all
lamps, and accessories that are
not needed in both vehicles.
Unplug accessories from the
cigarette lighter or the accessory
power outlets. This avoids
sparks and helps save both
batteries and accessories.
4. Locate the positive (+) and negative (−) terminals on the
other vehicle.
5. Locate the positive (+) and negative (−) battery terminals on
the ELR. The access cover is under the load floor access
cover in the rear cargo area.
Open the access covers for the
positive (+) terminal (1) and the
negative (−) terminal (2).
6. Check that the jumper cables do not have loose or missing
insulation or a shock could result
and the vehicles could be
damaged.
Before connecting the jumper
cables, here are some basic
things to know. Positive (+)
jumper cable goes to positive (+)
battery terminal or a remote
positive (+) terminal if available.
Negative (−) jumper cable goes
to negative (−) battery terminal
or a remote negative (−) terminal
if available. Do not connect
positive (+) to negative (−) or
there will be a short that may
damage the battery and other
parts of the vehicle.
Page 334 of 408

Black plate (74,1)Cadillac ELR Owner Manual (GMNA-Localizing-U.S./Canada-6081525) -
2014 - Second Edition - 1/22/14
10-74 Vehicle Care
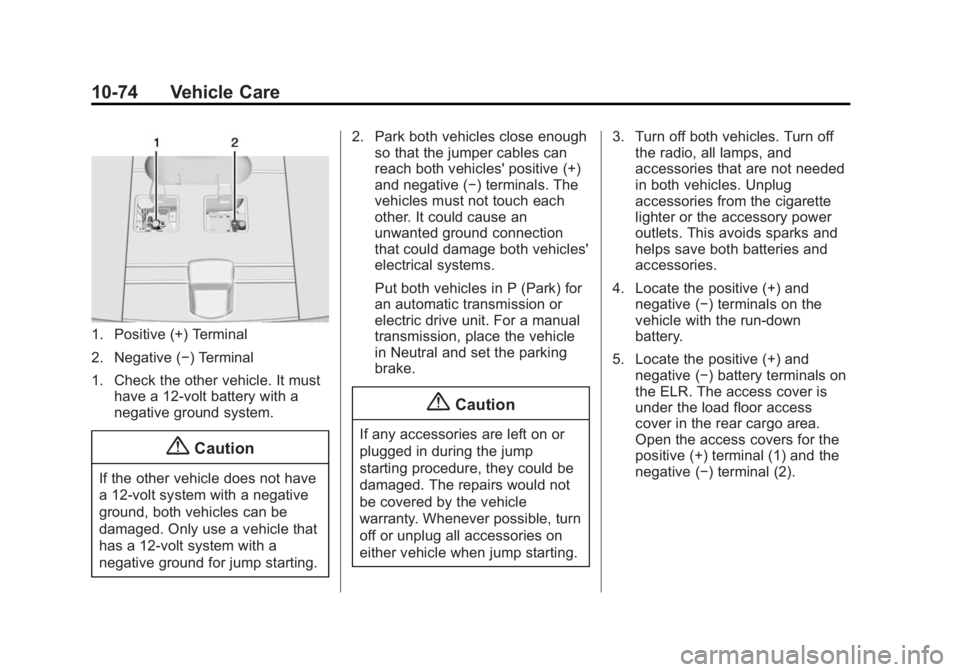
1. Positive (+) Terminal
2. Negative (−) Terminal
1. Check the other vehicle. It musthave a 12-volt battery with a
negative ground system.
{Caution
If the other vehicle does not have
a 12-volt system with a negative
ground, both vehicles can be
damaged. Only use a vehicle that
has a 12-volt system with a
negative ground for jump starting. 2. Park both vehicles close enough
so that the jumper cables can
reach both vehicles' positive (+)
and negative (−) terminals. The
vehicles must not touch each
other. It could cause an
unwanted ground connection
that could damage both vehicles'
electrical systems.
Put both vehicles in P (Park) for
an automatic transmission or
electric drive unit. For a manual
transmission, place the vehicle
in Neutral and set the parking
brake.
{Caution
If any accessories are left on or
plugged in during the jump
starting procedure, they could be
damaged. The repairs would not
be covered by the vehicle
warranty. Whenever possible, turn
off or unplug all accessories on
either vehicle when jump starting. 3. Turn off both vehicles. Turn off
the radio, all lamps, and
accessories that are not needed
in both vehicles. Unplug
accessories from the cigarette
lighter or the accessory power
outlets. This avoids sparks and
helps save both batteries and
accessories.
4. Locate the positive (+) and negative (−) terminals on the
vehicle with the run-down
battery.
5. Locate the positive (+) and negative (−) battery terminals on
the ELR. The access cover is
under the load floor access
cover in the rear cargo area.
Open the access covers for the
positive (+) terminal (1) and the
negative (−) terminal (2).
Page 362 of 408

Black plate (12,1)Cadillac ELR Owner Manual (GMNA-Localizing-U.S./Canada-6081525) -
2014 - Second Edition - 1/22/14
11-12 Service and Maintenance
Recommended Fluids, Lubricants, and Parts
Recommended Fluids and Lubricants
UsageFluid/Lubricant
Engine Oil Use only engine oil licensed to the dexos1
®specification of the proper
SAE viscosity grade. ACDelco dexos1 Synthetic Blend is recommended.
See Engine Oil on page 10-9.
Engine Cooling System Premix DEX-COOL
®(GM Part No. 12378390, in Canada 10953456). See
Engine Coolant on page 10-16.
High Voltage Battery Cooling System Premix DEX-COOL (GM Part No. 12378390, in Canada 10953456). Power Electronics Cooling System Premix DEX-COOL (GM Part No. 12378390, in Canada 10953456). Hydraulic Brake System DOT 3 Hydraulic Brake Fluid (GM Part No. 19299818, in Canada 19299819).
Windshield Washer Automotive windshield washer fluid that meets regional freeze protection requirements.
Parking Brake Cable Guides Chassis Lubricant (GM Part No. 12377985, in Canada 88901242) or lubricant meeting requirements of NLGI #2, Category LB or GC-LB.
Electric Drive Unit DEXRON
®-VI Automatic Transmission Fluid.
Key Lock Cylinders Multi-Purpose Lubricant, Superlube (GM Part No. 12346241, in Canada 10953474).
Page 394 of 408

Black plate (8,1)Cadillac ELR Owner Manual (GMNA-Localizing-U.S./Canada-6081525) -
2014 - Second Edition - 1/22/14
14-8 OnStar
to function properly. These systems
may not operate if the battery is
discharged or disconnected.
Add-on Electrical Equipment
The OnStar system is integrated
into the electrical architecture of the
vehicle. Do not add any electrical
equipment. SeeAdd-On Electrical
Equipment on page 9-71. Added
electrical equipment may interfere
with the operation of the OnStar
system and cause it to not operate.
Privacy
The complete OnStar Privacy
Statement may be found at
www.onstar.com (U.S.),
or www.onstar.ca (Canada).
Privacy-sensitive users of wireless
communications are cautioned that
the privacy of any information sent
via wireless cellular communications
cannot be assured. Third parties
may unlawfully intercept or access
transmissions and private
communications without consent.
OnStar - libcurl and unzip
acknowledgments
Certain OnStar components include
libcurl and unzip software. Below
are the notices and licenses
associated with this software:
libcurl:
COPYRIGHT AND PERMISSION
NOTICE
Copyright (c) 1996 - 2010, Daniel
Stenberg,
All rights reserved.
Permission to use, copy, modify,
and distribute this software for any
purpose with or without fee is
hereby granted, provided that the
above copyright notice and this
permission notice appear in all
copies.
THE SOFTWARE IS PROVIDED
“AS IS,” WITHOUT WARRANTY OF
ANY KIND, EXPRESS OR
IMPLIED, INCLUDING BUT NOT
LIMITED TO THE WARRANTIES
OF MERCHANTABILITY, FITNESS FOR A PARTICULAR PURPOSE
AND NONINFRINGEMENT OF
THIRD PARTY RIGHTS. IN NO
EVENT SHALL THE AUTHORS OR
COPYRIGHT HOLDERS BE
LIABLE FOR ANY CLAIM,
DAMAGES OR OTHER LIABILITY,
WHETHER IN AN ACTION OF
CONTRACT, TORT OR
OTHERWISE, ARISING FROM,
OUT OF OR IN CONNECTION
WITH THE SOFTWARE OR THE
USE OR OTHER DEALINGS IN
THE SOFTWARE.
Except as contained in this notice,
the name of a copyright holder shall
not be used in advertising or
otherwise to promote the sale, use
or other dealings in this Software
without prior written authorization of
the copyright holder.
unzip:
This is version 2005-Feb-10 of the
Info-ZIP copyright and license. The
definitive version of this document