trunk release CADILLAC ELR 2014 Owner's Manual
[x] Cancel search | Manufacturer: CADILLAC, Model Year: 2014, Model line: ELR, Model: CADILLAC ELR 2014Pages: 408, PDF Size: 4.47 MB
Page 7 of 408

Black plate (1,1)Cadillac ELR Owner Manual (GMNA-Localizing-U.S./Canada-6081525) -
2014 - Second Edition - 1/22/14
In Brief 1-1
In Brief
Instrument Panel
Instrument Panel Overview . . . . 1-2
Initial Drive Information
Initial Drive Information . . . . . . . . 1-4
Remote Keyless Entry (RKE)System . . . . . . . . . . . . . . . . . . . . . . 1-4
Remote Start . . . . . . . . . . . . . . . . . . 1-5
Door Locks . . . . . . . . . . . . . . . . . . . 1-5
Trunk Release . . . . . . . . . . . . . . . . 1-6
Windows . . . . . . . . . . . . . . . . . . . . . . 1-6
Seat Adjustment . . . . . . . . . . . . . . 1-7
Memory Features . . . . . . . . . . . . . 1-9
Heated Seats . . . . . . . . . . . . . . . . . 1-9
Head Restraint Adjustment . . . . . . . . . . . . . . . . . 1-10
Safety Belts . . . . . . . . . . . . . . . . . . 1-10
Passenger Sensing System . . . . . . . . . . . . . . . . . . . . . 1-10
Mirror Adjustment . . . . . . . . . . . . 1-11 Steering Wheel
Adjustment . . . . . . . . . . . . . . . . . 1-12
Interior Lighting . . . . . . . . . . . . . . 1-12
Exterior Lighting . . . . . . . . . . . . . 1-13
Windshield Wiper/Washer . . . . 1-13
Climate Controls . . . . . . . . . . . . . 1-14Vehicle Features
Steering Wheel Controls . . . . . 1-15
Cruise Control . . . . . . . . . . . . . . . 1-15
Infotainment System . . . . . . . . . 1-16
Driver Information Center (DIC) . . . . . . . . . . . . . . . 1-16
Forward Collision Alert (FCA) System . . . . . . . . . . . . . . . . . . . . . 1-17
Lane Departure Warning (LDW) . . . . . . . . . . . . . 1-17
Side Blind Zone Alert (SBZA) . . . . . . . . . . . . . . . 1-17
Rear Vision Camera (RVC) . . . . . . . . . . . . . 1-17
Ultrasonic Parking Assist . . . . 1-17 Active Emergency Braking
System . . . . . . . . . . . . . . . . . . . . . 1-17
Power Outlets . . . . . . . . . . . . . . . 1-18
Universal Remote System . . . 1-18
Battery and Efficiency
High Voltage Safety Information . . . . . . . . . . . . . . . . . 1-19
Charging . . . . . . . . . . . . . . . . . . . . . 1-19
Fueling . . . . . . . . . . . . . . . . . . . . . . 1-23
Regenerative Braking . . . . . . . . 1-23
Service . . . . . . . . . . . . . . . . . . . . . . 1-24
Performance and Maintenance
Traction Control/Electronic Stability Control . . . . . . . . . . . . 1-24
Tire Pressure Monitor . . . . . . . . 1-25
Engine Oil Life System . . . . . . 1-25
Driving for Better Energy Efficiency . . . . . . . . . . . . . . . . . . . 1-25
Roadside Service . . . . . . . . . . . . 1-27
OnStar
®. . . . . . . . . . . . . . . . . . . . . 1-28
Page 10 of 408

Black plate (4,1)Cadillac ELR Owner Manual (GMNA-Localizing-U.S./Canada-6081525) -
2014 - Second Edition - 1/22/14
1-4 In Brief
21.Traction Control/Electronic
Stability Control on page 9-33.
MODE Button. See Driver
Mode Control on page 9-35 (If
Equipped).
22. Shift Lever. See Electric Drive
Unit on page 9-28.
23. Dual Automatic Climate Control
System on page 8-1.Initial Drive
Information
This section provides a brief
overview about some of the
important features that may or may
not be on your specific vehicle.
For more detailed information, refer
to each of the features which can be
found later in this owner manual.
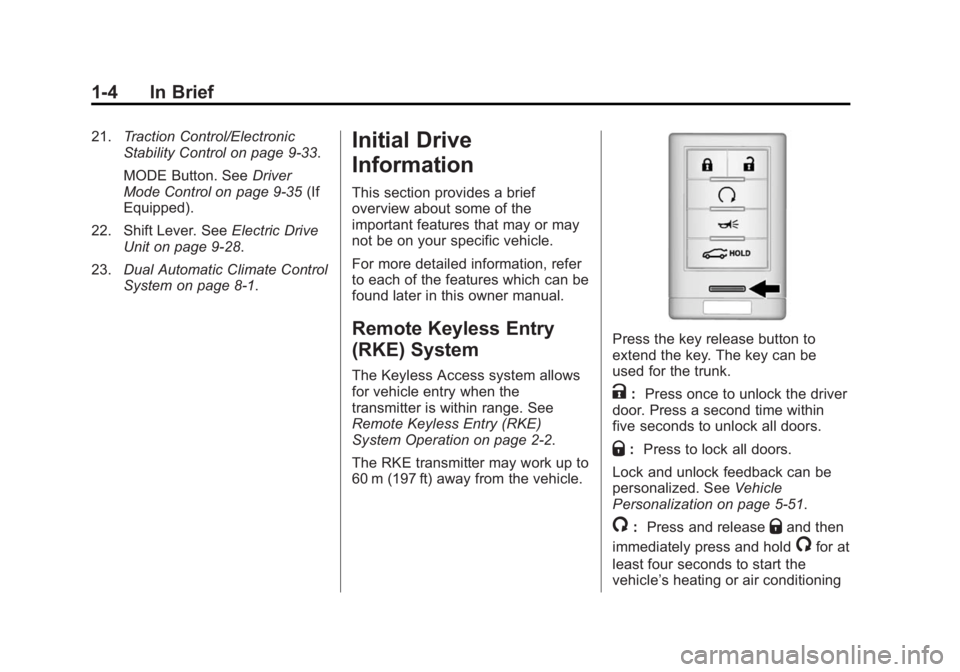
Remote Keyless Entry
(RKE) System
The Keyless Access system allows
for vehicle entry when the
transmitter is within range. See
Remote Keyless Entry (RKE)
System Operation on page 2-2.
The RKE transmitter may work up to
60 m (197 ft) away from the vehicle.
Press the key release button to
extend the key. The key can be
used for the trunk.
K:Press once to unlock the driver
door. Press a second time within
five seconds to unlock all doors.
Q: Press to lock all doors.
Lock and unlock feedback can be
personalized. See Vehicle
Personalization on page 5-51.
/: Press and releaseQand then
immediately press and hold
/for at
least four seconds to start the
vehicle’s heating or air conditioning
Page 11 of 408

Black plate (5,1)Cadillac ELR Owner Manual (GMNA-Localizing-U.S./Canada-6081525) -
2014 - Second Edition - 1/22/14
In Brief 1-5
systems and rear window defogger
from outside the vehicle using the
RKE transmitter. SeeRemote Start
on page 2-8.
L: Press and release to initiate
vehicle locator. Press and hold for
three seconds to sound the panic
alarm. Press again to cancel the
panic alarm.
i: Press and hold to release
the trunk.
See Keys on page 2-1 andRemote
Keyless Entry (RKE) System
Operation on page 2-2.
Remote Start
Use remote start to heat or cool the
interior when the vehicle is plugged
in to maximize electric range by
utilizing electricity from the electrical
outlet. Normal operation of the
system will return after the vehicle
has been turned on.
Activating Remote Start
1. Aim the transmitter at the vehicle. 2. Press and release
Qon the
RKE transmitter; the doors
will lock.
3. Immediately press and hold
/
until the turn signal lamps flash,
or for at least four seconds.
Pressing
/again during a
remote start will turn the
feature off.
After entering the vehicle during a
remote start, press the POWER
O
button on the center stack with the
brake pedal applied to operate as
normal.
Canceling Remote Start
To cancel a remote start, do any of
the following:
.Aim the transmitter at the
vehicle.
.Press and hold/until the
parking lamps turn off.
.Turn on the hazard warning
flashers.
.Press the POWERObutton on
the center stack, with the brake
pedal applied, then press the
POWER
Obutton again to turn
the vehicle off.
See Remote Start on page 2-8.
Door Locks
To lock or unlock the doors from the
outside, press
QorKon the RKE
transmitter. See Remote Keyless
Entry (RKE) System Operation on
page 2-2.
Page 12 of 408

Black plate (6,1)Cadillac ELR Owner Manual (GMNA-Localizing-U.S./Canada-6081525) -
2014 - Second Edition - 1/22/14
1-6 In Brief
For Keyless Access, the RKE
transmitter must be within 1 m (3 ft)
of the door handle sensor (1). Grip
and press to open.
To lock or unlock the door from the
inside, press the power door lock
switch (2).
To open the door press the door
latch button (3). If the vehicle is
stationary, the door latch button
unlatches an unlocked door.
SeeDoor Locks on page 2-10.
If the vehicle has lost battery power,
the doors can be opened manually.
See Power Door Locks on
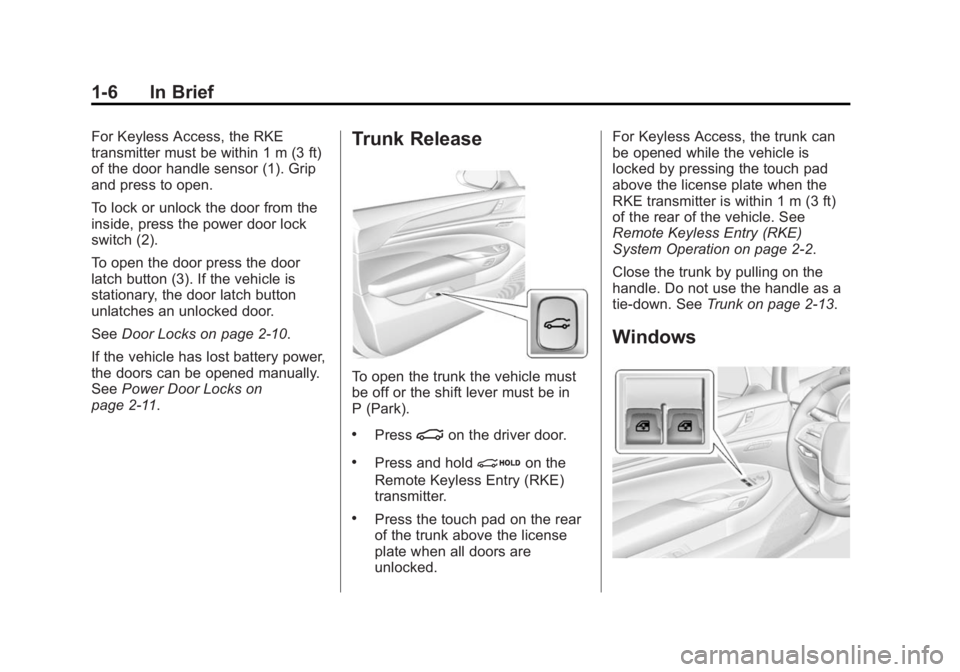
page 2-11.Trunk Release
To open the trunk the vehicle must
be off or the shift lever must be in
P (Park).
.Press|on the driver door.
.Press and holdion the
Remote Keyless Entry (RKE)
transmitter.
.Press the touch pad on the rear
of the trunk above the license
plate when all doors are
unlocked. For Keyless Access, the trunk can
be opened while the vehicle is
locked by pressing the touch pad
above the license plate when the
RKE transmitter is within 1 m (3 ft)
of the rear of the vehicle. See
Remote Keyless Entry (RKE)
System Operation on page 2-2.
Close the trunk by pulling on the
handle. Do not use the handle as a
tie-down. See
Trunk on page 2-13.
Windows
Page 26 of 408

Black plate (20,1)Cadillac ELR Owner Manual (GMNA-Localizing-U.S./Canada-6081525) -
2014 - Second Edition - 1/22/14
1-20 In Brief
with the 12 amp AC current setting
or 18 hours using the default 8 amp
AC current setting. When using a
240-volt charging station, it will take
approximately five hours to charge
the vehicle. Charge times will vary
with outside temperature. There are
three ways to program how the
vehicle is charged. See
Programmable Charging on
page 5-29.
The charging system may run fans
and pumps that result in sounds
from the vehicle while it is turned
off. Additional unexpected clicking
sounds may be caused by the
electrical devices used while
charging.
While the charge cord is plugged
into the vehicle, the vehicle cannot
be driven.
Charging
Start Charge
1. Make sure the vehicle is parkedand turned off. 2. Push the rearward edge of the
charge port door in and release
to open the door.
In cold weather conditions, ice
may form around the charge port
door. Remove ice from the area
before attempting to open or
close the charge port door.
3. Open the rear trunk, lift the left
load support floor cover, and
remove the charge cord. Pull up
on the charge cord handle to
release. The vehicle plug is
stored as shown. 4. Plug the charge cord into the
electrical outlet. See Electrical
Requirements for Battery
Charging on page 9-66. Verify
the charge cord status. See the
charge cord user guide. See
Charge Cord on page 9-64.
Select the appropriate charge
level using the Select Charge
Level Preference screen on the
center stack. See “Charge Level
Selection” underProgrammable
Charging on page 5-29.
Page 37 of 408

Black plate (3,1)Cadillac ELR Owner Manual (GMNA-Localizing-U.S./Canada-6081525) -
2014 - Second Edition - 1/22/14
Keys, Doors, and Windows 2-3
K(Unlock):Press once to unlock
the driver door. Press a second time
within five seconds to unlock all
doors.
The hazard warning lamps will flash
twice each time the button is
pressed and the anti-theft alarm
system will be disarmed. See
Vehicle Alarm System on
page 2-15.
On vehicles with remote operating
windows, pressing and holding
K
will open all of the vehicle's
windows. See Power Windows on
page 2-19. This feature can be
disabled by a dealer technician.
Q(Lock): Press to lock all doors.
The hazard warning lamps will flash
once and the anti-theft alarm system
will be armed. See Vehicle Alarm
System on page 2-15.
If the driver door is open when
Qis
pressed, all doors lock and then the
driver door will unlock if the
Unlocked Door Anti-Lockout feature
is enabled through vehicle personalization. See
“Unlocked
Door Anti-Lockout” underVehicle
Personalization on page 5-51. This
may vary based on vehicle
personalization.
L(Vehicle Locator/Panic
Alarm): Press and release to
initiate vehicle locator. The exterior
lamps flash and the horn chirps
three times. Press and hold for
three seconds to sound the panic
alarm. The horn sounds and the
turn signals flash for 30 seconds.
Press again to cancel the panic
alarm.
/(Remote Vehicle Start): Press
and release
Qand then immediately
press and hold
/for at least
four seconds to start the vehicle
from outside using the RKE
transmitter. See Remote Start on
page 2-8.
i(Remote Trunk Release):
Press and hold to release the trunk.
Keyless Access Operation
To lock and unlock the doors and
access the trunk, the RKE
transmitter must be within 1 m (3 ft)
of the door or trunk.
Keyless Access can be
programmed to unlock all doors on
the first touch pad press from the
driver door. See Vehicle
Personalization on page 5-51.
Keyless Unlocking from the
Driver Door
When the RKE transmitter is within
1 m (3 ft) of the driver door handle,
pressing the touch pad button on
the driver door handle will unlock
and open the driver door. See Door
Locks on page 2-10.
To customize whether the doors
automatically unlock all doors, see
“Remote Locking, Unlocking,
Starting” underVehicle
Personalization on page 5-51.
Page 46 of 408

Black plate (12,1)Cadillac ELR Owner Manual (GMNA-Localizing-U.S./Canada-6081525) -
2014 - Second Edition - 1/22/14
2-12 Keys, Doors, and Windows
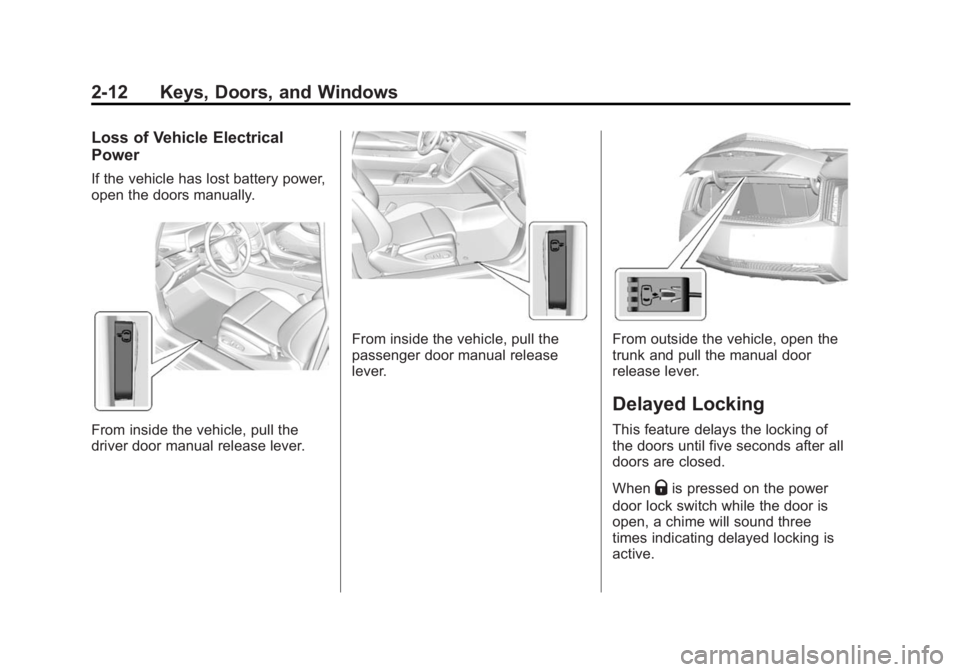
Loss of Vehicle Electrical
Power
If the vehicle has lost battery power,
open the doors manually.
From inside the vehicle, pull the
driver door manual release lever.
From inside the vehicle, pull the
passenger door manual release
lever.From outside the vehicle, open the
trunk and pull the manual door
release lever.
Delayed Locking
This feature delays the locking of
the doors until five seconds after all
doors are closed.
When
Qis pressed on the power
door lock switch while the door is
open, a chime will sound three
times indicating delayed locking is
active.
Page 48 of 408

Black plate (14,1)Cadillac ELR Owner Manual (GMNA-Localizing-U.S./Canada-6081525) -
2014 - Second Edition - 1/22/14
2-14 Keys, Doors, and Windows
Warning (Continued)
.Adjust the climate control
system to a setting that
brings in only outside air and
set the fan speed to the
highest setting. See“Climate
Control Systems” in the
Index.
.If the vehicle is equipped with
a power liftgate, disable the
power liftgate function.
See Engine Exhaust on
page 9-27.
Trunk Release
To open the trunk the shift lever
must be in P (Park).
.Press|on the driver door.
.Press and holdion the
Remote Keyless Entry (RKE)
transmitter.
.Press the touch pad on the rear
of the trunk above the license
plate when all doors are
unlocked. The trunk can be opened while the
vehicle is locked by pressing the
touch pad above the license plate
while the RKE transmitter is within
1 m (3 ft) of the rear of the vehicle.
See
“Keyless Access” inRemote
Keyless Entry (RKE) System
Operation on page 2-2.
Close the trunk by pulling on the
handle. Do not use the handle as a
tie-down.
Emergency Trunk Release
Handle
Page 49 of 408

Black plate (15,1)Cadillac ELR Owner Manual (GMNA-Localizing-U.S./Canada-6081525) -
2014 - Second Edition - 1/22/14
Keys, Doors, and Windows 2-15
{Caution
Do not use the emergency trunk
release handle as a tie-down or
anchor point when securing items
in the trunk as it could damage
the handle.
There is a glow-in-the-dark
emergency trunk release handle on
the trunk lid. This handle will glow
following exposure to light. Pull the
release handle to open the trunk
from the inside.
Vehicle Security
This vehicle has theft-deterrent
features; however, they do not make
the vehicle impossible to steal.
Vehicle Alarm System
This vehicle has an anti-theft alarm
system.
Arming the Alarm System
1. Close the trunk and the hood. Turn off the vehicle.
2. Lock the vehicle in one of three ways:
.Use the RKE transmitter.
.Use the Keyless Access
system.
.With a door open, pressQ
on the interior of the door.
3. After 30 seconds the alarm system will arm. Pressing
Qon
the RKE transmitter a second time will bypass the 30-second
delay and immediately arm the
alarm system.
If the driver door is opened without
first unlocking with the RKE
transmitter, the horn will chirp and
the lights will flash to indicate
pre-alarm. If the vehicle is not
started, or the door is not unlocked
by pressing
Kon the RKE
transmitter during the 10-second
pre-alarm, the alarm will be
activated.
If the charge cord theft alert is
enabled, the alarm will also be
activated when there is an attempt
to remove the charge cord, or if a
passenger door, the trunk, or the
hood is opened without first
disarming the system. When the
alarm is activated, the turn signals
flash and the horn sounds for about
30 seconds. The alarm system will
then re-arm to monitor for the next
unauthorized event.
Page 246 of 408

Black plate (58,1)Cadillac ELR Owner Manual (GMNA-Localizing-U.S./Canada-6081525) -
2014 - Second Edition - 1/22/14
9-58 Driving and Operating
Charging
Plug-In Charging
This section explains the process
for charging the vehicle's high
voltage battery. Do not allow the
vehicle to remain in temperature
extremes for long periods without
being driven or plugged in. It is
recommended that the vehicle be
plugged in when temperatures are
below 0°C (32°F) and above 32°C
(90°F) to maximize high voltage
battery life.
When using a 120-volt AC electrical
outlet, it will take approximately
12.5 hours to charge the vehicle
with the 12 amp AC current setting
or 18 hours using the default 8 amp
AC current setting. When using a
240-volt charging station, it will take
approximately five hours to charge
the vehicle. Charge times will vary
with outside temperature. There are
three ways to program how thevehicle is charged. See
Programmable Charging on
page 5-29.
The charging system may run fans
and pumps that result in sounds
from the vehicle while it is turned
off. Additional unexpected clicking
sounds may be caused by the
electrical devices used while
charging.
While the charge cord is plugged
into the vehicle, the vehicle cannot
be driven.
Charging
Start Charge
1. Make sure the vehicle is parked
and turned off.
2. Push the rearward edge of the charge port door in and release
to open the door.
In cold weather conditions, ice
may form around the charge port
door. Remove ice from the area
before attempting to open or
close the charge port door.
3. Open the rear trunk, lift the leftload support floor cover, and
remove the charge cord. Pull up
on the charge cord handle to
release. The vehicle plug is
stored as shown.
4. Plug the charge cord into the electrical outlet. See Electrical
Requirements for Battery
Charging on page 9-66. Verify
the charge cord status. See the
charge cord user guide. See
Charge Cord on page 9-64.
Select the appropriate charge
level using the Select Charge
Level Preference screen on the