buttons CADILLAC ELR 2016 Owners Manual
[x] Cancel search | Manufacturer: CADILLAC, Model Year: 2016, Model line: ELR, Model: CADILLAC ELR 2016Pages: 368, PDF Size: 6.92 MB
Page 13 of 368

Cadillac ELR Owner Manual (GMNA-Localizing-U.S/Canada-9087644) -
2016 - crc - 9/17/15
12 In Brief
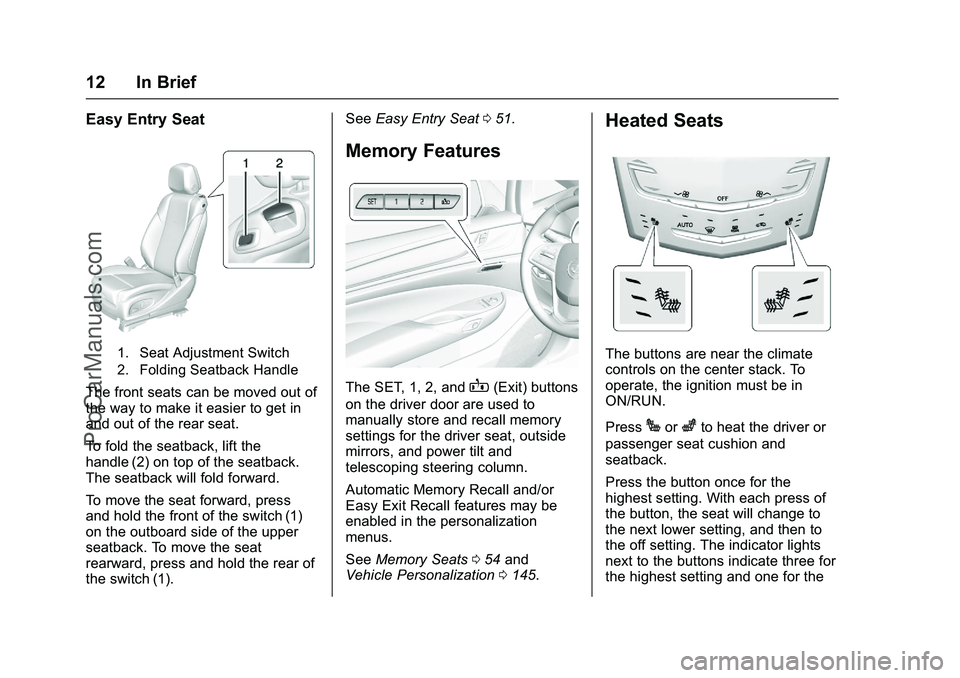
Easy Entry Seat
1. Seat Adjustment Switch
2. Folding Seatback Handle
The front seats can be moved out of
the way to make it easier to get in
and out of the rear seat.
To fold the seatback, lift the
handle (2) on top of the seatback.
The seatback will fold forward.
To move the seat forward, press
and hold the front of the switch (1)
on the outboard side of the upper
seatback. To move the seat
rearward, press and hold the rear of
the switch (1).See
Easy Entry Seat 051.
Memory Features
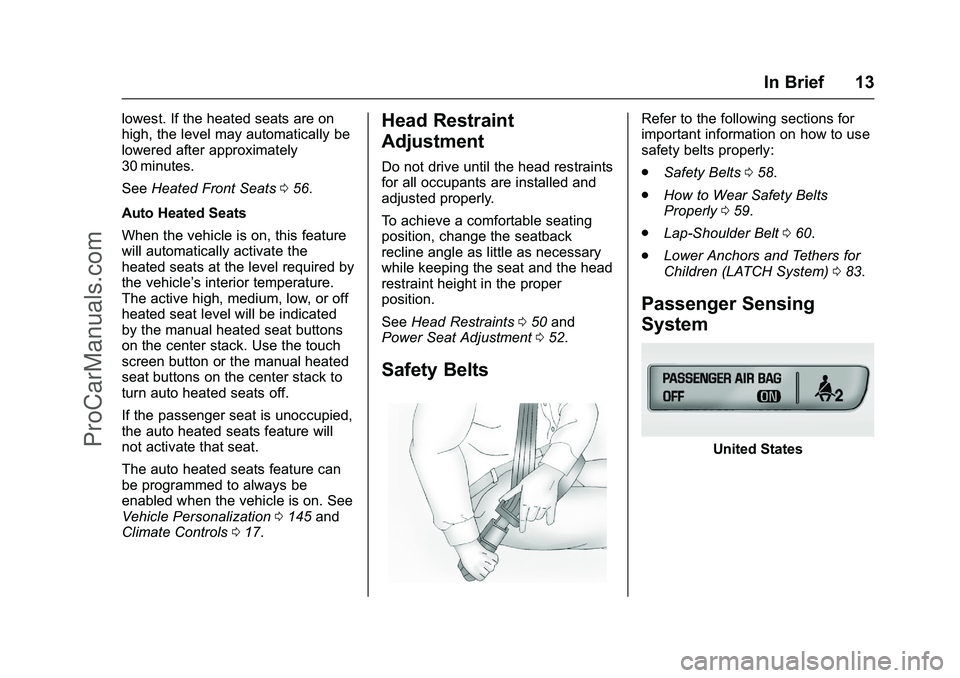
The SET, 1, 2, andB(Exit) buttons
on the driver door are used to
manually store and recall memory
settings for the driver seat, outside
mirrors, and power tilt and
telescoping steering column.
Automatic Memory Recall and/or
Easy Exit Recall features may be
enabled in the personalization
menus.
See Memory Seats 054 and
Vehicle Personalization 0145.
Heated Seats
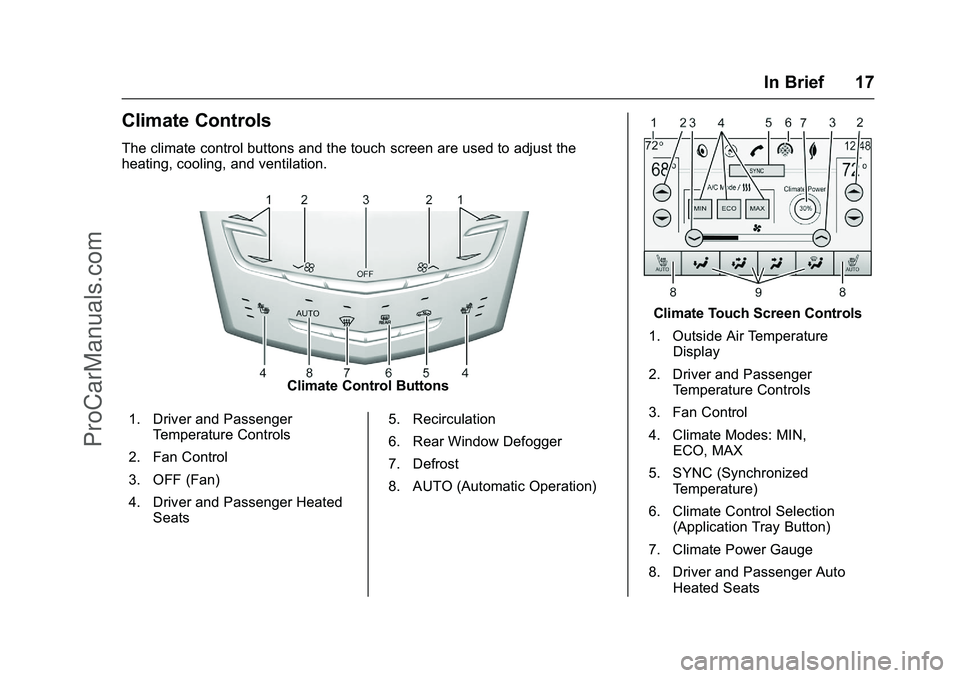
The buttons are near the climate
controls on the center stack. To
operate, the ignition must be in
ON/RUN.
Press
Jorzto heat the driver or
passenger seat cushion and
seatback.
Press the button once for the
highest setting. With each press of
the button, the seat will change to
the next lower setting, and then to
the off setting. The indicator lights
next to the buttons indicate three for
the highest setting and one for the
ProCarManuals.com
Page 14 of 368

Cadillac ELR Owner Manual (GMNA-Localizing-U.S/Canada-9087644) -
2016 - crc - 9/17/15
In Brief 13
lowest. If the heated seats are on
high, the level may automatically be
lowered after approximately
30 minutes.
SeeHeated Front Seats 056.
Auto Heated Seats
When the vehicle is on, this feature
will automatically activate the
heated seats at the level required by
the vehicle’ s interior temperature.
The active high, medium, low, or off
heated seat level will be indicated
by the manual heated seat buttons
on the center stack. Use the touch
screen button or the manual heated
seat buttons on the center stack to
turn auto heated seats off.
If the passenger seat is unoccupied,
the auto heated seats feature will
not activate that seat.
The auto heated seats feature can
be programmed to always be
enabled when the vehicle is on. See
Vehicle Personalization 0145 and
Climate Controls 017.Head Restraint
Adjustment
Do not drive until the head restraints
for all occupants are installed and
adjusted properly.
To achieve a comfortable seating
position, change the seatback
recline angle as little as necessary
while keeping the seat and the head
restraint height in the proper
position.
See Head Restraints 050 and
Power Seat Adjustment 052.
Safety Belts
Refer to the following sections for
important information on how to use
safety belts properly:
.
Safety Belts 058.
. How to Wear Safety Belts
Properly 059.
. Lap-Shoulder Belt 060.
. Lower Anchors and Tethers for
Children (LATCH System) 083.
Passenger Sensing
System
United States
ProCarManuals.com
Page 18 of 368

Cadillac ELR Owner Manual (GMNA-Localizing-U.S/Canada-9087644) -
2016 - crc - 9/17/15
In Brief 17
Climate Controls
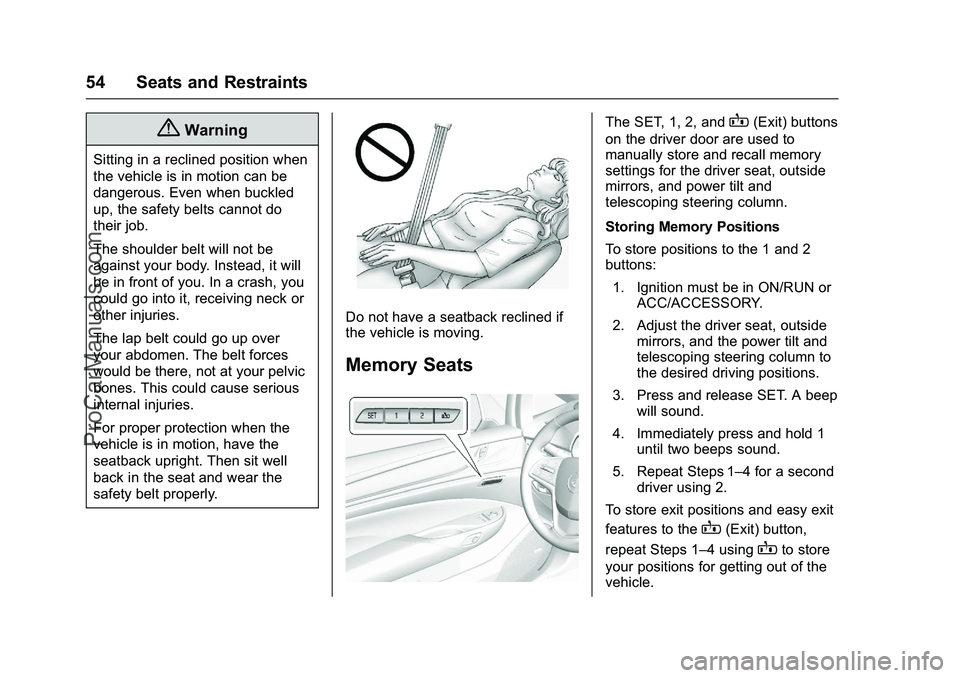
The climate control buttons and the touch screen are used to adjust the
heating, cooling, and ventilation.
Climate Control Buttons
1. Driver and Passenger Temperature Controls
2. Fan Control
3. OFF (Fan)
4. Driver and Passenger Heated Seats 5. Recirculation
6. Rear Window Defogger
7. Defrost
8. AUTO (Automatic Operation)
Climate Touch Screen Controls
1. Outside Air Temperature Display
2. Driver and Passenger Temperature Controls
3. Fan Control
4. Climate Modes: MIN, ECO, MAX
5. SYNC (Synchronized Temperature)
6. Climate Control Selection (Application Tray Button)
7. Climate Power Gauge
8. Driver and Passenger Auto Heated Seats
ProCarManuals.com
Page 36 of 368

Cadillac ELR Owner Manual (GMNA-Localizing-U.S/Canada-9087644) -
2016 - crc - 9/17/15
Keys, Doors, and Windows 35
5. Wait for 10 minutes until theDIC displays PRESS ENGINE
START BUTTON TO LEARN,
then press POWER
O.
The DIC reads REMOTE
LEARN PENDING,
PLEASE WAIT.
6. Repeat Step 5 two additional times. After the third time all
previously known transmitters
will no longer work with the
vehicle. Remaining transmitters
can be relearned during the
next steps. The DIC display
should now show READY FOR
REMOTE #1.
7. Remove the rubber liner toaccess the pocket. Place the
new transmitter, button side
down, on the indent in the
center console storage area.
8. Press POWER
O. When the
transmitter is learned, the DIC
display will show that it is ready
to program the new transmitter.
9. Remove the transmitter from the transmitter pocket and
press
QorKon the
transmitter.
10. To program additional transmitters, repeat Steps 7–9.
11. When all additional transmitters are programmed, press and
hold POWER
Ofor
approximately 12 seconds to
exit programming mode.
Starting the Vehicle with a Low
Transmitter Battery
When you try to start the vehicle,
if the transmitter battery is weak,
or if there is interference with the
signal, the DIC may display NO
REMOTE DETECTED or NO REMOTE KEY WAS DETECTED
PLACE KEY IN TRANSMITTER
POCKET THEN START YOUR
VEHICLE. See
Key and Lock
Messages 0139.
To start the vehicle:
1. Open the center console storage area and the
storage tray.
2. Place the transmitter, buttonside down, into the transmitter
indent.
3. With the vehicle in P (Park) or N (Neutral), press the brake
pedal and POWER
O.
ProCarManuals.com
Page 55 of 368

Cadillac ELR Owner Manual (GMNA-Localizing-U.S/Canada-9087644) -
2016 - crc - 9/17/15
54 Seats and Restraints
{Warning
Sitting in a reclined position when
the vehicle is in motion can be
dangerous. Even when buckled
up, the safety belts cannot do
their job.
The shoulder belt will not be
against your body. Instead, it will
be in front of you. In a crash, you
could go into it, receiving neck or
other injuries.
The lap belt could go up over
your abdomen. The belt forces
would be there, not at your pelvic
bones. This could cause serious
internal injuries.
For proper protection when the
vehicle is in motion, have the
seatback upright. Then sit well
back in the seat and wear the
safety belt properly.
Do not have a seatback reclined if
the vehicle is moving.
Memory Seats
The SET, 1, 2, andB(Exit) buttons
on the driver door are used to
manually store and recall memory
settings for the driver seat, outside
mirrors, and power tilt and
telescoping steering column.
Storing Memory Positions
To store positions to the 1 and 2
buttons:
1. Ignition must be in ON/RUN or ACC/ACCESSORY.
2. Adjust the driver seat, outside mirrors, and the power tilt and
telescoping steering column to
the desired driving positions.
3. Press and release SET. A beep will sound.
4. Immediately press and hold 1 until two beeps sound.
5. Repeat Steps 1–4 for a second driver using 2.
To store exit positions and easy exit
features to the
B(Exit) button,
repeat Steps 1–4 using
Bto store
your positions for getting out of the
vehicle.
ProCarManuals.com
Page 57 of 368

Cadillac ELR Owner Manual (GMNA-Localizing-U.S/Canada-9087644) -
2016 - crc - 9/17/15
56 Seats and Restraints
Heated Front Seats
{Warning
If you cannot feel temperature
change or pain to the skin, the
seat heater may cause burns. To
reduce the risk of burns, people
with such a condition should use
care when using the seat heater,
especially for long periods of
time. Do not place anything on
the seat that insulates against
heat, such as a blanket, cushion,
cover, or similar item. This may
cause the seat heater to
overheat. An overheated seat
heater may cause a burn or may
damage the seat.
The buttons are near the climate
controls on the center stack. To
operate, the ignition must be in
ON/RUN.
Press
Jorzto heat the driver or
passenger seat cushion and
seatback.
Press the button once for the
highest setting. With each press of
the button, the seat will change to
the next lower setting, and then to
the off setting. The indicator lights
next to the buttons indicate three for
the highest setting and one for the
lowest. If the heated seats are on high, the level may automatically be
lowered after approximately
30 minutes.
When this feature is off, the heated
seat symbol on the button is white.
When the heated seat is turned on,
the symbol turns red.
The passenger seat may take
longer to heat up.
Auto Heated Seats
When the vehicle is on, this feature
will automatically activate the
heated seats at the level required by
the vehicle’
s interior temperature.
The active high, medium, low, or off
heated seat level will be indicated
by the manual heated seat buttons
on the center stack. Use the manual
heated seat buttons on the center
stack to turn auto heated seats off.
If the passenger seat is unoccupied,
the auto heated seats feature will
not activate that seat. The auto
heated seats feature can be
programmed to always be enabled
when the vehicle is on.
ProCarManuals.com
Page 147 of 368

Cadillac ELR Owner Manual (GMNA-Localizing-U.S/Canada-9087644) -
2016 - crc - 9/17/15
146 Instruments and Controls
.Audio Cue Volume
Manage Favorites
This allows favorites to be edited.
See “Manage Favorites” in
“Settings” under“Radio” in the
infotainment manual.
Number of Favorites Shown
Press to set the number of favorites
to display.
Select the desired number or select
Auto and the infotainment system
will automatically adjust the number
of favorites shown.
Auto Volume
This feature adjusts the volume
based on vehicle speed and
ambient noise.
Select Off, Low, Medium-Low,
Medium, Medium-High, or High.
Maximum Startup Volume
This feature sets the maximum
startup volume. If the vehicle is
started and the volume is greater
than this level, the volume is adjusted to this level. To set the
maximum startup volume, press +
or
−to increase or decrease.
Audio Cue Volume
This feature sets the volume of
audio files played at system startup
and shutdown.
Select On, then press + or −to
increase or decrease the volume.
Vehicle
Select and the following may
display:
. Climate and Air Quality
. Collision/Detection Systems
. Comfort and Convenience
. Energy
. Lighting
. Power Door Locks
. Remote Lock, Unlock, Start
Climate and Air Quality
Select and the following may
display:
. Auto Fan Max Speed .
Auto Heated Seats
. Auto Defog
. Engine Assisted Heating
Plugged-In
Auto Fan Max Speed
This feature will set the maximum
auto fan speed.
Select Low, Medium, or High.
Auto Heated Seats
This feature will automatically
activate heated seats at the level
required by the interior temperature.
The auto heated seats can be
turned off by using the heated seat
buttons on the center stack.
Select Off or On.
Auto Defog
When set to On, the front defog will
automatically come on when the
vehicle is started.
Select Off or On.
ProCarManuals.com
Page 152 of 368

Cadillac ELR Owner Manual (GMNA-Localizing-U.S/Canada-9087644) -
2016 - crc - 9/17/15
Instruments and Controls 151
Manage Apple CarPlay Devices
Select to manage Apple devices.
Apple CarPlay must be on for this
feature to be accessed.
Android Auto
Select and the following may
display:
.Android Auto
. Manage Android Auto Devices
Android Auto
This feature allows Android devices
to be connected to the infotainment
system through a USB port.
Select Off or On.
Manage Android Auto Devices
Select to manage Android devices.
Android Auto must be on for this
feature to be accessed.
Voice
Select and the following may
display:
. Confidence Threshold
. Prompt Length .
Audio Feedback Speed
. Display "What Can I Say?" Tips
Confidence Threshold
This feature allows the adjustment
of the sensitivity of the speech
recognition system.
Select Confirm More or
Confirm Less.
Prompt Length
This feature adjusts the voice
prompt length.
Select Short or Long.
Audio Feedback Speed
This feature adjusts the audio
feedback speed.
Select Slow, Medium, or Fast.
Display "What Can I Say?" Tips
This feature gives voice
command tips.
Select Off or On.
Display
Select and the following may
display:
. Proximity Sensing
. Calibrate Touchscreen
. Turn Display Off
Proximity Sensing
When on, certain screen buttons
and features will become visible
when a hand approaches the
screen.
Select Off, On, or On - Map Only.
Calibrate Touchscreen
Select to calibrate the touchscreen,
then follow the prompts.
Turn Display Off
Select to turn the display off. Press
anywhere on the display area or any
faceplate button to turn the
display on.
Rear Camera
Select and the following may be
display:
. Guidance Lines
ProCarManuals.com
Page 153 of 368

Cadillac ELR Owner Manual (GMNA-Localizing-U.S/Canada-9087644) -
2016 - crc - 9/17/15
152 Instruments and Controls
.Rear Park Assist Symbols
Guidance Lines
Select to turn Off or On. See
Assistance Systems for Parking or
Backing 0212.
Rear Park Assist Symbols
Select to turn Off or On. See
Assistance Systems for Parking or
Backing 0212.
Return to Factory Settings
Select and the following may
display:
.
Restore Vehicle Settings
. Clear All Private Data
. Restore Radio Settings
Restore Vehicle Settings
This allows selection of restoring
vehicle settings.
Select Restore or Cancel.
Clear All Private Data
This allows selection to clear all
private information from the vehicle.
Select Delete or Cancel. Restore Radio Settings
This allows selection to restore
radio settings.
Select Restore or Cancel.
Software Information
Select to view the infotainment
system current software information.
Universal Remote
System
See
Radio Frequency
Statement 0343.
Universal Remote System
Programming
If equipped, these buttons are in the
overhead console.
This system can replace up to three
remote control transmitters used to
activate devices such as garage
door openers, security systems, and
home automation devices. These
ProCarManuals.com
Page 154 of 368

Cadillac ELR Owner Manual (GMNA-Localizing-U.S/Canada-9087644) -
2016 - crc - 9/17/15
Instruments and Controls 153
instructions refer to a garage door
opener, but can be used for other
devices.
Do not use the Universal Remote
system with any garage door opener
that does not have the stop and
reverse feature. This includes any
garage door opener model
manufactured before April 1, 1982.
Read these instructions completely
before programming the Universal
Remote system. It may help to have
another person assist with the
programming process.
Keep the original hand-held
transmitter for use in other vehicles
as well as for future programming.
Erase the programming when
vehicle ownership is terminated.
See“Erasing Universal Remote
System Buttons” later in this
section.
To program a garage door opener,
park outside directly in line with and
facing the garage door opener
receiver. Clear all people and
objects near the garage door. Make sure the hand-held transmitter
has a new battery for quick and
accurate transmission of the
radio-frequency signal.
Programming the Universal
Remote System
For questions or help programming
the Universal Remote system, call
1-800-355-3515 or see
www.homelink.com.
Programming involves
time-sensitive actions, and may time
out causing the procedure to be
repeated.
To program up to three devices:
1. Hold the end of the hand-held transmitter about 3 to 8 cm (1
to 3 in) away from the
Universal Remote system
buttons with the indicator light
in view. The hand-held
transmitter was supplied by the
manufacturer of the garage
door opener receiver.
2. At the same time, press and hold both the hand-held
transmitter button and one of
the three Universal Remote system buttons to be used to
operate the garage door. Do
not release either button until
the indicator light changes from
a slow to a rapid flash. Then
release both buttons.
Some garage door openers
may require substitution of
Step 2 with the procedure
under
“Radio Signals for
Canada and Some Gate
Operators” later in this section.
3. Press and hold the newly programmed Universal Remote
system button for five seconds
while watching the indicator
light and garage door
activation.
.If the indicator light stays on
continuously or the garage
door moves when the
button is pressed, then
programming is complete.
There is no need to
complete Steps 4–6.
. If the indicator light does
not come on or the garage
door does not move, a
second button press may
ProCarManuals.com