remote control CADILLAC ESCALADE 2003 2.G User Guide
[x] Cancel search | Manufacturer: CADILLAC, Model Year: 2003, Model line: ESCALADE, Model: CADILLAC ESCALADE 2003 2.GPages: 486, PDF Size: 3.32 MB
Page 240 of 486

{(Subtitle):Press this button to call-up a menu that
will operate only when a DVD is being played. The
format and content of this function is de®ned by the disc
and is dependent of the disc.
[(Fast Forward):Press this button to fast forward
the DVD or CD. To stop fast forwarding, press this
button again. This button may not work when the DVD
is playing the copyright or the previews.
s(Play/Pause):Press this button to turn the DVD
player on, to start play of a DVD or CD and to toggle
between play and pause of a DVD or CD.
Slow Play:When the DVD is playing, press the pause
button then press the fast forward button. The DVD
will continue playing in a slow play mode. To cancel slow
play mode, press the play/pause button.
u(Next Track/Chapter):Press this button to advance
to the beginning of the next track or chapter. This
button may not work when the DVD is playing the
copyright or the previews.
Battery Replacement
To change the batteries, do the following:
1. Remove the battery compartment door located on
the bottom of the remote control.
2. Replace the two AA batteries in the compartment.
Make sure that they are installed correctly.
3. Close the battery door securely.
Notice:Do not store the remote control in heat or
direct sunlight. This could damage the remote
control and it would not be covered by your vehicles
warranty. Keep the remote control stored in a
cool, dry place.
If the remote control is to be stored for a long period of
time, remove the batteries and keep them in a cool,
dry place.
3-90
Page 242 of 486

Stereo RCA Jacks
The RCA jacks are located behind the video screen on
the front of the DVD console. The RCA jacks allow you to
connect audio and video from an auxiliary device such as
a camcorder or a video game unit to your RSE system
just as you would to a standard television. Standard RCA
cables are needed to connect the auxiliary device to the
RCA jacks. The yellow connector inputs video and the
red and white connectors input right and left stereo audio.
Refer to the manufacturer's instructions for proper
connection of your auxiliary device.
To use the auxiliary inputs on the RSE system, connect
an external auxiliary device to the color-coded RCA
jacks and turn both the auxiliary device and the
RSE system power on. If the RSE system had been
previously in the DVD player mode, you will need
to press the SRCE button on the faceplate or the remote
control to change to the auxiliary mode. Pressing the
SRCE button will toggle the RSE system between
the auxiliary device and the DVD player.
How to Change the Video Format when in
the Auxiliary Mode
The auxiliary input video format is preset to NTSC. In
some countries, the video format may be in PAL system.
To change the video format, perform the following:
1. Press the display menu button.
2. Press the navigation down arrow key to scroll down
to Video Format.
3. Press the enter button to select Video Format.
4. Press the navigation key to select the PAL video
format.
5. Press the enter button to accept the change.
Audio Output
Audio from the DVD player or auxiliary inputs may be
heard through the following possible sources:
·Wireless Headphones
·Vehicle Speakers
·Vehicle wired headphone jacks on the Rear Seat
Audio system (if equipped)
The RSE system will always transmit the audio signal
by infrared to the wireless headphones, if there is audio
available. See ªHeadphonesº previously for more
information.
3-92
Page 243 of 486

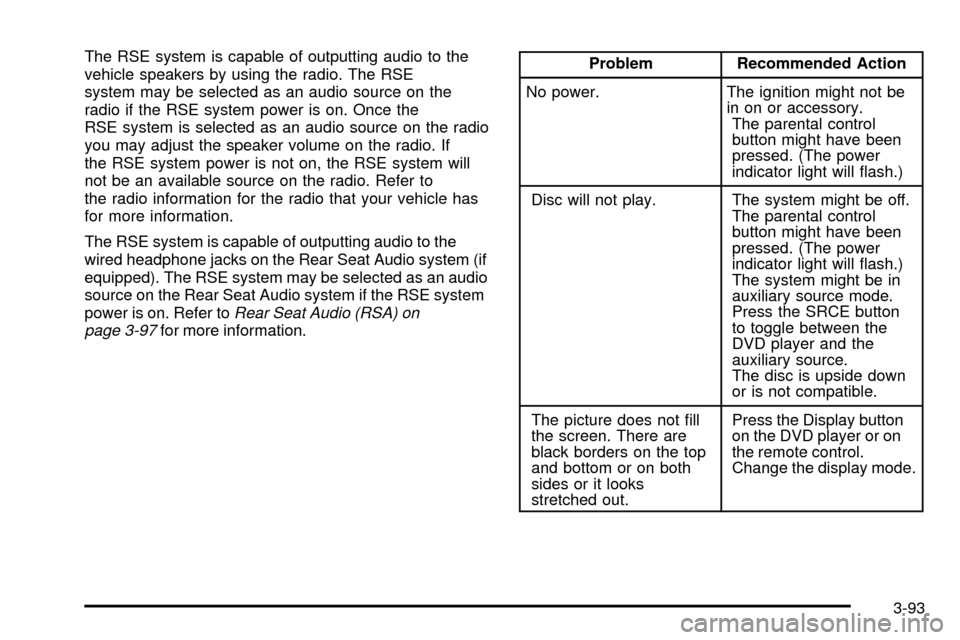
The RSE system is capable of outputting audio to the
vehicle speakers by using the radio. The RSE
system may be selected as an audio source on the
radio if the RSE system power is on. Once the
RSE system is selected as an audio source on the radio
you may adjust the speaker volume on the radio. If
the RSE system power is not on, the RSE system will
not be an available source on the radio. Refer to
the radio information for the radio that your vehicle has
for more information.
The RSE system is capable of outputting audio to the
wired headphone jacks on the Rear Seat Audio system (if
equipped). The RSE system may be selected as an audio
source on the Rear Seat Audio system if the RSE system
power is on. Refer to
Rear Seat Audio (RSA) on
page 3-97for more information.
Problem Recommended Action
No power. The ignition might not be
in on or accessory.
The parental control
button might have been
pressed. (The power
indicator light will ¯ash.)
Disc will not play. The system might be off.
The parental control
button might have been
pressed. (The power
indicator light will ¯ash.)
The system might be in
auxiliary source mode.
Press the SRCE button
to toggle between the
DVD player and the
auxiliary source.
The disc is upside down
or is not compatible.
The picture does not ®ll
the screen. There are
black borders on the top
and bottom or on both
sides or it looks
stretched out.Press the Display button
on the DVD player or on
the remote control.
Change the display mode.
3-93
Page 244 of 486

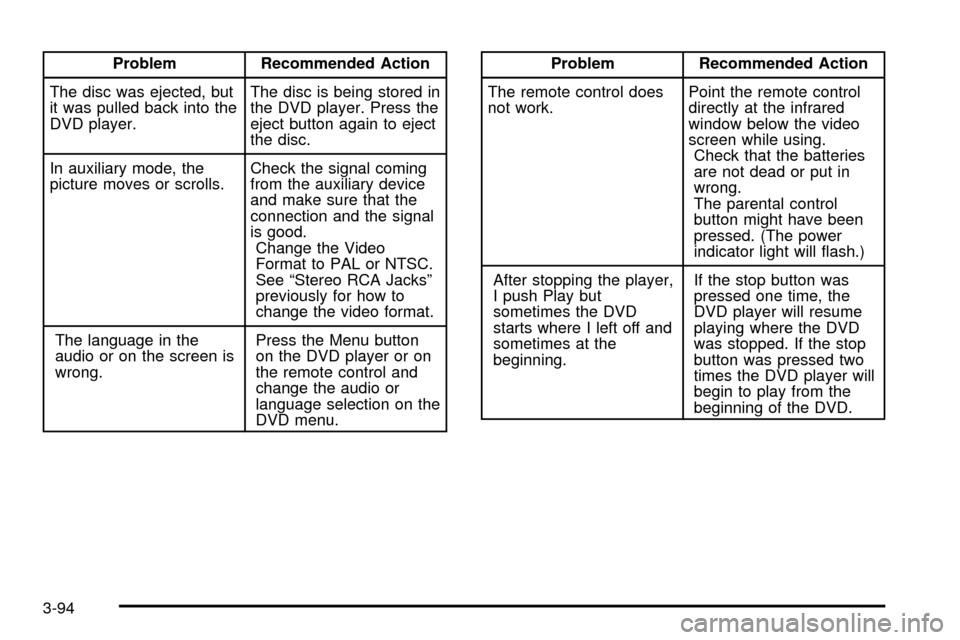
Problem Recommended Action
The disc was ejected, but
it was pulled back into the
DVD player.The disc is being stored in
the DVD player. Press the
eject button again to eject
the disc.
In auxiliary mode, the
picture moves or scrolls.Check the signal coming
from the auxiliary device
and make sure that the
connection and the signal
is good.
Change the Video
Format to PAL or NTSC.
See ªStereo RCA Jacksº
previously for how to
change the video format.
The language in the
audio or on the screen is
wrong.Press the Menu button
on the DVD player or on
the remote control and
change the audio or
language selection on the
DVD menu.Problem Recommended Action
The remote control does
not work.Point the remote control
directly at the infrared
window below the video
screen while using.
Check that the batteries
are not dead or put in
wrong.
The parental control
button might have been
pressed. (The power
indicator light will ¯ash.)
After stopping the player,
I push Play but
sometimes the DVD
starts where I left off and
sometimes at the
beginning.If the stop button was
pressed one time, the
DVD player will resume
playing where the DVD
was stopped. If the stop
button was pressed two
times the DVD player will
begin to play from the
beginning of the DVD.
3-94
Page 247 of 486

Rear Seat Audio (RSA)
This feature allows rear seat passengers to listen to any
of the audio sources: radio, cassette tapes, CDs, DVDs,
or XMŸ (48 contiguous US states, if equipped)
depending on your vehicles options. In the event that the
front seat passengers are listening to any of these remote
sources the rear seat passengers can only listen to the
remote source being used by the front seat passengers
or FM, AM, or the radios internal CD. For example, rear
seat passengers may listen to cassette tape, CDs, or
DVDs through the headphones while the driver listens to
the radio through the front speakers. The rear seat
passengers have control of the volume for each set of
headphones. The front seat audio controls always
override the RSA controls.
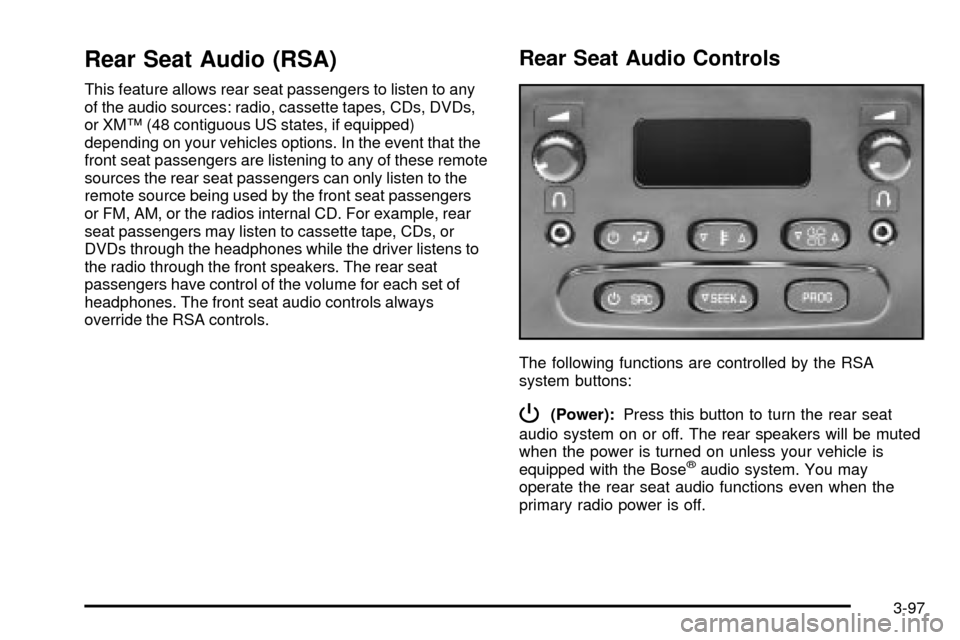
Rear Seat Audio Controls
The following functions are controlled by the RSA
system buttons:
P(Power):Press this button to turn the rear seat
audio system on or off. The rear speakers will be muted
when the power is turned on unless your vehicle is
equipped with the Bose
žaudio system. You may
operate the rear seat audio functions even when the
primary radio power is off.
3-97
Page 481 of 486

Rear Seat Armrest..........................................2-47
Rear Seat Audio Controls.................................3-97
Rear Seat Audio (RSA)....................................3-97
Rear Seat Entertainment System.......................3-85
Rear Seat Operation......................................... 1-8
Rear Seat Outside Passenger Positions.............1-44
Rear Seat Passengers, Safety Belts..................1-44
Rear Storage Area..........................................2-46
Rear Window Defogger....................................3-30
Rearview Mirror, Automatic Dimming with OnStar
ž,
Compass and Temperature Display..................2-33
Reclining Seatbacks.......................................... 1-6
Reclining the Seatbacks...................................1-25
Recreational Vehicle Towing.............................4-50
REDUCED ENGINE POWER...........................3-63
Remote Control..............................................3-88
Remote Keyless Entry System, Operation............ 2-5
Remote Keyless Entry System............................ 2-4
Removing the 50/50 Split Bench Seats..............1-16
Removing the Bench Seat................................1-22
Removing the Flat Tire and Installing the
Spare Tire..................................................5-80
Removing the Spare Tire and Tools...................5-77
REPLACE LIFTGATE FUSE.............................3-67
Replacement Bulbs.........................................5-64
Replacing Brake System Parts..........................5-42
Replacing Restraint System Parts After
a Crash.....................................................1-91
Replacing the 50/50 Split Bench Seat................1-18Replacing the Bench Seat................................1-24
Reporting Safety Defects.................................7-10
Canadian Government..................................7-10
General Motors...........................................7-10
United States Government............................7-10
Reprogramming a Single HomeLink
žButton.......2-44
Resetting Defaults...........................................2-44
Restraint System Check...................................6-12
Checking Your Restraint Systems...................1-90
Replacing Restraint System Parts After
a Crash..................................................1-91
Restraint Systems...........................................1-90
Checking....................................................1-90
Replacing Parts...........................................1-91
Retained Accessory Power (RAP)......................2-21
Returning the Seat to an Upright Position...........1-22
Returning the Seatbacks to an Upright Position......1-27
Returning the Seats to an Upright Position.........1-12
Returning the Seat(s) to an Upright Position.......1-15
Right Front Passenger Position, Safety Belts......1-42
RIGHT REAR DOOR AJAR..............................3-67
Road Sensing Suspension................................. 4-9
Roadside Service Availability.............................. 7-7
Roadside Service for the Hearing or Speech
Impaired...................................................... 7-7
Roadside......................................................... 7-6
Service........................................................ 7-6
Rocking Your Vehicle To Get It Out...................4-48
Running Your Engine While You Are Parked.......2-32
13
Page 485 of 486

Transmission..................................................5-21
Fluid, Automatic...........................................5-21
Temperature Gage.......................................3-43
Transportation Options...................................... 7-8
Traveling to Remote Areas...............................4-21
Trip Information Button....................................3-52
Turn and Lane Change Signals.......................... 3-8
TURN SIGNAL ON.........................................3-65
Turn Signal/Multifunction Lever........................... 3-8
Turn Signals When Towing a Trailer..................4-61
U
Ultrasonic Rear Parking Assist (URPA)...............3-20
Underbody Flushing Service.............................6-15
Underhood Fuse Block...................................5-107
Understanding Radio Reception.......................3-103
Unfolding the Seatback....................................1-20
Unfolding the Seatbacks..................................1-14
Uniform Tire Quality Grading............................5-71
United States ± Customer Assistance.................. 7-4
Using HomeLink
ž...........................................2-43
Using the Recovery Hooks...............................4-49
V
Vehicle Identi®cation......................................5-102
Number (VIN)............................................5-102
Service Parts Identi®cation Label..................5-102
Vehicle Personalization....................................2-50
Memory Seat..............................................2-50
Vehicle Storage..............................................5-43
Vehicle............................................................ 4-5
Control........................................................ 4-5
Damage Warnings........................................... iv
Loading......................................................4-51
Symbols......................................................... iv
Ventilation Adjustment......................................3-31
Video Screen.................................................3-88
Visors...........................................................2-17
Voltmeter Gage..............................................3-40
W
Warning Lights, Gages and Indicators................3-34
Warnings.......................................................3-62
DIC Warnings and Messages........................3-62
Hazard Warning Flashers............................... 3-6
17