ECO mode CADILLAC ESCALADE 2009 3.G User Guide
[x] Cancel search | Manufacturer: CADILLAC, Model Year: 2009, Model line: ESCALADE, Model: CADILLAC ESCALADE 2009 3.GPages: 586, PDF Size: 4.47 MB
Page 175 of 586
Windshield Wipers
Turn the band with the wiper symbol to control the
windshield wipers.
8(Mist):Turn to mist for a single wiping cycle.
Hold it there until the wipers start. Then let go.
The wipers stop after one wipe. Hold the band
on mist longer, for more wipe cycles.
9(Off):Turns the wipers off.
6(Delay): Turn the band to adjust the delay time.
The delay between wiping cycles becomes shorter
as the band is moved to the top of the lever.
This can be very useful in light rain or snow.
6(Low Speed):For steady wiping at low speed.
?(High Speed):For high-speed wiping.
Clear ice and snow from the wiper blades before using
them. If they are frozen to the windshield, gently
loosen or thaw them. Damaged wiper blades may not
clear the windshield well, making it harder to see
and drive safely. If the blades do become damaged,
install new blades or blade inserts. For more information,
seeWindshield Wiper Blade Replacement on page 6-54.Heavy snow or ice can overload the wiper motor.
A circuit breaker will stop the motor until it cools down.
Clear away snow or ice to prevent an overload.
Rainsense™ II Wipers
The vehicle has Rainsense™ II windshield wipers.
These wipers automatically turn on when a sensor,
mounted next to the inside rearview mirror, detects
moisture on the windshield. When active, these wipers
are able to detect moisture on the windshield and
automatically turn on the wipers.
To turn on the Rainsense™ feature, the wipers must be
set to one of the �ve delay settings. Each of the �ve
settings adjusts the sensitivity of the rain sensor.
Since different drivers have different setting preferences,
it is recommended that the mid-range setting, position
three, be used initially. For more wipes, select the higher
settings; for fewer wipes, select the lower settings located
closer to the off position on the multifunction lever.
The rain sensor will automatically control the frequency
of the wipes from off to high speed according to the
weather conditions. The wipers can be left in a
Rainsense™ mode even when it is not raining.
3-9
Page 184 of 586
Disabling and Resetting IntelliBeam®at
the Rearview Mirror
IntelliBeam®can be disabled by using the controls on
the inside rearview mirror.
AUTO
3(On/Off):To disable the system, press this
button on the inside rearview mirror. The IntelliBeam®
indicator will turn off and will not come back on until the
IntelliBeam®button is pressed again.
(Stalk Disable):When IntelliBeam
®has turned on the
high-beams, pull or push the high-beam stalk. This
will disable IntelliBeam
®. The IntelliBeam®indicator on
the mirror will turn off. To re-enable IntelliBeam®,
press the IntelliBeam®button on the mirror.
A different sensitivity setting is available for dealer
diagnostics. This is done by pushing and holding this
button for 20 seconds until the IntelliBeam
®indicator
light �ashes three times. If you accidentally activate this,
the vehicle’s setting will automatically be reset each
time the ignition is turned off and then on again.
Cleaning the IntelliBeam®Light Sensor
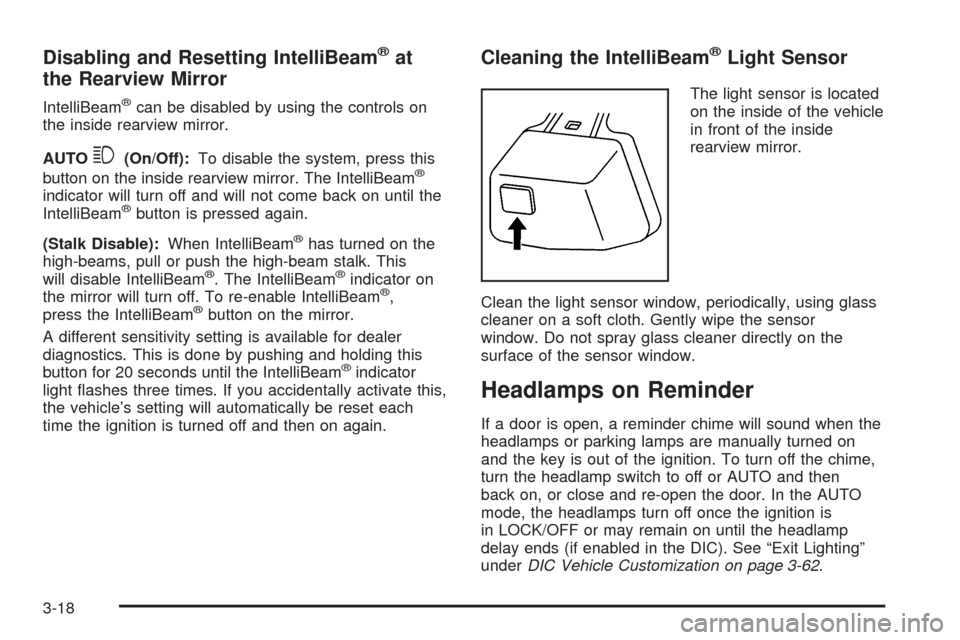
The light sensor is located
on the inside of the vehicle
in front of the inside
rearview mirror.
Clean the light sensor window, periodically, using glass
cleaner on a soft cloth. Gently wipe the sensor
window. Do not spray glass cleaner directly on the
surface of the sensor window.
Headlamps on Reminder
If a door is open, a reminder chime will sound when the
headlamps or parking lamps are manually turned on
and the key is out of the ignition. To turn off the chime,
turn the headlamp switch to off or AUTO and then
back on, or close and re-open the door. In the AUTO
mode, the headlamps turn off once the ignition is
in LOCK/OFF or may remain on until the headlamp
delay ends (if enabled in the DIC). See “Exit Lighting”
underDIC Vehicle Customization on page 3-62.
3-18
Page 192 of 586
Automatic Operation
AUTO (Automatic):When automatic operation is
active the system will control the inside temperature,
the air delivery, and the fan speed.
Use the steps below to place the entire system in
automatic mode:
1. Press the AUTO button.
When AUTO is selected, the display will change to
show the current temperature(s) and AUTO come on
the display. The current delivery mode and fan speed
will also be displayed for approximately �ve seconds.
When AUTO is selected, the air conditioning
operation and air inlet will be automatically
controlled. The air conditioning compressor will run
when the outside temperature is over about
40°F (4°C). The air inlet will normally be set to
outside air. If it is hot outside, the air inlet may
automatically switch to recirculate inside air to help
quickly cool down the vehicle. The light on the
button comes on in recirculation.2. Set the driver’s and passenger’s temperature.
To �nd your comfort setting, start with a 74°F (23°C)
temperature setting and allow about 20 minutes
for the system to regulate. Use the driver or
passenger temperature buttons to adjust the
temperature setting as necessary. If a temperature
setting of 60°F (15°C) is chosen, the system
remains at the maximum cooling setting. If a
temperature setting of 90°F (32°C) is chosen, the
system remains at the maximum heat setting.
Choosing either maximum setting will not cause the
vehicle to heat or cool any faster.
Be careful not to cover the sensor located on the top of
the instrument panel near the windshield. This sensor
regulates air temperature based on sun load and
also turns on the headlamps.
To avoid blowing cold air in cold weather, the system
will delay turning on the fan until warm air is available.
The length of delay depends on the engine coolant
temperature. Pressing the fan switch will override this
delay and change the fan to a selected speed.
3-26
Page 193 of 586
Manual Operation
y9z(Fan Control): Press the up or down arrows
to increase or decrease the fan speed
Pressing this button when the system is off will turn
the system on.
Pressing either arrow while using automatic operation
will place the fan in manual operation. The fan
setting will display and the AUTO light will turn off.
The air delivery will remain in automatic operation.
N(Air Delivery Mode Control):Press to change
the direction of the air�ow in the vehicle. Repeatedly
press the button until the desired mode appears on
the display.
When the system is turned off, the display goes blank
after displaying the current status of the system.
H(Vent):Air is directed to the instrument panel
outlets.
)(Bi-Level):Air is divided between the instrument
panel and �oor outlets. Some air is directed towards the
windshield and side window outlets. Cooler air is directed
to the upper vents and warmer air to the �oor vents.
6(Floor):Air is directed to the �oor outlets, with
some to the windshield, side window outlets, and
second row �oor outlets. In this mode, the system
automatically selects outside air.
-(Defog):This mode clears the windows of fog or
moisture. Air is directed to the windshield, �oor outlets,
and side window vents. In this mode, the system
turns off recirculation and runs the air conditioning
compressor unless the outside temperature is close to
freezing. The recirculation mode cannot be selected
while in the defog mode.
0(Defrost):This mode removes fog or frost from the
windshield more quickly. Air is directed to the windshield
and side window vents, with some directed to the
�oor vents. In this mode, the system automatically forces
outside air into the vehicle and runs the air conditioning
compressor unless the outside temperature is close
to freezing.. The recirculation mode cannot be selected
while in the defrost mode.
Do not drive the vehicle until all the windows are clear.
3-27
Page 197 of 586

+/−(Increase/Decrease Temperature):Press
the+or−buttons to increase or decrease the cabin
temperature. The rear control temperature display
will show the temperature setting increasing or
decreasing.
The display only indicates climate control functions
when the system is in rear independent mode.
Manual Operation
DC(Fan Control):Press these buttons on the rear
seat audio control panel to increase or decrease
the air�ow. Pressing the fan up button when the system
is off will turn the system on. The air delivery mode
will remain under automatic control.
+/−(Temperature Control):Press these buttons to
adjust the temperature of the air �owing into the
passenger area. Press the + button for warmer air
and press the−button for cooler air.
N(Air Delivery Mode Control):Press the mode
button to change the direction of the air�ow in the
vehicle. Repeatedly press the button until the desired
mode appears on the display. Multiple presses will
cycle through the delivery selections.
Warning Lights, Gages, and
Indicators
Warning lights and gages can signal that something is
wrong before it becomes serious enough to cause
an expensive repair or replacement. Paying attention to
the warning lights and gages could prevent injury.
Warning lights come on when there may be or is a
problem with one of the vehicle’s functions. Some
warning lights come on brie�y when the engine is started
to indicate they are working.
Gages can indicate when there may be or is a problem
with one of the vehicle’s functions. Often gages and
warning lights work together to indicate a problem with
the vehicle.
When one of the warning lights comes on and stays on
while driving, or when one of the gages shows there
may be a problem, check the section that explains what
to do. Follow this manual’s advice. Waiting to do
repairs can be costly and even dangerous.
3-31
Page 217 of 586
Relearn Remote Key
This display allows you to match Remote Keyless
Entry (RKE) transmitters to your vehicle. To match
an RKE transmitter to your vehicle:
1. Press the vehicle information button until PRESS
V
TO RELEARN REMOTE KEY displays.
2. Press the set/reset button until REMOTE KEY
LEARNING ACTIVE is displayed.
3. Press and hold the lock and unlock buttons on
the �rst transmitter at the same time for about
15 seconds.
On vehicles with memory recall seats, the
�rst transmitter learned will match driver 1 and
the second will match driver 2.
A chime will sound indicating that the transmitter
is matched.
4. To match additional transmitters at this time,
repeat Step 3.
Each vehicle can have a maximum of
eight transmitters matched to it.
5. To exit the programming mode, you must
cycle the key to LOCK/OFF.
Compass Zone Setting
This display allows for setting the compass zone.
SeeDIC Compass on page 3-51for more information.
Compass Recalibration
This display allows for calibrating the compass. See
DIC Compass on page 3-51for more information.
Blank Display
This display shows no information.
DIC Compass
Your vehicle may have a compass in the Driver
Information Center (DIC).
Compass Zone
The zone is set to zone eight upon leaving the factory.
Your dealer/retailer will set the correct zone for your
location.
Under certain circumstances, such as during a long
distance cross-country trip or moving to a new state or
province, it will be necessary to compensate for
compass variance by resetting the zone through the
DIC if the zone is not set correctly.
3-51
Page 221 of 586
ENGINE HOT A/C (Air Conditioning)
TURNED OFF
This message displays when the engine coolant
becomes hotter than the normal operating temperature.
SeeEngine Coolant Temperature Gage on page 3-39.
To avoid added strain on a hot engine, the air
conditioning compressor automatically turns off. When
the coolant temperature returns to normal, the air
conditioning compressor turns back on. You can
continue to drive your vehicle.
If this message continues to appear, have the system
repaired by your dealer/retailer as soon as possible
to avoid damage to the engine.
ENGINE OIL HOT IDLE ENGINE
This message displays when the engine oil becomes
hotter than the normal operating temperature. Stop and
allow the vehicle to idle until it cools down. See
Engine Coolant Temperature Gage on page 3-39.
ENGINE OVERHEATED IDLE ENGINE
Notice:If you drive your vehicle while the engine is
overheating, severe engine damage may occur. If
an overheat warning appears on the instrument
panel cluster and/or DIC, stop the vehicle as soon
as possible. SeeEngine Overheating on page 6-30
for more information.
This message displays when the engine coolant
temperature is too hot. Stop and allow the vehicle to idle
until it cools down. SeeEngine Coolant Temperature
Gage on page 3-39.
SeeOverheated Engine Protection Operating Mode on
page 6-33for information on driving to a safe place
in an emergency.
ENGINE OVERHEATED STOP ENGINE
Notice:If you drive your vehicle while the engine
is overheating, severe engine damage may occur.
If an overheat warning appears on the instrument
panel cluster and/or DIC, stop the vehicle as soon
as possible. SeeEngine Overheating on page 6-30
for more information.
This message displays and a chime sounds if the engine
cooling system reaches unsafe temperatures for
operation. Stop and turn off the vehicle as soon as it is
safe to do so to avoid severe damage. This message
clears when the engine has cooled to a safe operating
temperature.
3-55
Page 225 of 586
SERVICE PARKING ASSIST
This message displays if there is a problem with the
Ultrasonic Rear Parking Assist (URPA) system. Do not
use this system to help you park. SeeUltrasonic
Rear Parking Assist (URPA) on page 2-42for more
information. See your dealer/retailer for service.
SERVICE RIGHT HEADLAMP
ASSEMBLY
On some models, this message will be displayed when
the right headlamp is out and needs to be serviced.
SeeLED Lighting on page 6-51for more information.
SERVICE SIDE BLIND ZONE ALERT
SYSTEM
If your vehicle has the Side Blind Zone Alert (SBZA)
system and this message displays, both SBZA displays
will remain on indicating there is a problem with the
SBZA system. If these displays remain on after
continued driving, the system needs service. See your
dealer/retailer. SeeSide Blind Zone Alert (SBZA)
on page 2-44for more information.
SERVICE STABILITRAK®
If your vehicle has StabiliTrak®and this message
displays, it means there may be a problem with the
StabiliTrak
®system. If you see this message, try to reset
the system. Stop; turn off the engine for at least
15 seconds; then start the engine again. If this message
still comes on, it means there is a problem. You
should see your dealer/retailer for service. The vehicle
is safe to drive, however, you do not have the bene�t
of StabiliTrak
®, so reduce your speed and drive
accordingly.
SERVICE SUSPENSION SYSTEM
This message displays when the Road Sensing
Suspension (RSS) system is not operating properly.
Have your vehicle serviced by your dealer/retailer.
SERVICE THEFT DETERRENT SYSTEM
This message displays when there is a problem with
the theft-deterrent system. The vehicle may or may not
restart so you may want to take the vehicle to your
dealer/retailer before turning off the engine. See
PASS-Key
®III+ Electronic Immobilizer Operation on
page 2-23for more information.
3-59
Page 257 of 586
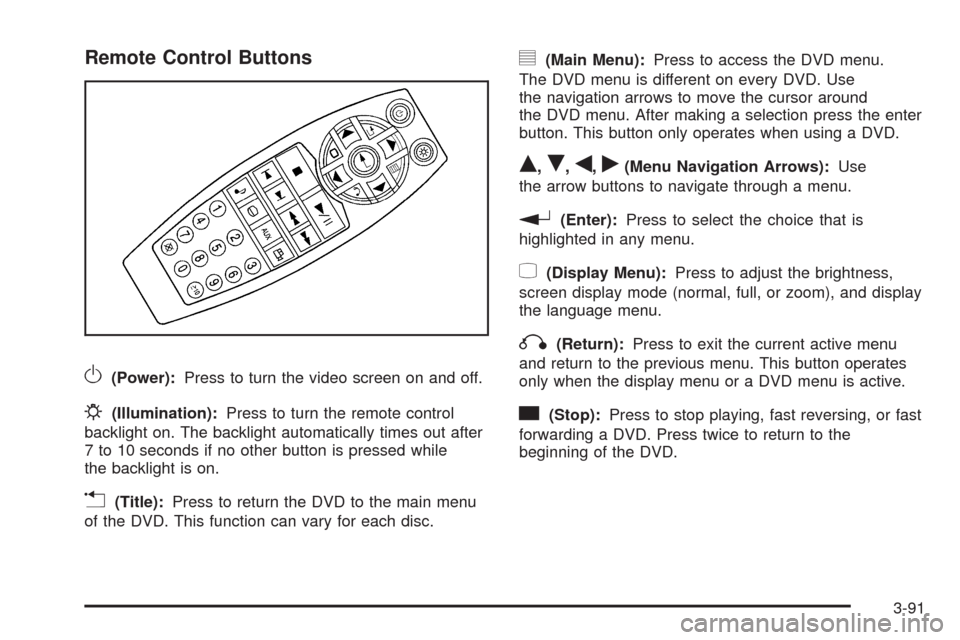
Remote Control Buttons
O(Power):Press to turn the video screen on and off.
P(Illumination):Press to turn the remote control
backlight on. The backlight automatically times out after
7 to 10 seconds if no other button is pressed while
the backlight is on.
v(Title):Press to return the DVD to the main menu
of the DVD. This function can vary for each disc.
y(Main Menu):Press to access the DVD menu.
The DVD menu is different on every DVD. Use
the navigation arrows to move the cursor around
the DVD menu. After making a selection press the enter
button. This button only operates when using a DVD.
Q,R,q,r(Menu Navigation Arrows):Use
the arrow buttons to navigate through a menu.
r(Enter):Press to select the choice that is
highlighted in any menu.
z(Display Menu):Press to adjust the brightness,
screen display mode (normal, full, or zoom), and display
the language menu.
q(Return):Press to exit the current active menu
and return to the previous menu. This button operates
only when the display menu or a DVD menu is active.
c(Stop):Press to stop playing, fast reversing, or fast
forwarding a DVD. Press twice to return to the
beginning of the DVD.
3-91
Page 260 of 586
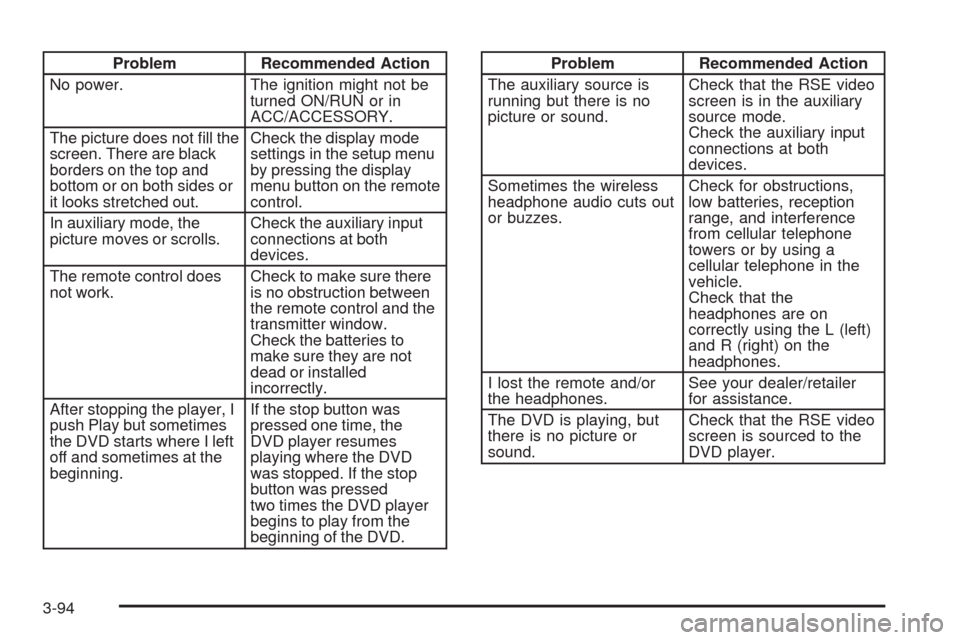
Problem Recommended Action
No power. The ignition might not be
turned ON/RUN or in
ACC/ACCESSORY.
The picture does not �ll the
screen. There are black
borders on the top and
bottom or on both sides or
it looks stretched out.Check the display mode
settings in the setup menu
by pressing the display
menu button on the remote
control.
In auxiliary mode, the
picture moves or scrolls.Check the auxiliary input
connections at both
devices.
The remote control does
not work.Check to make sure there
is no obstruction between
the remote control and the
transmitter window.
Check the batteries to
make sure they are not
dead or installed
incorrectly.
After stopping the player, I
push Play but sometimes
the DVD starts where I left
off and sometimes at the
beginning.If the stop button was
pressed one time, the
DVD player resumes
playing where the DVD
was stopped. If the stop
button was pressed
two times the DVD player
begins to play from the
beginning of the DVD.Problem Recommended Action
The auxiliary source is
running but there is no
picture or sound.Check that the RSE video
screen is in the auxiliary
source mode.
Check the auxiliary input
connections at both
devices.
Sometimes the wireless
headphone audio cuts out
or buzzes.Check for obstructions,
low batteries, reception
range, and interference
from cellular telephone
towers or by using a
cellular telephone in the
vehicle.
Check that the
headphones are on
correctly using the L (left)
and R (right) on the
headphones.
I lost the remote and/or
the headphones.See your dealer/retailer
for assistance.
The DVD is playing, but
there is no picture or
sound.Check that the RSE video
screen is sourced to the
DVD player.
3-94