buttons CADILLAC ESCALADE 2009 3.G User Guide
[x] Cancel search | Manufacturer: CADILLAC, Model Year: 2009, Model line: ESCALADE, Model: CADILLAC ESCALADE 2009 3.GPages: 586, PDF Size: 4.47 MB
Page 149 of 586
Adjusting the Brightness and Contrast of
the Screen
To adjust the brightness and contrast of the screen,
press the CONFIG hard key while the rear vision camera
image is on the display. Any adjustments made will
only affect the rear vision camera screen.
](Brightness):Touch the + (plus) or – (minus)
screen buttons to increase or decrease the brightness
of the screen.
_(Contrast):Touch the + (plus) or – (minus) screen
buttons to increase or decrease the contrast of the
screen.
Symbols
The navigation system may have a feature that lets the
driver view symbols on the navigation screen while
using the rear vision camera. The Ultrasonic Rear Park
Assist (URPA) system must not be disabled to use
the caution symbols. If URPA has been disabled and
the symbols have been turned on, the Rear Parking
Assist Symbols Unavailable error message may display.
SeeUltrasonic Rear Parking Assist (URPA) on
page 2-42.The symbols appear when an object has been detected
by the URPA system. The symbol may cover the
object when viewing the navigation screen.
To turn the symbols on or off:
1. Make sure that URPA has not been disabled.
2. Shift into P (Park).
3. Press the CONFIG hard key to enter the con�gure
menu options, then press the CONFIG hard key
repeatedly until Display is selected or touch
the Display screen button.
4. Select the Rear Camera Options screen button.
The Rear Camera Options screen will display.
5. Touch the Symbols screen button. The screen
button will be highlighted when on.Rear Vision Camera Error Messages
Service Rear Vision Camera System:This message
can display when the system is not receiving
information it requires from other vehicle systems.
2-49
Page 155 of 586
Your Responsibility
Increase the volume of the radio if the OnStar®advisor
cannot be heard. If the light next to the OnStar®buttons
is red, the system may not be functioning properly.
Press the OnStar
®button and request a vehicle
diagnostic. If the light appears clear (no light is
appearing), your OnStar
®subscription has expired and
all services have been deactivated. Press the OnStar®
button to con�rm that the OnStar®equipment is active.
Universal Home Remote
System
The Universal Home Remote System provides a way to
replace up to three hand-held Radio-Frequency (RF)
transmitters used to activate devices such as garage
door openers, security systems, and home lighting.
This device complies with Part 15 of the FCC Rules.
Operation is subject to the following two conditions:
1. This device may not cause harmful interference.
2. This device must accept any interference received,
including interference that may cause undesired
operation.This device complies with RSS-210 of Industry Canada.
Operation is subject to the following two conditions:
1. This device may not cause interference.
2. This device must accept any interference received,
including interference that may cause undesired
operation of the device.
Changes or modi�cations to this system by other than
an authorized service facility could void authorization to
use this equipment.
Universal Home Remote System
Operation (With Three Round LED)
This vehicle may have the Universal Home Remote
System. If there are three round Light Emitting
Diode (LED) indicator lights above the Universal
Home Remote buttons, follow the instructions below.
2-55
Page 156 of 586
This system provides a way to replace up to three
remote control transmitters used to activate devices
such as garage door openers, security systems,
and home automation devices.
Do not use this system with any garage door opener
that does not have the stop and reverse feature.
This includes any garage door opener model
manufactured before April 1, 1982.
Read the instructions completely before attempting to
program the transmitter. Because of the steps involved,
it may be helpful to have another person assist with
programming the transmitter.
Be sure to keep the original remote control transmitter
for use in other vehicles, as well as, for future
programming. Only the original remote control
transmitter is needed for Fixed Code programming.
The programmed buttons should be erased when
the vehicle is sold or the lease ends. See “Erasing
Universal Home Remote Buttons” later in this section.
Park the vehicle outside of the garage when
programming a garage door. Be sure that people
and objects are clear of the garage door or gate
that is being programmed.Programming Universal Home
Remote — Rolling Code
For questions or help programming the Universal
Home Remote System, call 1-866-572-2728 or go
to learcar2u.com.
Most garage door openers sold after 1996 are
Rolling Code units.
Programming a garage door opener involves
time-sensitive actions, so read the entire procedure
before starting. Otherwise, the device will time out
and the procedure will have to be repeated.
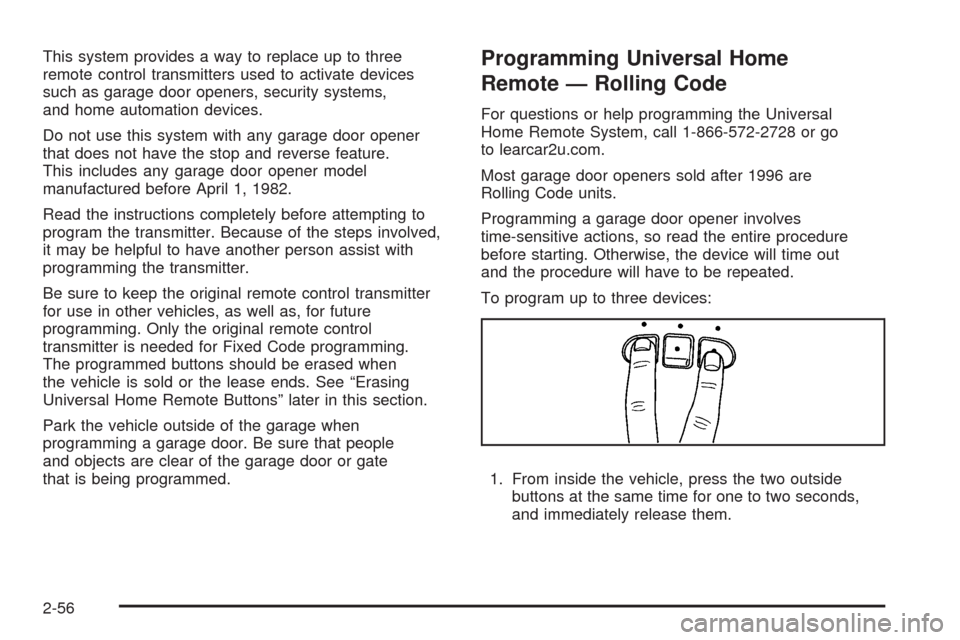
To program up to three devices:
1. From inside the vehicle, press the two outside
buttons at the same time for one to two seconds,
and immediately release them.
2-56
Page 159 of 586
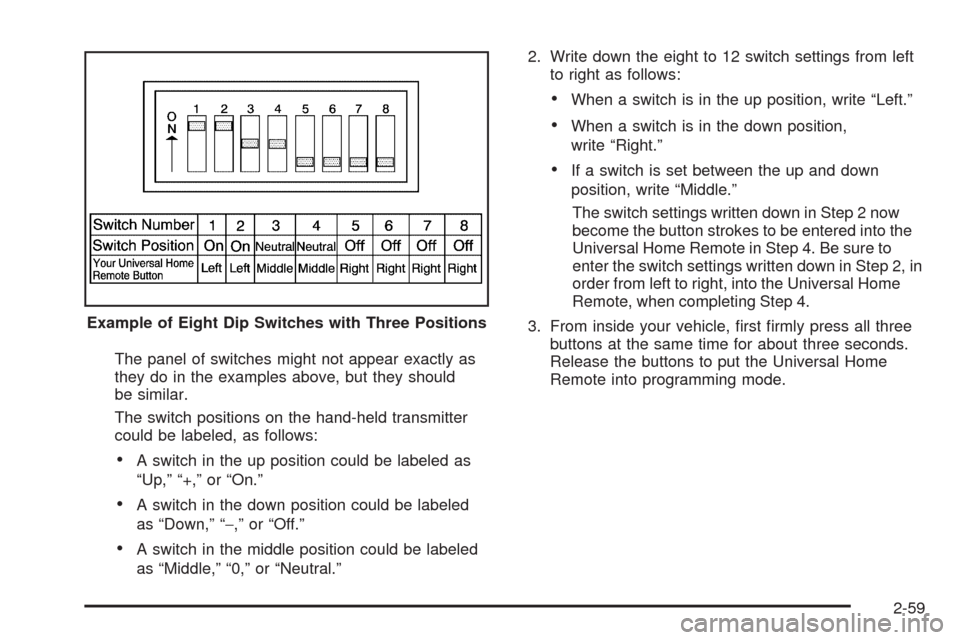
The panel of switches might not appear exactly as
they do in the examples above, but they should
be similar.
The switch positions on the hand-held transmitter
could be labeled, as follows:
A switch in the up position could be labeled as
“Up,” “+,” or “On.”
A switch in the down position could be labeled
as “Down,” “−,” or “Off.”
A switch in the middle position could be labeled
as “Middle,” “0,” or “Neutral.”2. Write down the eight to 12 switch settings from left
to right as follows:
When a switch is in the up position, write “Left.”
When a switch is in the down position,
write “Right.”
If a switch is set between the up and down
position, write “Middle.”
The switch settings written down in Step 2 now
become the button strokes to be entered into the
Universal Home Remote in Step 4. Be sure to
enter the switch settings written down in Step 2, in
order from left to right, into the Universal Home
Remote, when completing Step 4.
3. From inside your vehicle, �rst �rmly press all three
buttons at the same time for about three seconds.
Release the buttons to put the Universal Home
Remote into programming mode. Example of Eight Dip Switches with Three Positions
2-59
Page 160 of 586
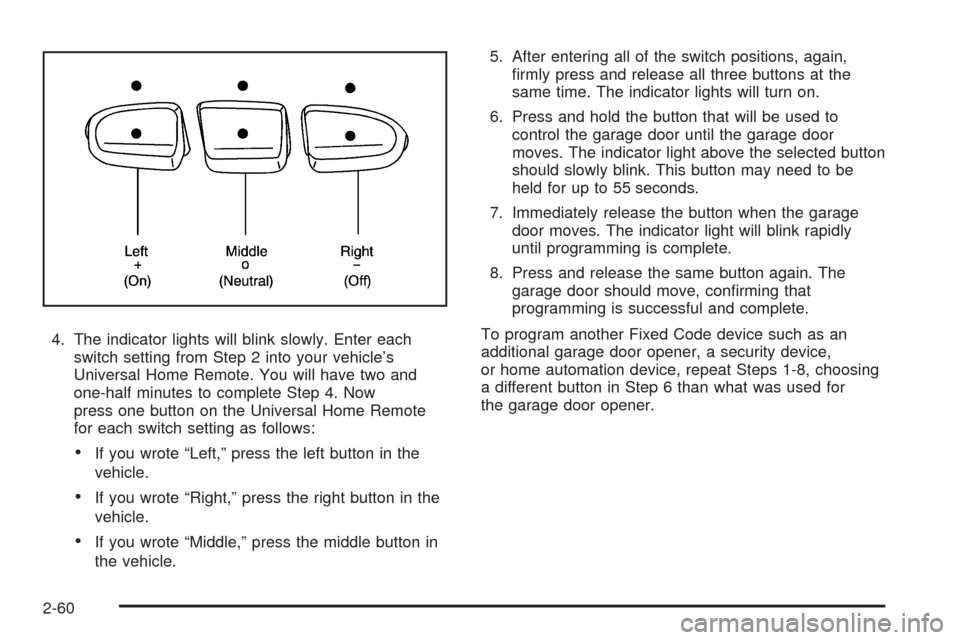
4. The indicator lights will blink slowly. Enter each
switch setting from Step 2 into your vehicle’s
Universal Home Remote. You will have two and
one-half minutes to complete Step 4. Now
press one button on the Universal Home Remote
for each switch setting as follows:
If you wrote “Left,” press the left button in the
vehicle.
If you wrote “Right,” press the right button in the
vehicle.
If you wrote “Middle,” press the middle button in
the vehicle.5. After entering all of the switch positions, again,
�rmly press and release all three buttons at the
same time. The indicator lights will turn on.
6. Press and hold the button that will be used to
control the garage door until the garage door
moves. The indicator light above the selected button
should slowly blink. This button may need to be
held for up to 55 seconds.
7. Immediately release the button when the garage
door moves. The indicator light will blink rapidly
until programming is complete.
8. Press and release the same button again. The
garage door should move, con�rming that
programming is successful and complete.
To program another Fixed Code device such as an
additional garage door opener, a security device,
or home automation device, repeat Steps 1-8, choosing
a different button in Step 6 than what was used for
the garage door opener.
2-60
Page 161 of 586
Using Universal Home Remote
Press and hold the appropriate button for at least half of
a second. The indicator light will come on while the
signal is being transmitted.
Reprogramming Universal Home
Remote Buttons
Any of the three buttons can be reprogrammed by
repeating the instructions.
Erasing Universal Home Remote
Buttons
The programmed buttons should be erased when the
vehicle is sold or the lease ends.To erase either Rolling Code or Fixed Code on the
Universal Home Remote device:
1. Press and hold the two outside buttons at the same
time for approximately 20 seconds, until the
indicator lights, located directly above the buttons,
begin to blink rapidly.
2. Once the indicator lights begin to blink, release both
buttons. The codes from all buttons will be erased.
For help or information on the Universal Home Remote
System, call the customer assistance phone number
underCustomer Assistance Offices on page 8-5.
2-61
Page 178 of 586
When the brakes are applied, cruise control is
turned off.
For vehicles with an Allison
®or Hydra-Matic 6-speed
automatic transmission, see “Grade Braking and Cruise
Grade Braking (Allison Transmission) underTow/Haul
Mode on page 2-33for an explanation of how cruise
control interacts with the Range Selection Mode,
tow/haul and grade braking systems.
If the vehicle has StabiliTrak
®, and the system begins to
limit wheel spin, cruise control will automatically
disengage. SeeStabiliTrak
®System on page 5-6. When
road conditions allow the cruise control to be safely
used again, it can be turned back on.
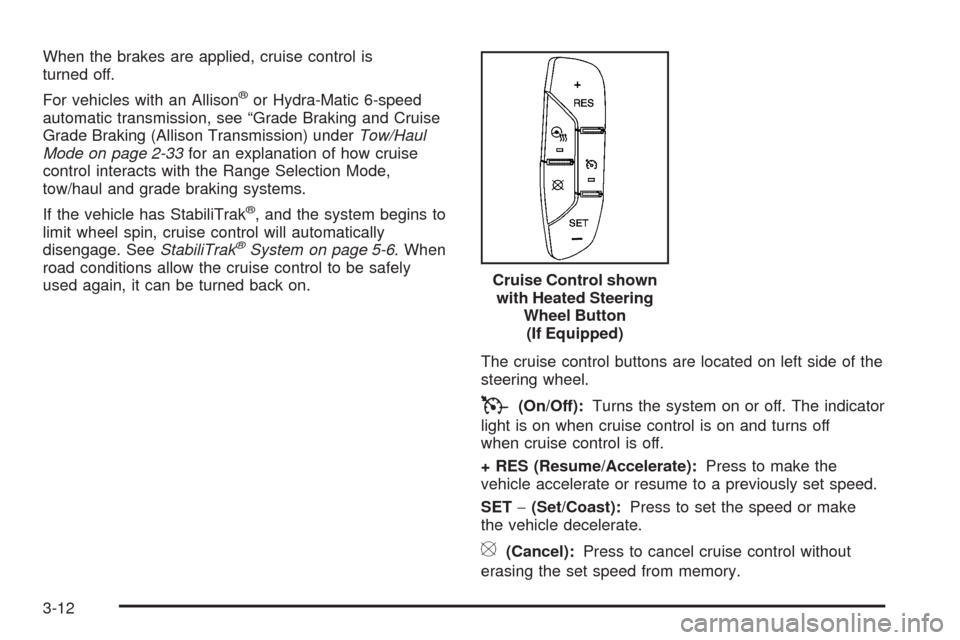
The cruise control buttons are located on left side of the
steering wheel.
T(On/Off):Turns the system on or off. The indicator
light is on when cruise control is on and turns off
when cruise control is off.
+ RES (Resume/Accelerate):Press to make the
vehicle accelerate or resume to a previously set speed.
SET−(Set/Coast):Press to set the speed or make
the vehicle decelerate.
[(Cancel):Press to cancel cruise control without
erasing the set speed from memory.Cruise Control shown
with Heated Steering
Wheel Button
(If Equipped)
3-12
Page 192 of 586
Automatic Operation
AUTO (Automatic):When automatic operation is
active the system will control the inside temperature,
the air delivery, and the fan speed.
Use the steps below to place the entire system in
automatic mode:
1. Press the AUTO button.
When AUTO is selected, the display will change to
show the current temperature(s) and AUTO come on
the display. The current delivery mode and fan speed
will also be displayed for approximately �ve seconds.
When AUTO is selected, the air conditioning
operation and air inlet will be automatically
controlled. The air conditioning compressor will run
when the outside temperature is over about
40°F (4°C). The air inlet will normally be set to
outside air. If it is hot outside, the air inlet may
automatically switch to recirculate inside air to help
quickly cool down the vehicle. The light on the
button comes on in recirculation.2. Set the driver’s and passenger’s temperature.
To �nd your comfort setting, start with a 74°F (23°C)
temperature setting and allow about 20 minutes
for the system to regulate. Use the driver or
passenger temperature buttons to adjust the
temperature setting as necessary. If a temperature
setting of 60°F (15°C) is chosen, the system
remains at the maximum cooling setting. If a
temperature setting of 90°F (32°C) is chosen, the
system remains at the maximum heat setting.
Choosing either maximum setting will not cause the
vehicle to heat or cool any faster.
Be careful not to cover the sensor located on the top of
the instrument panel near the windshield. This sensor
regulates air temperature based on sun load and
also turns on the headlamps.
To avoid blowing cold air in cold weather, the system
will delay turning on the fan until warm air is available.
The length of delay depends on the engine coolant
temperature. Pressing the fan switch will override this
delay and change the fan to a selected speed.
3-26
Page 197 of 586

+/−(Increase/Decrease Temperature):Press
the+or−buttons to increase or decrease the cabin
temperature. The rear control temperature display
will show the temperature setting increasing or
decreasing.
The display only indicates climate control functions
when the system is in rear independent mode.
Manual Operation
DC(Fan Control):Press these buttons on the rear
seat audio control panel to increase or decrease
the air�ow. Pressing the fan up button when the system
is off will turn the system on. The air delivery mode
will remain under automatic control.
+/−(Temperature Control):Press these buttons to
adjust the temperature of the air �owing into the
passenger area. Press the + button for warmer air
and press the−button for cooler air.
N(Air Delivery Mode Control):Press the mode
button to change the direction of the air�ow in the
vehicle. Repeatedly press the button until the desired
mode appears on the display. Multiple presses will
cycle through the delivery selections.
Warning Lights, Gages, and
Indicators
Warning lights and gages can signal that something is
wrong before it becomes serious enough to cause
an expensive repair or replacement. Paying attention to
the warning lights and gages could prevent injury.
Warning lights come on when there may be or is a
problem with one of the vehicle’s functions. Some
warning lights come on brie�y when the engine is started
to indicate they are working.
Gages can indicate when there may be or is a problem
with one of the vehicle’s functions. Often gages and
warning lights work together to indicate a problem with
the vehicle.
When one of the warning lights comes on and stays on
while driving, or when one of the gages shows there
may be a problem, check the section that explains what
to do. Follow this manual’s advice. Waiting to do
repairs can be costly and even dangerous.
3-31
Page 212 of 586
Here are some situations owners may experience with
the fuel gage. None of these indicate a problem
with the fuel gage.
At the gas station, the fuel pump shuts off before
the gage reads full.
It takes a little more or less fuel to �ll up than the
fuel gage indicated. For example, the gage may
have indicated the tank was half full, but it actually
took a little more or less than half the tank’s
capacity to �ll the tank.
The gage goes back to empty when the ignition is
turned off.
Driver Information Center (DIC)
Your vehicle has a Driver Information Center (DIC).
The DIC displays information about your vehicle. It also
displays warning messages if a system problem is
detected. The DIC also allows some features to
be customized. SeeDIC Vehicle Customization on
page 3-62for more information.All messages will appear in the DIC display located in
the center of the instrument panel cluster.
The DIC comes on when the ignition is on. After a short
delay, the DIC will display the information that was
last displayed before the engine was turned off.
SeeDIC Operation and Displays on page 3-46andDIC
Vehicle Customization on page 3-62for the displays
available.
DIC Operation and Displays
The DIC has different displays which can be accessed
by pressing the DIC buttons located on the instrument
panel, next to the steering wheel.
The DIC displays trip, fuel, and vehicle system
information, and warning messages if a system problem
is detected. A digital speedometer also appears at
the bottom of the DIC display. The digital speedometer
can be enabled or disabled. See “DISPLAY DIGITAL
SPEED” underDIC Vehicle Customization on page 3-62
for more information.
3-46