tire size CADILLAC ESCALADE 2010 3.G Owners Manual
[x] Cancel search | Manufacturer: CADILLAC, Model Year: 2010, Model line: ESCALADE, Model: CADILLAC ESCALADE 2010 3.GPages: 616, PDF Size: 39.41 MB
Page 29 of 616
Note:The Tire Pressure Monitor can alert you aboutlow tire pressure, but it does not replace normal monthlytire maintenance. It is the driver’s responsibility tomaintain correct tire pressures.
SeeTire Pressure Monitor Systemon page 7!67andTire Pressure Monitor Operation on page 7!68.
Engine Oil Life System
The engine oil life system calculates engine oil lifebased on vehicle use and displays a DIC messagewhen it is necessary to change the engine oil and filter.The oil life system should be reset to 100% onlyfollowing an oil change.
Resetting the Oil Life System
1. Display the OIL LIFE REMAINING on the DIC.
2. Press and hold the SET/RESET button on the DICfor more than five seconds. The oil life will changeto 100%.
SeeEngine Oil Life System on page 7!20.
Fuel E85 (85% Ethanol)
This vehicle has a yellow fuel cap and can use eitherunleaded gasoline or ethanol fuel containing up to85% ethanol (E85). SeeGasoline Octaneo n p a g e 7!8andFuel E85 (85% Ethanol) on page 7!9.
Driving for Better Fuel Economy
Driving habits can affect fuel mileage. Here are somedriving tips to get the best fuel economy possible.
.Avoid fast starts and accelerate smoothly.
.Brake gradually and avoid abrupt stops.
.Avoid idling the engine for long periods of time.
.When road and weather conditions areappropriate, use cruise control, if equipped.
.Always follow posted speed limits or drive moreslowly when conditions require.
.Keep vehicle tires properly inflated.
.Combine several trips into a single trip.
.Replace the vehicle's tires with the same TPCSpec number molded into the tire's sidewall nearthe size.
.Follow recommended scheduled maintenance.
1-23
Page 122 of 616
different vehicle. Any object, such as an aftermarketseat heater or a comfort enhancing pad or device,installed under or on top of the seat fabric, couldalso interfere with the operation of the passengersensing system. This could either prevent properdeployment of the passenger airbag(s) or preventthe passenger sensing system from properly turningoff the passenger airbag(s). SeePassenger SensingSystem on page 2!84.
If you have any questions, call CustomerAssistance. The phone numbers and addresses forCustomer Assistance are in Step Two of theCustomer Satisfaction Procedure in this manual.SeeCustomer Satisfaction Procedure on page 9!2.
If the vehicle has rollover roof-rail airbags, seeDifferent Size Tires and Wheelson page 7!75foradditional important information.
Q: Because I have a disability, I have to get myvehicle modified. How can I find out whether thiswill affect my airbag system?
A:If you have questions, call Customer Assistance.The phone numbers and addresses for CustomerAssistance are in Step Two of the CustomerSatisfaction Procedure in this manual. SeeCustomer Satisfaction Procedure on page 9!2.
In addition, your dealer/retailer and the service manualhave information about the location of the airbagsensors, sensing and diagnostic module andairbag wiring.
2-90
Page 423 of 616
The Tire and Loading Information label also
shows the size of the original equipment
tires (C) and the recommended cold tire inflation
pressures (D). For more information on tires and
inflation seeTireson page 7!58andInflation - Tire
Pressureon page 7!65.
There is also important loading information on
the vehicle Certification/Tire label. It tells you the
Gross Vehicle Weight Rating (GVWR) and the
Gross Axle Weight Rating (GAWR) for the front
and rear axles. See“Certification/Tire Label”later
in this section.
Steps for Determining Correct Load Limit
1.Locate the statement“The combined weight
of occupants and cargo should never exceed
XXX kg or XXX lbs”on your vehicle's placard.
2.Determine the combined weight of the
driver and passengers that will be riding in
your vehicle.
3.Subtract the combined weight of the driver
and passengers from XXX kg or XXX lbs.
4.The resulting figure equals the available
amount of cargo and luggage load capacity.
For example, if the“XXX”amount equals
1400 lbs and there will be five 150 lb
passengers in your vehicle, the amount of
available cargo and luggage load capacity
is 650 lbs (1400!750 (5 x 150) = 650 lbs).
5.Determine the combined weight of luggage
and cargo being loaded on the vehicle.
That weight may not safely exceed the
available cargo and luggage load capacity
calculated in Step 4.
6.If your vehicle will be towing a trailer, the load
from your trailer will be transferred to your
vehicle. Consult this manual to determine
how this reduces the available cargo and
luggage load capacity of your vehicle.
SeeTowing a Traileron page 6!42for
important information on towing a trailer,
towing safety rules and trailering tips.
6-33
Page 425 of 616
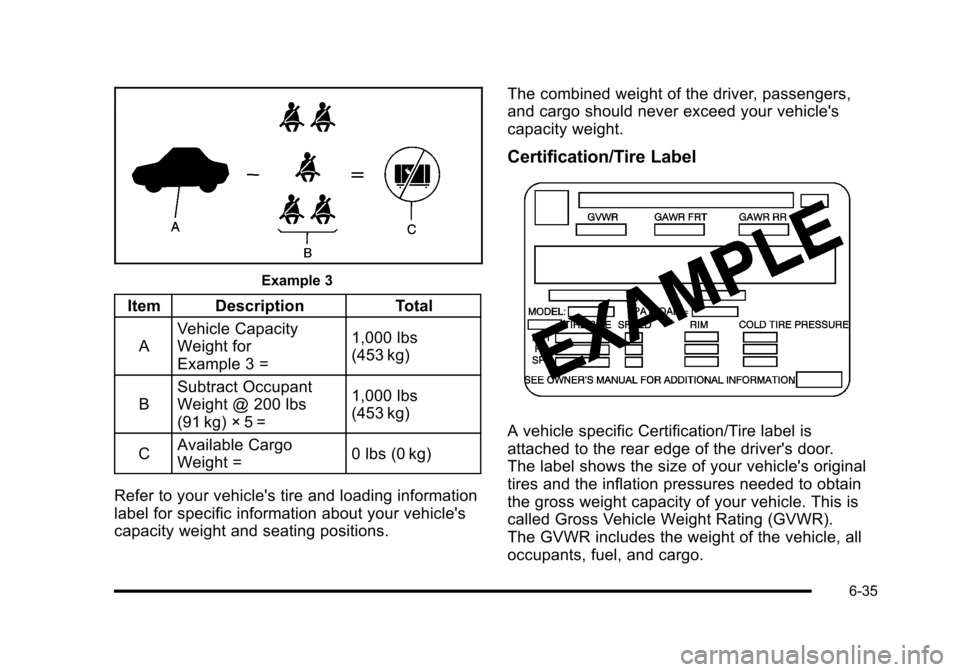
Example 3
ItemDescriptionTotal
A
Vehicle Capacity
Weight for
Example 3 =
1,000 lbs
(453 kg)
B
Subtract Occupant
Weight @ 200 lbs
(91 kg)!5 =
1,000 lbs
(453 kg)
CAvailable Cargo
Weight =0 lbs (0 kg)
Refer to your vehicle's tire and loading information
label for specific information about your vehicle's
capacity weight and seating positions.
The combined weight of the driver, passengers,
and cargo should never exceed your vehicle's
capacity weight.
Certification/Tire Label
A vehicle specific Certification/Tire label is
attached to the rear edge of the driver's door.
The label shows the size of your vehicle's original
tires and the inflation pressures needed to obtain
the gross weight capacity of your vehicle. This is
called Gross Vehicle Weight Rating (GVWR).
The GVWR includes the weight of the vehicle, all
occupants, fuel, and cargo.
6-35
Page 448 of 616
Section 7 Service and Appearance Care
Windshield Wiper Blade Replacement. . . . . . . . . . . 7-57
Tires. . . . . . . . . . . . . . . . . . . . . . . . . . . . . . . . . . . . . . . . . . . . . . . 7-58Tire Sidewall Labeling . . . . . . . . . . . . . . . . . . . . . . . . . 7-60Tire Terminology and Definitions . . . . . . . . . . . . . . . 7-62Inflation - Tire Pressure . . . . . . . . . . . . . . . . . . . . . . . . 7-65High-Speed Operation . . . . . . . . . . . . . . . . . . . . . . . . . 7-66Tire Pressure Monitor System . . . . . . . . . . . . . . . . . 7-67Tire Pressure Monitor Operation . . . . . . . . . . . . . . . 7-68Tire Inspection and Rotation . . . . . . . . . . . . . . . . . . . 7-71When It Is Time for New Tires . . . . . . . . . . . . . . . . . 7-73Buying New Tires . . . . . . . . . . . . . . . . . . . . . . . . . . . . . . 7-73Different Size Tires and Wheels . . . . . . . . . . . . . . . 7-75Uniform Tire Quality Grading . . . . . . . . . . . . . . . . . . . 7-76Wheel Alignment and Tire Balance . . . . . . . . . . . . 7-77Wheel Replacement . . . . . . . . . . . . . . . . . . . . . . . . . . . 7-77Tire Chains . . . . . . . . . . . . . . . . . . . . . . . . . . . . . . . . . . . . 7-78If a Tire Goes Flat . . . . . . . . . . . . . . . . . . . . . . . . . . . . . 7-79Changing a Flat Tire . . . . . . . . . . . . . . . . . . . . . . . . . . . 7-80Removing the Spare Tire and Tools . . . . . . . . . . . . 7-81Removing the Flat Tire and Installing theSpare Tire . . . . . . . . . . . . . . . . . . . . . . . . . . . . . . . . . . . 7-86Secondary Latch System . . . . . . . . . . . . . . . . . . . . . . 7-91Storing a Flat or Spare Tire and Tools . . . . . . . . . 7-94Spare Tire . . . . . . . . . . . . . . . . . . . . . . . . . . . . . . . . . . . . . 7-98
Appearance Care. . . . . . . . . . . . . . . . . . . . . . . . . . . . . . . . . 7-98Interior Cleaning . . . . . . . . . . . . . . . . . . . . . . . . . . . . . . 7-98Fabric/Carpet . . . . . . . . . . . . . . . . . . . . . . . . . . . . . . . . . . 7-99Leather . . . . . . . . . . . . . . . . . . . . . . . . . . . . . . . . . . . . . . . 7-100Instrument Panel, Vinyl, and Other PlasticSurfaces . . . . . . . . . . . . . . . . . . . . . . . . . . . . . . . . . . . 7-101Wood Panels . . . . . . . . . . . . . . . . . . . . . . . . . . . . . . . . . 7-101Speaker Covers . . . . . . . . . . . . . . . . . . . . . . . . . . . . . . 7-101Care of Safety Belts . . . . . . . . . . . . . . . . . . . . . . . . . . 7-102Weatherstrips . . . . . . . . . . . . . . . . . . . . . . . . . . . . . . . . 7-102Washing Your Vehicle . . . . . . . . . . . . . . . . . . . . . . . . 7-102Cleaning Exterior Lamps/Lenses . . . . . . . . . . . . . 7-103Finish Care . . . . . . . . . . . . . . . . . . . . . . . . . . . . . . . . . . . 7-103Windshield, Backglass, and Wiper Blades . . . . 7-104Aluminum or Chrome-Plated Wheelsand Trim . . . . . . . . . . . . . . . . . . . . . . . . . . . . . . . . . . . 7-104Tires . . . . . . . . . . . . . . . . . . . . . . . . . . . . . . . . . . . . . . . . . . 7-105Sheet Metal Damage . . . . . . . . . . . . . . . . . . . . . . . . . 7-105Finish Damage . . . . . . . . . . . . . . . . . . . . . . . . . . . . . . . 7-106Underbody Maintenance . . . . . . . . . . . . . . . . . . . . . 7-106Chemical Paint Spotting . . . . . . . . . . . . . . . . . . . . . . 7-106
Vehicle Identification. . . . . . . . . . . . . . . . . . . . . . . . . . . . 7-107Vehicle Identification Number (VIN) . . . . . . . . . . . 7-107Service Parts Identification Label . . . . . . . . . . . . . 7-107
7-2
Page 505 of 616
{WARNING:
.Poorly maintained and improperly used
tires are dangerous.
.Overloading your tires can cause
overheating as a result of too much
flexing. You could have an air-out and a
serious accident. SeeLoading the Vehicle
on page 6!32.
.Underinflated tires pose the same danger
as overloaded tires. The resulting
accident could cause serious injury.
Check all tires frequently to maintain the
recommended pressure. Tire pressure
should be checked when your tires are
cold. SeeInflation - Tire Pressureon
page 7!65.
(Continued)
WARNING: (Continued)
.Overinflated tires are more likely to be
cut, punctured, or broken by a sudden
impact—such as when you hit a
pothole. Keep tires at the recommended
pressure.
.Worn, old tires can cause accidents.
If your tread is badly worn, or if your tires
have been damaged, replace them.
SeeHigh-Speed Operationon page 7!66for
inflation pressure adjustment for high speed
driving.
22!Inch Tires
If your vehicle has the optional 22!inch
P285/45R22 size tires, they are classified as
touring tires and are designed for on!road use.
The low!profile, wide tread design is not
recommended for off!road driving. SeeOff-Road
Drivingon page 6!13, for additional information.
7-59
Page 506 of 616
Tire Sidewall Labeling
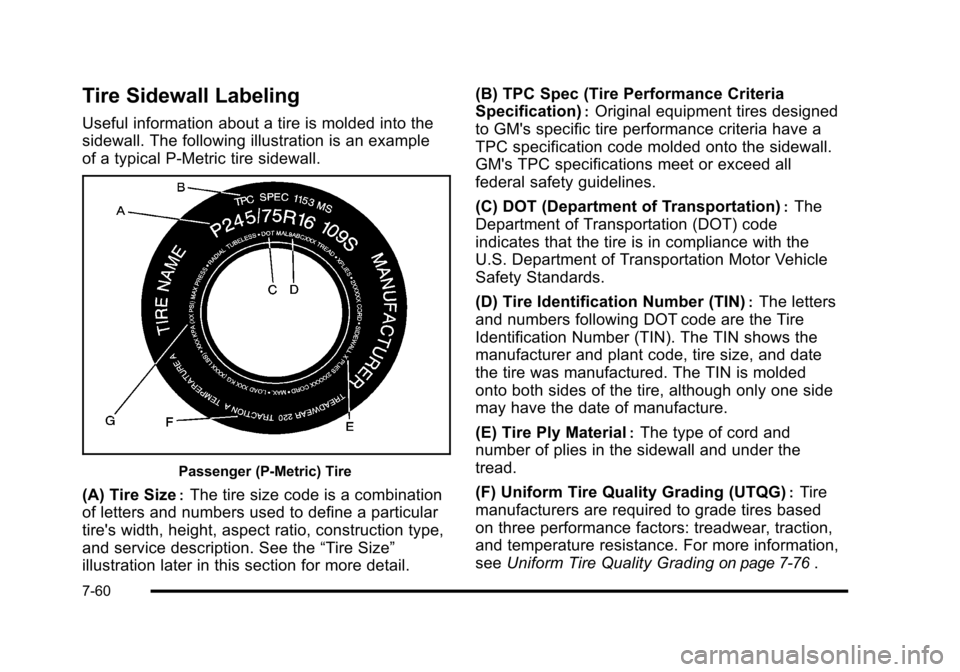
Useful information about a tire is molded into the
sidewall. The following illustration is an example
of a typical P!Metric tire sidewall.
Passenger (P!Metric) Tire
(A) Tire Size:The tire size code is a combination
of letters and numbers used to define a particular
tire's width, height, aspect ratio, construction type,
and service description. See the“Tire Size”
illustration later in this section for more detail.
(B) TPC Spec (Tire Performance Criteria
Specification):Original equipment tires designed
to GM's specific tire performance criteria have a
TPC specification code molded onto the sidewall.
GM's TPC specifications meet or exceed all
federal safety guidelines.
(C) DOT (Department of Transportation):The
Department of Transportation (DOT) code
indicates that the tire is in compliance with the
U.S. Department of Transportation Motor Vehicle
Safety Standards.
(D) Tire Identification Number (TIN):The letters
and numbers following DOT code are the Tire
Identification Number (TIN). The TIN shows the
manufacturer and plant code, tire size, and date
the tire was manufactured. The TIN is molded
onto both sides of the tire, although only one side
may have the date of manufacture.
(E) Tire Ply Material:The type of cord and
number of plies in the sidewall and under the
tread.
(F) Uniform Tire Quality Grading (UTQG):Tire
manufacturers are required to grade tires based
on three performance factors: treadwear, traction,
and temperature resistance. For more information,
seeUniform Tire Quality Gradingon page 7!76.
7-60
Page 507 of 616
(G) Maximum Cold Inflation Load Limit:
Maximum load that can be carried and the
maximum pressure needed to support that load.
For information on recommended tire pressure
seeInflation - Tire Pressureon page 7!65and
Loading the Vehicleon page 6!32.
Tire Size
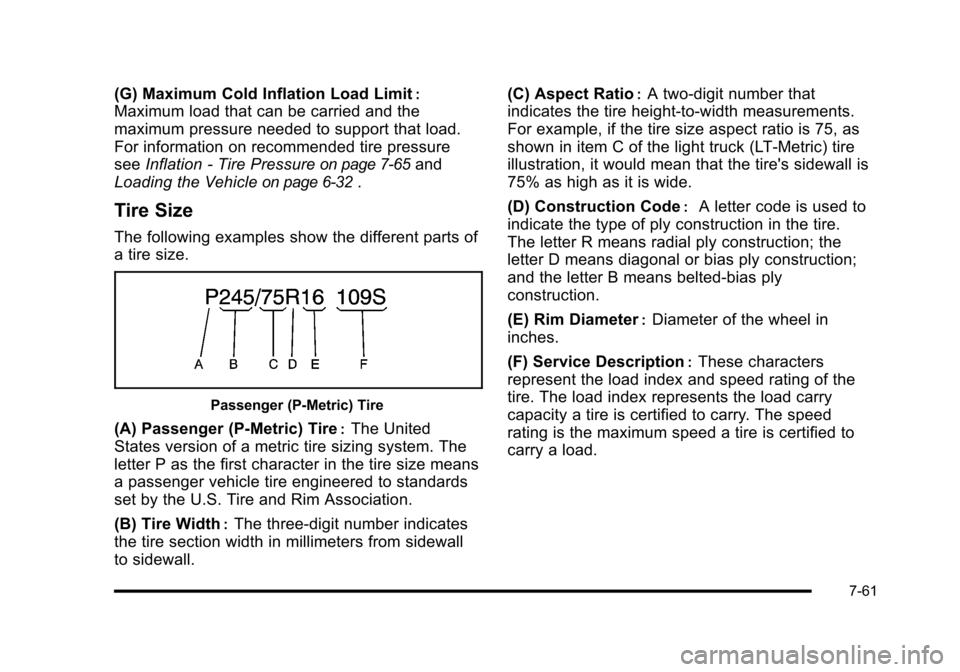
The following examples show the different parts of
a tire size.
Passenger (P!Metric) Tire
(A) Passenger (P!Metric) Tire:The United
States version of a metric tire sizing system. The
letter P as the first character in the tire size means
a passenger vehicle tire engineered to standards
set by the U.S. Tire and Rim Association.
(B) Tire Width:The three!digit number indicates
the tire section width in millimeters from sidewall
to sidewall.
(C) Aspect Ratio:A two!digit number that
indicates the tire height!to!width measurements.
For example, if the tire size aspect ratio is 75, as
shown in item C of the light truck (LT!Metric) tire
illustration, it would mean that the tire's sidewall is
75% as high as it is wide.
(D) Construction Code:A letter code is used to
indicate the type of ply construction in the tire.
The letter R means radial ply construction; the
letter D means diagonal or bias ply construction;
and the letter B means belted!bias ply
construction.
(E) Rim Diameter:Diameter of the wheel in
inches.
(F) Service Description:These characters
represent the load index and speed rating of the
tire. The load index represents the load carry
capacity a tire is certified to carry. The speed
rating is the maximum speed a tire is certified to
carry a load.
7-61
Page 510 of 616

Speed Rating:An alphanumeric code assigned
to a tire indicating the maximum speed at which a
tire can operate.
Traction:The friction between the tire and the
road surface. The amount of grip provided.
Tread:The portion of a tire that comes into
contact with the road.
Treadwear Indicators:Narrow bands, sometimes
called wear bars, that show across the tread of a
tire when only 1/16 inch (1.6 mm) of tread
remains. SeeWhen It Is Time for New Tireson
page 7!73.
UTQGS (Uniform Tire Quality Grading
Standards):A tire information system that
provides consumers with ratings for a tire's
traction, temperature, and treadwear. Ratings are
determined by tire manufacturers using
government testing procedures. The ratings are
molded into the sidewall of the tire. SeeUniform
Tire Quality Gradingon page 7!76.
Vehicle Capacity Weight:The number of
designated seating positions multiplied by 150 lbs
(68 kg) plus the rated cargo load. SeeLoading the
Vehicleon page 6!32.
Vehicle Maximum Load on the Tire:Load on an
individual tire due to curb weight, accessory
weight, occupant weight, and cargo weight.
Vehicle Placard:A label permanently attached to
a vehicle showing the vehicle's capacity weight
and the original equipment tire size and
recommended inflation pressure. See“Tire and
Loading Information Label”underLoading the
Vehicleon page 6!32.
7-64
Page 512 of 616
How to Check
Use a good quality pocket-type gage to check tire
pressure. You cannot tell if your tires are properly
inflated simply by looking at them. Radial tires
may look properly inflated even when they are
underinflated. Check the tire's inflation pressure
when the tires are cold. Cold means your vehicle
has been sitting for at least three hours or driven
no more than 1 mile (1.6 km).
Remove the valve cap from the tire valve stem.
Press the tire gage firmly onto the valve to get a
pressure measurement. If the cold tire inflation
pressure matches the recommended pressure on
the Tire and Loading Information label, no further
adjustment is necessary. If the pressure is low,
add air until you reach the recommended amount.
If you overfill the tire, release air by pushing on
the metal stem in the center of the tire valve.
Recheck the tire pressure with the tire gage.
Be sure to put the valve caps back on the valve
stems. They help prevent leaks by keeping out dirt
and moisture.
High-Speed Operation
{WARNING:
Driving at high speeds, 160 km/h (100 mph) or
higher, puts an additional strain on tires.
Sustained high-speed driving causes excessive
heat build up and can cause sudden tire failure.
You could have a crash and you or others could
be killed. Some high-speed rated tires require
inflation pressure adjustment for high speed
operation. When speed limits and road conditions
are such that a vehicle can be driven at high
speeds, make sure the tires are rated for high
speed operation, in excellent condition, and set to
the correct cold tire inflation pressure for the
vehicle load.
If your vehicle has P265/65R18 or P285/45R22 sizetires and you will be driving at high speeds, speeds of100 mph (160 km/h) or higher, set the cold inflationpressure to 3 psi (20 kPa) above the recommended tirepressure shown on the Tire and Loading InformationLabel. When you end this high!speed driving, return thetires to the cold inflation pressure shown on the Tire andLoading Information label. SeeLoading the Vehicleonpage 6!32andInflation - Tire Pressure on page 7!65.
7-66