CADILLAC ESCALADE 2011 3.G Owners Manual
Manufacturer: CADILLAC, Model Year: 2011, Model line: ESCALADE, Model: CADILLAC ESCALADE 2011 3.GPages: 558, PDF Size: 7.59 MB
Page 231 of 558
Black plate (25,1)Cadillac Escalade/Escalade ESV Owner Manual - 2011
Infotainment System 7-25
Care of Your CDs and DVDs
Sound quality can be reduced due
to disc quality, recording method,
quality of the music recorded, and
how the disc has been handled.
Handle discs carefully and store
them in their original cases or other
protective cases away from direct
sunlight and dust. If the bottom
surface of a disc is damaged, the
disc may not play properly or at all.
Do not touch the bottom surface of
a disc while handling it; this could
damage the surface. Pick up discs
by grasping the outer edges or the
edge of the hole and the outer edge.
If the bottom surface of a disc is
dirty, take a soft lint free cloth,
or dampen a clean soft cloth in
a mild neutral detergent solution
mixed with water, and clean it.
Wipe the disc from the center to
the outer edge.Notice:
If a label is added to a CD
or DVD, or more than one CD or
DVD is inserted into the slot at a
time, or an attempt is made to
play scratched or damaged CDs
or DVDs, the player could be
damaged. While using the CD
or DVD player, use only CDs or
DVDs in good condition without
any label, load one CD or DVD at
a time, and keep the player and
the loading slot free of foreign
materials, liquids, and debris.
Do not add any label to a CD or
DVD, it could get caught in the
player. If a CD or DVD is recorded
on a personal computer and a
description label is needed, try
labeling the top of the recorded
CD or DVD with a soft marker.
CD/DVD Messages
If Disc Read Error appears on the
display and/or the CD/DVD comes
out, it could be for one of the
following reasons:
.If a CD was inserted with an
invalid or unknown format.
.If a DVD is not from a correct
region.
.It is very hot. When the
temperature returns to normal,
the CD should play.
.You are driving on a very
rough road. When the road
becomes smoother, the CD/DVD
should play.
.The CD/DVD is dirty, scratched,
wet, or upside down.
.The air is very humid. If so, wait
about an hour and try again.
.There may have been a problem
while burning the CD/DVD.
.The label may be caught in the
CD/DVD player.
Page 232 of 558
Black plate (26,1)Cadillac Escalade/Escalade ESV Owner Manual - 2011
7-26 Infotainment System
If the CD/DVD is not playing
correctly, for any other reason,
try a known good CD/DVD.
If any error occurs repeatedly or
if an error cannot be corrected,
contact your dealer.
Connecting a USB Storage
Device or iPod®
The USB Port, located in the center
console, can be used to control an
iPod or a USB storage device.
To avoid connection problems,
extension cords are not
recommended. Use only the
cable that came with the device.
To connect a USB storage device,
connect the device to the USB port
located in the center console.To connect an iPod, connect one
end of the USB cable that came
with the iPod to the iPod’s dock
connector and connect the other
end to the USB port. If the vehicle is
on and the USB connection works,
“OK to disconnect”
and a GM logo
may appear on the iPod and iPod
appears on the radio's display.
The iPod music appears on the
radio’s display and begins playing.
The iPod charges while it is
connected to the vehicle if the
vehicle is in the ACC/ACCESSORY
or ON/RUN position. When the
vehicle is turned off, the iPod
automatically powers off and will
not charge or draw power from the
vehicle's battery. USB Supported File and Folder
Structure
The guidelines that must be met
while using USB supported files and
folders are:
.Up to 700 folders.
.Up to 8 folders in depth.
.Up to 65,535 files.
.Folder and file names up to
64 bytes.
.Files with an .mp3 or .wma file
extension.
.AAC files stored on an iPod.
.FAT16
.FAT32
Page 233 of 558
Black plate (27,1)Cadillac Escalade/Escalade ESV Owner Manual - 2011
Infotainment System 7-27
Using the Navigation Audio
System to Control a USB
Storage Device or iPod
®
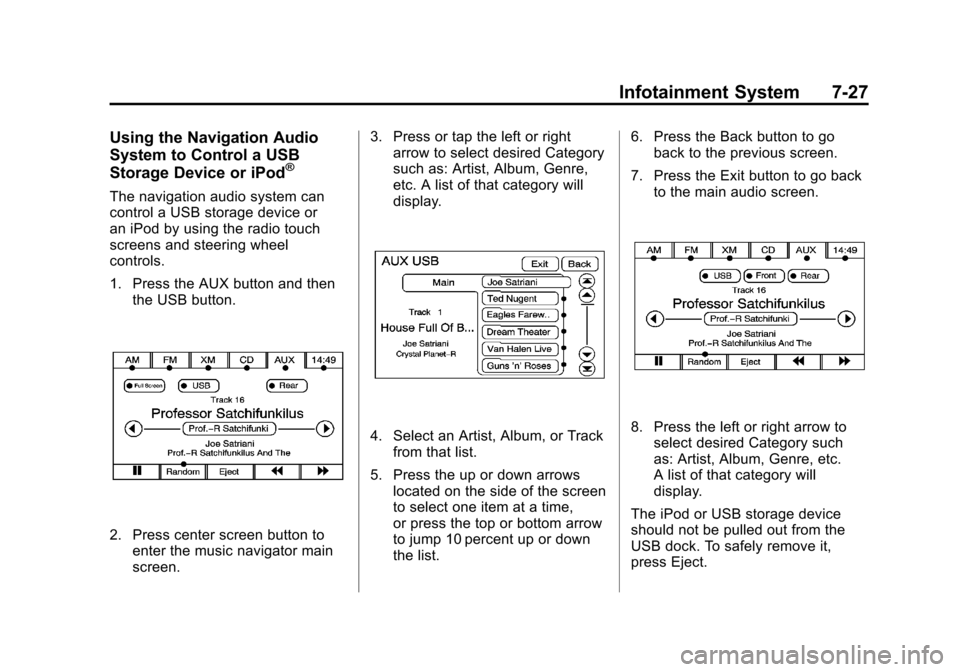
The navigation audio system can
control a USB storage device or
an iPod by using the radio touch
screens and steering wheel
controls.
1. Press the AUX button and thenthe USB button.
2. Press center screen button toenter the music navigator main
screen. 3. Press or tap the left or right
arrow to select desired Category
such as: Artist, Album, Genre,
etc. A list of that category will
display.
4. Select an Artist, Album, or Track
from that list.
5. Press the up or down arrows located on the side of the screen
to select one item at a time,
or press the top or bottom arrow
to jump 10 percent up or down
the list. 6. Press the Back button to go
back to the previous screen.
7. Press the Exit button to go back to the main audio screen.8. Press the left or right arrow toselect desired Category such
as: Artist, Album, Genre, etc.
A list of that category will
display.
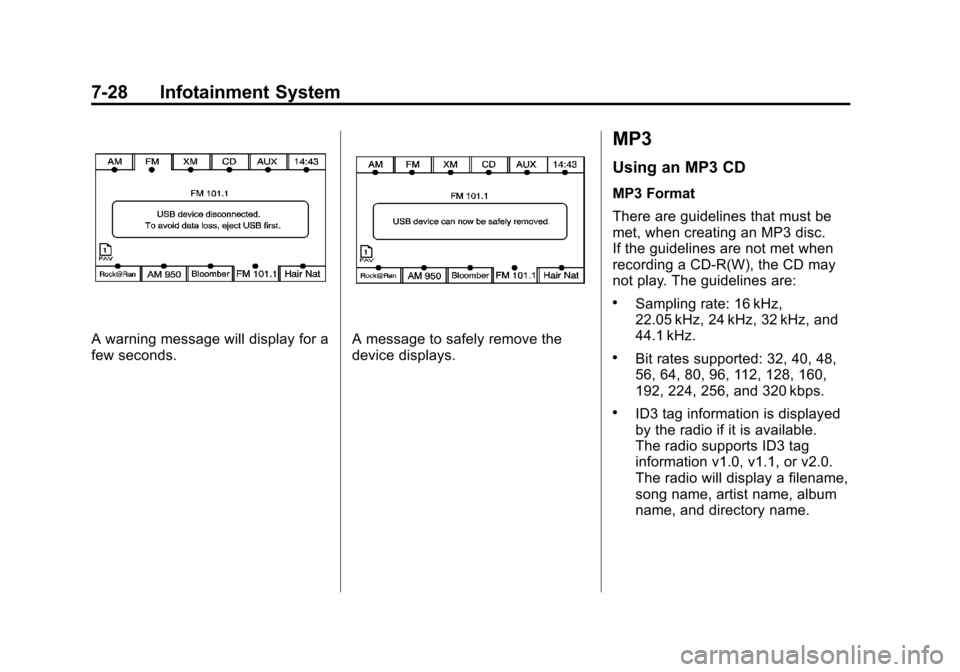
The iPod or USB storage device
should not be pulled out from the
USB dock. To safely remove it,
press Eject.
Page 234 of 558
Black plate (28,1)Cadillac Escalade/Escalade ESV Owner Manual - 2011
7-28 Infotainment System
A warning message will display for a
few seconds.A message to safely remove the
device displays.
MP3
Using an MP3 CD
MP3 Format
There are guidelines that must be
met, when creating an MP3 disc.
If the guidelines are not met when
recording a CD-R(W), the CD may
not play. The guidelines are:
.Sampling rate: 16 kHz,
22.05 kHz, 24 kHz, 32 kHz, and
44.1 kHz.
.Bit rates supported: 32, 40, 48,
56, 64, 80, 96, 112, 128, 160,
192, 224, 256, and 320 kbps.
.ID3 tag information is displayed
by the radio if it is available.
The radio supports ID3 tag
information v1.0, v1.1, or v2.0.
The radio will display a filename,
song name, artist name, album
name, and directory name.
Page 235 of 558
Black plate (29,1)Cadillac Escalade/Escalade ESV Owner Manual - 2011
Infotainment System 7-29
.Maximum 32 characters,
including spaces, in a file or
folder name.
.Maximum number of folders is
100 with a maximum hierarchy
of eight folders.
.Create a folder structure that
makes it easy to find songs
while driving. Organize songs
by albums using one folder for
each album. Each folder or
album should contain 18 songs
or less.
.It is recommended that there is a
maximum of 192 files on a disc.
.The files can be recorded
on a CD-R or CD-RW with a
maximum capacity of 700MB.
.DVD with MP3 are not playable
on this system.
Root Directory
The root directory is treated
as a folder. If the root directory
has compressed audio files, the
directory displays as No Folder
or ALL. Empty Directory or Folder
If a root directory or a folder exists
somewhere in the file structure that
contains only folders/subfolders
and no compressed files directly
beneath them, the player advances
to the next folder in the file structure
that contains compressed audio
files and the empty folder is not
displayed or numbered.
No Folder
When the CD contains only
compressed files, the files are
located under the root folder.
The next and previous folder
functions will have no function on
a CD that was recorded without
folders or playlists. When displaying
the name of the folder the radio will
display No Folder.
Order of Play
Play begins from the first track
under the root directory. When all
tracks from the root directory have
been played, play continues from
files according to their numerical
listing. After playing the last track
from the last folder, play begins
again at the first track of the first
folder or root directory.
When play enters a new folder, the
display does not automatically show
the new folder name. The new track
name appears on the display.
File System and Naming
The song name that displays is the
song name that is contained in the
ID3 tag. If the song name is not
present in the ID3 tag, then the
radio displays the file name without
the extension (such as .mp3) as the
track name.
Track names longer than
32 characters or four pages are
shortened. The display does not
show parts of words on the last
page of text and the extension of
the filename does not display.
Page 236 of 558
Black plate (30,1)Cadillac Escalade/Escalade ESV Owner Manual - 2011
7-30 Infotainment System
Playing an MP3
While playing a CD, the navigation
system is available.
When you insert a CD, the CD
tab displays. If a DSP setting is
selected for the CD, it will be
activated each time you play a CD.
If you turn off the ignition or radio
with a CD in the player, it stays in
the player. When you turn on the
ignition or radio, the CD starts
playing where it stopped, if it was
the last selected audio source.
As each new track starts to play,
the track number appears on the
display.
If an error appears on the display,
see“CD/DVD Messages” in this
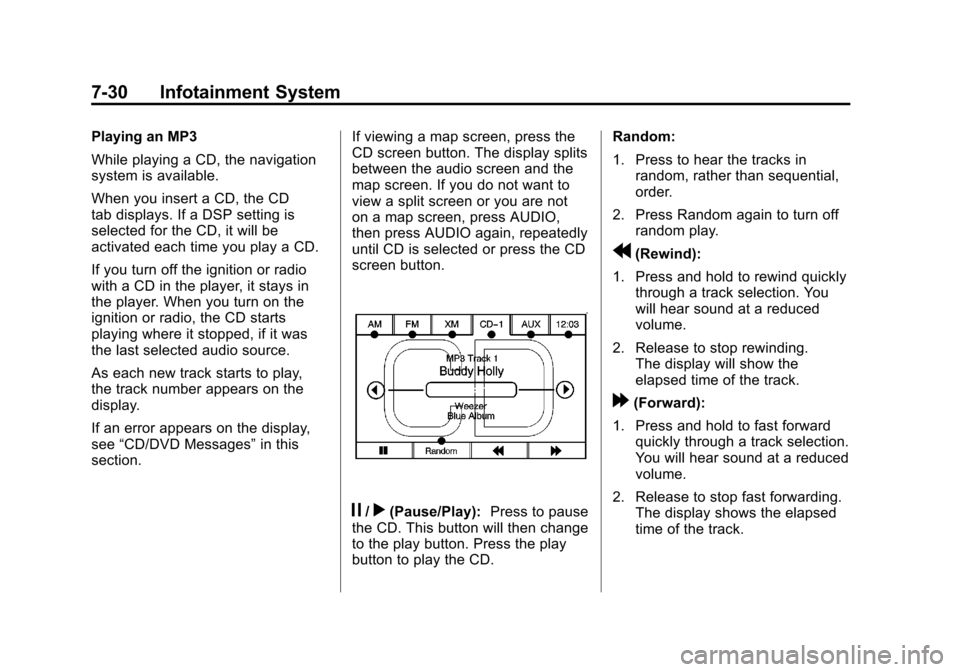
section. If viewing a map screen, press the
CD screen button. The display splits
between the audio screen and the
map screen. If you do not want to
view a split screen or you are not
on a map screen, press AUDIO,
then press AUDIO again, repeatedly
until CD is selected or press the CD
screen button.
j/r(Pause/Play):
Press to pause
the CD. This button will then change
to the play button. Press the play
button to play the CD. Random:
1. Press to hear the tracks in
random, rather than sequential,
order.
2. Press Random again to turn off random play.
r(Rewind):
1. Press and hold to rewind quickly through a track selection. You
will hear sound at a reduced
volume.
2. Release to stop rewinding. The display will show the
elapsed time of the track.
[(Forward):
1. Press and hold to fast forward quickly through a track selection.
You will hear sound at a reduced
volume.
2. Release to stop fast forwarding. The display shows the elapsed
time of the track.
Page 237 of 558
Black plate (31,1)Cadillac Escalade/Escalade ESV Owner Manual - 2011
Infotainment System 7-31
q r(Folder/Artist/Album):
1. Select the left or right arrow to go to the previous or next folder,
artist, or album on the disc.
2. Press the middle screen button, with the folder, artist, or album
name, to sort the MP3 by folder,
artist, or album. It may take a
few minutes for the system to
sort the MP3.
y © ¨ z(Seek):
1. To seek tracks, press the up arrow to go to the next track.
2. Press the down arrow to go to the start of the current track,
if more than eight seconds have
played. 3. If either arrow is pressed more
than once, the player continues
moving backward or forward
through the CD. The sound
mutes while seeking.
w(Tuning Knob):
1. Turn counterclockwise one notch to go to the start of the current
track, turn it again to go to the
previous track.
2. Turn this knob clockwise to go to the next track.
When playing an MP3 the rear seat
operator can power on the RSE
video screen and use the remote
control to navigate through the MP3.
Auxiliary Devices
Using the Auxiliary Input Jack
The navigation system has an
auxiliary input jack located on
the right side of the faceplate.
This is not an audio output; do not
plug the headphone set into the
front auxiliary input jack. An external
audio device such as an iPod,
laptop computer, MP3 player, CD
player, or cassette tape player, etc.
can be connected to the auxiliary
input jack for use as another audio
source.
Drivers are encouraged to set
up any auxiliary device while the
vehicle is in P (Park). See Defensive
Driving on page 9‑2 for more
information on driver distraction.
Page 238 of 558
Black plate (32,1)Cadillac Escalade/Escalade ESV Owner Manual - 2011
7-32 Infotainment System
To use a portable audio player,
connect a 1/8 in (3.5 mm) cable to
the radio's front auxiliary input jack.
When a device is connected, press
the AUDIO control button, then
press it again until AUX is selected
or press the AUX screen button to
begin playing audio from the device
over the vehicle speakers.
For optimal sound quality, increase
the portable audio device's volume
to the loudest level.
It is always best to power the
portable audio device through its
own battery while playing.
The vehicle may have a rear
entertainment system (RSE) with
a second and third row screen.
The RSE has audio adapters to
allow you to connect auxiliary
devices. The audio can be heard
through the speakers or through
the wireless or wired headphones.
See the Rear Seat Infotainment
user guide for more information.Drivers are encouraged to
set up any auxiliary device
while the vehicle is in P (Park).
See
Defensive Driving on page 9‑2
for more information on driver
distraction.
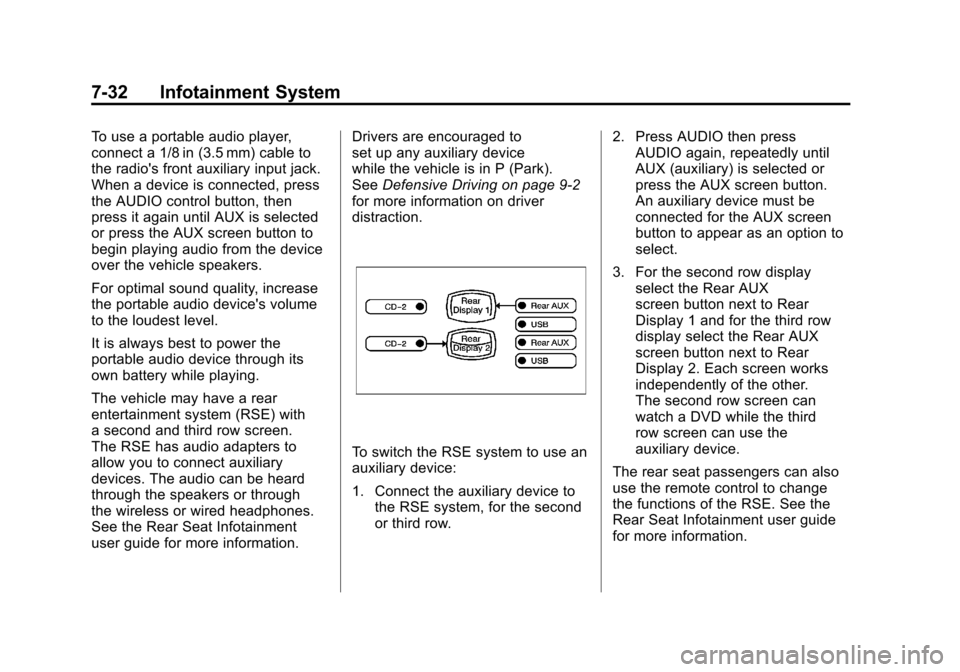
To switch the RSE system to use an
auxiliary device:
1. Connect the auxiliary device to the RSE system, for the second
or third row. 2. Press AUDIO then press
AUDIO again, repeatedly until
AUX (auxiliary) is selected or
press the AUX screen button.
An auxiliary device must be
connected for the AUX screen
button to appear as an option to
select.
3. For the second row display select the Rear AUX
screen button next to Rear
Display 1 and for the third row
display select the Rear AUX
screen button next to Rear
Display 2. Each screen works
independently of the other.
The second row screen can
watch a DVD while the third
row screen can use the
auxiliary device.
The rear seat passengers can also
use the remote control to change
the functions of the RSE. See the
Rear Seat Infotainment user guide
for more information.
Page 239 of 558
Black plate (33,1)Cadillac Escalade/Escalade ESV Owner Manual - 2011
Infotainment System 7-33
Rear Seat
Infotainment
Rear Seat Entertainment
(RSE) System (Overhead)
The vehicle may have
an Overhead DVD Rear Seat
Entertainment (RSE) system.
The RSE system works with the
vehicle's audio system. The DVD
player is part of the front radio.
The RSE system includes a radio
with a DVD player, a video display
screen, and if the vehicle has a third
row seat, it could have a second
video display screen, audio/video
jacks, two wireless headphones,
and a remote control. SeeCD/DVD
Player on page 7‑19 for more
information on the vehicle's DVD
system.
Before Driving
The RSE is designed for rear seat
passengers only. The driver cannot
safely view the video screen while
driving and should not try to do so.
In severe or extreme weather
conditions, the RSE system might
not work until the temperature
is within the operating range.
The operating range for the RSE
system is above −20°C (−4°F)
or below 60°C (140°F). If the
temperature of the vehicle is
outside this range, heat or cool
the vehicle until the temperature
is within the operating range of
the RSE system.
Parental Control
The RSE system may have a
Parental Control feature, depending
on which radio the vehicle has.
To start Parental Control, press and hold the radio power button for more
than two seconds to stop all system
features such as: radio, video
screen, Rear Seat Audio (RSA),
DVD, and/or CD. While Parental
Control is on, a padlock icon
displays.
The radio can be turned back on
with a single press of the power
button, but the RSE system will
remain under Parental Control.
To turn Parental Control off, press
and hold the radio power button for
more than two seconds. The RSE
returns from where it was previously
left and the padlock icon disappears
from the radio display.
Parental Control can also be turned
off by inserting or ejecting any disc,
pressing the play icon on the radio
DVD display menu, or changing an
ignition position.
Page 240 of 558
Black plate (34,1)Cadillac Escalade/Escalade ESV Owner Manual - 2011
7-34 Infotainment System
Headphones
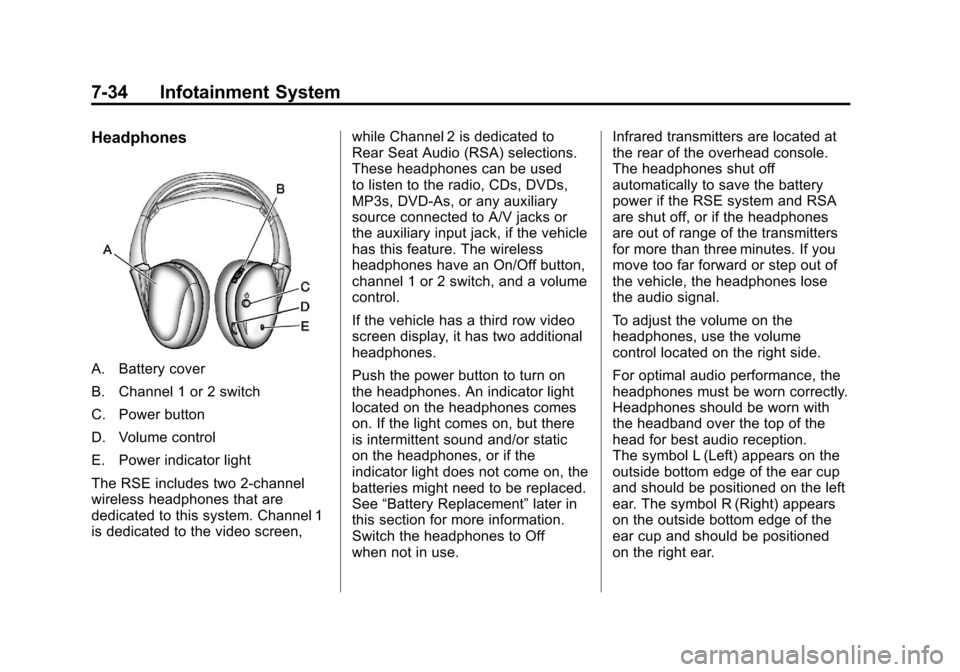
A. Battery cover
B. Channel 1 or 2 switch
C. Power button
D. Volume control
E. Power indicator light
The RSE includes two 2-channel
wireless headphones that are
dedicated to this system. Channel 1
is dedicated to the video screen,while Channel 2 is dedicated to
Rear Seat Audio (RSA) selections.
These headphones can be used
to listen to the radio, CDs, DVDs,
MP3s, DVD‐As, or any auxiliary
source connected to A/V jacks or
the auxiliary input jack, if the vehicle
has this feature. The wireless
headphones have an On/Off button,
channel 1 or 2 switch, and a volume
control.
If the vehicle has a third row video
screen display, it has two additional
headphones.
Push the power button to turn on
the headphones. An indicator light
located on the headphones comes
on. If the light comes on, but there
is intermittent sound and/or static
on the headphones, or if the
indicator light does not come on, the
batteries might need to be replaced.
See
“Battery Replacement” later in
this section for more information.
Switch the headphones to Off
when not in use. Infrared transmitters are located at
the rear of the overhead console.
The headphones shut off
automatically to save the battery
power if the RSE system and RSA
are shut off, or if the headphones
are out of range of the transmitters
for more than three minutes. If you
move too far forward or step out of
the vehicle, the headphones lose
the audio signal.
To adjust the volume on the
headphones, use the volume
control located on the right side.
For optimal audio performance, the
headphones must be worn correctly.
Headphones should be worn with
the headband over the top of the
head for best audio reception.
The symbol L (Left) appears on the
outside bottom edge of the ear cup
and should be positioned on the left
ear. The symbol R (Right) appears
on the outside bottom edge of the
ear cup and should be positioned
on the right ear.