headrest CADILLAC ESCALADE 2011 3.G Owners Manual
[x] Cancel search | Manufacturer: CADILLAC, Model Year: 2011, Model line: ESCALADE, Model: CADILLAC ESCALADE 2011 3.GPages: 558, PDF Size: 7.59 MB
Page 59 of 558
Black plate (3,1)Cadillac Escalade/Escalade ESV Owner Manual - 2011
Seats and Restraints 3-3
Push down on the head restraint
after the button is released to make
sure that it is locked in place.
The head restraints are not
designed to be removed.
The vehicle's 2nd-row seats have
head restraints in the outboard
seating positions that cannot be
adjusted.
The vehicle's 3rd-row seat,
if equipped, has headrests that
can be adjusted up and down.Front Seats
Power Seat Adjustment
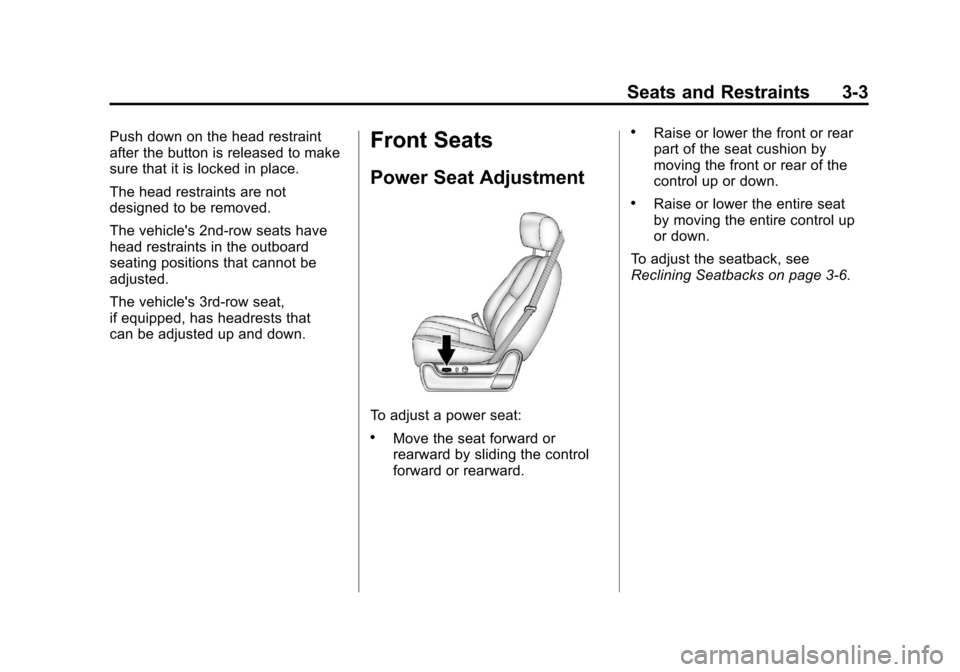
To adjust a power seat:
.Move the seat forward or
rearward by sliding the control
forward or rearward.
.Raise or lower the front or rear
part of the seat cushion by
moving the front or rear of the
control up or down.
.Raise or lower the entire seat
by moving the entire control up
or down.
To adjust the seatback, see
Reclining Seatbacks on page 3‑6.
Page 75 of 558
Black plate (19,1)Cadillac Escalade/Escalade ESV Owner Manual - 2011
Seats and Restraints 3-19
Tumbling the Third Row Seat
To tumble the seat:
1. Open the liftgate to access thecontrols for the seat.
2. Make sure the headrests are completely lowered and there is
nothing under, in front of, or on
the seat.
3. Fold the seatbacks forward using lever “1”and the
instructions listed previously
under “Folding the Seatback.”
The seat cannot be unlatched
from the floor unless the
seatback is folded.
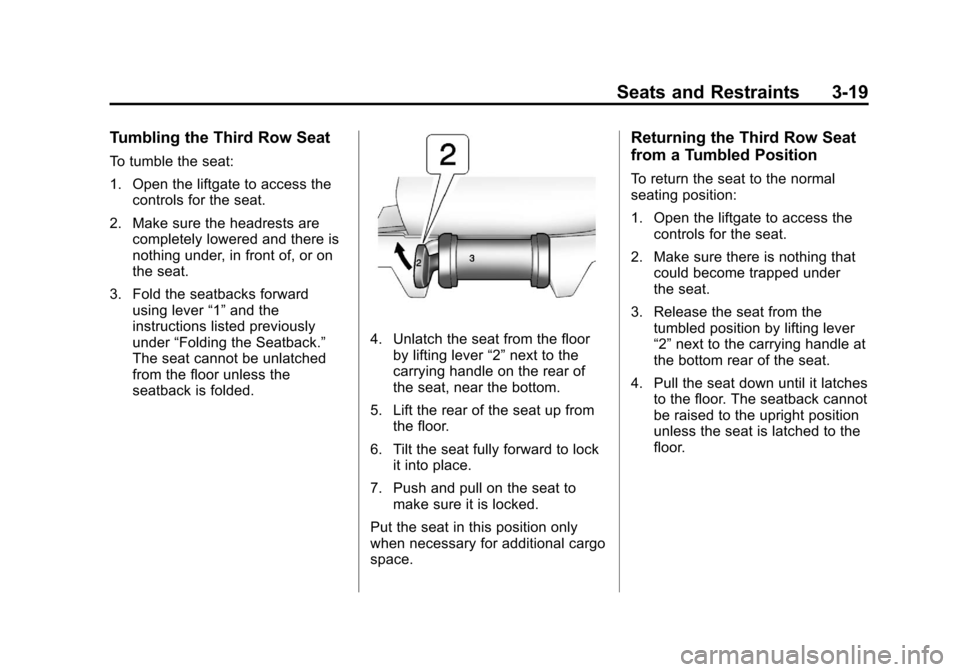
4. Unlatch the seat from the floor by lifting lever “2”next to the
carrying handle on the rear of
the seat, near the bottom.
5. Lift the rear of the seat up from the floor.
6. Tilt the seat fully forward to lock it into place.
7. Push and pull on the seat to make sure it is locked.
Put the seat in this position only
when necessary for additional cargo
space.
Returning the Third Row Seat
from a Tumbled Position
To return the seat to the normal
seating position:
1. Open the liftgate to access the controls for the seat.
2. Make sure there is nothing that could become trapped under
the seat.
3. Release the seat from the tumbled position by lifting lever
“2”next to the carrying handle at
the bottom rear of the seat.
4. Pull the seat down until it latches to the floor. The seatback cannot
be raised to the upright position
unless the seat is latched to the
floor.
Page 125 of 558
Black plate (69,1)Cadillac Escalade/Escalade ESV Owner Manual - 2011
Seats and Restraints 3-69
Notice:Do not let the LATCH
attachments rub against the
vehicle’ s safety belts. This may
damage these parts. If necessary,
move buckled safety belts to
avoid rubbing the LATCH
attachments.
Do not fold the empty rear seat
with a safety belt buckled. This
could damage the safety belt or
the seat. Unbuckle and return the
safety belt to its stowed position,
before folding the seat.
1. Attach and tighten the lower attachments to the
lower anchors. If the child
restraint does not have lower
attachments or the desired
seating position does not have
lower anchors, secure the child
restraint with the top tether and the safety belts. Refer to your
child restraint manufacturer
instructions and the instructions
in this manual.
1.1. Find the lower anchors
for the desired seating
position.
1.2. Put the child restraint on the seat.
1.3. Attach and tighten the lower attachments on the child
restraint to the lower
anchors.
2. If the child restraint manufacturer recommends that the top tether
be attached, attach and tighten
the top tether to the top tether
anchor, if the vehicle has one. Refer to the child restraint
instructions and the following
steps:
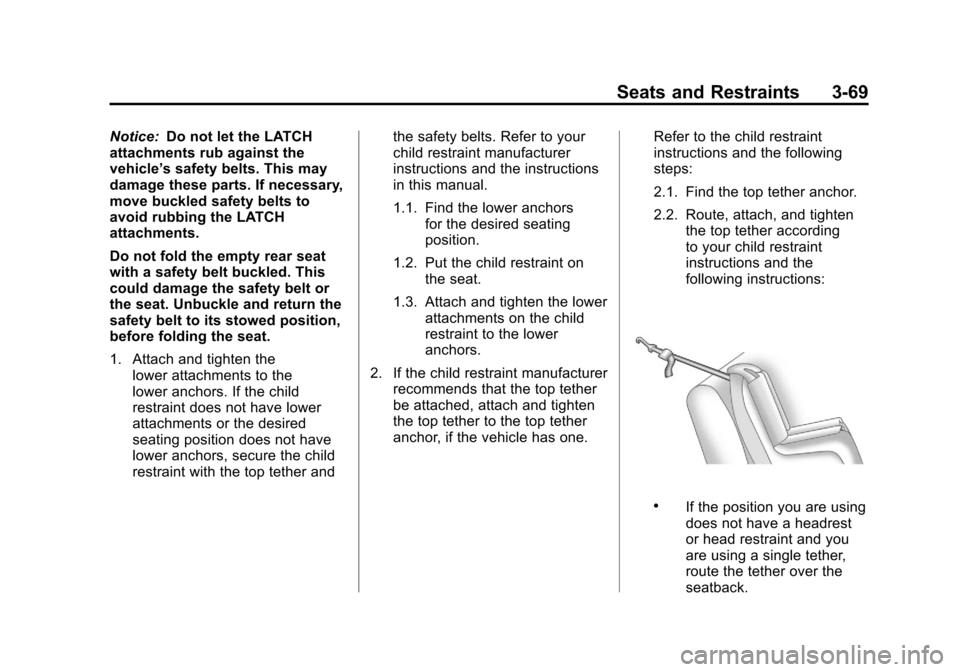
2.1. Find the top tether anchor.
2.2. Route, attach, and tighten
the top tether according
to your child restraint
instructions and the
following instructions:
.If the position you are using
does not have a headrest
or head restraint and you
are using a single tether,
route the tether over the
seatback.
Page 126 of 558
Black plate (70,1)Cadillac Escalade/Escalade ESV Owner Manual - 2011
3-70 Seats and Restraints
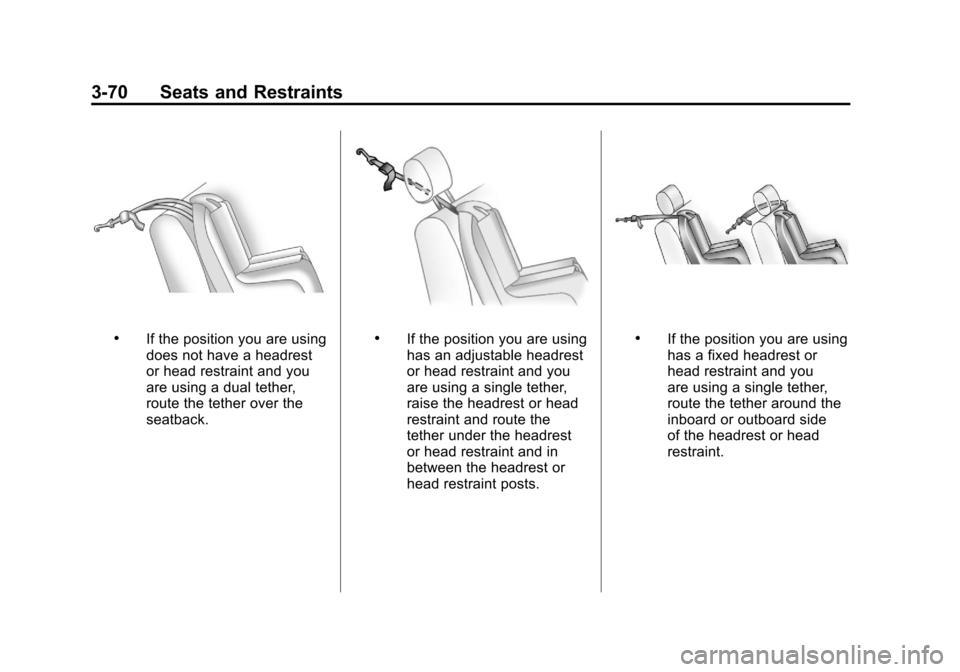
.If the position you are using
does not have a headrest
or head restraint and you
are using a dual tether,
route the tether over the
seatback..If the position you are using
has an adjustable headrest
or head restraint and you
are using a single tether,
raise the headrest or head
restraint and route the
tether under the headrest
or head restraint and in
between the headrest or
head restraint posts..If the position you are using
has a fixed headrest or
head restraint and you
are using a single tether,
route the tether around the
inboard or outboard side
of the headrest or head
restraint.
Page 127 of 558
Black plate (71,1)Cadillac Escalade/Escalade ESV Owner Manual - 2011
Seats and Restraints 3-71
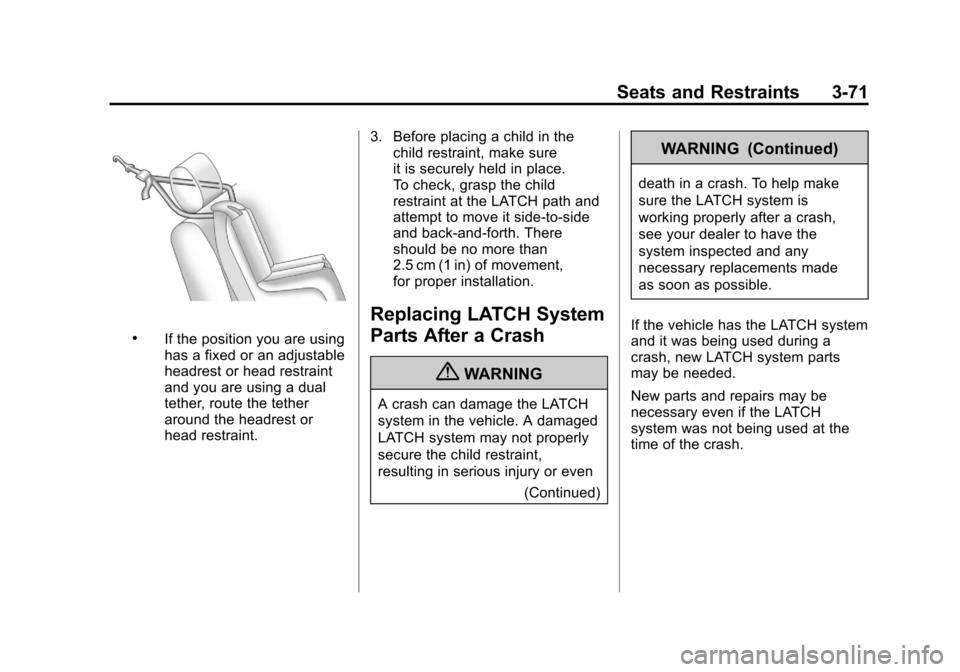
.If the position you are using
has a fixed or an adjustable
headrest or head restraint
and you are using a dual
tether, route the tether
around the headrest or
head restraint.3. Before placing a child in the
child restraint, make sure
it is securely held in place.
To check, grasp the child
restraint at the LATCH path and
attempt to move it side‐to‐side
and back‐and‐forth. There
should be no more than
2.5 cm (1 in) of movement,
for proper installation.
Replacing LATCH System
Parts After a Crash
{WARNING
A crash can damage the LATCH
system in the vehicle. A damaged
LATCH system may not properly
secure the child restraint,
resulting in serious injury or even
(Continued)
WARNING (Continued)
death in a crash. To help make
sure the LATCH system is
working properly after a crash,
see your dealer to have the
system inspected and any
necessary replacements made
as soon as possible.
If the vehicle has the LATCH system
and it was being used during a
crash, new LATCH system parts
may be needed.
New parts and repairs may be
necessary even if the LATCH
system was not being used at the
time of the crash.
Page 207 of 558
Black plate (1,1)Cadillac Escalade/Escalade ESV Owner Manual - 2011
Infotainment System 7-1
Infotainment
System
Introduction
Introduction . . . . . . . . . . . . . . . . . . . 7-2
Theft-Deterrent Feature . . . . . . . 7-3
Overview . . . . . . . . . . . . . . . . . . . . . . 7-3
Radio
AM-FM Radio . . . . . . . . . . . . . . . . 7-10
Satellite Radio . . . . . . . . . . . . . . . 7-16
Radio Reception . . . . . . . . . . . . . 7-17
Rear Side WindowAntenna . . . . . . . . . . . . . . . . . . . . 7-18
Satellite Radio Antenna . . . . . . 7-18
Audio Players
CD/DVD Player . . . . . . . . . . . . . . 7-19
MP3 . . . . . . . . . . . . . . . . . . . . . . . . . 7-28
Auxiliary Devices . . . . . . . . . . . . 7-31
Rear Seat Infotainment
Rear Seat Entertainment (RSE) System
(Overhead) . . . . . . . . . . . . . . . . . 7-33
Rear Seat Entertainment (RSE) System
(Headrest DVD) . . . . . . . . . . . . 7-43
Rear Seat Audio (RSA) System . . . . . . . . . . . . . . . . . . . . . 7-58
Navigation
Using the NavigationSystem . . . . . . . . . . . . . . . . . . . . . 7-60
Maps . . . . . . . . . . . . . . . . . . . . . . . . 7-62
Navigation Symbols . . . . . . . . . 7-64
Destination . . . . . . . . . . . . . . . . . . 7-69
Configure Menu . . . . . . . . . . . . . 7-83
Global Positioning System (GPS) . . . . . . . . . . . . . . 7-96
Vehicle Positioning . . . . . . . . . . 7-97
Problems with Route Guidance . . . . . . . . . . . . . . . . . . . 7-97 If the System Needs
Service . . . . . . . . . . . . . . . . . . . . . 7-98
Map Data Updates . . . . . . . . . . . 7-98
Database Coverage Explanations . . . . . . . . . . . . . . . 7-98
Voice Recognition
Voice Recognition . . . . . . . . . . . 7-99
Phone
Bluetooth . . . . . . . . . . . . . . . . . . . 7-102
Page 249 of 558
Black plate (43,1)Cadillac Escalade/Escalade ESV Owner Manual - 2011
Infotainment System 7-43
DVD Distortion
Video distortion can occur when
operating cellular phones, scanners,
CB radios, Global Position Systems
(GPS)*, two-way radios, mobile fax
machines, or walkie talkies.
It might be necessary to turn off the
DVD player when operating one of
these devices in or near the vehicle.
*Excludes the OnStar
®System.
Cleaning the RSE Overhead
Console
When cleaning the RSE overhead
console surface, use only a clean
cloth dampened with clean water.
Cleaning the Video Screen
When cleaning the video screen,
use only a clean cloth dampened
with clean water. Use care when
directly touching or cleaning the
screen, as damage could result.
Rear Seat Entertainment
(RSE) System
(Headrest DVD)
Vehicles with an RSE system
include two head restraint video
display screens with integrated
DVD players, auxiliary inputs,
two wireless headphones, and a
remote control. This system works
independently from the vehicle's
Overhead DVD RSE system.
SeeRear Seat Entertainment (RSE)
System (Overhead) on page 7‑33
or Rear Seat Entertainment (RSE)
System (Headrest DVD) on
page 7‑43 for information about
the Overhead DVD RSE system.
The vehicle has a feature called
Retained Accessory Power (RAP).
With RAP, the RSE system can be
played even after the ignition is
turned off. See Retained Accessory
Power (RAP) on page 9‑35 for more
information.
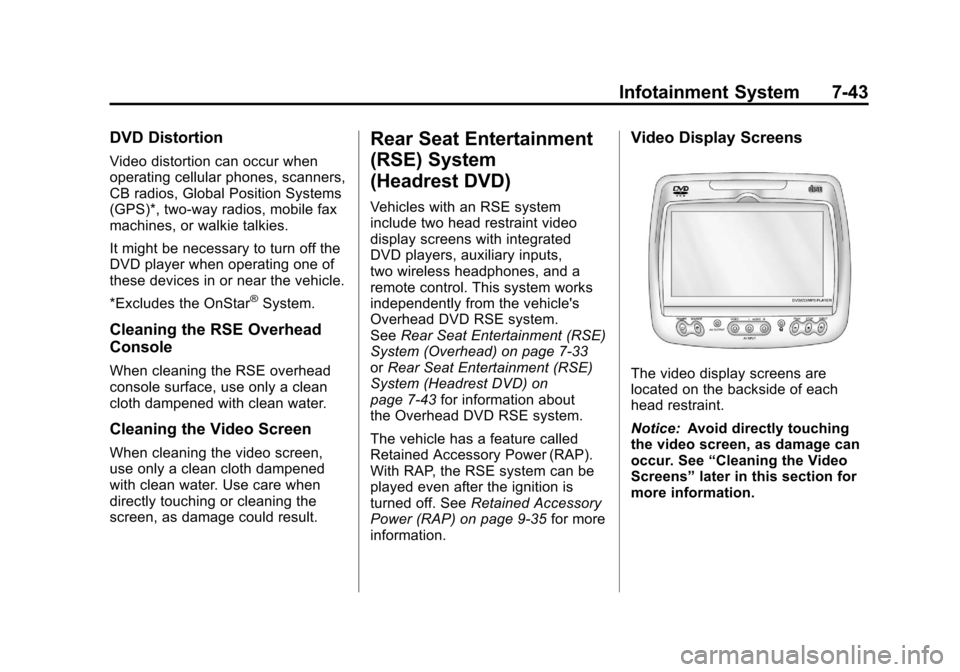
Video Display Screens
The video display screens are
located on the backside of each
head restraint.
Notice: Avoid directly touching
the video screen, as damage can
occur. See “Cleaning the Video
Screens” later in this section for
more information.
Page 251 of 558

Black plate (45,1)Cadillac Escalade/Escalade ESV Owner Manual - 2011
Infotainment System 7-45
EJECTX:Press to eject a disc
from the DVD slot.
If a disc is ejected from the player,
but not removed, it will automatically
reload into the player. Another way
to reload a disc that has been
ejected, but not removed from the
DVD player, is to press the eject
button or the play button.
PLAY
r: Press this button located
below the video display screen to
start playback of a disc. On DVDs
and video CDs with playback
control (PBC), menu screens can
display automatically. It might be
necessary to press the play button
again to begin play.
There is a play position memory
feature for DVD and video CD only.
If the DVD player is turned off and
then turned back on, the DVD
player resumes playback where
the disc stopped. The play position
memory is erased if the disc is
removed. STOP
c:
Press once to stop
playing a DVD.
There is a pre-stop feature for DVD
and video CD only. This feature
resumes playback of the disc
where it was stopped. Press the
stop button once during disc
playback and
cdisplays on the
DVD startup screen. This icon
disappears after a few seconds.
Press the stop button a second
time, or eject the disc, to cancel
the pre-stop feature and to clear
the disc position memory.
SOURCE: Press to select between
Monitor 3, Monitor 4, or the
AV INPUT.
Each video display screen can be
adjusted independently, as well as
display information from both DVD
players and both A/V inputs. Infrared Remote Sensor:
Located
in the top center of the video display
screen. Do not block the signal from
the remote to the sensor.
Infrared Transmitters: Located in
the top center of the video display
screen. Do not block the signal from
the headphones to the transmitter.
Video Display Screen: Located on
the back of each headrest.
AV OUTPUT (Audio/Video Output
Jack): Located on the lower left
side of the screen and is identified
on the video screen panel as the
AV OUTPUT.
Headphone Jack: Wired
headphones can be plugged into
the headphone jack with one-eighth
inch stereo plugs.
Page 252 of 558
Black plate (46,1)Cadillac Escalade/Escalade ESV Owner Manual - 2011
7-46 Infotainment System
AV INPUT: (Audio/Video Input
Jack):The audio/video input jack
is located below the video display
screen and allows viewing of
auxiliary sources such as portable
DVD players, game stations,
or video cameras, on each screen.
.Video Input —The yellow
connector is used for video
input.
.L Audio —The white connector
is used for the left side audio.
.R Audio —The red connector is
used for the right side audio.
Level Lock and Release Latch:
The viewing angle of the video
screen can be adjusted by releasing
the latch and gently moving the
screen. Then lock it into a secure
position.
Vehicle Speakers
Audio from the DVD player or an
auxiliary device can be heard
through the vehicle speakers or
the wireless/wired headphones,
while the radio is tuned to one
of the six frequencies selected
on the Sound Around portion of
the system’ s remote control.
See “Remote Control” later in
this section.
Only one audio source can be heard
through the vehicle’ s speakers at a
time. The audio source being used
is specified by the A/V (audio/video)
source selected on the driver side
head restraint video display screen.
To turn the RSE system audio
output to the vehicle’s speakers,
press Sound Around ON, on the
system’ s remote control. The audio
from the RSE system can be
heard through the wireless/wired
headphones and the vehicle’s
speakers at the same time. The volume on the radio can vary
when switching between the radio,
CD, DVD, MP3, or an auxiliary
device.
Wireless Headphones
The two wireless headphones
included with the Headrest DVD
RSE system will only work with
the Headrest DVD RSE system
and are marked for channel 3 and 4.
The wireless headphones must be
used within a line of sight of the
transmitter that is located above
the video display screen.
3‐4 Channel Selector:
This is
located on the right earpiece. Either
Channel 3 or 4 can be selected with
the channel selector. The driver side
monitor is designated as Channel 3,
and the passenger side as
Channel 4. Set the channel selector
switch according to the video
display screen being viewed.
Page 253 of 558
Black plate (47,1)Cadillac Escalade/Escalade ESV Owner Manual - 2011
Infotainment System 7-47
The message,“To listen to this
monitor tune your headphones
to Channel 3 (or 4)” displays for
five seconds then disappears
when the video display screen is
turned on.
OFF/ON (Power): Turn the power
switch located on the earpiece to
turn the wireless headphones on
or off. Each headphone has a light
to indicate ON. If the light does
not come on, the batteries may
need to be replaced. See “Battery
Replacement” underRear Seat
Entertainment (RSE) System
(Overhead) on page 7‑33 orRear
Seat Entertainment (RSE) System
(Headrest DVD) on page 7‑43 for
more information.
The headphones shut off
automatically if the RSE system is
turned off or if the headphones are
out of range of the transmitter for
more than three minutes. VOL0(Volume):
Use to adjust
the volume on the headphones.
Notice: Do not store the
headphones in heat or direct
sunlight. This could damage
the headphones and repairs will
not be covered by the warranty.
Storage in extreme cold can
weaken the batteries. Keep the
headphones stored in a cool,
dry place.
Remote Control
To use the remote control, aim at
the remote sensor located on top
center of the video display screen
and press the desired button.
Objects blocking the line-of-sight
can affect the function of the remote
control. Direct or very bright light can affect the ability of the
transmitter to receive signals
from the remote control. If the
remote control does not seem to
be working, the batteries might
need to be replaced. See
“Battery
Replacement” following this section.
The remote control provided with
the Headrest DVD RSE system, is
not a universal remote control and
will not control other equipment.
Notice: Storing the remote
control in a hot area or in direct
sunlight can damage it, and the
repairs will not be covered by the
warranty. Storage in extreme cold
can weaken the batteries. Keep
the remote control stored in a
cool, dry place.